Android의 GPS 위치 확인 사용 예
GPS 포지셔닝은 현재 많은 휴대폰에 탑재된 기능으로, 매우 실용적입니다. 이 문서에서는 예를 들어 Android에서 GPS 위치 확인을 사용하는 방법을 설명합니다. 참고할 수 있도록 모든 사람과 공유하세요. 구체적인 방법은 다음과 같습니다.
일반적으로 안드로이드에서 GPS를 통해 현재 위치를 얻으려면 먼저 LocationManager 인스턴스를 얻어야 하며, 해당 인스턴스의 getLastKnownLocation() 메소드를 통해 첫 번째 위치를 얻어야 한다고 설명합니다.
void android.location.LocationManager.requestLocationUpdates(String provider, long minTime, float minDistance, LocationListener listener)
provider는 GPS 포지셔닝(LocationManager.GPS_PROVIDER) 또는 네트워크 포지셔닝(LocationManager.NETWORK_PROVIDER)을 사용할 수 있는 포지셔닝 방법입니다. 이 문서는 GPS 포지셔닝에 관한 것이므로 LocationManager입니다. .GPS_PROVIDER가 사용됩니다. minTime은 위치 업데이트 간격입니다. Listener는 위치 변경에 대한 리스너입니다. LocationListener()를 직접 정의하고 onLocationChanged()를 재정의하고 위치가 변경되면 작업을 추가합니다.
레이아웃 파일은 다음과 같습니다.
<LinearLayout xmlns:android="http://schemas.android.com/apk/res/android"
  xmlns:tools="http://schemas.android.com/tools"
  android:layout_width="match_parent"
  android:layout_height="match_parent"
  android:orientation="vertical"
  android:paddingBottom="@dimen/activity_vertical_margin"
  android:paddingLeft="@dimen/activity_horizontal_margin"
  android:paddingRight="@dimen/activity_horizontal_margin"
  android:paddingTop="@dimen/activity_vertical_margin"
  tools:context=".MainActivity" >

  <TextView
    android:id="@+id/txt_time"
    style="@style/my_text"
    android:layout_width="fill_parent"
    android:layout_height="wrap_content"
    android:text="时间:" />

  <TextView
    android:id="@+id/txt_lat"
    style="@style/my_text"
    android:layout_width="fill_parent"
    android:layout_height="wrap_content"
    android:text="经度:" />

  <TextView
    android:id="@+id/txt_lng"
    style="@style/my_text"
    android:layout_width="fill_parent"
    android:layout_height="wrap_content"
    android:text="纬度:" />

</LinearLayout>MainActivity.java 파일은 다음과 같습니다.
package com.hzhi.my_gps;
import java.text.SimpleDateFormat;
import java.util.Date;
import java.util.Timer;
import java.util.TimerTask;
import android.location.Criteria;
import android.location.Location;
import android.location.LocationListener;
import android.location.LocationManager;
import android.os.Bundle;
import android.os.Handler;
import android.os.Message;
import android.app.Activity;
import android.content.Context;
import android.view.Menu;
import android.widget.TextView;
public class MainActivity extends Activity {

  TextView txt_time;
  TextView txt_lat;
  TextView txt_lng;
  LocationManager lom;
  Location loc;
  Double lat;
  Double lng;
  SimpleDateFormat formatter = new SimpleDateFormat("yyyy-MM-dd HH:mm:ss");
  Date now;
  String str_date;
  Timer timer;

  @Override
  protected void onCreate(Bundle savedInstanceState) {

    super.onCreate(savedInstanceState);
    setContentView(R.layout.activity_main);

    get_con();
    get_gps();

    timer = new Timer(true);
    timer.schedule(task, 0, 1000);
  }

  @Override
  public boolean onCreateOptionsMenu(Menu menu) {
    // Inflate the menu; this adds items to the action bar if it is present.
    getMenuInflater().inflate(R.menu.main, menu);
    return true;
  }

  public void get_gps(){

    lom = (LocationManager) getSystemService(Context.LOCATION_SERVICE);
    loc = lom.getLastKnownLocation(LocationManager.GPS_PROVIDER);

    if (loc != null) {
      lat = loc.getLatitude();
      lng = loc.getLongitude();
      txt_lat.setText("纬度:" + String.valueOf(lat));
      txt_lng.setText("经度:" + String.valueOf(lng));
    }
    else{
      txt_lat.setText("纬度:未知" );
      txt_lng.setText("经度:未知" );
    }

    Criteria criteria = new Criteria();
    criteria.setAccuracy(Criteria.ACCURACY_FINE);
    criteria.setAltitudeRequired(false);
    criteria.setBearingRequired(false);
    criteria.setCostAllowed(true);
    criteria.setPowerRequirement(Criteria.POWER_LOW);
    String provider = lom.getBestProvider(criteria, true);

    lom.requestLocationUpdates(provider, 1000, 10, los);
  }

  LocationListener los = new LocationListener(){
    public void onLocationChanged(Location location){
      if (location != null) {
        lat = location.getLatitude();
        lng = location.getLongitude();
        txt_lat.setText("纬度:" + String.valueOf(lat));
        txt_lng.setText("经度:" + String.valueOf(lng));
      }
      else{
        txt_lat.setText("纬度:未知" );
        txt_lng.setText("经度:未知" );
      }
    };

    public void onProviderDisabled(String provider){

    };

    public void onProviderEnabled(String provider){ };

    public void onStatusChanged(String provider, int status,
    Bundle extras){ };
  };

  // 获取控件
  public void get_con(){

    txt_time = (TextView) findViewById(R.id.txt_time);
    txt_lat = (TextView) findViewById(R.id.txt_lat);
    txt_lng = (TextView) findViewById(R.id.txt_lng);
  }

  Handler handler = new Handler(){

    public void handleMessage(Message msg){
      switch (msg.what){
      case 1:
        get_time();
        break;
      }
    }
  };

  TimerTask task = new TimerTask(){
     public void run() {
       Message message = new Message();
       message.what = 1;
       handler.sendMessage(message);
    }
  };

  // 获取时间
  public void get_time(){

    now = new Date(System.currentTimeMillis());
    str_date = formatter.format(now);
    txt_time.setText("时间:" + str_date);
  }
}AndroidManifest.xml 파일에 권한을 추가합니다.
<uses-permission android:name="android.permission.ACCESS_FINE_LOCATION"/>
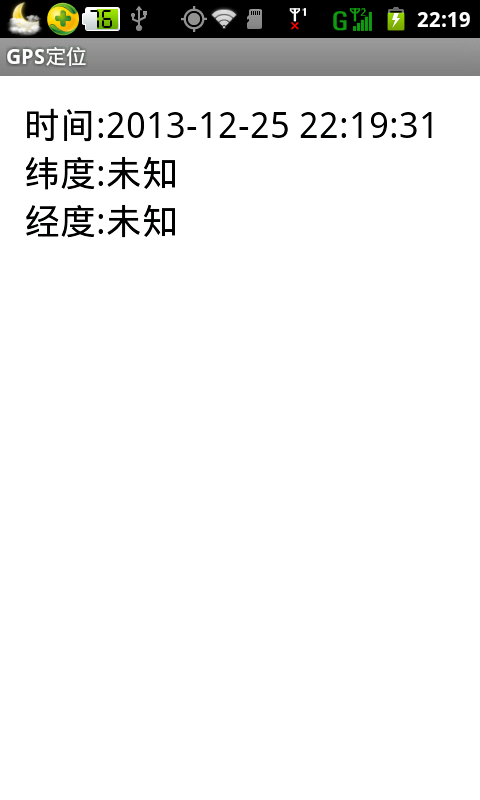
달리기 전에 GPS 위성을 켜세요. 실행 결과는 아래 그림과 같습니다.

신호가 충분하면 독자들이 야외에서 작업할 수 있습니다. 어딘가에서 시도하면 GPS 위치를 얻을 수 있습니다.
이 글이 모든 분들의 안드로이드 프로그래밍 설계에 도움이 되기를 바랍니다.
Android에서 GPS 위치 확인 사용 사례에 대한 더 많은 관련 기사를 보려면 PHP 중국어 웹사이트를 주목하세요!

핫 AI 도구

Undresser.AI Undress
사실적인 누드 사진을 만들기 위한 AI 기반 앱

AI Clothes Remover
사진에서 옷을 제거하는 온라인 AI 도구입니다.

Undress AI Tool
무료로 이미지를 벗다

Clothoff.io
AI 옷 제거제

AI Hentai Generator
AI Hentai를 무료로 생성하십시오.

인기 기사

뜨거운 도구

메모장++7.3.1
사용하기 쉬운 무료 코드 편집기

SublimeText3 중국어 버전
중국어 버전, 사용하기 매우 쉽습니다.

스튜디오 13.0.1 보내기
강력한 PHP 통합 개발 환경

드림위버 CS6
시각적 웹 개발 도구

SublimeText3 Mac 버전
신 수준의 코드 편집 소프트웨어(SublimeText3)

뜨거운 주제
 7533
7533
 15
15
 1379
1379
 52
52
 82
82
 11
11
 55
55
 19
19
 21
21
 86
86
 Java의 클래스로드 메커니즘은 다른 클래스 로더 및 대표 모델을 포함하여 어떻게 작동합니까?
Mar 17, 2025 pm 05:35 PM
Java의 클래스 로딩에는 부트 스트랩, 확장 및 응용 프로그램 클래스 로더가있는 계층 적 시스템을 사용하여 클래스로드, 링크 및 초기화 클래스가 포함됩니다. 학부모 위임 모델은 핵심 클래스가 먼저로드되어 사용자 정의 클래스 LOA에 영향을 미치도록합니다.
 카페인 또는 구아바 캐시와 같은 라이브러리를 사용하여 자바 애플리케이션에서 다단계 캐싱을 구현하려면 어떻게해야합니까?
Mar 17, 2025 pm 05:44 PM
이 기사는 카페인 및 구아바 캐시를 사용하여 자바에서 다단계 캐싱을 구현하여 응용 프로그램 성능을 향상시키는 것에 대해 설명합니다. 구성 및 퇴거 정책 관리 Best Pra와 함께 설정, 통합 및 성능 이점을 다룹니다.
 캐싱 및 게으른 하중과 같은 고급 기능을 사용하여 객체 관계 매핑에 JPA (Java Persistence API)를 어떻게 사용하려면 어떻게해야합니까?
Mar 17, 2025 pm 05:43 PM
이 기사는 캐싱 및 게으른 하중과 같은 고급 기능을 사용하여 객체 관계 매핑에 JPA를 사용하는 것에 대해 설명합니다. 잠재적 인 함정을 강조하면서 성능을 최적화하기위한 설정, 엔티티 매핑 및 모범 사례를 다룹니다. [159 문자]
 고급 Java 프로젝트 관리, 구축 자동화 및 종속성 해상도에 Maven 또는 Gradle을 어떻게 사용합니까?
Mar 17, 2025 pm 05:46 PM
이 기사에서는 Java 프로젝트 관리, 구축 자동화 및 종속성 해상도에 Maven 및 Gradle을 사용하여 접근 방식과 최적화 전략을 비교합니다.
 적절한 버전 및 종속성 관리로 Custom Java 라이브러리 (JAR Files)를 작성하고 사용하려면 어떻게해야합니까?
Mar 17, 2025 pm 05:45 PM
이 기사에서는 Maven 및 Gradle과 같은 도구를 사용하여 적절한 버전 및 종속성 관리로 사용자 정의 Java 라이브러리 (JAR Files)를 작성하고 사용하는 것에 대해 설명합니다.


