Android는 Google Zxing을 기반으로 다양한 QR 코드 스캔 효과를 구현합니다.
WeChat의 등장으로 QR 코드는 쇼핑몰, KFC, 레스토랑 등 어디에서나 볼 수 있습니다. QR 코드 스캔에는 Google의 오픈 소스 프레임워크인 Zxing이 사용됩니다. http://code.google.com/p/zxing/에 가서 소스 코드와 Jar 패키지를 다운로드할 수 있습니다. 이전에는 내 프로젝트의 QR 코드 스캔 기능이 스캔 기능만 구현했고 UI가 정말 못생겼습니다. 좋음 응용 프로그램 소프트웨어의 UI 인터페이스는 대중이 받아들여야 합니다. 그렇지 않으면 사람들이 귀하의 소프트웨어를 사용하지 않을 것입니다. 따라서 응용 프로그램 소프트웨어 기능은 인터페이스만큼 중요합니다. 예를 들어 WeChat UI는 다음과 같습니다. 많은 응용 소프트웨어도 WeChat에서 QR 코드를 스캔하는 효과를 모방했습니다. WeChat만큼 정교하지는 않지만 여전히 효과가 좋기 때문에 UI 수정 코드와 스캔 코드를 공유하겠습니다. 첫째, 앞으로의 프로젝트에서 동일한 기능을 직접 복사하여 사용할 수 있습니다. 둘째는 QR 코드 기능을 추가하지 않은 사람들에게 참고할 것입니다. 다음으로 이 기능을 단계별로 구현하면서 불필요한 파일을 많이 제거했습니다.
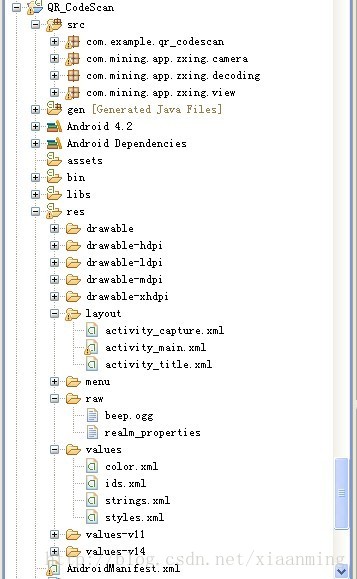
먼저 프로젝트의 구조를 살펴보겠습니다

프로젝트에 동일한 작업을 수행하려면 이 기능을 추가하려면 com.mining.app.zxing.camera, com.mining.app.zxing.decoding, 및 com.mining.app.zxing.view를 프로젝트에 추가한 다음 해당 리소스를 입력하려면 내 프로젝트에서 직접 인용했습니다. 물론 Zxing도 인용해야 합니다. .jar
MipcaActivityCapture가 포함된 com.example.qr_codescan 패키지는 또한 이전 프로젝트의 코드를 직접 소개합니다. 예를 들어 스캔이 다음과 같은 경우입니다. 성공하면 소리와 진동 등이 발생합니다. 스캔이 완료된 후 스캔은 주로 내부의 handlerDecode(결과 결과, 비트맵 바코드) 방법에 중점을 둡니다. 결과의 초기 매개변수와 QR 코드의 비트맵은 다음과 같습니다. handlerDecode(결과 결과, 비트맵 바코드)에 전달됩니다. 해당 처리 코드만 작성하면 됩니다. 다른 위치를 변경할 필요는 없습니다. 스캔한 결과와 사진은 여기서 처리하겠습니다. 🎜> MipcaActivityCapture 인터페이스의 레이아웃을 직접 변경했습니다. 먼저 렌더링을 살펴보겠습니다. 저는 주로 FrameLayout을 내부에 중첩하여 사용합니다.
레이아웃 코드는 다음과 같습니다
/**
 * 处理扫描结果
 * @param result
 * @param barcode
 */
public void handleDecode(Result result, Bitmap barcode) {
  inactivityTimer.onActivity();
  playBeepSoundAndVibrate();
  String resultString = result.getText();
  if (resultString.equals("")) {
    Toast.makeText(MipcaActivityCapture.this, "Scan failed!", Toast.LENGTH_SHORT).show();
  }else {
    Intent resultIntent = new Intent();
    Bundle bundle = new Bundle();
    bundle.putString("result", resultString);
    bundle.putParcelable("bitmap", barcode);
    resultIntent.putExtras(bundle);
    this.setResult(RESULT_OK, resultIntent);
  }
  MipcaActivityCapture.this.finish();
}그 안에는 인터페이스 상단 부분을 다른 레이아웃으로 작성해서 포함시켰습니다. 왜냐하면 이 Activity_title은 내 다른 액티비티에서도 사용되기 때문입니다. 프로젝트에 동일한 작업을 수행합니다.
<?xml version="1.0" encoding="utf-8"?>
<FrameLayout xmlns:android="http://schemas.android.com/apk/res/android"
  android:layout_width="fill_parent"
    android:layout_height="fill_parent" >

  <RelativeLayout
    android:layout_width="fill_parent"
    android:layout_height="fill_parent" >

    <SurfaceView
      android:id="@+id/preview_view"
      android:layout_width="fill_parent"
      android:layout_height="fill_parent"
      android:layout_gravity="center" />

    <com.mining.app.zxing.view.ViewfinderView
      android:id="@+id/viewfinder_view"
      android:layout_width="wrap_content"
      android:layout_height="wrap_content" />

    <include
      android:id="@+id/include1"
      android:layout_width="fill_parent"
      android:layout_height="wrap_content"
      android:layout_alignParentTop="true"
      layout="@layout/activity_title" />
  </RelativeLayout>

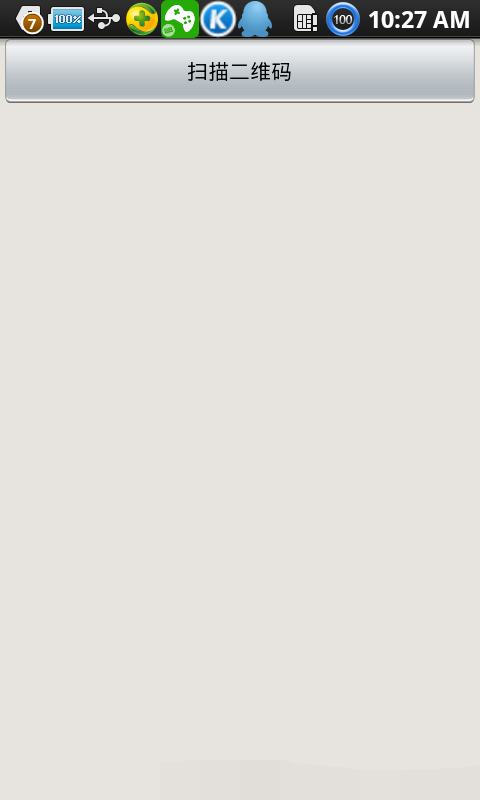
</FrameLayout>내 데모에는 버튼, ImageView 및 TextView가 있는 메인 인터페이스 MainActivity가 있습니다. 스캔할 때 버튼을 클릭하면 QR 코드 스캔 인터페이스로 들어갑니다. OK이면 기본 인터페이스로 돌아가서 TextView에 스캔 결과를 표시하고 ImageView에 그림을 표시합니다. 그러면 여기에 그림을 추가할 필요가 없습니다. 다음과 같이 간단합니다
<?xml version="1.0" encoding="utf-8"?>
<RelativeLayout xmlns:android="http://schemas.android.com/apk/res/android"
  android:layout_width="fill_parent"
  android:layout_height="wrap_content"
  android:background="@drawable/mmtitle_bg_alpha" >

  <Button
    android:id="@+id/button_back"
    android:layout_width="75.0dip"
    android:text="返回"
    android:background="@drawable/mm_title_back_btn"
    android:textColor="@android:color/white"
    android:layout_height="wrap_content"
    android:layout_centerVertical="true"
    android:layout_marginLeft="2dip" />

  <TextView
    android:id="@+id/textview_title"
    android:layout_width="wrap_content"
    android:layout_height="wrap_content"
    android:layout_alignBaseline="@+id/button_back"
    android:layout_alignBottom="@+id/button_back"
    android:layout_centerHorizontal="true"
    android:gravity="center_vertical"
    android:text="二维码扫描"
    android:textColor="@android:color/white"
    android:textSize="18sp" />

</RelativeLayout>MainActivity에서 내부 함수는 위에서 언급한 바와 같습니다
<RelativeLayout xmlns:android="http://schemas.android.com/apk/res/android"
  xmlns:tools="http://schemas.android.com/tools"
  android:layout_width="match_parent"
  android:layout_height="match_parent"
  android:background="#ffe1e0de" >

  <Button
    android:id="@+id/button1"
    android:layout_width="fill_parent"
    android:layout_height="wrap_content"
    android:layout_alignParentTop="true"
    android:text="扫描二维码" />

  <TextView
    android:id="@+id/result"
    android:layout_width="fill_parent"
    android:layout_height="wrap_content"
    android:layout_below="@+id/button1"
    android:lines="2"
    android:gravity="center_horizontal"
    android:textColor="@android:color/black"
    android:textSize="16sp" />

  <ImageView
    android:id="@+id/qrcode_bitmap"
    android:layout_width="fill_parent"
    android:layout_height="fill_parent"
    android:layout_alignParentLeft="true"
    android:layout_below="@+id/result"/>
</RelativeLayout>위 코드는 비교적 간단하지만 위챗처럼 스캔박스를 만들고 싶다면 , 위의 코드는 해당 효과가 없습니다. com.mining.app.zxing.view 패키지 아래의 ViewfinderView 클래스를 다시 작성해야 합니다. 위챗의 그림은 모두 제가 직접 그린 것입니다. 코드를 보시면 이해가 되실 겁니다. 스캐닝 프레임의 크기를 수정하려면 CameraManager 클래스로 이동하여 수정하세요.
package com.example.qr_codescan;


import android.app.Activity;
import android.content.Intent;
import android.graphics.Bitmap;
import android.os.Bundle;
import android.view.View;
import android.view.View.OnClickListener;
import android.widget.Button;
import android.widget.ImageView;
import android.widget.TextView;

public class MainActivity extends Activity {
  private final static int SCANNIN_GREQUEST_CODE = 1;
  /**
   * 显示扫描结果
   */
  private TextView mTextView ;
  /**
   * 显示扫描拍的图片
   */
  private ImageView mImageView;


  @Override
  protected void onCreate(Bundle savedInstanceState) {
    super.onCreate(savedInstanceState);
    setContentView(R.layout.activity_main);

    mTextView = (TextView) findViewById(R.id.result);
    mImageView = (ImageView) findViewById(R.id.qrcode_bitmap);

    //点击按钮跳转到二维码扫描界面,这里用的是startActivityForResult跳转
    //扫描完了之后调到该界面
    Button mButton = (Button) findViewById(R.id.button1);
    mButton.setOnClickListener(new OnClickListener() {

      @Override
      public void onClick(View v) {
        Intent intent = new Intent();
        intent.setClass(MainActivity.this, MipcaActivityCapture.class);
        intent.setFlags(Intent.FLAG_ACTIVITY_CLEAR_TOP);
        startActivityForResult(intent, SCANNIN_GREQUEST_CODE);
      }
    });
  }


  @Override
  protected void onActivityResult(int requestCode, int resultCode, Intent data) {
    super.onActivityResult(requestCode, resultCode, data);
    switch (requestCode) {
    case SCANNIN_GREQUEST_CODE:
      if(resultCode == RESULT_OK){
        Bundle bundle = data.getExtras();
        //显示扫描到的内容
        mTextView.setText(bundle.getString("result"));
        //显示
        mImageView.setImageBitmap((Bitmap) data.getParcelableExtra("bitmap"));
      }
      break;
    }
  }

}위 코드에서 중간은 위챗에서 사용하는 그림입니다. 더 많이 만들고 싶으시면 아래 코드
/*
 * Copyright (C) 2008 ZXing authors
 *
 * Licensed under the Apache License, Version 2.0 (the "License");
 * you may not use this file except in compliance with the License.
 * You may obtain a copy of the License at
 *
 *   *
 * Unless required by applicable law or agreed to in writing, software
 * distributed under the License is distributed on an "AS IS" BASIS,
 * WITHOUT WARRANTIES OR CONDITIONS OF ANY KIND, either express or implied.
 * See the License for the specific language governing permissions and
 * limitations under the License.
 */

package com.mining.app.zxing.view;

import java.util.Collection;
import java.util.HashSet;

import android.content.Context;
import android.content.res.Resources;
import android.graphics.Bitmap;
import android.graphics.Canvas;
import android.graphics.Color;
import android.graphics.Paint;
import android.graphics.Rect;
import android.graphics.Typeface;
import android.util.AttributeSet;
import android.view.View;

import com.example.qr_codescan.R;
import com.google.zxing.ResultPoint;
import com.mining.app.zxing.camera.CameraManager;

/**
 * This view is overlaid on top of the camera preview. It adds the viewfinder
 * rectangle and partial transparency outside it, as well as the laser scanner
 * animation and result points.
 *
 */
public final class ViewfinderView extends View {
  private static final String TAG = "log";
  /**
   * 刷新界面的时间
   */
  private static final long ANIMATION_DELAY = 10L;
  private static final int OPAQUE = 0xFF;

  /**
   * 四个绿色边角对应的长度
   */
  private int ScreenRate;

  /**
   * 四个绿色边角对应的宽度
   */
  private static final int CORNER_WIDTH = 10;
  /**
   * 扫描框中的中间线的宽度
   */
  private static final int MIDDLE_LINE_WIDTH = 6;

  /**
   * 扫描框中的中间线的与扫描框左右的间隙
   */
  private static final int MIDDLE_LINE_PADDING = 5;

  /**
   * 中间那条线每次刷新移动的距离
   */
  private static final int SPEEN_DISTANCE = 5;

  /**
   * 手机的屏幕密度
   */
  private static float density;
  /**
   * 字体大小
   */
  private static final int TEXT_SIZE = 16;
  /**
   * 字体距离扫描框下面的距离
   */
  private static final int TEXT_PADDING_TOP = 30;

  /**
   * 画笔对象的引用
   */
  private Paint paint;

  /**
   * 中间滑动线的最顶端位置
   */
  private int slideTop;

  /**
   * 中间滑动线的最底端位置
   */
  private int slideBottom;

  private Bitmap resultBitmap;
  private final int maskColor;
  private final int resultColor;

  private final int resultPointColor;
  private Collection<ResultPoint> possibleResultPoints;
  private Collection<ResultPoint> lastPossibleResultPoints;

  boolean isFirst;

  public ViewfinderView(Context context, AttributeSet attrs) {
    super(context, attrs);

    density = context.getResources().getDisplayMetrics().density;
    //将像素转换成dp
    ScreenRate = (int)(20 * density);

    paint = new Paint();
    Resources resources = getResources();
    maskColor = resources.getColor(R.color.viewfinder_mask);
    resultColor = resources.getColor(R.color.result_view);

    resultPointColor = resources.getColor(R.color.possible_result_points);
    possibleResultPoints = new HashSet<ResultPoint>(5);
  }

  @Override
  public void onDraw(Canvas canvas) {
    //中间的扫描框,你要修改扫描框的大小,去CameraManager里面修改
    Rect frame = CameraManager.get().getFramingRect();
    if (frame == null) {
      return;
    }

    //初始化中间线滑动的最上边和最下边
    if(!isFirst){
      isFirst = true;
      slideTop = frame.top;
      slideBottom = frame.bottom;
    }

    //获取屏幕的宽和高
    int width = canvas.getWidth();
    int height = canvas.getHeight();

    paint.setColor(resultBitmap != null ? resultColor : maskColor);

    //画出扫描框外面的阴影部分,共四个部分,扫描框的上面到屏幕上面,扫描框的下面到屏幕下面
    //扫描框的左边面到屏幕左边,扫描框的右边到屏幕右边
    canvas.drawRect(0, 0, width, frame.top, paint);
    canvas.drawRect(0, frame.top, frame.left, frame.bottom + 1, paint);
    canvas.drawRect(frame.right + 1, frame.top, width, frame.bottom + 1,
        paint);
    canvas.drawRect(0, frame.bottom + 1, width, height, paint);


    if (resultBitmap != null) {
      // Draw the opaque result bitmap over the scanning rectangle
      paint.setAlpha(OPAQUE);
      canvas.drawBitmap(resultBitmap, frame.left, frame.top, paint);
    } else {

      //画扫描框边上的角,总共8个部分
      paint.setColor(Color.GREEN);
      canvas.drawRect(frame.left, frame.top, frame.left + ScreenRate,
          frame.top + CORNER_WIDTH, paint);
      canvas.drawRect(frame.left, frame.top, frame.left + CORNER_WIDTH, frame.top
          + ScreenRate, paint);
      canvas.drawRect(frame.right - ScreenRate, frame.top, frame.right,
          frame.top + CORNER_WIDTH, paint);
      canvas.drawRect(frame.right - CORNER_WIDTH, frame.top, frame.right, frame.top
          + ScreenRate, paint);
      canvas.drawRect(frame.left, frame.bottom - CORNER_WIDTH, frame.left
          + ScreenRate, frame.bottom, paint);
      canvas.drawRect(frame.left, frame.bottom - ScreenRate,
          frame.left + CORNER_WIDTH, frame.bottom, paint);
      canvas.drawRect(frame.right - ScreenRate, frame.bottom - CORNER_WIDTH,
          frame.right, frame.bottom, paint);
      canvas.drawRect(frame.right - CORNER_WIDTH, frame.bottom - ScreenRate,
          frame.right, frame.bottom, paint);


      //绘制中间的线,每次刷新界面,中间的线往下移动SPEEN_DISTANCE
      slideTop += SPEEN_DISTANCE;
      if(slideTop >= frame.bottom){
        slideTop = frame.top;
      }
      canvas.drawRect(frame.left + MIDDLE_LINE_PADDING, slideTop - MIDDLE_LINE_WIDTH/2, frame.right - MIDDLE_LINE_PADDING,slideTop + MIDDLE_LINE_WIDTH/2, paint);


      //画扫描框下面的字
      paint.setColor(Color.WHITE);
      paint.setTextSize(TEXT_SIZE * density);
      paint.setAlpha(0x40);
      paint.setTypeface(Typeface.create("System", Typeface.BOLD));
      canvas.drawText(getResources().getString(R.string.scan_text), frame.left, (float) (frame.bottom + (float)TEXT_PADDING_TOP *density), paint);


      Collection<ResultPoint> currentPossible = possibleResultPoints;
      Collection<ResultPoint> currentLast = lastPossibleResultPoints;
      if (currentPossible.isEmpty()) {
        lastPossibleResultPoints = null;
      } else {
        possibleResultPoints = new HashSet<ResultPoint>(5);
        lastPossibleResultPoints = currentPossible;
        paint.setAlpha(OPAQUE);
        paint.setColor(resultPointColor);
        for (ResultPoint point : currentPossible) {
          canvas.drawCircle(frame.left + point.getX(), frame.top
              + point.getY(), 6.0f, paint);
        }
      }
      if (currentLast != null) {
        paint.setAlpha(OPAQUE / 2);
        paint.setColor(resultPointColor);
        for (ResultPoint point : currentLast) {
          canvas.drawCircle(frame.left + point.getX(), frame.top
              + point.getY(), 3.0f, paint);
        }
      }


      //只刷新扫描框的内容,其他地方不刷新
      postInvalidateDelayed(ANIMATION_DELAY, frame.left, frame.top,
          frame.right, frame.bottom);

    }
  }

  public void drawViewfinder() {
    resultBitmap = null;
    invalidate();
  }

  /**
   * Draw a bitmap with the result points highlighted instead of the live
   * scanning display.
   *
   * @param barcode
   *      An image of the decoded barcode.
   */
  public void drawResultBitmap(Bitmap barcode) {
    resultBitmap = barcode;
    invalidate();
  }

  public void addPossibleResultPoint(ResultPoint point) {
    possibleResultPoints.add(point);
  }

}를
canvas.drawRect(frame.left + MIDDLE_LINE_PADDING, slideTop - MIDDLE_LINE_WIDTH/2, frame.right - MIDDLE_LINE_PADDING,slideTop + MIDDLE_LINE_WIDTH/2, paint);
<로 변경해주세요. 🎜>
스캔라인을 직접 찾으려면 WeChat에 가세요. 잠시 후 제가 올린 사진이 왜곡되어 있습니다. WeChat APK를 다운로드하고 접미사 이름을 zip으로 변경한 다음 압축을 풀어보세요. > 스캔 상자 아래에 글꼴을 그리는 코드를 수정하여 글꼴에 따라 자동으로 중간에 정렬되도록 수정해야 합니다. 처리하지 못한 단어가 너무 길면 자동 줄 바꿈이 필요합니다. .Rect lineRect = new Rect();
lineRect.left = frame.left;
lineRect.right = frame.right;
lineRect.top = slideTop;
lineRect.bottom = slideTop + 18;
canvas.drawBitmap(((BitmapDrawable)(getResources().getDrawable(R.drawable.qrcode_scan_line))).getBitmap(), null, lineRect, paint);
실행 중인 인터페이스의 스크린샷. 가운데 녹색 선이 위아래로 움직이는데 이는 WeChat의 효과와 유사합니다. 실행하려면 여전히 해당 권한이 필요합니다.
 Google Zxing을 기반으로 다양한 QR 코드 스캔 효과를 구현하는 Android 기반 기사를 더 보려면 PHP 중국어 웹사이트를 주목하세요!

핫 AI 도구

Undresser.AI Undress
사실적인 누드 사진을 만들기 위한 AI 기반 앱

AI Clothes Remover
사진에서 옷을 제거하는 온라인 AI 도구입니다.

Undress AI Tool
무료로 이미지를 벗다

Clothoff.io
AI 옷 제거제

AI Hentai Generator
AI Hentai를 무료로 생성하십시오.

인기 기사

뜨거운 도구

메모장++7.3.1
사용하기 쉬운 무료 코드 편집기

SublimeText3 중국어 버전
중국어 버전, 사용하기 매우 쉽습니다.

스튜디오 13.0.1 보내기
강력한 PHP 통합 개발 환경

드림위버 CS6
시각적 웹 개발 도구

SublimeText3 Mac 버전
신 수준의 코드 편집 소프트웨어(SublimeText3)

뜨거운 주제
 7548
7548
 15
15
 1382
1382
 52
52
 83
83
 11
11
 57
57
 19
19
 22
22
 90
90


