이 기사의 예에서는 ViewPager 다중 페이지 슬라이딩 전환 및 애니메이션 효과를 구현하기 위한 Android 프로그래밍 방법을 설명합니다. 참고하실 수 있도록 모두와 공유해 주세요. 자세한 내용은 다음과 같습니다.
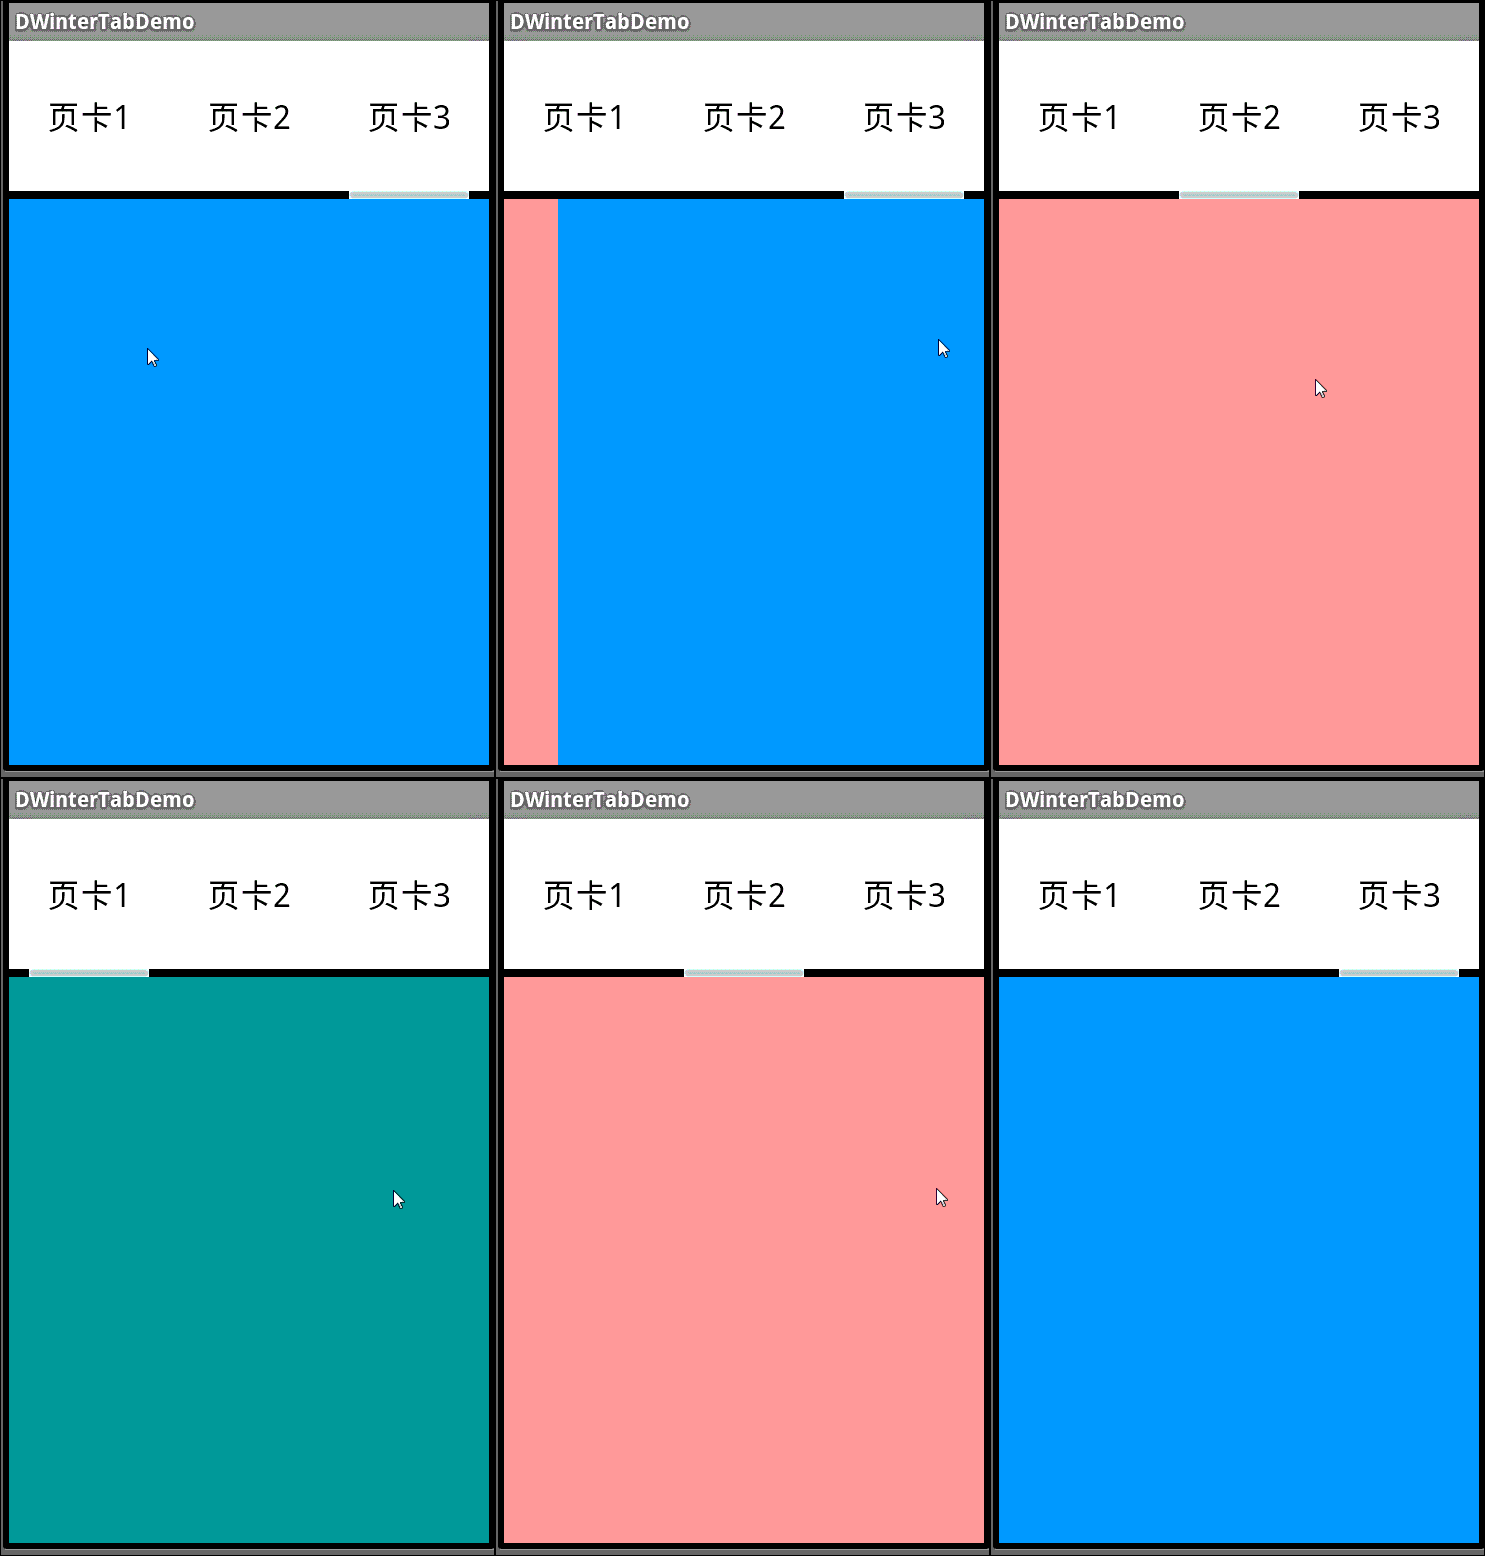
1. 먼저 Sina Weibo의 탭 슬라이딩 효과인 렌더링을 살펴보겠습니다. 제스처로 슬라이드하거나 위의 헤더를 클릭하여 전환할 수 있습니다. 마찬가지로
흰색 가로 막대가 해당 페이지 헤더로 이동합니다. 이는 애니메이션 효과이며 흰색 막대가 천천히 지나갑니다. 좋아요, 다음에는 구현해 보겠습니다.

2. 시작하기 전에 먼저 컨트롤인 ViewPager를 알아야 합니다. Google SDK와 함께 제공되는 추가 패키지에 포함된 클래스로 화면 간 전환에 사용할 수 있습니다.
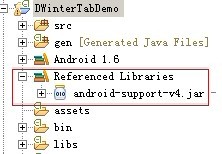
이 추가 패키지는 libs 폴더의 최종 소스 코드에서 모든 사람에게 제공될 android-support-v4.jar입니다. 물론 인터넷에서 직접 최신 버전을 검색할 수도 있습니다.
찾은 후 프로젝트에 추가해야 합니다

먼저 인터페이스를 해보자
인터페이스 디자인은 매우 간단합니다. 첫 번째는 한 행에 3개의 헤더가 있고, 두 번째 행에는 애니메이션 이미지가 있고, 세 번째 행에는 페이지 카드 내용이 표시됩니다.
<?xml version="1.0" encoding="utf-8"?>
<LinearLayout xmlns:android="http://schemas.android.com/apk/res/android"
 xmlns:umadsdk="http://schemas.android.com/apk/res/com.LoveBus"
 android:layout_width="fill_parent"
 android:layout_height="fill_parent"
 android:orientation="vertical" >
 <LinearLayout
  android:id="@+id/linearLayout1"
  android:layout_width="fill_parent"
  android:layout_height="100.0dip"
  android:background="#FFFFFF" >
  <TextView
   android:id="@+id/text1"
   android:layout_width="fill_parent"
   android:layout_height="fill_parent"
   android:layout_weight="1.0"
   android:gravity="center"
   android:text="页卡1"
   android:textColor="#000000"
   android:textSize="22.0dip" />
  <TextView
   android:id="@+id/text2"
   android:layout_width="fill_parent"
   android:layout_height="fill_parent"
   android:layout_weight="1.0"
   android:gravity="center"
   android:text="页卡2"
   android:textColor="#000000"
   android:textSize="22.0dip" />
  <TextView
   android:id="@+id/text3"
   android:layout_width="fill_parent"
   android:layout_height="fill_parent"
   android:layout_weight="1.0"
   android:gravity="center"
   android:text="页卡3"
   android:textColor="#000000"
   android:textSize="22.0dip" />
 </LinearLayout>
 <ImageView
  android:id="@+id/cursor"
  android:layout_width="fill_parent"
  android:layout_height="wrap_content"
  android:scaleType="matrix"
  android:src="@drawable/a" />
 <android.support.v4.view.ViewPager
  android:id="@+id/vPager"
  android:layout_width="wrap_content"
  android:layout_height="wrap_content"
  android:layout_gravity="center"
  android:layout_weight="1.0"
  android:background="#000000"
  android:flipInterval="30"
  android:persistentDrawingCache="animation" />
</LinearLayout>
3개의 페이지 카드를 표시하고 싶기 때문에 3개의 페이지 카드 내용에 대한 인터페이스 디자인도 필요합니다. 여기서는 배경색만 설정하면 차이가 생길 수 있습니다.
<?xml version="1.0" encoding="utf-8"?>
<LinearLayout xmlns:android="http://schemas.android.com/apk/res/android"
 android:layout_width="fill_parent"
 android:layout_height="fill_parent"
 android:orientation="vertical"
 android:background="#158684" >
</LinearLayout>
4. 코드 부분을 초기화해야 합니다
(1) 먼저 변수를 정의합니다
private ViewPager mPager;//页卡内容
private List<View> listViews; // Tab页面列表
private ImageView cursor;// 动画图片
private TextView t1, t2, t3;// 页卡头标
private int offset = 0;// 动画图片偏移量
private int currIndex = 0;// 当前页卡编号
private int bmpW;// 动画图片宽度
(2) 헤더를 초기화합니다
/**
  * 初始化头标
*/
 private void InitTextView() {
  t1 = (TextView) findViewById(R.id.text1);
  t2 = (TextView) findViewById(R.id.text2);
  t3 = (TextView) findViewById(R.id.text3);
  t1.setOnClickListener(new MyOnClickListener(0));
  t2.setOnClickListener(new MyOnClickListener(1));
  t3.setOnClickListener(new MyOnClickListener(2));
 }
/**
  * 头标点击监听
*/
public class MyOnClickListener implements View.OnClickListener {
  private int index = 0;
  public MyOnClickListener(int i) {
   index = i;
  }
  @Override
  public void onClick(View v) {
   mPager.setCurrentItem(index);
  }
};카드 내용이 표시되는 페이지를 클릭하시면 누구나 문제가 없으실 것이라고 생각합니다.
(3) 페이지 카드 콘텐츠 영역 초기화
/**
  * 初始化ViewPager
*/
private void InitViewPager() {
  mPager = (ViewPager) findViewById(R.id.vPager);
  listViews = new ArrayList<View>();
  LayoutInflater mInflater = getLayoutInflater();
  listViews.add(mInflater.inflate(R.layout.lay1, null));
  listViews.add(mInflater.inflate(R.layout.lay2, null));
  listViews.add(mInflater.inflate(R.layout.lay3, null));
  mPager.setAdapter(new MyPagerAdapter(listViews));
  mPager.setCurrentItem(0);
  mPager.setOnPageChangeListener(new MyOnPageChangeListener());
}여기에 3개의 페이지 카드 인터페이스를 로드하고 첫 번째 페이지 카드가 기본적으로 표시됩니다. 여기서도 어댑터를 구현해야 합니다.
여기서 각 페이지에 카드 로드 및 언로드를 구현합니다
(3) 초기화 애니메이션
/**
  * 初始化动画
*/
private void InitImageView() {
  cursor = (ImageView) findViewById(R.id.cursor);
  bmpW = BitmapFactory.decodeResource(getResources(), R.drawable.a)
    .getWidth();// 获取图片宽度
  DisplayMetrics dm = new DisplayMetrics();
  getWindowManager().getDefaultDisplay().getMetrics(dm);
  int screenW = dm.widthPixels;// 获取分辨率宽度
  offset = (screenW / 3 - bmpW) / 2;// 计算偏移量
  Matrix matrix = new Matrix();
  matrix.postTranslate(offset, 0);
  cursor.setImageMatrix(matrix);// 设置动画初始位置
}화면 해상도에 따라 그림의 너비에 따른 애니메이션 움직임의 오프셋 계산

페이지 전환 모니터링 구현
/**
  * 页卡切换监听
*/
public class MyOnPageChangeListener implements OnPageChangeListener {
  int one = offset * 2 + bmpW;// 页卡1 -> 页卡2 偏移量
  int two = one * 2;// 页卡1 -> 页卡3 偏移量
  @Override
  public void onPageSelected(int arg0) {
   Animation animation = null;
   switch (arg0) {
   case 0:
    if (currIndex == 1) {
     animation = new TranslateAnimation(one, 0, 0, 0);
    } else if (currIndex == 2) {
     animation = new TranslateAnimation(two, 0, 0, 0);
    }
    break;
   case 1:
    if (currIndex == 0) {
     animation = new TranslateAnimation(offset, one, 0, 0);
    } else if (currIndex == 2) {
     animation = new TranslateAnimation(two, one, 0, 0);
    }
    break;
   case 2:
    if (currIndex == 0) {
     animation = new TranslateAnimation(offset, two, 0, 0);
    } else if (currIndex == 1) {
     animation = new TranslateAnimation(one, two, 0, 0);
    }
    break;
   }
   currIndex = arg0;
   animation.setFillAfter(true);// True:图片停在动画结束位置
   animation.setDuration(300);
   cursor.startAnimation(animation);
  }
  @Override
  public void onPageScrolled(int arg0, float arg1, int arg2) {
  }
  @Override
  public void onPageScrollStateChanged(int arg0) {
  }
}5. 작업 완료 후 직접 보러 오세요 노력의 결실

이 기사가 Android 프로그래밍에 종사하는 모든 사람에게 도움이 되기를 바랍니다.
Android가 ViewPager 다중 페이지 슬라이딩 전환 및 애니메이션 효과를 구현하는 방법에 대한 자세한 관련 기사를 보려면 PHP 중국어 웹사이트에 주목하세요!