Python에서 이미지 속성 정보를 읽는 구현 방법
이 글에서는 Python 스크립트를 사용하여 이미지 정보를 읽습니다.
1. 오류 처리가 구현되지 않았습니다.
2. 모든 정보는 읽히지 않습니다. GPS 정보. 사진 해상도, 사진 픽셀, 장비 제조사, 촬영 장비 등
3. 사진의 GPS 정보는 단순 수정 후 강제 수정이 가능해야 합니다
4. 하지만 GPS 정보 자체가 없는 사진의 경우 구현이 매우 복잡하고 각 디스크립터의 오프셋을 주의 깊게 계산해야 합니다
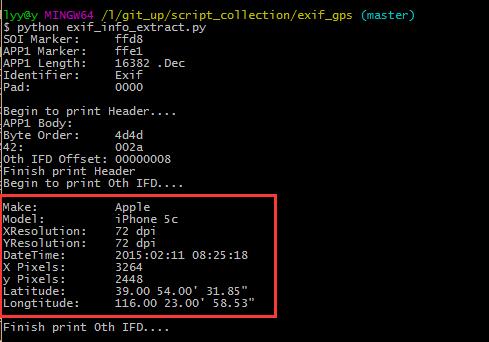
스크립트를 실행한 후 판독 결과는 다음과 같습니다

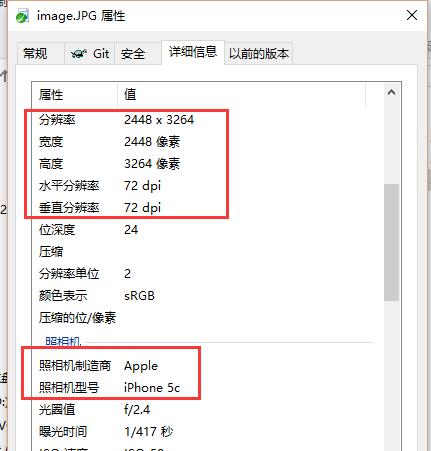
여기서 보기 및 Windows 속성 브라우저에서 읽는 내용은 똑같습니다

소스코드는 다음과 같습니다
# -*- coding:utf-8 -*-
import binascii

class ParseMethod(object):
  @staticmethod
  def parse_default(f, count, offset):
    pass

  @staticmethod
  def parse_latitude(f, count, offset):
    old_pos = f.tell()
    f.seek(12 + offset)

    latitude = [0,0,0]
    for i in xrange(count):
      byte = f.read(4)
      numerator = byte.encode('hex')

      byte = f.read(4)
      denominator = byte.encode('hex')

      latitude[i] = float(int(numerator, 16)) / int(denominator, 16)


    print 'Latitude:\t%.2f %.2f\' %.2f\"' % (latitude[0], latitude[1], latitude[2])
    f.seek(old_pos)


  @staticmethod
  def parse_longtitude(f, count, offset):
    old_pos = f.tell()
    f.seek(12 + offset)

    longtitude = [0,0,0]
    for i in xrange(count):
      byte = f.read(4)
      numerator = byte.encode('hex')

      byte = f.read(4)
      denominator = byte.encode('hex')

      longtitude[i] = float(int(numerator, 16)) / int(denominator, 16)


    print 'Longtitude:\t%.2f %.2f\' %.2f\"' % (longtitude[0], longtitude[1], longtitude[2])
    f.seek(old_pos)

  @staticmethod
  def parse_make(f, count, offset):
    old_pos = f.tell()
    f.seek(12 + offset)
    byte = f.read(count)
    a = byte.encode('hex')
    print 'Make:\t\t' + binascii.a2b_hex(a)
    f.seek(old_pos)

  @staticmethod
  def parse_model(f, count, offset):
    old_pos = f.tell()
    f.seek(12 + offset)
    byte = f.read(count)
    a = byte.encode('hex')
    print 'Model:\t\t' + binascii.a2b_hex(a)
    f.seek(old_pos)

  @staticmethod
  def parse_datetime(f, count, offset):
    old_pos = f.tell()
    f.seek(12 + offset)
    byte = f.read(count)
    a = byte.encode('hex')
    print 'DateTime:\t' + binascii.a2b_hex(a)
    f.seek(old_pos)

  # rational data type, 05
  @staticmethod
  def parse_xresolution(f, count, offset):
    old_pos = f.tell()
    f.seek(12 + offset)

    byte = f.read(4)
    numerator = byte.encode('hex')
    byte = f.read(4)
    denominator = byte.encode('hex')
    xre = int(numerator, 16) / int(denominator, 16)

    print 'XResolution:\t' + str(xre) + ' dpi'
    f.seek(old_pos)

  @staticmethod
  def parse_yresolution(f, count, offset):
    old_pos = f.tell()
    f.seek(12 + offset)

    byte = f.read(4)
    numerator = byte.encode('hex')
    byte = f.read(4)
    denominator = byte.encode('hex')
    xre = int(numerator, 16) / int(denominator, 16)

    print 'YResolution:\t' + str(xre) + ' dpi'
    f.seek(old_pos)

  @staticmethod
  def parse_exif_ifd(f, count, offset):
    old_pos = f.tell()
    f.seek(12 + offset)

    byte = f.read(2)
    a = byte.encode('hex')
    exif_ifd_number = int(a, 16)

    for i in xrange(exif_ifd_number):
      byte = f.read(2)
      tag_id = byte.encode('hex')
      #print tag_id,

      byte = f.read(2)
      type_n = byte.encode('hex')
      #print type_n,

      byte = f.read(4)
      count = byte.encode('hex')
      #print count,

      byte = f.read(4)
      value_offset = byte.encode('hex')
      #print value_offset

      value_offset = int(value_offset, 16)
      EXIF_IFD_DICT.get(tag_id, ParseMethod.parse_default)(f, count, value_offset)

    f.seek(old_pos)

  @staticmethod
  def parse_x_pixel(f, count, value):
    print 'X Pixels:\t' + str(value)

  @staticmethod
  def parse_y_pixel(f, count, value):
    print 'y Pixels:\t' + str(value)

  @staticmethod
  def parse_gps_ifd(f, count, offset):
    old_pos = f.tell()
    f.seek(12 + offset)
    byte = f.read(2)
    a = byte.encode('hex')
    gps_ifd_number = int(a, 16)

    for i in xrange(gps_ifd_number):
      byte = f.read(2)
      tag_id = byte.encode('hex')
      #print tag_id,

      byte = f.read(2)
      type_n = byte.encode('hex')
      #print type_n,

      byte = f.read(4)
      count = byte.encode('hex')
      #print count,

      byte = f.read(4)
      value_offset = byte.encode('hex')
      #print value_offset

      count = int(count, 16)
      value_offset = int(value_offset, 16)
      GPS_IFD_DICT.get(tag_id, ParseMethod.parse_default)(f, count, value_offset)

    f.seek(old_pos)

IFD_dict = {
  '010f' : ParseMethod.parse_make ,
  '0110' : ParseMethod.parse_model ,
  '0132' : ParseMethod.parse_datetime ,
  '011a' : ParseMethod.parse_xresolution ,
  '011b' : ParseMethod.parse_yresolution ,
  '8769' : ParseMethod.parse_exif_ifd ,
  '8825' : ParseMethod.parse_gps_ifd
}

EXIF_IFD_DICT = {
  'a002' : ParseMethod.parse_x_pixel ,
  'a003' : ParseMethod.parse_y_pixel
}

GPS_IFD_DICT = {
  '0002' : ParseMethod.parse_latitude ,
  '0004' : ParseMethod.parse_longtitude
}


with open('image.jpg', 'rb') as f:
  byte = f.read(2)
  a = byte.encode('hex')
  print 'SOI Marker:\t' + a

  byte = f.read(2)
  a = byte.encode('hex')
  print 'APP1 Marker:\t' + a

  byte = f.read(2)
  a = byte.encode('hex')
  print 'APP1 Length:\t' + str(int(a, 16)) + ' .Dec'

  byte = f.read(4)
  a = byte.encode('hex')
  print 'Identifier:\t' + binascii.a2b_hex(a)

  byte = f.read(2)
  a = byte.encode('hex')
  print 'Pad:\t\t' + a

  print

  print 'Begin to print Header.... '
  print 'APP1 Body: '

  byte = f.read(2)
  a = byte.encode('hex')
  print 'Byte Order:\t' + a

  byte = f.read(2)
  a = byte.encode('hex')
  print '42:\t\t' + a

  byte = f.read(4)
  a = byte.encode('hex')
  print '0th IFD Offset:\t' + a

  print 'Finish print Header'

  print 'Begin to print 0th IFD....'
  print
  #print 'Total: ',
  byte = f.read(2)
  a = byte.encode('hex')
  interoperability_number = int(a, 16)
  #print interoperability_number


  for i in xrange(interoperability_number):
    byte = f.read(2)
    tag_id = byte.encode('hex')
    #print tag_id,

    byte = f.read(2)
    type_n = byte.encode('hex')
    #print type_n,

    byte = f.read(4)
    count = byte.encode('hex')
    #print count,

    byte = f.read(4)
    value_offset = byte.encode('hex')
    #print value_offset

    count = int(count, 16)
    value_offset = int(value_offset, 16)

    # simulate switch
    IFD_dict.get(tag_id, ParseMethod.parse_default)(f, count, value_offset)


  print
print 'Finish print 0th IFD....'요약
Python을 사용하여 이미지 속성 정보를 읽는 구현 방법은 여기까지입니다. 다들 교훈을 얻으셨나요? 이 글이 모든 분들의 공부나 업무에 도움이 되었으면 좋겠습니다.
Python에서 이미지 속성 정보를 읽는 방법에 대한 더 많은 관련 글은 PHP 중국어 홈페이지를 참고해주세요!

핫 AI 도구

Undresser.AI Undress
사실적인 누드 사진을 만들기 위한 AI 기반 앱

AI Clothes Remover
사진에서 옷을 제거하는 온라인 AI 도구입니다.

Undress AI Tool
무료로 이미지를 벗다

Clothoff.io
AI 옷 제거제

AI Hentai Generator
AI Hentai를 무료로 생성하십시오.

인기 기사

뜨거운 도구

메모장++7.3.1
사용하기 쉬운 무료 코드 편집기

SublimeText3 중국어 버전
중국어 버전, 사용하기 매우 쉽습니다.

스튜디오 13.0.1 보내기
강력한 PHP 통합 개발 환경

드림위버 CS6
시각적 웹 개발 도구

SublimeText3 Mac 버전
신 수준의 코드 편집 소프트웨어(SublimeText3)

뜨거운 주제
 7526
7526
 15
15
 1378
1378
 52
52
 81
81
 11
11
 54
54
 19
19
 21
21
 74
74
 Linux 터미널에서 Python 버전을 볼 때 발생하는 권한 문제를 해결하는 방법은 무엇입니까?
Apr 01, 2025 pm 05:09 PM
Linux 터미널에서 Python 버전을 보려고 할 때 Linux 터미널에서 Python 버전을 볼 때 권한 문제에 대한 솔루션 ... Python을 입력하십시오 ...
 10 시간 이내에 프로젝트 및 문제 중심 방법에서 컴퓨터 초보자 프로그래밍 기본 사항을 가르치는 방법?
Apr 02, 2025 am 07:18 AM
10 시간 이내에 컴퓨터 초보자 프로그래밍 기본 사항을 가르치는 방법은 무엇입니까? 컴퓨터 초보자에게 프로그래밍 지식을 가르치는 데 10 시간 밖에 걸리지 않는다면 무엇을 가르치기로 선택 하시겠습니까?
 한 데이터 프레임의 전체 열을 Python의 다른 구조를 가진 다른 데이터 프레임에 효율적으로 복사하는 방법은 무엇입니까?
Apr 01, 2025 pm 11:15 PM
Python의 Pandas 라이브러리를 사용할 때는 구조가 다른 두 데이터 프레임 사이에서 전체 열을 복사하는 방법이 일반적인 문제입니다. 두 개의 dats가 있다고 가정 해
 중간 독서를 위해 Fiddler를 사용할 때 브라우저에서 감지되는 것을 피하는 방법은 무엇입니까?
Apr 02, 2025 am 07:15 AM
Fiddlerevery Where를 사용할 때 Man-in-the-Middle Reading에 Fiddlereverywhere를 사용할 때 감지되는 방법 ...
 정규 표현이란 무엇입니까?
Mar 20, 2025 pm 06:25 PM
정규 표현식은 프로그래밍의 패턴 일치 및 텍스트 조작을위한 강력한 도구이며 다양한 응용 프로그램에서 텍스트 처리의 효율성을 높입니다.
 Uvicorn은 Serving_forever ()없이 HTTP 요청을 어떻게 지속적으로 듣습니까?
Apr 01, 2025 pm 10:51 PM
Uvicorn은 HTTP 요청을 어떻게 지속적으로 듣습니까? Uvicorn은 ASGI를 기반으로 한 가벼운 웹 서버입니다. 핵심 기능 중 하나는 HTTP 요청을 듣고 진행하는 것입니다 ...
 문자열을 통해 객체를 동적으로 생성하고 방법을 파이썬으로 호출하는 방법은 무엇입니까?
Apr 01, 2025 pm 11:18 PM
파이썬에서 문자열을 통해 객체를 동적으로 생성하고 메소드를 호출하는 방법은 무엇입니까? 특히 구성 또는 실행 해야하는 경우 일반적인 프로그래밍 요구 사항입니다.
 인기있는 파이썬 라이브러리와 그 용도는 무엇입니까?
Mar 21, 2025 pm 06:46 PM
이 기사는 Numpy, Pandas, Matplotlib, Scikit-Learn, Tensorflow, Django, Flask 및 요청과 같은 인기있는 Python 라이브러리에 대해 설명하고 과학 컴퓨팅, 데이터 분석, 시각화, 기계 학습, 웹 개발 및 H에서의 사용에 대해 자세히 설명합니다.


