LinearLayout, Relativeayout, FrameLayout 등을 포함하여 몇 가지 일반적인 ViewGroup 구현이 Android에 제공됩니다. 이러한 ViewGroup은 일반적인 개발 요구 사항을 충족할 수 있지만 복잡한 인터페이스 요구 사항의 경우 이러한 레이아웃으로는 충분하지 않습니다. 따라서 우리가 접촉한 애플리케이션에는 사용자 정의 ViewGroup이 많이 있습니다.
사용자 정의 ViewGroup을 구현하기 위한 첫 번째 단계는 사용자 정의 속성을 배우는 것입니다. 이러한 사용자 정의 속성은 레이아웃 파일을 구성할 때 더 유연해집니다. 사용자 정의 속성은 값 디렉터리의 attrs.xml 파일에서 선언됩니다.
<?xml version="1.0" encoding="utf-8"?>
<resources>
 <declare-styleable name="CascadeViewGroup">
  <attr name="verticalspacing" format="dimension"/>
  <attr name="horizontalspacing" format="dimension"/>
 </declare-styleable>

 <declare-styleable name="CascadeViewGroup_LayoutParams">
  <attr name="layout_paddingleft" format="dimension"/>
  <attr name="layout_paddinTop" format="dimension"/>
 </declare-styleable>
</resources>
여기서는 두 개의 사용자 정의 속성 세트를 선언합니다. CascadeViewGroup의 속성은 레이아웃 파일의
코드를 작성하기 전에 CascadeLayout에서 사용할 기본 너비와 높이도 설정했습니다. 이 두 가지 속성은 Dimens.xml에 정의되어 있습니다.
<?xml version="1.0" encoding="utf-8"?>
<resources>
  <dimen name="default_horizontal_spacing">10dp</dimen>
 <dimen name="default_vertical_spacing">10dp</dimen>
</resources>
사용자 정의 구성 요소인 CascadeLayout 작성을 시작해 보겠습니다.
package com.app.CustomViewMotion;

import android.content.Context;
import android.content.res.TypedArray;
import android.util.AttributeSet;
import android.view.View;
import android.view.ViewGroup;

/**
 * Created by charles on 2015/8/13.
 */
public class CascadeViewGroup extends ViewGroup {

 //自定义布局中设置的宽度和高度
 private int mHoriztonalSpacing;
 private int mVerticalSpacing;

 public CascadeViewGroup(Context context) {
  this(context, null);
 }

 public CascadeViewGroup(Context context, AttributeSet attrs) {
  this(context, attrs, 0);
 }

 public CascadeViewGroup(Context context, AttributeSet attrs, int defStyle) {
  super(context, attrs, defStyle);
  TypedArray a = context.obtainStyledAttributes(attrs, R.styleable.CascadeViewGroup);
  try {
   //获取设置的宽度
   mHoriztonalSpacing = a.getDimensionPixelSize(R.styleable.CascadeViewGroup_horizontalspacing,
     this.getResources().getDimensionPixelSize(R.dimen.default_horizontal_spacing));
   //获取设置的高度
   mVerticalSpacing = a.getDimensionPixelSize(R.styleable.CascadeViewGroup_verticalspacing,
     this.getResources().getDimensionPixelSize(R.dimen.default_vertical_spacing));

  } catch (Exception e) {
   e.printStackTrace();

  } finally {
   a.recycle();
  }
 }

 @Override
 protected void onMeasure(int widthMeasureSpec, int heightMeasureSpec) {
  final int count = this.getChildCount();
  int width = this.getPaddingLeft();
  int height = this.getPaddingTop();
  for (int i = 0; i < count; i++) {
   final View currentView = this.getChildAt(i);
   this.measureChild(currentView, widthMeasureSpec, heightMeasureSpec);
   CascadeViewGroup.LayoutParams lp = (CascadeViewGroup.LayoutParams) currentView.getLayoutParams();
   if(lp.mSettingPaddingLeft != 0){
    width +=lp.mSettingPaddingLeft;
   }
   if(lp.mSettingPaddingTop != 0){
    height +=lp.mSettingPaddingTop;
   }
   lp.x = width;
   lp.y = height;
   width += mHoriztonalSpacing;
   height += mVerticalSpacing;
  }
  width +=getChildAt(this.getChildCount() - 1).getMeasuredWidth() + this.getPaddingRight();
  height += getChildAt(this.getChildCount() - 1).getMeasuredHeight() + this.getPaddingBottom();
  this.setMeasuredDimension(resolveSize(width, widthMeasureSpec), resolveSize(height, heightMeasureSpec));

 }

 @Override
 protected void onLayout(boolean b, int l, int i1, int i2, int i3) {
  final int count = this.getChildCount();
  for (int i = 0; i < count; i++) {
   final View currentView = this.getChildAt(i);
   CascadeViewGroup.LayoutParams lp = (CascadeViewGroup.LayoutParams) currentView.getLayoutParams();
   currentView.layout(lp.x, lp.y, lp.x + currentView.getMeasuredWidth(),
     lp.y + currentView.getMeasuredHeight());
  }


 }

 public static class LayoutParams extends ViewGroup.LayoutParams {
  int x;
  int y;
  int mSettingPaddingLeft;
  int mSettingPaddingTop;

  public LayoutParams(Context c, AttributeSet attrs) {
   super(c, attrs);
   TypedArray a = c.obtainStyledAttributes(attrs, R.styleable.CascadeViewGroup_LayoutParams);
   mSettingPaddingLeft = a.getDimensionPixelSize(R.styleable.CascadeViewGroup_LayoutParams_layout_paddingleft, 0);
   mSettingPaddingTop = a.getDimensionPixelSize(R.styleable.CascadeViewGroup_LayoutParams_layout_paddinTop, 0);
   a.recycle();
  }

  public LayoutParams(int width, int height) {
   super(width, height);
  }

  public LayoutParams(ViewGroup.LayoutParams source) {
   super(source);
  }
 }

 @Override
 protected ViewGroup.LayoutParams generateDefaultLayoutParams() {
  return new LayoutParams(LayoutParams.WRAP_CONTENT, LayoutParams.WRAP_CONTENT);
 }

 @Override
 protected ViewGroup.LayoutParams generateLayoutParams(ViewGroup.LayoutParams p) {
  return new LayoutParams(p);
 }

 @Override
 public ViewGroup.LayoutParams generateLayoutParams(AttributeSet attrs) {
  return new LayoutParams(this.getContext(), attrs);
 }
}코드가 약간 길지만 구조는 여전히 매우 명확합니다.
1) 생성자 또는 XML 파일의 구성 속성 값입니다. TypedArray의 메서드를 통해 레이아웃에 설정한 속성을 가져오고 이를 멤버 변수에 저장합니다.
2) 사용자 정의 내부 클래스 LayoutParams를 생성합니다. 이 내부 클래스를 구성하면 레이아웃 단계에서 레이아웃에 대한 하위 뷰를 측정할 때 해당 속성 값을 저장할 수 있습니다.
3) generateLayoutParams(), generateDefaultParams() 및 기타 메소드. 이러한 메소드에서 사용자 정의layoutParams를 반환합니다. 이러한 메소드를 재정의해야 하는 이유는 ViewGroup 클래스의 addView() 메소드를 보면 명확해집니다.
4) 측정 단계. 측정 단계에서는 자체 크기와 하위 뷰의 크기를 측정하고 하위 뷰 정보를 LayoutParams에 저장합니다.
5) 레이아웃 단계. 각 하위 View의 정보를 기반으로 위치를 배치합니다.
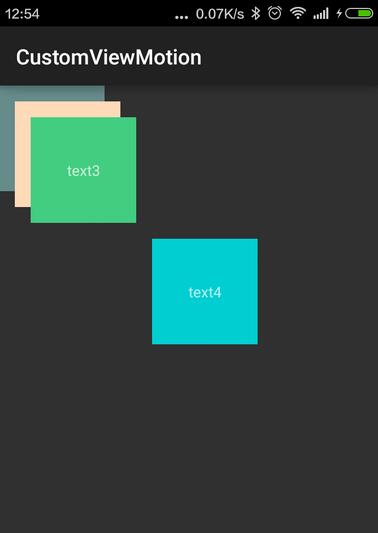
마지막으로 레이아웃 파일을 추가합니다.
<?xml version="1.0" encoding="utf-8"?>
<!--添加自定义属性给viewGroup-->
<!--新添加的命名空间的后缀必须保持和.xml中声明的包名一致-->
<com.app.CustomViewMotion.CascadeViewGroup
  xmlns:android="http://schemas.android.com/apk/res/android"
  xmlns:ts="http://schemas.android.com/apk/res/com.app.CustomViewMotion"
  android:layout_width="match_parent"
  android:layout_height="match_parent"
  ts:horizontalspacing="15dp"
  ts:verticalspacing="15dp">

 <TextView android:layout_width="100dp"
    android:layout_height="100dp"
    android:gravity="center"
    android:text="text1"
    android:background="#668B8B"/>

 <TextView android:layout_width="100dp"
    android:layout_height="100dp"
    android:gravity="center"
    android:text="text2"
    android:background="#FFDAB9"/>

 <TextView android:layout_width="100dp"
    android:layout_height="100dp"
    android:gravity="center"
    android:text="text3"
    android:background="#43CD80"/>

<!--这个子view中添加自定义子view属性-->
 <TextView android:layout_width="100dp"
    android:layout_height="100dp"
    android:gravity="center"
    android:text="text4"
    ts:layout_paddingleft="100dp"
    ts:layout_paddinTop="100dp"
    android:background="#00CED1"/>
</com.app.CustomViewMotion.CascadeViewGroup>로 얻은 효과는 다음과 같습니다.

위 내용은 모두 참고가 되셨으면 좋겠습니다. PHP 중국어 웹사이트를 지원합니다.
Android 사용자 정의 ViewGroup 구현 방법과 관련된 더 많은 기사를 보려면 PHP 중국어 웹사이트를 주목하세요!