스크립트를 사용하여 캔버스 개체를 제어하므로 일부 대화형 애니메이션을 구현하는 것은 매우 쉽습니다. 그러나 캔버스는 플래시와 달리 애니메이션용으로 특별히 설계된 적이 없으므로 필연적으로 몇 가지 제한 사항이 있습니다. 아마도 가장 큰 한계는 한 번 그려진 이미지가 그대로 유지된다는 점일 것입니다. 이동해야 한다면 모든 것(이전 항목 포함)을 다시 그려야 합니다. 다시 그리는 작업은 시간이 많이 걸리며 성능은 컴퓨터 속도에 따라 크게 달라집니다.
기본 애니메이션 단계
프레임을 그리려면 다음 단계가 필요합니다.
다음에 그릴 내용을 제외하고 캔버스를 지웁니다. 캔버스(예: 배경 이미지)를 완전히 채우십시오. 그렇지 않으면 모든 것을 지워야 합니다. 가장 간단한 방법은 clearRect 메서드를 사용하는 것입니다. 캔버스의 상태를 변경하는 일부 설정(스타일, 변형 등)을 변경하고, 프레임을 그릴 때마다 원래 상태로 유지하려면 먼저 저장해야 합니다.
애니메이션 모양 그리기
이 단계는 애니메이션 프레임을 다시 그리는 단계입니다.
캔버스 상태 복원 캔버스 상태가 저장되어 있으면 먼저 복원한 후 다음 프레임을 다시 그릴 수 있습니다.
캔버스에 내용을 그리는 것은 캔버스에서 제공하는 방법이나 커스터마이징을 사용하며, 일반적으로 스크립트 실행이 끝난 후에만 결과를 볼 수 있는 등의 작업은 불가능합니다. for 루프 내에서 애니메이션을 완성합니다. 다시 그리기를 예약할 방법이 필요합니다. 이러한 애니메이션 조작을 수행하는 방법에는 두 가지가 있습니다. 첫째, setInterval 및 setTimeout 메소드를 사용하여 설정된 시점에 다시 그리기를 제어할 수 있습니다.
setInterval(animateShape,500);
  setTimeout(animateShape,500);
애니메이션 예시 1
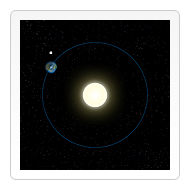
이 예시에서는 작은 태양계 시뮬레이션 시스템을 움직이게 만들어 보겠습니다.

var sun = new Image();
 var moon = new Image();
 var earth = new Image();
 function init(){
   sun.src = 'images/sun.png';
   moon.src = 'images/moon.png';
   earth.src = 'images/earth.png';
   setInterval(draw,100);
 }

 function draw() {
   var ctx = document.getElementById('canvas').getContext('2d');

   ctx.globalCompositeOperation = 'destination-over';
   ctx.clearRect(0,0,300,300); // clear canvas

   ctx.fillStyle = 'rgba(0,0,0,0.4)';
   ctx.strokeStyle = 'rgba(0,153,255,0.4)';
   ctx.save();
   ctx.translate(150,150);

   // Earth
   var time = new Date();
   ctx.rotate( ((2*Math.PI)/60)*time.getSeconds() + ((2*Math.PI)/60000)*time.getMilliseconds() );
   ctx.translate(105,0);
   ctx.fillRect(0,-12,50,24); // Shadow
   ctx.drawImage(earth,-12,-12);

   // Moon
   ctx.save();
   ctx.rotate( ((2*Math.PI)/6)*time.getSeconds() + ((2*Math.PI)/6000)*time.getMilliseconds() );
   ctx.translate(0,28.5);
   ctx.drawImage(moon,-3.5,-3.5);
   ctx.restore();

   ctx.restore();

   ctx.beginPath();
   ctx.arc(150,150,105,0,Math.PI*2,false); // Earth orbit
   ctx.stroke();

   ctx.drawImage(sun,0,0,300,300);
}애니메이션 예시 2

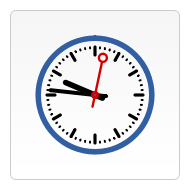
function init(){
clock();
setInterval(clock,1000);
}
function clock(){
var now = new Date();
var ctx = document.getElementById('canvas').getContext('2d');
ctx.save();
ctx.clearRect(0,0,150,150);
ctx.translate(75,75);
ctx.scale(0.4,0.4);
ctx.rotate(-Math.PI/2);
ctx.strokeStyle = "black";
ctx.fillStyle = "white";
ctx.lineWidth = 8;
ctx.lineCap = "round";
// Hour marks
ctx.save();
for (var i=0;i<12;i++){
ctx.beginPath();
ctx.rotate(Math.PI/6);
ctx.moveTo(100,0);
ctx.lineTo(120,0);
ctx.stroke();
}
ctx.restore();
// Minute marks
ctx.save();
ctx.lineWidth = 5;
for (i=0;i<60;i++){
if (i%5!=0) {
ctx.beginPath();
ctx.moveTo(117,0);
ctx.lineTo(120,0);
ctx.stroke();
}
ctx.rotate(Math.PI/30);
}
ctx.restore();
var sec = now.getSeconds();
var min = now.getMinutes();
var hr = now.getHours();
hr = hr>=12 ? hr-12 : hr;
ctx.fillStyle = "black";
// write Hours
ctx.save();
ctx.rotate( hr*(Math.PI/6) + (Math.PI/360)*min + (Math.PI/21600)*sec )
ctx.lineWidth = 14;
ctx.beginPath();
ctx.moveTo(-20,0);
ctx.lineTo(80,0);
ctx.stroke();
ctx.restore();
// write Minutes
ctx.save();
ctx.rotate( (Math.PI/30)*min + (Math.PI/1800)*sec )
ctx.lineWidth = 10;
ctx.beginPath();
ctx.moveTo(-28,0);
ctx.lineTo(112,0);
ctx.stroke();
ctx.restore();
// Write seconds
ctx.save();
ctx.rotate(sec * Math.PI/30);
ctx.strokeStyle = "#D40000";
ctx.fillStyle = "#D40000";
ctx.lineWidth = 6;
ctx.beginPath();
ctx.moveTo(-30,0);
ctx.lineTo(83,0);
ctx.stroke();
ctx.beginPath();
ctx.arc(0,0,10,0,Math.PI*2,true);
ctx.fill();
ctx.beginPath();
ctx.arc(95,0,10,0,Math.PI*2,true);
ctx.stroke();
ctx.fillStyle = "#555";
ctx.arc(0,0,3,0,Math.PI*2,true);
ctx.fill();
ctx.restore();
ctx.beginPath();
ctx.lineWidth = 14;
ctx.strokeStyle = '#325FA2';
ctx.arc(0,0,142,0,Math.PI*2,true);
ctx.stroke();
ctx.restore();
} 위는 캔버스 게임 개발 학습 8부: 애니메이션 기초 내용에 대한 자세한 내용은 PHP 중국어 홈페이지(www.php.cn)를 참고해주세요!