TextView는 상대적으로 간단하고 편집에는 사용할 수 없으며 정보를 표시하는 데에만 사용할 수 있습니다.
레이아웃 파일에서 일반적으로 사용되는 일부 XML 속성
android:gravity—설정하는 데 사용됩니다. 컨트롤 텍스트 정렬
android:layout_gravity—상위 컨트롤을 기준으로 컨트롤의 정렬을 설정하는 데 사용
android:text—컨트롤의 텍스트 정보를 설정하는 데 사용
android:layout_width—컨트롤의 너비를 설정하는 데 사용
android:layout_height—컨트롤의 높이를 설정하는 데 사용
android:ground—컨트롤의 배경색을 설정하는 데 사용 컨트롤
android :textColor—컨트롤의 텍스트 색상을 설정하는 데 사용
android:textSize—컨트롤의 텍스트 글꼴 크기를 설정하는 데 사용
android :width 및 android:height - android:layout_width
와 유사한 함수 차이점:
android:layout_width는 fill_parent(전체 화면을 가로로 채우기) 또는
wrap_content(크기 채우기)만 설정할 수 있습니다. 컨트롤 자체의 가로 방향)
android:width는 특정 컨트롤을 설정할 수 있습니다. 가로 크기 단위는 픽셀입니다
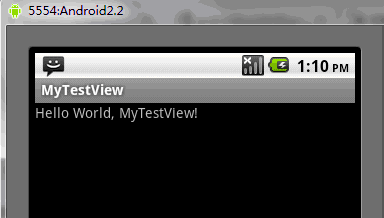
예: TextView 디스플레이
main.xml 레이아웃 파일
<?xml version="1.0" encoding="utf-8"?>
<LinearLayout xmlns:android="http://schemas.android.com/apk/res/android"
    android:orientation="vertical"
    android:layout_width="fill_parent"
    android:layout_height="fill_parent"
    >
<TextView
    android:layout_width="fill_parent"
    android:layout_height="wrap_content"
    android:text="@string/hello"
    />
</LinearLayout>string.xml 파일
<?xml version="1.0" encoding="utf-8"?>
<resources>
    <string name="hello">Hello World, MyTestView!</string>
    <string name="app_name">MyTestView</string>
</resources>MyTextView.java 파일
package org.loulijun.MyTestView;

import android.app.Activity;
import android.os.Bundle;

public class MyTestView extends Activity {
    /** Called when the activity is first created. */
    @Override
    public void onCreate(Bundle savedInstanceState) {
        super.onCreate(savedInstanceState);
        setContentView(R.layout.main);
    }
}실행 결과:

위는 Android UI 컨트롤 시리즈 콘텐츠: TextView(텍스트 상자) 관련 콘텐츠를 더 보려면 PHP Chinese Net(www.php.cn)을 참고하세요!