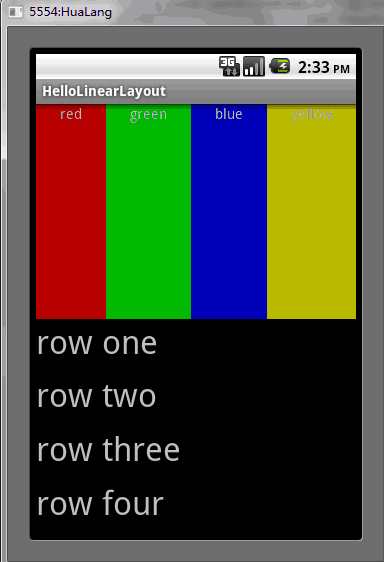
LinearLayout은 View 요소를 가로 또는 세로 방향으로 선형 방향으로 표시하는 ViewGroup입니다.
LinearLayout을 재사용할 수 있습니다. 중첩된 다중 레이어 LinearLayout을 사용하려면 대신 RelativeLayout을 사용하는 것이 좋습니다. .
1. HelloLinearLayout
이라는 프로젝트 생성을 시작합니다. 2. res/layout/main.xml 파일을 열고 다음 내용을 삽입합니다
<?xml version="1.0" encoding="utf-8"?>
<LinearLayout xmlns:android="http://schemas.android.com/apk/res/android"
    android:orientation="vertical"
    android:layout_width="fill_parent"
    android:layout_height="fill_parent"
    >
        <LinearLayout
                android:orientation="horizontal"
                android:layout_width="fill_parent"
                android:layout_height="fill_parent"
                android:layout_weight="1">
                <TextView
                        android:text="red"
                        android:gravity="center_horizontal"
                        android:background="#aa0000"
                        android:layout_width="wrap_content"
                        android:layout_height="fill_parent"
                        android:layout_weight="1"
                />
                <TextView
                        android:text="green"
                        android:gravity="center_horizontal"
                        android:background="#00aa00"
                        android:layout_width="wrap_content"
                        android:layout_height="fill_parent"
                        android:layout_weight="1"
                />
                <TextView
                        android:text="blue"
                        android:gravity="center_horizontal"
                        android:background="#0000aa"
                        android:layout_width="wrap_content"
                        android:layout_height="fill_parent"
                        android:layout_weight="1"
                />
                <TextView
                        android:text="yellow"
                        android:gravity="center_horizontal"
                        android:background="#aaaa00"
                        android:layout_width="wrap_content"
                        android:layout_height="fill_parent"
                        android:layout_weight="1"
                />
        </LinearLayout>
        <LinearLayout
                android:orientation="vertical"
                android:layout_width="fill_parent"
                android:layout_height="fill_parent"
                android:layout_weight="1">
                <TextView
                        android:text="row one"
                        android:textSize="15pt"
                        android:layout_width="fill_parent"
                        android:layout_height="wrap_content"
                        android:layout_weight="1"
                />
                <TextView
                        android:text="row two"
                        android:textSize="15pt"
                        android:layout_width="fill_parent"
                        android:layout_height="wrap_content"
                        android:layout_weight="1"
                />
                <TextView
                        android:text="row three"
                        android:textSize="15pt"
                        android:layout_width="fill_parent"
                        android:layout_height="wrap_content"
                        android:layout_weight="1"
                />
                <TextView
                        android:text="row four"
                        android:textSize="15pt"
                        android:layout_width="fill_parent"
                        android:layout_height="wrap_content"
                        android:layout_weight="1"
                />
        </LinearLayout>
</LinearLayout> 이 XML 파일을 주의 깊게 확인하세요. . 방향을 수직으로 정의하는 루트 요소 LinearLayout이 있습니다. 모든 하위 뷰(총 2개)는 수직으로 쌓입니다. 첫 번째 하위는 수평 방향으로 배치된 또 다른 LinearLayout이고 두 번째 하위는 수직으로 쌓입니다. 수직 레이아웃이 있는 LinearLayout 중첩된 각 LinearLayout에는 여러 TextView 요소가 포함되어 있으며 해당 방향은 상위 LinearLayout 태그에 의해 정의됩니다.
3. 이제 HelloLinearLayout.java를 열고 onCreate() 메서드에 res/layout/main.xml 레이아웃 파일이 로드되었는지 확인하세요.
public void onCreate(Bundle savedInstanceState) {
        super.onCreate(savedInstanceState);
setContentView(R.layout.main);setContentView(int) 메서드가 로드되었는지 확인하세요. 리소스 ID로 지정된 Activity 레이아웃 파일의 경우 - R.layout.main은 res/layout/main.xml 레이아웃 파일을 참조합니다
4. 프로그램을 실행하면 다음 상황을 볼 수 있습니다

위는 Android UI 컨트롤 시리즈의 내용입니다: LinearLayout(선형 레이아웃) 더 많은 관련 내용은 PHP 중국어 웹사이트(www.php.cn)를 참고하세요. !