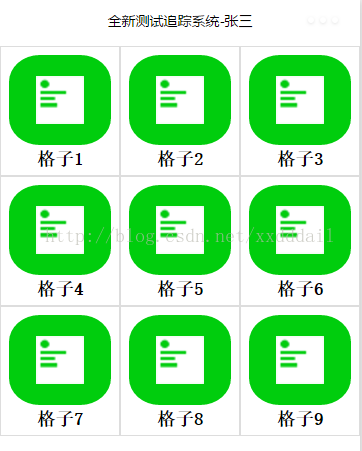
이 글은 주로 위챗 미니 프로그램 지우공게 예제 코드에 대한 정보를 소개하고 있습니다. 필요한 친구들은
위챗 미니 프로그램 지우공게
구현을 참고하세요. renders :

미니 프로그램은 WeChat에서 개발되었으며 모바일 측의 인터페이스이므로 더 편리하게 사용하기 위해 종종 nine을 사용하고 싶습니다. -네비게이션으로서의 사각형 그리드 인터페이스. 이를 달성하는 방법은 무엇입니까?
간단히 생각하면 주공 그리드는 3행 3열로 되어 있는데, 행을 하나의 단위로 보고 각 행을 3열로 나누면 괜찮을까요? 연습해보자.
우선 9그리드 데이터 생성을 고려해 보겠습니다. 각 그리드에는 점프를 용이하게 하는 아이콘, 제목, 경로가 필요하므로 해당 날에는 9페이지가 있습니다. Can인 1차원 배열입니다. 후속 구성을 더 잘 수행하기 위해 이 배열을 경로.js 파일로 분리한 다음 index.js 페이지에서 참조하고 경로를 인덱스 디렉터리에 넣습니다.
var PageItems =
 [
  {
   text: '格子1',
   icon: '../../images/c1.png',
   route: '../c1/c1',
  },
  {
   text: '格子2',
   icon: '../../images/c2.png',
   route: '../c2/c2',
  },
   {
   text: '格子3',
   icon: '../../images/c3.png',
   route: '../c3/c3',
  },
  {
   text: '格子4',
   icon: '../../images/c4.png',
   route: '../c4/c4',
  },
  {
   text: '格子5',
   icon: '../../images/c5',
   route: '../c5/c5',
  },
  {
   text: '格子6',
   icon: '../../images/c6.png',
   route: '../c6/c6',
  },
  {
   text: '格子7',
   icon: '../../images/c7.png',
   route: '../c7/c7',
  },
  {
   text: '格子8',
   icon: '../../images/c8',
   route: '../c8/c8',
  },
  {
   text: '格子9',
   icon: '../../images/c9.png',
   route: '../c9/c9',
  }
 ];
module.exports = {
 PageItems: PageItems
}index.js 페이지에서 Route.js를 참조한 다음 PageItems 데이터를 가져오지만 PageItems는 1차원 배열입니다. 그리고 이전에는 1개의 행과 3개의 열이 그룹으로 사용되므로 이 1차원 배열을 재구성해야 한다고 생각했습니다. 가장 직접적인 방법은 각 배열의 요소가 3개만 포함된 1차원 배열을 생성하는 것입니다. 코드는 다음과 같습니다
//index.js
//获取应用实例
var app = getApp()
var routes = require('routes');
Page({
data: {
userInfo: {},
cellHeight: '120px',
pageItems: []
},
//事件处理函数
onLoad: function () {
var that = this
console.log(app);
//调用应用实例的方法获取全局数据
app.getUserInfo(function (userInfo) {
wx.setNavigationBarTitle({
title: '全新测试追踪系统-' + userInfo.nickName,
success: function (res) {
// success
}
})
that.setData({
userInfo: userInfo
})
var pageItems = [];
var row = [];
var len = routes.PageItems.length;//重组PageItems
len = Math.floor((len + 2) / 3) * 3;
for (var i = 0; i < len; i++) {
if ((i + 1) % 3 == 0) {
row.push(indexs.PageItems[i]);
pageItems.push(row);
row = [];
continue;
}
else {
row.push(indexs.PageItems[i]);
}
}
wx.getSystemInfo({
success: function (res) {
var windowWidth = res.windowWidth;
that.setData({
cellHeight: (windowWidth / 3) + 'px'
})
},
complete: function () {
that.setData({
pageItems: pageItems
})
}
})
})
}
})각 그리드는 동일하지만 데이터는 동일하므로 index.wxml에 레이아웃을 지정합니다. 다르기 때문에 템플릿을 사용하여 발표한다고 생각했습니다. 이를 위해 먼저 셀 템플릿 cell.wxml을 만듭니다.
<template name="cell">
<navigator url="{{route}}" class="pages-item" style="height:{{cellHeight}}">
<view class="{{text==null||text.length==0?'pages-icon-wrapper-no-bg':'pages-icon-wrapper'}}" >
<image src="{{icon}}" class="pages-icon"></image>
</view>
<view class="pages-text-wrapper">
<text class="pages-text">{{text}}</text>
</view>
</navigator>
</template>여기서 두 개의 중괄호가 전달된 데이터에서 가져온 것임을 알 수 있습니다. 외부에서는 더 나은 표현을 위해 간단한 논리적 판단을 내릴 수 있습니다. 예를 들어 text==null인 경우 배경이 비어 있는 그리드를 표시하려고 합니다. 데이터가 있는 경우 배경이 있는 그리드를 표시하려고 하므로 "{{text==null||text.length== 0? 'pages-icon-wrapper-no-bg':'pages-icon-wrapper'}}".
또 다른 점은 이 인터페이스 파일을 템플릿으로 사용하기 때문에 템플릿 태그로 감싸고 템플릿이 참조되는 위치에서 호출을 식별할 수 있도록 이름을 지정합니다.
이제 index.wxml에서 이 템플릿을 참조합니다.
<!--index.wxml-->
<import src="cell.wxml" />
<view class="pages-container">
 <scroll-view scroll-y="true" class="pages-wrapper">
  <view wx:for="{{pageItems}}" wx:key="{{text}}">
   <view class="pages-row">
    <template is="cell" data="{{...item[0],cellHeight}}" />
    <template is="cell" data="{{...item[1],cellHeight}}" />
    <template is="cell" data="{{...item[2],cellHeight}}" />
   </view>
  </view>
 </scroll-view>
</view>템플릿은 가져오기를 사용하여 참조됩니다. 호출이 이루어지는 위치에 사용됩니다. 여기서는 cell.wxml에서 이름을 지정합니다. item[0], item[1], item[2]는 루프에 전달된 데이터이고, cellHeight는 index.js의 데이터에 저장된 데이터입니다. 템플릿에 데이터가 전달되면 프레임워크는 이를 필드, 즉 키-값 쌍의 형태로 확장하기 때문에 cell.wxml 파일을 다시 보면 키가 내부적으로 직접 데이터로 사용되는 것을 알 수 있습니다. .
데이터를 인터페이스에 제시한 후 이에 맞게 특정 스타일이 필요합니다. index.wxss 코드는 다음과 같습니다.
/**index.wxss**/

.pages-container {
 height: 100%;
 display: flex;
 flex-direction: column;
 box-sizing: border-box;
 padding-top: 10rpx;
 padding-bottom: 10rpx;
}

.pages-title-bg {
 width: 100%;
}

.pages-wrapper {

}


.pages-row {
 width: 100%;
 display: flex;
 flex-direction: row;
 justify-content: space-around;
}

.pages-item {
 position: relative;
 padding: 10rpx;
 width: 33%;
 background-color: #fff;
 border: #ddd solid 1px;
}

.pages-icon-wrapper {
 display: flex;
 justify-content: space-around;
 align-items: center;
 margin: 10rpx;
 border-radius: 30%;
 height: 75%;
 background:#00CD0D;
}

.pages-icon-wrapper-no-bg {
 display: flex;
 justify-content: space-around;
 align-items: center;
 margin: 10rpx;
 height: 75%;
}

.pages-icon {
 width: 100rpx;
 height: 100rpx;
}

.pages-text-wrapper {
 text-align: center;
}

.pages-text {
 font-weight: bolder;
}템플릿의 navigator 요소를 사용하여 그리드를 표시하므로 각 그리드를 자연스럽게 탐색할 수 있습니다.
읽어주셔서 감사합니다. 도움이 되기를 바랍니다. 이 사이트를 지원해 주셔서 감사합니다!
WeChat 애플릿 Jiugongge 예제 코드와 관련된 더 많은 기사를 보려면 PHP 중국어 웹사이트를 주목하세요!