

Xiaoqiang의 HTML5 모바일 개발 도로(38) - jqMobi 플러그인 ActionSheet

WeChat의 공유 버튼 메뉴와 같이 액션 시트는 이제 모바일 클라이언트에서 매우 일반적입니다. 아래에서는 다음과 같이 jqMobi를 사용하여 액션 시트를 구현합니다.
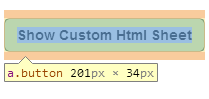
먼저 위 버튼을 마우스 오른쪽 버튼으로 클릭하고 요소 검사를 선택합니다(저는 Chrome 브라우저를 사용하고 있으며 먼저 F12를 누릅니다)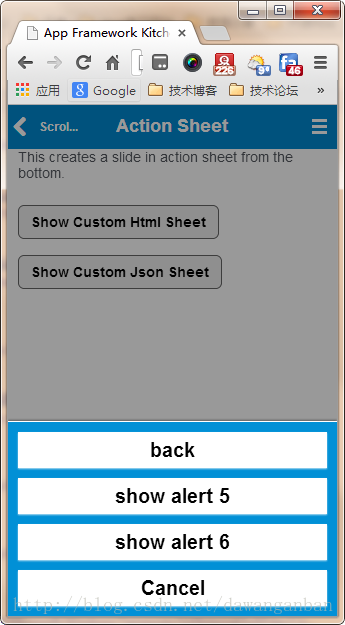
<a class="button" onclick="showCustomHtmlSheet()">Show Custom Html Sheet</a>
그런 다음 Ctrl + F를 눌러 showCustomHtmlSheet() 메서드를 찾습니다.

function showCustomHtmlSheet() {
$("#afui").actionsheet('<a >Back</a><a onclick="alert(\'hi\');" >Show Alert 3</a><a onclick="alert(\'goodbye\');">Show Alert 4</a>');
}위 그림의 마지막 취소 버튼은 시스템 기본 취소 버튼입니다.
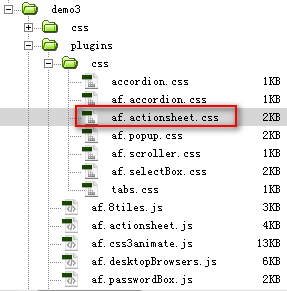
Ctrl + F를 눌러 플러그인을 찾으시면 다음 줄을 보실 수 있습니다
<link rel="stylesheet" type="text/css" href="plugins/css/af.actionsheet.css">
자, 우리 프로젝트에서 위의 효과를 달성해 보겠습니다.
먼저 af.actionsheet.css 파일을 소개합니다
jqMobi <link rel="stylesheet" type="text/css" href="plugins/css/af.actionsheet.css">
<a class="button" onclick="showCustomHtmlSheet()">Show Custom Html Sheet</a>
//底部 <script> function showCustomHtmlSheet() { $("#afui").actionsheet('<a >Back</a><a onclick="alert(\'hi\');" >Show Alert 3</a><a onclick="alert(\'goodbye\');">Show Alert 4</a>'); } </script>
에 입력하면 실행 결과는 다음과 같습니다.
위 내용은 Xiaoqiang의 HTML5 모바일 개발 로드(38) - jqMobi 플러그인 ActionSheet 내용입니다. 더 많은 관련 내용은 PHP 중국어 홈페이지(www.php.cn)를 참고해주세요! 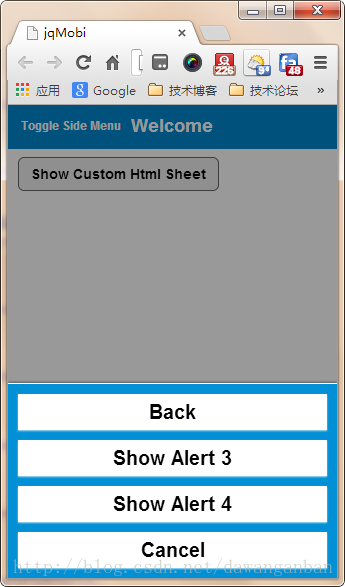

핫 AI 도구

Undresser.AI Undress
사실적인 누드 사진을 만들기 위한 AI 기반 앱

AI Clothes Remover
사진에서 옷을 제거하는 온라인 AI 도구입니다.

Undress AI Tool
무료로 이미지를 벗다

Clothoff.io
AI 옷 제거제

Video Face Swap
완전히 무료인 AI 얼굴 교환 도구를 사용하여 모든 비디오의 얼굴을 쉽게 바꾸세요!

인기 기사
뜨거운 도구

메모장++7.3.1
사용하기 쉬운 무료 코드 편집기

SublimeText3 중국어 버전
중국어 버전, 사용하기 매우 쉽습니다.

스튜디오 13.0.1 보내기
강력한 PHP 통합 개발 환경

드림위버 CS6
시각적 웹 개발 도구

SublimeText3 Mac 버전
신 수준의 코드 편집 소프트웨어(SublimeText3)


 HTML의 테이블 테두리
Sep 04, 2024 pm 04:49 PM
HTML의 테이블 테두리
Sep 04, 2024 pm 04:49 PM
HTML의 테이블 테두리 안내. 여기에서는 HTML의 테이블 테두리 예제를 사용하여 테이블 테두리를 정의하는 여러 가지 방법을 논의합니다.
 HTML의 중첩 테이블
Sep 04, 2024 pm 04:49 PM
HTML의 중첩 테이블
Sep 04, 2024 pm 04:49 PM
HTML의 Nested Table에 대한 안내입니다. 여기에서는 각 예와 함께 테이블 내에 테이블을 만드는 방법을 설명합니다.
 HTML 여백-왼쪽
Sep 04, 2024 pm 04:48 PM
HTML 여백-왼쪽
Sep 04, 2024 pm 04:48 PM
HTML 여백-왼쪽 안내. 여기에서는 HTML margin-left에 대한 간략한 개요와 코드 구현과 함께 예제를 논의합니다.
 HTML 테이블 레이아웃
Sep 04, 2024 pm 04:54 PM
HTML 테이블 레이아웃
Sep 04, 2024 pm 04:54 PM
HTML 테이블 레이아웃 안내. 여기에서는 HTML 테이블 레이아웃의 값에 대해 예제 및 출력 n 세부 사항과 함께 논의합니다.
 HTML 입력 자리 표시자
Sep 04, 2024 pm 04:54 PM
HTML 입력 자리 표시자
Sep 04, 2024 pm 04:54 PM
HTML 입력 자리 표시자 안내. 여기서는 코드 및 출력과 함께 HTML 입력 자리 표시자의 예를 논의합니다.
 HTML 정렬 목록
Sep 04, 2024 pm 04:43 PM
HTML 정렬 목록
Sep 04, 2024 pm 04:43 PM
HTML 순서 목록에 대한 안내입니다. 여기서는 HTML Ordered 목록 및 유형에 대한 소개와 각각의 예에 대해서도 설명합니다.
 HTML 온클릭 버튼
Sep 04, 2024 pm 04:49 PM
HTML 온클릭 버튼
Sep 04, 2024 pm 04:49 PM
HTML onclick 버튼에 대한 안내입니다. 여기에서는 각각의 소개, 작업, 예제 및 다양한 이벤트의 onclick 이벤트에 대해 설명합니다.
 HTML에서 텍스트 이동
Sep 04, 2024 pm 04:45 PM
HTML에서 텍스트 이동
Sep 04, 2024 pm 04:45 PM
HTML에서 텍스트 이동 안내. 여기서는 Marquee 태그가 구문과 함께 작동하는 방식과 구현할 예제에 대해 소개합니다.
