HTML로 사진 앨범 만들기
本文主要讲述采用Html5+jQuery+CSS 制作相册的小小记录。
主要功能点:
Html5进行布局
调用jQuery(借用官网的一句话:The Write Less, Do More)极大的简化了JavaScript编程
CSS 样式将表现与内容分离
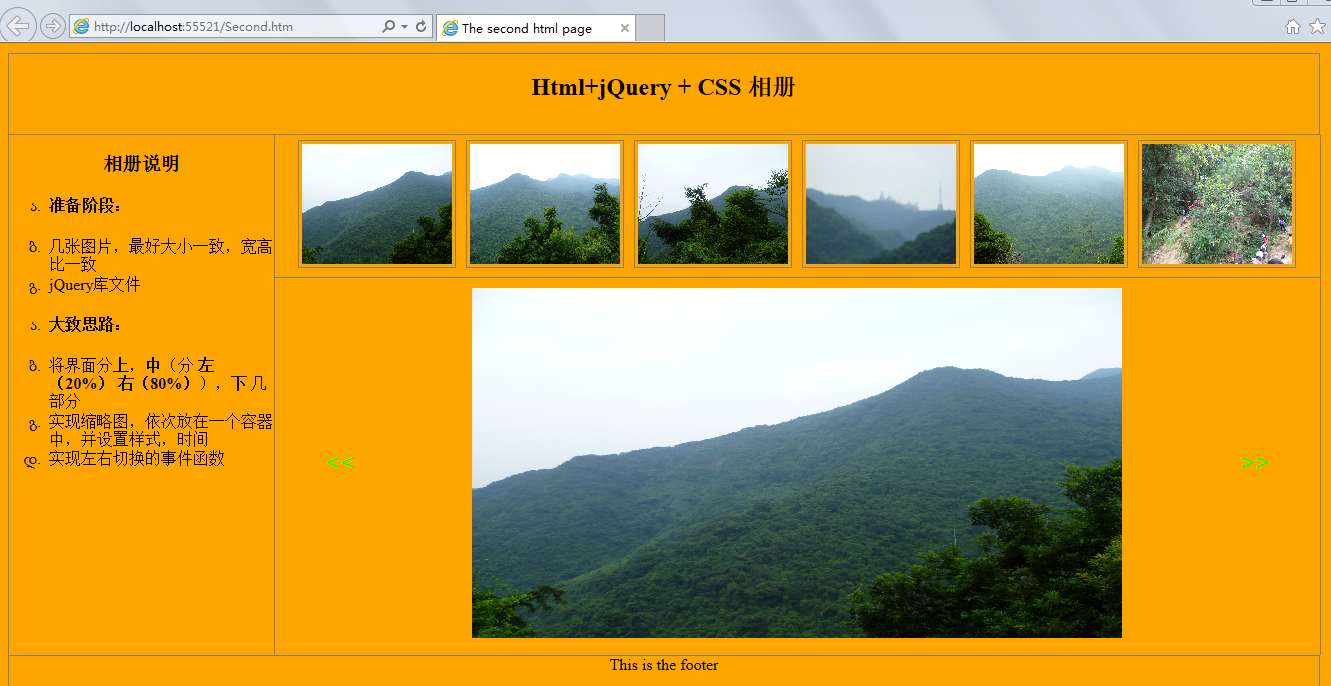
话不多说,先上效果图:

代码如下:
<!DOCTYPE html>
<html>
<head>
    <title>The second html page</title>
    <style type="text/css">
         ul li
        {
            list-style-type:georgian;
            text-align:left;
         }
         body
         {
           margin:10px;
           text-align:center;
           background-color:Orange;
          }
           header
        {
            height:80px;
            border:1px solid gray;
            width:99%
        }
         .left
        {
            border:1px solid gray;
            float:left;
            width:20%;
            height:520px;
            margin:0px;
            border-top-style:none;
            border-bottom-style:none;
            /*设置边框样式*/
        }
        .main
        {
            width:79%;
            float:left;
            height:520px;
            /*border:1px solid gray;*/
            border-right:1px solid gray;
            margin:0px;
            position:relative;/*设置成相对*/
        }
         footer
        {
            clear:left;
            height:60px;
            border:1px solid gray;
            width:99%
        }
        #container
        {
            display:block;
            padding:5px;
           /* border:1px solid gray;*/
            margin:5px;
            position:relative;
         }
         .small
         {
             display:block;
             border-bottom:1px solid gray;/*将缩略图,和大图隔开*/
         }
         .small img
         {
             width:150px;
             height:120px;
             margin:5px;
             border:1px solid gray;
             padding:3px;
         }
         .mm
         {
             cursor:pointer;
             border-radius:5px;/*鼠标移入样式*/

          }
         input[type="button"]
         {
             cursor:pointer;
             background-color:Orange;
             color:Lime;
             font-family:Arial;
             font-size:25px;
             height:50px;
             border:0px;
             width:50px;
             position:relative;
             top:150px;
          }
          #btnLeft
          {
           left:30px;
           float:left;
          }
           #btnRight
          {
           right:30px;
           float:right;
          }
    </style>
    <script type="text/javascript" src="js/jquery-3.1.1.min.js"></script>
    <script type="text/javascript">
        $(document).ready(function () {
            //初始加载六张图片作为缩略图
            for (var i = 0; i < 6; i++) {
                var src = "img/" + "0" + (i + 1).toString() + ".jpg";
                var img = $("<img />").attr("id", (i + 1).toString()).attr("alt", (i + 1).toString()).attr("src", src);
                $("#small").append(img);
            }
            //设置缩略图的点击事件,以及鼠标移入,移出事件
            $("#small img").click(function () {
                $("#img").css("display", "none");
                var src = $(this).attr("src");
                var alt = $(this).attr("alt");
                var nAlt = parseInt(alt);
                $("#img").attr("alt", nAlt).attr("src", src).fadeIn(delay);
            }).mouseover(function () {
                $(this).addClass("mm");
            }).mouseleave(function () {
                $(this).removeClass("mm");
            });
            var delay = 1000;
            //向左切换事件
            $("#btnLeft").click(function () {
                $("#img").css("display", "none");
                var alt = $("#img").attr("alt");
                if (alt == "1") {
                    alt = 7;
                }
                var nAlt = parseInt(alt) - 1;
                var src = "img/" + "0" + nAlt.toString() + ".jpg";
                $("#img").attr("alt", nAlt).attr("src", src).fadeIn(delay);
            });
            //向右切换事件
            $("#btnRight").click(function () {
                $("#img").css("display", "none");
                var alt = $("#img").attr("alt");
                if (alt == "6") {
                    alt = 0;
                }
                var nAlt = parseInt(alt) + 1;
                var src = "img/" + "0" + nAlt.toString() + ".jpg";
                $("#img").attr("alt", nAlt).attr("src", src).fadeIn(delay);
            });
        });
    </script>
</head>
<body>
<header>
<h2>Html+jQuery + CSS 相册</h2>
</header>
<aside class="left">
<h3>相册说明</h3>
   <ul>
        <li><h4>准备阶段:</h4></li>
        <li>几张图片,最好大小一致,宽高比一致</li>
        <li>jQuery库文件</li>
    </ul>
    <ul>
        <li><h4>大致思路:</h4></li>
        <li>将界面分<b>上</b>,<b>中</b>(分 <b>左(20%)</b> <b>右(80%)</b>),<b>下</b> 几部分</li>
        <li>实现缩略图,依次放在一个容器中,并设置样式,时间</li>
        <li>实现左右切换的事件函数</li>
    </ul>
</aside>
<section class="main">
    <div class="small" id="small">

    </div>
    <div id="container">
        <input type="button" id="btnLeft" value="<<" />
        <img id="img" alt="1" src="img/01.jpg" width="650" height="350" />
        <input type="button" id="btnRight" value=">>" />
    </div>
</section>
<footer>
    <div>This is the footer</div>
</footer>
</body>
</html>更多Html 制作相册相关文章请关注PHP中文网!

핫 AI 도구

Undresser.AI Undress
사실적인 누드 사진을 만들기 위한 AI 기반 앱

AI Clothes Remover
사진에서 옷을 제거하는 온라인 AI 도구입니다.

Undress AI Tool
무료로 이미지를 벗다

Clothoff.io
AI 옷 제거제

AI Hentai Generator
AI Hentai를 무료로 생성하십시오.

인기 기사

뜨거운 도구

메모장++7.3.1
사용하기 쉬운 무료 코드 편집기

SublimeText3 중국어 버전
중국어 버전, 사용하기 매우 쉽습니다.

스튜디오 13.0.1 보내기
강력한 PHP 통합 개발 환경

드림위버 CS6
시각적 웹 개발 도구

SublimeText3 Mac 버전
신 수준의 코드 편집 소프트웨어(SublimeText3)

뜨거운 주제
 7529
7529
 15
15
 1378
1378
 52
52
 81
81
 11
11
 54
54
 19
19
 21
21
 76
76
 HTML의 테이블 테두리
Sep 04, 2024 pm 04:49 PM
HTML의 테이블 테두리 안내. 여기에서는 HTML의 테이블 테두리 예제를 사용하여 테이블 테두리를 정의하는 여러 가지 방법을 논의합니다.
 HTML 여백-왼쪽
Sep 04, 2024 pm 04:48 PM
HTML 여백-왼쪽 안내. 여기에서는 HTML margin-left에 대한 간략한 개요와 코드 구현과 함께 예제를 논의합니다.
 HTML의 중첩 테이블
Sep 04, 2024 pm 04:49 PM
HTML의 Nested Table에 대한 안내입니다. 여기에서는 각 예와 함께 테이블 내에 테이블을 만드는 방법을 설명합니다.
 HTML 테이블 레이아웃
Sep 04, 2024 pm 04:54 PM
HTML 테이블 레이아웃 안내. 여기에서는 HTML 테이블 레이아웃의 값에 대해 예제 및 출력 n 세부 사항과 함께 논의합니다.
 HTML 입력 자리 표시자
Sep 04, 2024 pm 04:54 PM
HTML 입력 자리 표시자 안내. 여기서는 코드 및 출력과 함께 HTML 입력 자리 표시자의 예를 논의합니다.
 HTML 정렬 목록
Sep 04, 2024 pm 04:43 PM
HTML 순서 목록에 대한 안내입니다. 여기서는 HTML Ordered 목록 및 유형에 대한 소개와 각각의 예에 대해서도 설명합니다.
 HTML에서 텍스트 이동
Sep 04, 2024 pm 04:45 PM
HTML에서 텍스트 이동 안내. 여기서는 Marquee 태그가 구문과 함께 작동하는 방식과 구현할 예제에 대해 소개합니다.
 HTML 온클릭 버튼
Sep 04, 2024 pm 04:49 PM
HTML onclick 버튼에 대한 안내입니다. 여기에서는 각각의 소개, 작업, 예제 및 다양한 이벤트의 onclick 이벤트에 대해 설명합니다.


