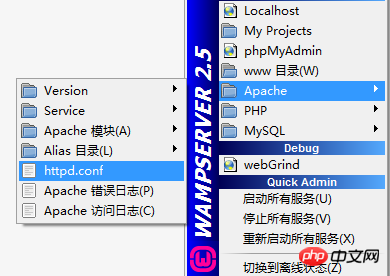
머리말: WAMP를 사용할 때 종종 사용자 정의 구성이 필요합니다.
아래와 같이 httpd.conf 파일을 엽니다. 
Document루트(두 곳)를 찾아 다음과 같이 수정합니다.
#demo为自定义网站目录,下面不再说明DocumentRoot "f:/demo"<Directory "F:/demo">
구성 서비스를 다시 시작합니다.
테스트: 브라우저를 열고 localhost/test.php를 입력합니다. (test.php는 데모 디렉터리에 새로 생성된 테스트 파일입니다.)
수정 wamp 설치 디렉터리 wampmanager.ini 파일:
[Menu.Left]......
Type: item; Caption: "www 目录"; Action: shellexecute; FileName: "F:/wamp/www"; Glyph: 2替换为:
Type: item; Caption: "demo 目录"; Action: shellexecute; FileName: "F:/demo"; Glyph: 2......
그런 다음 wamp 설치 디렉터리에서 wampmanager.tpl 파일을 수정합니다.
[Menu.Left]......
Type: item; Caption: "${w_wwwDirectory}"; Action: shellexecute; FileName: "${wwwDir}"; Glyph: 2替换为:
Type: item; Caption: "${demo 目录}"; Action: shellexecute; FileName: "${F:/demo}"; Glyph: 2......구성 서비스를 다시 시작합니다.
wamp 설치 디렉터리에서 binapacheapache2.4.9confextrahttpd-vhosts.conf 파일을 엽니다. (가상 디렉터리 구성 파일)
다음 코드 추가:
//添加站点,test01和test02目录下放置网站文件<VirtualHost *:80>
    ServerAdmin webmaster@dummy-host2.example.com //邮箱地址,可不写
    DocumentRoot "f:/demo/test01" //网站文件目录
    ServerName test01.com //主机名
    ErrorLog "logs/dummy-host2.example.com-error.log" //错误日志,可不写
    CustomLog "logs/dummy-host2.example.com-access.log" common //日常日志,可不写</VirtualHost>

<VirtualHost *:80>
    ServerAdmin webmaster@dummy-host2.example.com //邮箱地址,可不写
    DocumentRoot "f:/demo/test02" //网站文件目录
    ServerName test02.com //主机名
    ErrorLog "logs/dummy-host2.example.com-error.log" //错误日志,可不写
CustomLog "logs/dummy-host2.example.com-access.log" common //日常日志,可不写</VirtualHost>위와 같이 httpd.conf 파일을 다시 열고 다음과 같이 수정합니다.
# Virtual hosts#Include conf/extra/httpd-vhosts.conf替换为# Virtual hostsInclude conf/extra/httpd-vhosts.conf
//有些版本没有,则不用修改Deny from all
Allow from 127.0.0.1替换为:
Allow from all#Allow from 127.0.0.1
서비스 다시 시작
C:WindowsSystem32driversetchosts를 열고 다음을 추가합니다.
//添加站点127.0.0.1 test01.com127.0.0.1 test02.com
테스트: 브라우저를 열고 test01.com 및 test02.com을 입력합니다. (이 두 디렉터리에 미리 테스트 파일을 작성해 주어야 합니다.)
apache의 기본 포트는 80입니다. 사용 중인 경우 포트 번호를 수정해야 합니다.
위와 같이 httpd.conf 파일을 열고 다음과 같이 수정합니다.
Listen 80替换为:Listen 8080(或改成其它未被占用端口号)
서비스를 다시 시작합니다.
테스트: localhost:8080/test.php (앞서 만든 테스트 파일은 데모 디렉터리에 있습니다).
위 내용은 WAMP 공통환경 구성 예시코드 9 상세 소개(그림)의 상세 내용입니다. 자세한 내용은 PHP 중국어 웹사이트의 기타 관련 기사를 참조하세요!