문자 메시지 전송을 위한 Android 소형 프로그램 샘플 코드
이 글에서는 안드로이드 개발 과정에서 문자 메시지를 보내는 작은 프로그램의 예를 주로 소개합니다. 또한 방송 수신자를 모니터링하는 문자 메시지 보내기의 예도 함께 제공됩니다. 필요하신 분은 참고하시면 됩니다

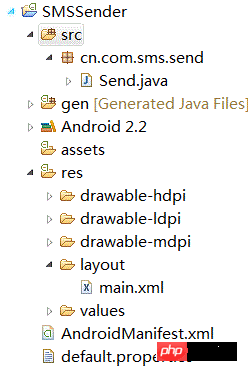
위 그림은 코드 구조도 입니다.
이제 구체적인 코드를 살펴보겠습니다.
Send.java
package cn.com.sms.send;

import java.util.ArrayList;
import java.util.Iterator;

import android.app.Activity;
import android.app.PendingIntent;
import android.content.Intent;
import android.os.Bundle;
import android.telephony.SmsManager;
import android.util.Log;
import android.view.View;
import android.widget.Button;
import android.widget.EditText;
import android.widget.Toast;

public class Send extends Activity {
  private String message;
  private String number ;
  private EditText editText;
  private EditText editText2;
  @Override
  public void onCreate(Bundle savedInstanceState) {
    super.onCreate(savedInstanceState);
    setContentView(R.layout.main);
     editText = (EditText) this.findViewById(R.id.number);
     editText2 = (EditText)this.findViewById(R.id.message);

    Button button = (Button)this.findViewById(R.id.button);
    button.setOnClickListener(new View.OnClickListener() {

      public void onClick(View v) {
         number = editText.getText().toString();
         message = editText2.getText().toString();
         // 在LogCat中可以查看到number和message的相关信息
         Log.i("number", number);
         Log.i("message", message);
         /*获取系统默认的信息管理器,一定要注意的是SmsManager是android.telephony.SmsManager;这和
         *我们使用的版本有关,在 Android 2.0 以前 应该使用 android.telephony.gsm.SmsManager
         *Android 2.0 之后的版本应该用 android.telephony.SmsManager。
         */
        SmsManager smsManager = SmsManager.getDefault();
        /*PendingIntent.getBroadcast返回一个用于广播的PendingIntent对象,类似于调用Content.sendBroadcast();
         */
        PendingIntent paIntent = PendingIntent.getBroadcast(Send.this, 0, new Intent("SMS_SENT"), 0);
        PendingIntent deliveryIntent = PendingIntent.getBroadcast(Send.this, 0, new Intent("SMS_DELIVERED"), 0);
        // smsManager.pideMessage有些时候短信如果超过了字数,我们就需要这个方法来帮我们拆分短信内容。
        ArrayList<String> smses = smsManager.pideMessage(message);
        Iterator<String> iterator = smses.iterator();
        while(iterator.hasNext()){
          String temp = iterator.next();
          //发送短信
          smsManager.sendTextMessage(number, null, temp, paIntent, deliveryIntent);
        }
        // 弹出一个浮动框显示提示内容,Toast.LENGTH_LONG代表浮动框显示时间的长短
        Toast.makeText(Send.this, "短信发送完成", Toast.LENGTH_LONG).show();


      }
    });

  }
}
main.xml
<?xml version="1.0" encoding="utf-8"?>
<LinearLayout xmlns:android="http://schemas.android.com/apk/res/android"
  android:orientation="vertical"
  android:layout_width="fill_parent"
  android:layout_height="fill_parent"
  >
<TextView
  android:layout_width="fill_parent"
  android:layout_height="wrap_content"
  android:text="欢迎使用短信发送器,请输入电话号码"
  />
 <EditText
  android:id="@+id/number"
  android:layout_width="fill_parent"
  android:layout_height="wrap_content"
  android:hint="这里输入电话号码"
 />
 <TextView
 android:layout_width="fill_parent"
  android:layout_height="wrap_content"
  android:text="欢迎使用短信发送器,请输入短信内容"
 />
 <EditText
  android:id="@+id/message"
  android:layout_width="fill_parent"
  android:layout_height="wrap_content"
  android:minLines="3"
  android:hint="这里输入短信内容"
 />
 <Button
  android:id="@+id/button"
  android:layout_width="wrap_content"
  android:layout_height="wrap_content"
  android:text="send"
 />
</LinearLayout>
AndroidManifest.xml
<?xml version="1.0" encoding="utf-8"?>
<manifest xmlns:android="http://schemas.android.com/apk/res/android"
   package="cn.com.sms.send"
   android:versionCode="1"
   android:versionName="1.0">
  <uses-sdk android:minSdkVersion="8" />
  <uses-permission android:name="android.permission.SEND_SMS"></uses-permission>

  <application android:icon="@drawable/icon" android:label="@string/app_name">
    <activity android:name=".Send"
         android:label="@string/app_name">
      <intent-filter>
        <action android:name="android.intent.action.MAIN" />
        <category android:name="android.intent.category.LAUNCHER" />
      </intent-filter>
    </activity>

  </application>
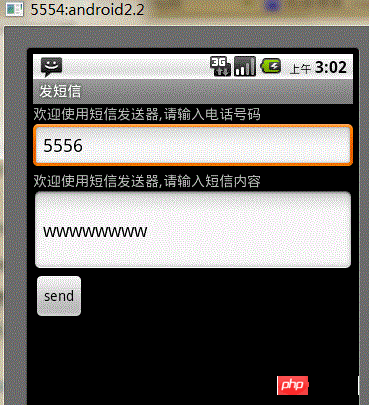
</manifest>최종 렌더링은

전화 통화 애플릿과 유사하게 기능 테스트를 위해 여기에서 두 개의 AVD를 열어야 합니다.
생각:
문자 메시지 애플리케이션의 주요 클래스는 SmsManager입니다. Android 2.0 이전에는 android.telephony.gsm.SmsManager
를 사용한 다음 android.telephony.SmsManager를 사용해야 합니다.
SmsManager smsManager = SmsManager.getDefault();
는 시스템을 얻는다는 의미입니다. 기본 정보 관리자
<<> SMSMANAGER.SENDTEXTEXTMESSAGE (DestinationAddress, SCADDDRESS, Text, SENTINTENT, DELIVERYINTENT) ddress: 서비스 제공업체의 SMS 센터 번호(예: China Mobile의 SMS 센터 번호), 필요하지 않습니다. 시험 중에 채워 넣으세요.
-- 텍스트: 短信内容
상태
~ --> 후속 처리: 이 의도는 상대방이 SMS를 수신했는지 여부에 대한 상태 정보를 패키지합니다. 공급자가 성공적으로 보냈으나 상대방이 이를 받지 못했습니다.)
public
static PendingIntent getBroadcast(Context context, int requestCode, Intentintent, int flags)
Context.sendBroadcast( ) 호출과 유사하게 브로드캐스트용 PendingIntent를 반환합니다.함수
requestCode는 당분간 사용되지 않습니다intent는 방송에 사용되는 의도입니다플래그에는 FLAG_ONE_SHOT, FLAG_NO_CREATE, FLAG_CANCEL_
CURRENT
, FLAG_UP
이 포함됩니다. DATE_CURRENT는 새로 생성된 PendingIntent를 한 번만 사용하도록 설정하고, 없으면 생성하지 않고, 현재 업데이트현재속성을 취소하는 데 사용됩니다. 또한 AndroidManifest.xml에서 SMS 전송 권한을 선언해야 합니다.
SmsManager smsMgr = SmsManager.getDefault();
smsMgr.sendTextMessage(address, null, message, null, null);
문자 메시지 작성 인터페이스 표시:
Uri smsToUri = Uri.parse("smsto://10086");
Intent mIntent = new Intent( android.content.Intent.ACTION_SENDTO, smsToUri );
startActivity( mIntent );
이메일 보내기:
Intent i = new Intent(Intent.ACTION_SEND);
i.putExtra(Intent.EXTRA_EMAIL, address);
i.putExtra(Intent.EXTRA_SUBJECT, filename);
i.putExtra(Intent.EXTRA_STREAM, Uri.parse("file://" + filename)); ;
i.setType("text/csv");
startActivity(Intent.createChooser(i, "EMail File"));
업그레이드 버전:
이 코드는 다음에 브로드캐스트를 추가합니다. 그것은 수신기 모니터링입니다. 자세한 코드는 다음과 같습니다.
package cn.com.sms.send;

import java.util.ArrayList;
import java.util.Iterator;

import android.app.Activity;
import android.app.PendingIntent;
import android.content.BroadcastReceiver;
import android.content.Context;
import android.content.Intent;
import android.content.IntentFilter;
import android.os.Bundle;
import android.telephony.SmsManager;
import android.util.Log;
import android.view.View;
import android.widget.Button;
import android.widget.EditText;
import android.widget.Toast;

public class Send extends Activity {
  private String message;
  private String number ;
  private EditText editText;
  private EditText editText2;
  @Override
  public void onCreate(Bundle savedInstanceState) {
    super.onCreate(savedInstanceState);
    setContentView(R.layout.main);
     editText = (EditText) this.findViewById(R.id.number);
     editText2 = (EditText)this.findViewById(R.id.message);

    Button button = (Button)this.findViewById(R.id.button);
    button.setOnClickListener(new View.OnClickListener() {

      public void onClick(View v) {
         number = editText.getText().toString();
         message = editText2.getText().toString();
         // 在LogCat中可以查看到number和message的相关信息
         Log.i("number", number);
         Log.i("message", message);
         /*获取系统默认的信息管理器,一定要注意的是SmsManager是android.telephony.SmsManager;这和
         *我们使用的版本有关,在 Android 2.0 以前 应该使用 android.telephony.gsm.SmsManager
         *Android 2.0 之后的版本应该用 android.telephony.SmsManager。
         */
        SmsManager smsManager = SmsManager.getDefault();
        /*PendingIntent.getBroadcast返回一个用于广播的PendingIntent对象,类似于调用Content.sendBroadcast();
         */
        PendingIntent paIntent = PendingIntent.getBroadcast(Send.this, 0, new Intent("SMS_SENT2"), 0);
        PendingIntent deliveryIntent = PendingIntent.getBroadcast(Send.this, 0, new Intent("SMS_DELIVERED2"), 0);

        // 注册一个BroadcastReceiver,当有匹配它的IntentFilter的Intent出现时,该方法会被触发
        registerReceiver(new BroadcastReceiver(){

          @Override
          public void onReceive(Context context, Intent intent) {
            int resultCode = getResultCode();
            switch(resultCode){
            case Activity.RESULT_OK:
              Toast.makeText(getBaseContext(), "信息发送成功了哦、", Toast.LENGTH_LONG).show();
              break;
            default:
              Toast.makeText(getBaseContext(), "信息发送失败了哦、", Toast.LENGTH_LONG).show();

            }
          }


        }, new IntentFilter("SMS_SENT2"));


        registerReceiver(new BroadcastReceiver() {

          @Override
          public void onReceive(Context context, Intent intent) {
            Toast.makeText(getBaseContext(), "deliveryIntent", Toast.LENGTH_LONG).show();
            Log.i("短信接收人是否查看信息", "看了");
          }
        }, new IntentFilter("SMS_DELIVERED2"));


        // smsManager.pideMessage有些时候短信如果超过了字数,我们就需要这个方法来帮我们拆分短信内容。
        ArrayList<String> smses = smsManager.pideMessage(message);
        Iterator<String> iterator = smses.iterator();
        while(iterator.hasNext()){
          String temp = iterator.next();
          //发送短信
          smsManager.sendTextMessage(number, null, temp, paIntent, deliveryIntent);
        }
        // 弹出一个浮动框显示提示内容,Toast.LENGTH_LONG代表浮动框显示时间的长短
        Toast.makeText(Send.this, "短信发送完成", Toast.LENGTH_LONG).show();


      }
    });

  }
}main.xml은 AndroidManifest.xml과 이전 코드와 동일합니다.
쿼리
하면 수신기에 이를 학습시키고 처리하도록 합니다. 일반적으로 onReceive() 메소드에서 처리됩니다.如果不是在代码中主动通过registerReceiver()进行注册,那么就要从AndroidManifest.xml进行配置,代码如下
<receiver android:name="类名">
<intent-filter>
<action android:name="接收者中Intent参数的action属性" />
</intent-filter>
</receiver>
这里需要注意,在配置文件中activity标签和receiver标签是平级的。
在模拟器中发送中文会接收方出现乱码的问题,但是在真机中,就不会出现乱码的情况了。所以开发者只需要正常开发短信功能,不需要编码转换。
위 내용은 문자 메시지 전송을 위한 Android 소형 프로그램 샘플 코드의 상세 내용입니다. 자세한 내용은 PHP 중국어 웹사이트의 기타 관련 기사를 참조하세요!

핫 AI 도구

Undresser.AI Undress
사실적인 누드 사진을 만들기 위한 AI 기반 앱

AI Clothes Remover
사진에서 옷을 제거하는 온라인 AI 도구입니다.

Undress AI Tool
무료로 이미지를 벗다

Clothoff.io
AI 옷 제거제

AI Hentai Generator
AI Hentai를 무료로 생성하십시오.

인기 기사

뜨거운 도구

메모장++7.3.1
사용하기 쉬운 무료 코드 편집기

SublimeText3 중국어 버전
중국어 버전, 사용하기 매우 쉽습니다.

스튜디오 13.0.1 보내기
강력한 PHP 통합 개발 환경

드림위버 CS6
시각적 웹 개발 도구

SublimeText3 Mac 버전
신 수준의 코드 편집 소프트웨어(SublimeText3)

뜨거운 주제
 7518
7518
 15
15
 1378
1378
 52
52
 81
81
 11
11
 53
53
 19
19
 21
21
 68
68
 새로운 보고서는 소문난 삼성 갤럭시 S25, 갤럭시 S25 플러스, 갤럭시 S25 울트라 카메라 업그레이드에 대한 비판적인 평가를 제공합니다.
Sep 12, 2024 pm 12:23 PM
최근 아이스 유니버스는 삼성의 차기 플래그십 스마트폰으로 널리 알려진 갤럭시 S25 울트라에 대한 세부 정보를 꾸준히 공개해 왔습니다. 무엇보다도 유출자는 삼성이 카메라 업그레이드를 하나만 가져올 계획이라고 주장했습니다.
 삼성 갤럭시 S25 울트라, 디자인 변경 루머가 공개된 첫 번째 렌더링 이미지 유출
Sep 11, 2024 am 06:37 AM
OnLeaks는 이제 Android Headlines와 제휴하여 X(이전 Twitter) 팔로어로부터 4,000달러 이상의 수익을 창출하려는 시도가 실패한 지 며칠 후 Galaxy S25 Ultra에 대한 첫 번째 모습을 제공합니다. 맥락에 따라 h 아래에 포함된 렌더링 이미지
 IFA 2024 | TCL의 NXTPAPER 14는 성능 면에서는 Galaxy Tab S10 Ultra와 일치하지 않지만 크기에서는 거의 일치합니다.
Sep 07, 2024 am 06:35 AM
TCL은 두 가지 새로운 스마트폰을 발표하는 것과 함께 NXTPAPER 14라는 새로운 Android 태블릿도 발표했는데, TCL의 거대한 화면 크기는 판매 포인트 중 하나입니다. NXTPAPER 14는 TCL의 시그니처 브랜드인 무광택 LCD 패널 버전 3.0을 갖추고 있습니다.
 Samsung Galaxy S24 FE는 4가지 색상과 2가지 메모리 옵션으로 예상보다 낮은 가격으로 출시될 예정
Sep 12, 2024 pm 09:21 PM
삼성전자는 팬에디션(FE) 스마트폰 시리즈를 언제 업데이트할지 아직 힌트를 주지 않았다. 현재 상태로 Galaxy S23 FE는 2023년 10월 초에 출시된 회사의 최신 버전으로 남아 있습니다.
 Vivo Y300 Pro는 7.69mm의 슬림한 본체에 6,500mAh 배터리를 탑재했습니다.
Sep 07, 2024 am 06:39 AM
Vivo Y300 Pro는 방금 완전히 공개되었으며 대용량 배터리를 갖춘 가장 얇은 중급 Android 휴대폰 중 하나입니다. 정확히 말하면 스마트폰의 두께는 7.69mm에 불과하지만 배터리 용량은 6,500mAh입니다. 최근 출시된 것과 동일한 용량이다.
 새로운 보고서는 소문난 삼성 갤럭시 S25, 갤럭시 S25 플러스, 갤럭시 S25 울트라 카메라 업그레이드에 대한 비판적인 평가를 제공합니다.
Sep 12, 2024 pm 12:22 PM
최근 아이스 유니버스는 삼성의 차기 플래그십 스마트폰으로 널리 알려진 갤럭시 S25 울트라에 대한 세부 정보를 꾸준히 공개해 왔습니다. 무엇보다도 유출자는 삼성이 카메라 업그레이드를 하나만 가져올 계획이라고 주장했습니다.
 Xiaomi Redmi Note 14 Pro Plus는 Light Hunter 800 카메라를 탑재한 최초의 Qualcomm Snapdragon 7s Gen 3 스마트폰으로 출시됩니다.
Sep 27, 2024 am 06:23 AM
Redmi Note 14 Pro Plus는 이제 작년 Redmi Note 13 Pro Plus(Amazon에서 현재 $375)의 직접적인 후속 제품으로 공식화되었습니다. 예상대로 Redmi Note 14 Pro Plus는 Redmi Note 14 및 Redmi Note 14 Pro와 함께 Redmi Note 14 시리즈를 주도합니다. 리
 iQOO Z9 Turbo Plus: 잠재적으로 강화된 시리즈 플래그십에 대한 예약 시작
Sep 10, 2024 am 06:45 AM
OnePlus의 자매 브랜드 iQOO는 2023-4년 제품 주기가 거의 끝날 수 있습니다. 그럼에도 불구하고 브랜드는 Z9 시리즈가 아직 끝나지 않았다고 선언했습니다. 최종이자 아마도 최고급인 Turbo+ 변형이 예상대로 발표되었습니다. 티


