

HTML5 Canvas 고급 코드의 자세한 코드 설명(그림)

BeginPath() - 새 경로 시작
closePath() - 마지막 줄의 끝점을 초기 좌표와 연결하는 선을 그려 기존 경로를 닫으려고 합니다.
fill() - 설명된 모양;
isPointInPath(x,y) - 지정된 점이 현재 경로에 설명된 모양 내에 있으면 true를 반환합니다. > lineTo(x,y) - 지정된 좌표에 하위 경로를 그립니다.
moveTo(x,y) - 하위 경로를 그리지 않고 지정된 좌표로 이동합니다. 🎜>
ret(x,y,w,h)——왼쪽 상단 모서리가 (x,y)이고 너비가 w이고 높이가 h인 직사각형을 그립니다.
스트로크()——하위 경로에 설명된 모양의 윤곽선을 그립니다.
<style type="text/css">
        canvas{
            border:thin solid black;
            margin: 4px;
        }
        body > *{
            float: left;
        }
</style><canvas id="canvas1" width="500" height="140">
您的浏览器不支持<code>canvas</code>!
</canvas> <script>
//由直线创建路径
var ctx=document.getElementById("canvas1").getContext("2d");
ctx.fillStyle="#136455";
ctx.strokeStyle="blue";
ctx.lineWidth=4;
ctx.beginPath();
ctx.moveTo(10,10);
ctx.lineTo(110,10);
ctx.lineTo(110,120);
ctx.closePath();
ctx.fill();
ctx.beginPath();
ctx.moveTo(150,10);
ctx.lineTo(200,10);
ctx.lineTo(200,120);
ctx.lineTo(190,120);
ctx.fill();
ctx.stroke();
ctx.beginPath();
ctx.moveTo(250,10);
ctx.lineTo(250,120);
ctx.stroke();
</script>lineCap - 선이나 닫힌 도형을 그릴 때 선 끝의 스타일을 설정합니다. 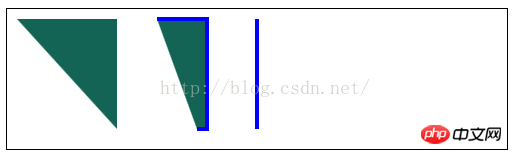
    <canvas id="canvas2" width="500" height="140">
        您的浏览器不支持<code>canvas</code>!
</canvas> <script>
//设置lineCap属性
var ctx2=document.getElementById("canvas2").getContext("2d");
ctx2.strokeStyle="red";
ctx2.lineWidth=2;
ctx2.beginPath();
ctx2.moveTo(0,50);
ctx2.lineTo(200,50);
ctx2.stroke();
ctx2.strokeStyle="black";
ctx2.lineWidth=40;
var xpos=50;
var styles=["butt","round","square"];
for(var i=0;i<styles.length;i++){
ctx2.beginPath();
ctx2.lineCap=styles[i];
ctx2.moveTo(xpos,50);
ctx2.lineTo(xpos,150);
ctx2.stroke();
xpos+=50;
}
</script> <canvas id="canvas3" width="500" height="140">
您的浏览器不支持<code>canvas</code>!
</canvas>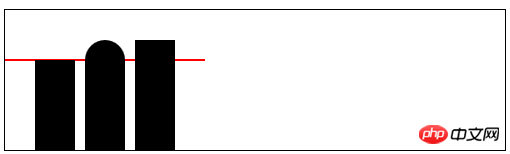 2) 호 그리기:
arc(x,y,rad,startAngle,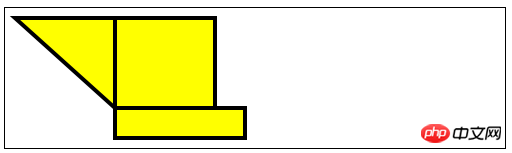 end
end
각도,
)——호를 (x, y)로 그리고 반경은 rad이고 시작 각도는 startAngle이고 끝 각도는 endAngle입니다. 선택적 매개변수 direction은 호의 방향을 지정합니다 ; arcTo(x1,y1,x2,y2,rad)——Draw (x1, y1)을 통과하고 (x2, y2)에서 끝나는 반경 rad의 호
    <script>
        //用Rect方法绘制矩形
        var ctx3=document.getElementById("canvas3").getContext("2d");
        ctx3.fillStyle="yellow";
        ctx3.strokeStyle="black";
        ctx3.lineWidth=4;

        ctx3.beginPath();
        ctx3.moveTo(110,10);
        ctx3.lineTo(110,100);
        ctx3.lineTo(10,10);
        ctx3.closePath();

        ctx3.rect(110,10,100,90);
        ctx3.rect(110,100,130,30);
        ctx3.fill();
        ctx3.stroke();
</script> <canvas id="canvas4" width="500" height="140">
您的浏览器不支持<code>canvas</code>!
</canvas>
    <script>
        //使用arcTo方法
        var ctx4=document.getElementById("canvas4").getContext("2d");
        var point1=[100,10];
        var point2=[200,10];
        var point3=[200,110];

        ctx4.fillStyle="yellow";
        ctx4.strokeStyle="black";
        ctx4.lineWidth=4;

        ctx4.beginPath();
        ctx4.moveTo(point1[0],point1[1]);
        ctx4.arcTo(point2[0],point2[1],point3[0],point3[1],100);
        ctx4.stroke();

        drawPoint(point1[0],point1[1]);
        drawPoint(point2[0],point2[1]);
        drawPoint(point3[0],point3[1]);

        ctx4.beginPath();
        ctx4.moveTo(point1[0],point1[1]);
        ctx4.lineTo(point2[0],point2[1]);
        ctx4.lineTo(point3[0],point3[1]);
        ctx4.stroke();

        function drawPoint(x,y){
            ctx4.lineWidth=1;
            ctx4.strokeStyle="red";
            ctx4.strokeRect(x-2,y-2,4,4);
        }
</script> <canvas id="canvas5" width="500" height="140">
您的浏览器不支持<code>canvas</code>!
</canvas>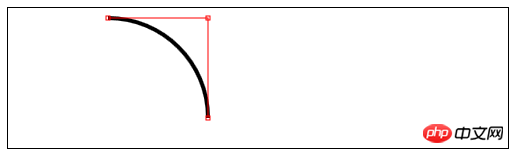
    <script>
        //响应鼠标移动绘制圆弧
        var canvasElem = document.getElementById("canvas5");
        var ctx5 = canvasElem.getContext("2d");

        var point1 = [100, 10];
        var point2 = [200, 10];
        var point3 = [200, 110];

        draw();

        canvasElem.onmousemove = function (e) {
            if (e.ctrlKey) {
                point1 = [e.clientX, e.clientY];
            } else if(e.shiftKey) {
                point2 = [e.clientX, e.clientY];
            } else {
                point3 = [e.clientX, e.clientY];
            }
            ctx5.clearRect(0, 0, 540, 140);
            draw();
        }

        function draw() {

            ctx5.fillStyle = "yellow";
            ctx5.strokeStyle = "black";
            ctx5.lineWidth = 4;

            ctx5.beginPath();
            ctx5.moveTo(point1[0], point1[1]);
            ctx5.arcTo(point2[0], point2[1], point3[0], point3[1], 50);
            ctx5.stroke();

            drawPoint(point1[0], point1[1]);
            drawPoint(point2[0], point2[1]);
            drawPoint(point3[0], point3[1]);

            ctx5.beginPath();
            ctx5.moveTo(point1[0], point1[1]);
            ctx5.lineTo(point2[0], point2[1]);
            ctx5.lineTo(point3[0], point3[1]);
            ctx5.stroke();
        }

        function drawPoint(x, y) {
            ctx5.lineWidth = 1;
            ctx5.strokeStyle = "red";
            ctx5.strokeRect(x -2, y-2, 4, 4);
        }
</script> <canvas id="canvas6" width="500" height="140">
您的浏览器不支持<code>canvas</code>!
</canvas>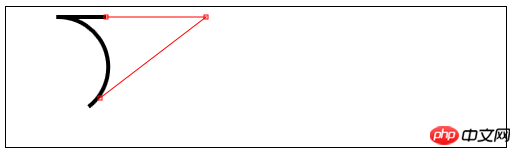 3) 베지어 곡선 그리기
bezierCurveTo(cx1,cy1,cx2, cy2,x,y)——(x,y) 지점에 베지어 곡선을 그립니다. 제어점은 (cx1,cy1) 및 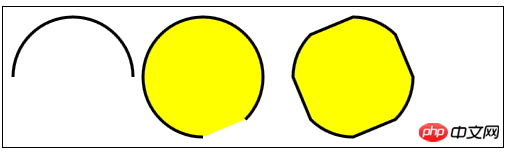 (cx2,cy2)입니다. >
quadraticCurveTo(cx,xy,x,y)——점 (x, y)에 대해 2차 베지어 곡선을 그립니다. 제어점은 (cx, cy)입니다.
    <script>
        //使用arc方法
        var ctx6=document.getElementById("canvas6").getContext("2d");
        ctx6.fillStyle="yellow";
        ctx6.lineWidth=3;

        ctx6.beginPath();
        ctx6.arc(70,70,60,0,Math.PI,true);
        ctx6.stroke();
        ctx6.beginPath();
        ctx6.arc(200,70,60,Math.PI/2,Math.PI/4,false);
        ctx6.fill();
        ctx6.stroke();

        ctx6.beginPath();
        var val=0;
        for(var i=0;i<4;i++){
            ctx6.arc(350,70,60,val,val+Math.PI/4,false);
            val+=Math.PI/2;
        }
        ctx6.closePath();
        ctx6.fill();
        ctx6.stroke();
</script><canvas id="canvas" width="500" height="140">
Your browser doesn't support the <code>canvas</code> element
</canvas> <script>
var canvasElem = document.getElementById("canvas");
var ctx = canvasElem.getContext("2d");
var startPoint = [50, 100];
var endPoint = [400, 100];
var cp1 = [250, 50];
var cp2 = [350, 50];
canvasElem.onmousemove = function(e) {
if (e.shiftKey) {
cp1 = [e.clientX, e.clientY];
} else if (e.ctrlKey) {
cp2 = [e.clientX, e.clientY];
}
ctx.clearRect(0, 0, 500, 140);
draw();
}
draw();
function draw() {
ctx.lineWidth = 3;
ctx.strokeStyle = "black";
ctx.beginPath();
ctx.moveTo(startPoint[0], startPoint[1]);
ctx.bezierCurveTo(cp1[0], cp1[1], cp2[0], cp2[1],
endPoint[0], endPoint[1]);
ctx.stroke();
ctx.lineWidth = 1;
ctx.strokeStyle = "red";
var points = [startPoint, endPoint, cp1, cp2];
for (var i = 0; i < points.length; i++) {
drawPoint(points[i]);
}
drawLine(startPoint, cp1);
drawLine(endPoint, cp2);
}
function drawPoint(point) {
ctx.beginPath();
ctx.strokeRect(point[0] -2, point[1] -2, 4, 4);
}
function drawLine(from, to) {
ctx.beginPath();
ctx.moveTo(from[0], from[1]);
ctx.lineTo(to[0], to[1]);
ctx.stroke();
}
</script> <canvas id="canvas" width="500" height="140">
Your browser doesn't support the <code>canvas</code> element
</canvas>4) 클리핑 영역 생성
클립 () – 새 클리핑 영역 만들기
>5) 텍스트 그리기: 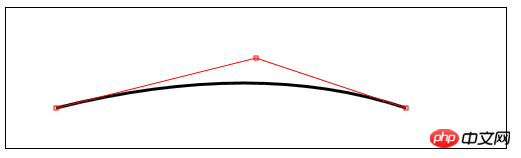
fillText(
strokeText(
font——设置绘制文本时使用的字体;
textAlign——设置文本的对齐方式:start、end、left、right、center;
textBaseline——设置文本的基线:top、hanging、middle、alphabetic、ideographic、bottom;
6)使用特效和转换:
6.1)使用阴影:
shadowBlur——设置阴影的模糊程度;
shadowColor——设置阴影的颜色;
shadowOffsetX——设置阴影的水平偏移量;
shadowOffsetY——设置阴影的垂直偏移量;
   <canvas id="canvas8" width="500" height="140">
        您的浏览器不支持<code>canvas</code>!
</canvas> <script>
//给图形和文本应用阴影
var ctx8=document.getElementById("canvas8").getContext("2d");
ctx8.fillStyle="lightgrey";
ctx8.strokeStyle="black";
ctx8.lineWidth=3;
ctx8.shadowOffsetX=5;
ctx8.shadowOffsetY=5;
ctx8.shadowBlur=5;
ctx8.shadowColor="grey";
ctx8.beginPath();
ctx8.arc(420,70,50,0,Math.PI,true);
ctx8.stroke();
ctx8.beginPath();
ctx8.arc(420,80,40,0,Math.PI,false);
ctx8.fill();
ctx8.font="100px sans-serif";
ctx8.fillText("hello",50,100);
ctx8.strokeText("hello",50,100);
</script>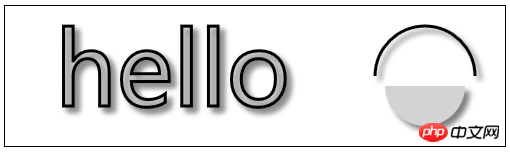
6.2)使用透明度:
globalAlpha——给文本和图形设置透明度(从0到1);
    <canvas id="canvas9" width="300" height="120">
        您的浏览器不支持<code>canvas</code>!
</canvas> <script>
//使用globalAlpha属性,设置透明度
var ctx9=document.getElementById("canvas9").getContext("2d");
ctx9.fillStyle="lightgrey";
ctx9.strokeStyle="black";
ctx9.lineWidth=3;
ctx9.font="100px sans-serif";
ctx9.fillText("hello",10,100);
ctx9.strokeText("hello",10,100);
ctx9.fillStyle="red";
ctx9.globalAlpha=0.5;
ctx9.fillRect(10,10,240,100);
</script>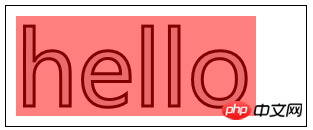
6.3)使用合成:
globalCompositeOperation——与透明度属性结合使用,来控制图形和文本在画布上绘制的方式;
globalCompositeOperation允许的值:
=copy——将来源绘制于目标之上,忽略一切透明度设置;
=source-atop——在两个图像都不透明处显示来源图像,
目标图像不透明但来源图像透明处显示目标图像,其它位置显示为透明;
=source-in——来源图像和目标图像都不透明处显示来源图像。其它位置显示为透明;
=source-out——来源图像不透明但目标图像透明处显示来源图像。其它位置显示为透明;
=source-over——来源图像不透明处显示来源图像。其它位置显示目标图像;
=destination-atop——与source-atop相同,但用目标图像替代来源图像,反之亦然;
=destination-in——与source-in相同,但用目标图像替代来源图像,反之亦然;
=destination-over——与source-over相同,但用目标图像替代来源图像,反之亦然;
=destination-out——与source-out相同,但用目标图像替代来源图像,反之亦然;
=lighter——显示来源图像与目标图像的总和,颜色值限制最高255(100%);
=xor——对来源图像和目标图像执行异或运算;
    <canvas id="canvas10" width="300" height="120">
        您的浏览器不支持<code>canvas</code>!
    </canvas>
    <label>Comosition Value:</label>
    <select id="list">
        <option>copy</option>
        <option>destination-atop</option>
        <option>destination-in</option>
        <option>destination-over</option>
        <option>destination-out</option>
        <option>lighter</option>
        <option>source-atop</option>
        <option>source-in</option>
        <option>source-out</option>
        <option>source-over</option>
        <option>xor</option>
</select> <script>
//使用globalCompositeOperation属性
var ctx10=document.getElementById("canvas10").getContext("2d");
ctx10.fillStyle="lightgrey";
ctx10.strokeStyle="black";
ctx10.lineWidth=3;
var compVal="copy";
document.getElementById("list").onchange=function(e){
compVal= e.target.value;
draw();
}
draw();
function draw(){
ctx10.clearRect(0,0,300,120);
ctx10.globalAlpha=1.0;
ctx10.font="100px sans-serif";
ctx10.fillText("hello",10,100);
ctx10.strokeText("hello",10,100);
ctx10.globalCompositeOperation=compVal;
ctx10.fillStyle="red";
ctx10.globalAlpha=0.5;
ctx10.fillRect(100,10,150,100);
}
</script>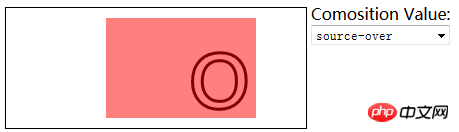
6.4)使用变换:
scale(
rotate(
translate(
transform(a,b,c,d,e,f)——合并现有的变换和a-f值所指定的矩阵;
setTansform(a,b,c,d,e,f)——用a-f值所指定的矩阵替换现有的变换;
    <canvas id="canvas11" width="400" height="200">
        您的浏览器不支持<code>canvas</code>!
</canvas> <script>
//使用变换
var ctx11=document.getElementById("canvas11").getContext("2d");
ctx11.fillStyle="lightgrey";
ctx11.strokeStyle="black";
ctx11.lineWidth=3;
ctx11.clearRect(0,0,300,120);
ctx11.globalAlpha=1.0;
ctx11.font="100px sans-serif";
ctx11.fillText("hello",10,100);
ctx11.strokeText("hello",10,100);
ctx11.scale(1.3,1.3);
ctx11.translate(100,-50);
ctx11.rotate(0.5);
ctx11.fillStyle="red";
ctx11.globalAlpha=0.5;
ctx11.fillRect(100,10,150,100);
ctx11.strokeRect(0,0,300,200);
</script>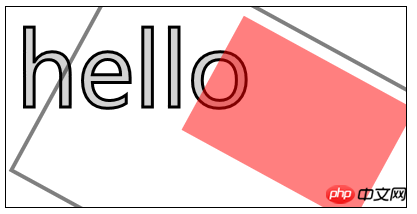
위 내용은 HTML5 Canvas 고급 코드의 자세한 코드 설명(그림)의 상세 내용입니다. 자세한 내용은 PHP 중국어 웹사이트의 기타 관련 기사를 참조하세요!

핫 AI 도구

Undresser.AI Undress
사실적인 누드 사진을 만들기 위한 AI 기반 앱

AI Clothes Remover
사진에서 옷을 제거하는 온라인 AI 도구입니다.

Undress AI Tool
무료로 이미지를 벗다

Clothoff.io
AI 옷 제거제

Video Face Swap
완전히 무료인 AI 얼굴 교환 도구를 사용하여 모든 비디오의 얼굴을 쉽게 바꾸세요!

인기 기사
뜨거운 도구

메모장++7.3.1
사용하기 쉬운 무료 코드 편집기

SublimeText3 중국어 버전
중국어 버전, 사용하기 매우 쉽습니다.

스튜디오 13.0.1 보내기
강력한 PHP 통합 개발 환경

드림위버 CS6
시각적 웹 개발 도구

SublimeText3 Mac 버전
신 수준의 코드 편집 소프트웨어(SublimeText3)
뜨거운 주제
 7647
7647
 15
1392
52
91
11
73
19
36
110
15
1392
52
91
11
73
19
36
110

 HTML의 테이블 테두리
Sep 04, 2024 pm 04:49 PM
HTML의 테이블 테두리
Sep 04, 2024 pm 04:49 PM
HTML의 테이블 테두리 안내. 여기에서는 HTML의 테이블 테두리 예제를 사용하여 테이블 테두리를 정의하는 여러 가지 방법을 논의합니다.
 HTML의 중첩 테이블
Sep 04, 2024 pm 04:49 PM
HTML의 중첩 테이블
Sep 04, 2024 pm 04:49 PM
HTML의 Nested Table에 대한 안내입니다. 여기에서는 각 예와 함께 테이블 내에 테이블을 만드는 방법을 설명합니다.
 HTML 여백-왼쪽
Sep 04, 2024 pm 04:48 PM
HTML 여백-왼쪽
Sep 04, 2024 pm 04:48 PM
HTML 여백-왼쪽 안내. 여기에서는 HTML margin-left에 대한 간략한 개요와 코드 구현과 함께 예제를 논의합니다.
 HTML 테이블 레이아웃
Sep 04, 2024 pm 04:54 PM
HTML 테이블 레이아웃
Sep 04, 2024 pm 04:54 PM
HTML 테이블 레이아웃 안내. 여기에서는 HTML 테이블 레이아웃의 값에 대해 예제 및 출력 n 세부 사항과 함께 논의합니다.
 HTML 입력 자리 표시자
Sep 04, 2024 pm 04:54 PM
HTML 입력 자리 표시자
Sep 04, 2024 pm 04:54 PM
HTML 입력 자리 표시자 안내. 여기서는 코드 및 출력과 함께 HTML 입력 자리 표시자의 예를 논의합니다.
 HTML에서 텍스트 이동
Sep 04, 2024 pm 04:45 PM
HTML에서 텍스트 이동
Sep 04, 2024 pm 04:45 PM
HTML에서 텍스트 이동 안내. 여기서는 Marquee 태그가 구문과 함께 작동하는 방식과 구현할 예제에 대해 소개합니다.
 HTML 정렬 목록
Sep 04, 2024 pm 04:43 PM
HTML 정렬 목록
Sep 04, 2024 pm 04:43 PM
HTML 순서 목록에 대한 안내입니다. 여기서는 HTML Ordered 목록 및 유형에 대한 소개와 각각의 예에 대해서도 설명합니다.
 HTML 온클릭 버튼
Sep 04, 2024 pm 04:49 PM
HTML 온클릭 버튼
Sep 04, 2024 pm 04:49 PM
HTML onclick 버튼에 대한 안내입니다. 여기에서는 각각의 소개, 작업, 예제 및 다양한 이벤트의 onclick 이벤트에 대해 설명합니다.
