이 글에서는 JavaScript를 사용하여 이미지 자르기 효과를 얻는 방법을 주로 소개하고 있으며, 필요한 친구들은
을 참조할 수 있습니다. 마우스의 좌표 위치를 파악하고 누르기, 끌기, 놓기 등의 마우스 동작 이벤트를 모니터링하여 마우스를 끌어 이미지 크기를 변경하는 방법을 알아보세요.
CSS에서도 클립 속성을 배울 수 있습니다.
1. CSS를 사용하여 이미지 불투명도 및 자르기 효과를 구현합니다.
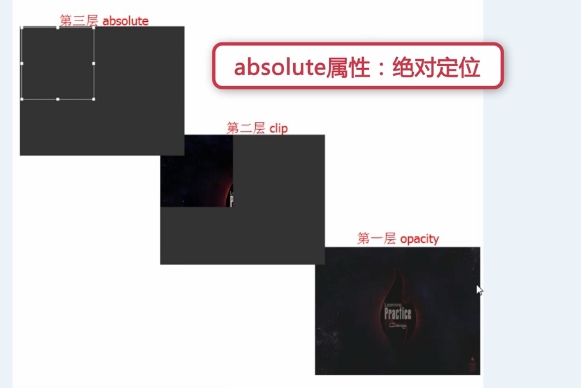
사진 자르기 3레이어 구조
1. 첫 번째 레이어 불투명도, 레이어에 투명도 설정
2. 두 번째 레이어 클립, 클립 속성: 이미지를 잘라내어 이미지의 일부를 표시하고 다른 부분은 숨깁니다
3. 세 번째 레이어 선택 상자는 8개의 효과를 포함하여 절대(두 번째 레이어와 겹침)입니다. 터치 포인트

html 코드:
<p id="box">
 <img src="img/1.jpg" id="img1" />
 <img src="img/1.jpg" id="img2" />
 <p id="main">
  <p class="pmin up-left"></p>
  <p class="pmin up"></p>
  <p class="pmin up-right"></p>
  <p class="pmin right"></p>
  <p class="pmin right-down"></p>
  <p class="pmin down"></p>
  <p class="pmin left-down"></p>
  <p class="pmin left"></p>
 </p>
</p>
css 코드:
body{
  background: #333;
 }
 #box{
  width: 500px;
  height: 380px;
  position: absolute;
  top: 100px;
  left: 200px;
 }
 #img1,#img2{
  position: absolute;
  top: 0;
  left: 0;
 }
 #img1{
  opacity: 0.3;
 }
 #img2{
  clip: rect(0,200px,200px,0);
 }
 #main{
  position: absolute;/*第三层需用绝对定位浮在上面*/
  width: 200px;
  height: 200px;
  border: 1px solid #fff;
 }
 .pmin{
  position: absolute;
  width: 8px;
  height: 8px;
  background: #fff;
 }
 .up-left{margin-top: -4px;margin-left: -4px;cursor: nw-resize;}
 .up{
  left: 50%;/*父元素盒子main宽度的一半,注意要有绝对定位*/
  margin-left:-4px;
  top: -4px;
  cursor: n-resize;
 }
 .up-right{top: -4px;right: -4px;cursor: ne-resize;}
 .right{top: 50%;margin-top: -4px;right: -4px;cursor: e-resize;}
 .right-down{right: -4px;bottom: -4px;cursor: se-resize;}
 .down{bottom: -4px;left: 50%;margin-left: -4px;cursor: s-resize;}
 .left-down{left: -4px;bottom: -4px;cursor: sw-resize;}
.left{left: -4px;top: 50%;margin-top: -4px;cursor: w-resize;}2. javascript 선택 상자 가져오기 offset
선택 상자의 마우스 끌기 위치에 대한 자세한 설명:
offsetLeft: 상위 요소의 왼쪽 테두리를 기준으로 한 요소의 거리
clientX: 마우스 위치의 가로 좌표;
clientWidth: 요소의 너비
offsetXY: 이벤트가 발생하는 상자 모델의 좌표입니다. 스크롤 바.
clientXY: 전체 브라우저에서 사용 가능한 부분의 좌표이며, 스크롤바와는 관련이 없습니다. 즉, 스크롤바를 드래그하여 보여야 하는 영역은 고려하지 않습니다.
pageXY: 스크롤바와 관련된 전체 웹페이지의 좌표입니다.

화면 왼쪽과 상단을 기준으로 요소의 거리를 가져오는 getPosition() 함수를 구성합니다.
js 코드는 다음과 같습니다.
//获取元素相对于屏幕左边及上边的距离,利用offsetLeft
 function getPosition(el){
  var left = el.offsetLeft;
  var top = el.offsetTop;
  var parent = el.offsetParent;
  while(parent != null){
   left += parent.offsetLeft;
   top += parent.offsetTop;
   parent = parent.offsetParent;
  }
  return {"left":left,"top":top};
}3. Javascript는 제어 접점
을 구현하여 마우스 누르기, 끌기 및 놓기 이벤트를 모니터링하여 크기를 제어합니다. 천막의.
차이점 참고:
Element.clientWidth 속성은 요소의 내부 너비를 픽셀 단위로 나타냅니다. 이 속성에는 패딩이 포함되지만 세로 스크롤 막대(있는 경우), 테두리 및 여백은 포함되지 않습니다.
즉, clientWidth에는 테두리가 포함되지 않고, offsetWidth에는 테두리가 포함됩니다.
1) 오른쪽 터치 포인트
js 코드 클릭:
var mainp = $('main');
 var rightp = $('right');
 var isDraging = false;
 var contact = "";//表示被按下的触点
 //鼠标按下时
 rightp.onmousedown = function(){
  isDraging = true;
  contact = "right";
 }
 //鼠标松开时
 window.onmouseup = function(){
  isDraging = false;
 }
 //鼠标移动时
 window.onmousemove = function(e){
  if(isDraging == true){
   if(contact == "right"){
    var e = e||window.event;
    var x = e.clientX;//鼠标位置的横坐标
    var widthBefore = mainp.offsetWidth - 2;//选取框变化前的宽度
    //var widthBefore = mainp.clientWidth;
    var addWidth = x - getPosition(mainp).left - widthBefore;//鼠标移动后选取框增加的宽度
    mainp.style.width = widthBefore + addWidth + 'px';//选取框变化后的宽度
   }
  }
 }
//获取id的函数
function $(id){
 return document.getElementById(id);
}2) 위 터치포인트 클릭
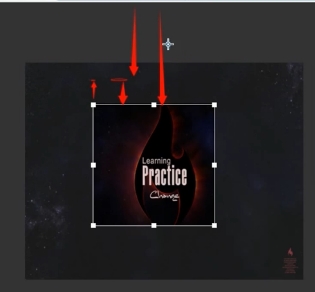
위 중간 접점을 클릭하여 이동 시, 선택박스의 높이와 왼쪽 상단의 위치를 변경해야 합니다.
증가된 높이 = 화면 상단을 기준으로 선택 윤곽의 거리 - 마우스 위치의 세로 좌표
증가된 높이에서 선택 윤곽의 왼쪽 상단에 있는 상단 값을 빼야 합니다. , 마우스를 위쪽으로 움직일수록 높이가 증가하기 때문에 아래쪽으로 움직일수록 높이가 감소하고 위쪽이 증가합니다.
다이어그램 변경:

js 코드:
else if(contact == "up"){
    var y = e.clientY;//鼠标位置的纵坐标
    var heightBefore = mainp.offsetHeight - 2;//选取框变化前的高度
    var addHeight = getPosition(mainp).top - y;//增加的高度
    mainp.style.height = heightBefore + addHeight + 'px';//选取框变化后的宽度
    mainp.style.top = mainp.offsetTop - addHeight + 'px';//相当于变化后左上角的纵坐标,鼠标向上移纵坐标减小,下移增大
}3) 왼쪽 터치 클릭 포인트
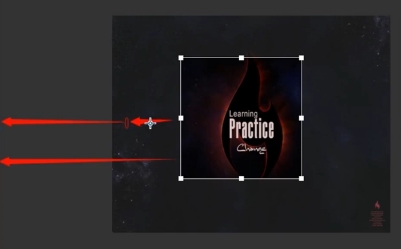
위의 터치 포인트를 클릭하는 것과 원리는 동일하며 너비와 왼쪽 위치가 변경됩니다
다이어그램 변경:

js 코드 :
 else if(contact == "left"){
     var widthBefore = mainp.offsetWidth - 2;
      var addWidth = getPosition(mainp).left - e.clientX;//增加的宽度等于距离屏幕左边的距离减去鼠标位置横坐标
      mainp.style.width = widthBefore + addWidth + 'px';
     mainp.style.left = mainp.offsetLeft - addWidth + 'px';//左边的距离(相当于左边位置横坐标)等于选取框距父级元素的距离减去增加的宽度
}4) 아래 연락처 클릭
증가폭 = 마우스 위치 세로좌표 - 화면 상단으로부터의 거리 - 원래 폭
좌측상단 위치는 변경할 필요가 없습니다
js 코드 :
else if(contact = "down"){
     var heightBefore = mainp.offsetHeight - 2;
     var addHeight = e.clientY - getPosition(mainp).top - mainp.offsetHeight;
     mainp.style.height = heightBefore + addHeight + 'px';
}5) 4개 클릭 시 변경 모퉁이는 높이와 너비 변경이 중첩된 것이므로 유지 관리 및 코드 재사용을 용이하게 하기 위해 위의 네 가지 변경 프로세스를 함수로 캡슐화하는 것이 가장 좋습니다.
if else를 사용하면 8번을 판단해야 하므로 switch 문으로 변경하여 코드를 단순화합니다
수정된 js 코드는 다음과 같습니다. 🎜>
window.onmousemove = function(e){
  var e = e||window.event;
  if(isDraging == true){
   switch (contact){
    case "up" : upMove(e);break;
    case "right" : rightMove(e);break;
    case "down" : downMove(e);break;
    case "left" : leftMove(e);break;
    case "up-right" : upMove(e);rightMove(e);break;
    case "down-right" : downMove(e);rightMove(e);break;
    case "down-left" : downMove(e);leftMove(e);break;
    case "up-left" : upMove(e);leftMove(e);break;
   }
  }
 }
//获取id的函数
function $(id){
 return document.getElementById(id);
}
//获取元素相对于屏幕左边及上边的距离,利用offsetLeft
 function getPosition(el){
  var left = el.offsetLeft;
  var top = el.offsetTop;
  var parent = el.offsetParent;
  while(parent != null){
   left += parent.offsetLeft;
   top += parent.offsetTop;
   parent = parent.offsetParent;
  }
  return {"left":left,"top":top};
 }
 //up移动
 function upMove(e){
  var y = e.clientY;//鼠标位置的纵坐标
  var heightBefore = mainp.offsetHeight - 2;//选取框变化前的高度
  var addHeight = getPosition(mainp).top - y;//增加的高度
  mainp.style.height = heightBefore + addHeight + 'px';//选取框变化后的宽度
  mainp.style.top = mainp.offsetTop - addHeight + 'px';//相当于变化后左上角的纵坐标,鼠标向上移纵坐标减小,下移增大
 }
 //right移动
 function rightMove(e){
  var x = e.clientX;//鼠标位置的横坐标
  var widthBefore = mainp.offsetWidth - 2;//选取框变化前的宽度
  //var widthBefore = mainp.clientWidth;
  var addWidth = x - getPosition(mainp).left - widthBefore;//鼠标移动后选取框增加的宽度
  mainp.style.width = widthBefore + addWidth + 'px';//选取框变化后的宽度
 }
 //down移动
 function downMove(e){
  var heightBefore = mainp.offsetHeight - 2;
  var addHeight = e.clientY - getPosition(mainp).top - mainp.offsetHeight;
  mainp.style.height = heightBefore + addHeight + 'px';
 }
 //left移动
 function leftMove(e){
  var widthBefore = mainp.offsetWidth - 2;
  var addWidth = getPosition(mainp).left - e.clientX;//增加的宽度等于距离屏幕左边的距离减去鼠标位置横坐标
  mainp.style.width = widthBefore + addWidth + 'px';
  mainp.style.left = mainp.offsetLeft - addWidth + 'px';//左边的距离(相当于左边位置横坐标)等于选取框距父级元素的距离减去增加的宽度
}4. 선택 상자 영역을 밝게 표시
1) 두 번째 레이어 이미지 선택 상자의 클립 속성을 재설정해야 합니다. 아이콘의 네 가지 측면:
//设置选取框图片区域明亮显示
 function setChoice(){
  var top = mainp.offsetTop;
  var right = mainp.offsetLeft + mainp.offsetWidth;
  var bottom = mainp.offsetTop + mainp.offsetHeight;
  var left = mainp.offsetLeft;
  img2.style.clip = "rect("+top+"px,"+right+"px,"+bottom+"px,"+left+"px)";
}//禁止图片被选中 document.onselectstart = new Function('event.returnValue = false;');
CSS 스타일에서는 텍스트를 선택할 수 없다는 의미이고, 이미지의 경우 p와 같은 효과가 있습니다.
5. 마키 위치 드래그 구현먼저 이벤트 버블링을 중지합니다.
js 코드는 다음과 같습니다.
rree6. 이미지 자르기 영역 미리보기 구현
이미지 미리보기 영역에 대한 p
html 코드 추가:
<p id="preview">
 <img src="img/1.jpg" id="img3" />
</p>
css代码:
#preview{
  position: absolute;
  width: 500px;
  height: 380px;
  top: 100px;
  left:710px ;
 }
#preview #img3{position: absolute;}注意:要让clip:rect(top,right,bottom,left) 起作用,必须让作用元素为相对/绝对定位。
js部分同样是利用clip属性,和setChoice()函数同时被调用
同时为了让右边预览区的左上角位置固定,需要设置其top和left的值
//右边图片预览函数
 function setPreview(){
  var top = mainp.offsetTop;
  var right = mainp.offsetLeft + mainp.offsetWidth;
  var bottom = mainp.offsetTop + mainp.offsetHeight;
  var left = mainp.offsetLeft;
  var img3 = $('img3');
  img3.style.top = -top + 'px';
  img3.style.left = -left + 'px';
  img3.style.clip = "rect("+top+"px,"+right+"px,"+bottom+"px,"+left+"px)";
}위 내용은 JavaScript를 기반으로 이미지 자르기 효과를 구현하는 샘플 코드(그림)의 상세 내용입니다. 자세한 내용은 PHP 중국어 웹사이트의 기타 관련 기사를 참조하세요!