HTML5 게임 프레임워크 cnGameJS 개발 기록 - 게임 장면 객체
1. 장면 객체 는 언제 필요한가요?
씬 객체는 이전 글에서 소개한 지도 객체와는 다르며, 다양한 종류의 게임에서 사용됩니다. 이전 맵 개체는 Sokoban 및 Tank Battle과 같은 그리드 게임에서 사용되었습니다. 이 섹션에서 소개하는 장면 개체는 Super Mario, Dinosaur Kombat 등과 같이 특정 장면이 있는 게임에 적합합니다. 이러한 유형의 게임은 일반적으로 2D 장면에서 플레이어 개체를 제어합니다. 플레이어가 움직이면 장면도 그에 따라 움직입니다.
2. 장면 예:
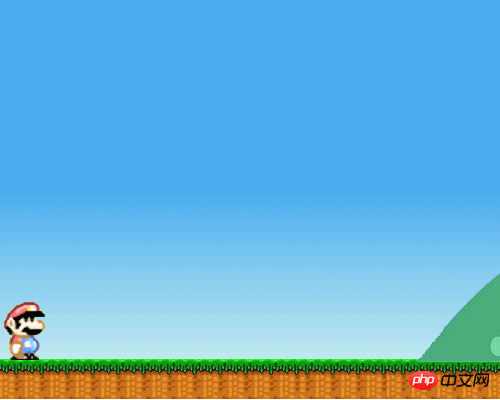
효과: (왼쪽 및 오른쪽 키로 슈퍼 마리오의 움직임을 제어)

코드:
<body>
<div><canvas id="gameCanvas">请使用支持canvas的浏览器查看</canvas></div>
</body>
<script src="cnGame_v1.0.js"></script>
<script>
var Src="http://images.cnblogs.com/cnblogs_com/Cson/290336/o_player.png";
var background="background.png";
/* 初始化 */
cnGame.init('gameCanvas',{width:500,height:400});
var floorY=cnGame.height-40;
var gameObj=(function(){
/* 玩家对象 */
var player=function(options){
this.init(options);
this.speedX=0;
this.moveDir;
this.isJump=false;
}
cnGame.core.inherit(player,cnGame.Sprite);
player.prototype.initialize=function(){
this.addAnimation(new cnGame.SpriteSheet("playerRight",Src,{frameSize:[50,60],loop:true,width:150,height:60}));
this.addAnimation(new cnGame.SpriteSheet("playerLeft",Src,{frameSize:[50,60],loop:true,width:150,height:120,beginY:60}));
}
player.prototype.moveRight=function(){
if(cnGame.core.isUndefined(this.moveDir)||this.moveDir!="right"){
this.moveDir="right";
this.speedX<0&&(this.speedX=0);
this.setMovement({aX:10,maxSpeedX:15});
this.setCurrentAnimation("playerRight");
}
}
player.prototype.moveLeft=function(){
if(cnGame.core.isUndefined(this.moveDir)||this.moveDir!="left"){
this.moveDir="left";
this.speedX>0&&(this.speedX=0);
this.setMovement({aX:-10,maxSpeedX:15});
this.setCurrentAnimation("playerLeft");
}
}
player.prototype.stopMove=function(){
if(this.speedX<0){
this.setCurrentImage(Src,0,60);
}
else if(this.speedX>0){
this.setCurrentImage(Src);
}
this.moveDir=undefined;
this.resetMovement();
}
player.prototype.update=function(){
player.prototype.parent.prototype.update.call(this);//调用父类update
if(cnGame.input.isPressed("right")){
this.moveRight();
}
else if(cnGame.input.isPressed("left")){
this.moveLeft();
}
else{
this.stopMove();
}
}
return {
initialize:function(){
cnGame.input.preventDefault(["left","right","up","down"]);
this.player=new player({src:Src,width:50,height:60,x:0,y:floorY-60});
this.player.initialize();
this.background=new cnGame.View({src:background,player:this.player,imgWidth:2301});
this.background.centerPlayer(true);
this.background.insideView(this.player,"x");
},
update:function(){
this.player.update();
this.background.update([this.player]);
},
draw:function(){
this.background.draw();
this.player.draw();
}
};
})();
cnGame.loader.start([Src,background],gameObj);
</script> 3. 코드 구현:
장면을 구성하려면 먼저 충분히 넓은 배경 그림 이 필요합니다. 플레이어가 오른쪽으로 이동할 때 플레이어는 항상 배경의 중간 지점에 있습니다. 플레이어의 속도는 반대 방향의 배경으로 변환됩니다. 먼저 초기화 함수 를 살펴보세요.
/**
         *初始化
        **/
        init:function(options){
            /**
             *默认对象
            **/
            var defaultObj={
                width:cg.width,
                height:cg.height,
                imgWidth:cg.width,
                imgHeight:cg.height,
                x:0,
                y:0

            }
            options=options||{};
            options=cg.core.extend(defaultObj,options);
            this.player=options.player;
            this.width=options.width;
            this.height=options.height;
            this.imgWidth=options.imgWidth;
            this.imgHeight=options.imgHeight;
            this.centerX=this.width/2;
            this.src=options.src;
            this.x=options.x;
            this.y=options.y;
            this.insideArr=[];
            this.isLoop=false;;
            this.isCenterPlayer=false;
            this.onEnd=options.onEnd;

},xy와 크기 외에도 사용자가 전달하는 매개변수에는 세 가지 매개변수가 있는데, 그 중 하나는 플레이어 개체를 배치할지 여부를 설정하는 것입니다. 중앙에 있고 플레이어를 움직이지 않고 배경만 움직입니다. 위의 배경 이동 효과를 얻으려면 이 매개변수를 true로 설정해야 합니다. 또 다른 매개변수는 루프 여부를 설정하는 것입니다. 루프로 설정하면 배경이 극점으로 이동한 후 원래 위치로 돌아갑니다. 마지막 매개변수는 onEnd입니다. 비순환으로 설정하면 배경이 극한으로 이동한 후 콜백 함수가 실행됩니다.
장면 개체의 초점은 업데이트 방법입니다.
/**
         *背景移动时的更新
        **/
        update:function(spritelist){//传入所有sprite的数组
            if(this.isCenterPlayer){
                if(this.player.x>this.centerX){
                    if(this.x<this.imgWidth-this.width){
                        var marginX=this.player.x-this.centerX;
                        this.x+=marginX;
                        if(spritelist){
                            for(var i=0,len=spritelist.length;i<len;i++){
                                if(spritelist[i]==this.player){
                                    spritelist[i].x=this.centerX;
                                }
                                else{
                                    spritelist[i].x-=marginX;
                                }
                            }
                        }
                    }
                    else if(this.isLoop){
                        if(spritelist){
                            for(var i=0,len=spritelist.length;i<len;i++){
                                if(spritelist[i]!=this.player){
                                    spritelist[i].move(this.imgWidth-this.width);
                                }
                            }
                        }
                        this.x=0;
                    }
                    else{
                        this.onEnd&&this.onEnd();
                    }
                }
            }
            for(var i=0,len=this.insideArr.length;i<len;i++){
                inside.call(this,this.insideArr[i]);
            }
},이 방법은 먼저 플레이어 개체가 장면의 중심을 초과했는지 여부를 확인합니다. 거리를 초과하여 플레이어를 고정합니다. 장면 중앙에서 초과 거리는 반대 방향으로 이동하는 배경과 플레이어를 제외한 다른 스프라이트가 반대 방향으로 이동하는 거리로 설정됩니다. 이 경우 배경만 설정됩니다. 이동 및 기타 스프라이트 개체가 이동하고 플레이어는 고정됩니다 . 루프인 경우 이동 범위를 초과한 후 배경 및 기타 스프라이트의 x 좌표를 재설정합니다. 루프가 아닌 경우 이동이 끝난 후 onEnd 콜백 함수가 호출됩니다. 또한 플레이어가 항상 디스플레이 영역 내에 있도록 제한해야 하는 경우 insideView 메서드를 호출할 수도 있습니다.
장면 객체의 모든 코드를 첨부하세요:
/**
 *
 *场景
 *
**/
cnGame.register("cnGame",function(cg){

    /**
     *使指定对象在可视区域view内
    **/
    var inside=function(sprite){
        var dir=sprite.insideDir;
        if(dir!="y"){
            if(sprite.x<0){
                sprite.x=0;
            }
            else if(sprite.x>this.width-sprite.width){
                sprite.x=this.width-sprite.width;
            }
        }
        if(dir!="x"){
            if(sprite.y<0){
                sprite.y=0;
            }
            else if(sprite.y>this.height-sprite.height){
                sprite.y=this.height-sprite.height;
            }
        }

    }

    var view=function(options){
        this.init(options);

    }
    view.prototype={

        /**
         *初始化
        **/
        init:function(options){
            /**
             *默认对象
            **/
            var defaultObj={
                width:cg.width,
                height:cg.height,
                imgWidth:cg.width,
                imgHeight:cg.height,
                x:0,
                y:0

            }
            options=options||{};
            options=cg.core.extend(defaultObj,options);
            this.player=options.player;
            this.width=options.width;
            this.height=options.height;
            this.imgWidth=options.imgWidth;
            this.imgHeight=options.imgHeight;
            this.centerX=this.width/2;
            this.src=options.src;
            this.x=options.x;
            this.y=options.y;
            this.insideArr=[];
            this.isLoop=false;;
            this.isCenterPlayer=false;
            this.onEnd=options.onEnd;

        },
        /**
         *使player的位置保持在场景中点之前的移动背景
        **/
        centerPlayer:function(isLoop){
            isLoop=isLoop||false;
            this.isLoop=isLoop;
            this.isCenterPlayer=true;
        },
        /**
         *使对象的位置保持在场景内
        **/
        insideView:function(sprite,dir){//dir为限定哪个方向在view内,值为x或y,不传则两个方向皆限定
            if(cg.core.isArray(sprite)){
                for(var i=0,len=sprite.length;i로그인 후 복사
위 내용은 HTML5 게임 프레임워크 cnGameJS 개발 기록 - 게임 장면 객체의 상세 내용입니다. 자세한 내용은 PHP 중국어 웹사이트의 기타 관련 기사를 참조하세요!

핫 AI 도구

Undresser.AI Undress
사실적인 누드 사진을 만들기 위한 AI 기반 앱

AI Clothes Remover
사진에서 옷을 제거하는 온라인 AI 도구입니다.

Undress AI Tool
무료로 이미지를 벗다

Clothoff.io
AI 옷 제거제

Video Face Swap
완전히 무료인 AI 얼굴 교환 도구를 사용하여 모든 비디오의 얼굴을 쉽게 바꾸세요!

인기 기사

뜨거운 도구

메모장++7.3.1
사용하기 쉬운 무료 코드 편집기

SublimeText3 중국어 버전
중국어 버전, 사용하기 매우 쉽습니다.

스튜디오 13.0.1 보내기
강력한 PHP 통합 개발 환경

드림위버 CS6
시각적 웹 개발 도구

SublimeText3 Mac 버전
신 수준의 코드 편집 소프트웨어(SublimeText3)

뜨거운 주제
 7686
7686
 15
15
 1639
1639
 14
14
 1393
1393
 52
52
 1287
1287
 25
25
 1229
1229
 29
29
 HTML의 테이블 테두리
Sep 04, 2024 pm 04:49 PM
HTML의 테이블 테두리 안내. 여기에서는 HTML의 테이블 테두리 예제를 사용하여 테이블 테두리를 정의하는 여러 가지 방법을 논의합니다.
 HTML의 중첩 테이블
Sep 04, 2024 pm 04:49 PM
HTML의 Nested Table에 대한 안내입니다. 여기에서는 각 예와 함께 테이블 내에 테이블을 만드는 방법을 설명합니다.
 HTML 여백-왼쪽
Sep 04, 2024 pm 04:48 PM
HTML 여백-왼쪽 안내. 여기에서는 HTML margin-left에 대한 간략한 개요와 코드 구현과 함께 예제를 논의합니다.
 HTML 테이블 레이아웃
Sep 04, 2024 pm 04:54 PM
HTML 테이블 레이아웃 안내. 여기에서는 HTML 테이블 레이아웃의 값에 대해 예제 및 출력 n 세부 사항과 함께 논의합니다.
 HTML 입력 자리 표시자
Sep 04, 2024 pm 04:54 PM
HTML 입력 자리 표시자 안내. 여기서는 코드 및 출력과 함께 HTML 입력 자리 표시자의 예를 논의합니다.
 HTML에서 텍스트 이동
Sep 04, 2024 pm 04:45 PM
HTML에서 텍스트 이동 안내. 여기서는 Marquee 태그가 구문과 함께 작동하는 방식과 구현할 예제에 대해 소개합니다.
 HTML 정렬 목록
Sep 04, 2024 pm 04:43 PM
HTML 순서 목록에 대한 안내입니다. 여기서는 HTML Ordered 목록 및 유형에 대한 소개와 각각의 예에 대해서도 설명합니다.
 HTML 온클릭 버튼
Sep 04, 2024 pm 04:49 PM
HTML onclick 버튼에 대한 안내입니다. 여기에서는 각각의 소개, 작업, 예제 및 다양한 이벤트의 onclick 이벤트에 대해 설명합니다.


