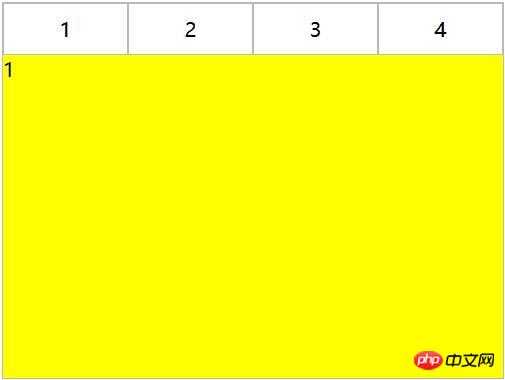
다음 편집기는 CSS를 사용하여 탭 레이아웃을 구현하는 간단한 예를 제공합니다(반드시 읽어야 함). 에디터가 꽤 좋다고 생각해서 지금 공유해서 참고용으로 올려보겠습니다. 에디터와 함께 구경해보세요
1. 레이아웃 방법
1. 🎜 >rree
<p class="container">
   <p class="tab-content">
     <p id="item1" class="item">内容1</p>
     <p id="item2" class="item">内容2</p>
     <p id="item3" class="item">内容3</p>
     <p id="item4" class="item">内容4</p>
   </p>
   <p class="tab-control">
     <ul>
        <li><a href="#item1">内容1</a></li>
        <li><a href="#item2">内容2</a></li>
        <li><a href="#item3">内容3</a></li>
        <li><a href="#item4">内容4</a></li>
     </ul>
   </p>
</p>
2. 콘텐츠 및 탭 통합
ul,li{
  margin:0;
  padding:0;
  list-style:none;
}
.container{
  width:400px;
  height:300px;
  background-color:silver;
}
.tab-content{
  width:100%;
  height:80%;
  overflow:hidden;
}
.tab-content .item{
  width:100%;
  height:100%;
}
.tab-control{
  width:100%;
  height:20%;
}
.tab-control ul{
  height:100%;
}
.tab-control li{
  width:25%;
  height:100%;
  float:left;
  border:1px solid silver;
  box-sizing:border-box;
  background-color:white;
  cursor: pointer;
}
.tab-control li:hover{
  background-color:#7b7474
}
.tab-control a{
  display:inline-block;
  width:100%;
  height:100%;
  line-height:100%;
  text-align:center;
  text-decoration: none;
}
.tab-control a::after{
  content:"";
  display:inline-block;
  height:100%;
  vertical-align:middle;
}
.tab-content .item:target{
  background:yellow;
}<p class="container">
<ul>
<li class="item active">
<p class="title">1</p>
<p class="content">1</p>
</li>
<li class="item">
<p class="title">2</p>
<p class="content ml1">2</p>
</li>
<li class="item">
<p class="title">3</p>
<p class="content ml2">3</p>
</li>
<li class="item">
<p class="title">4</p>
<p class="content ml3">4</p>
</li>
</ul>
</p>
2. CSS 상호작용
앵커 구현(대상)
(1) 레이아웃 1의 경우: 항목이 위에서 아래로 정렬되고 상위 요소 탭 콘텐츠가 Overflow:hidden으로 추가됩니다. 앵커 포인트를 사용하여 다른 태그를 클릭하면 해당 ID를 가진 항목이 탭 콘텐츠의 보기 로 전환되고, 마우스 오버를 사용하여 탭 버튼 <🎜에 전환 스타일을 추가합니다. >.
ul,li,p{
  margin:0;
  padding:0;
  list-style:none;
}
.container{
  width:400px;
  height:300px;
  background-color:silver;
  border:1px solid silver;
}
.container ul{
  width:100%;
  height:100%;
  overflow:hidden;
}
.container .item{
  float:left;
  width:25%;
  height:100%;
  background-color:white;
}
.container .item .title{
  line-height:40px;
  border:1px solid silver;
  box-sizing:border-box;
  text-align:center;
  cursor:pointer;
}
.container .item .content{
  width:400%;
  height:100%;
  background-color:yellow;
}
.ml1{
  margin-left:-100%;
}
.ml2{
  margin-left:-200%;
}
.ml3{
  margin-left:-300%;
}
.active{
  position:relative;
  z-index:1
}
.container .item:hover{
  position:relative;
  z-index:1
}
.container .item:hover .title{
  border-bottom:none;
  background-color:yellow;
}<p class="container">
<p class="tab-content">
<p id="item1" class="item">内容1</p>
<p id="item2" class="item">内容2</p>
<p id="item3" class="item">内容3</p>
<p id="item4" class="item">内容4</p>
</p>
<p class="tab-control">
<ul>
<li><a href="#item1">内容1</a></li>
<li><a href="#item2">内容2</a></li>
<li><a href="#item3">内容3</a></li>
<li><a href="#item4">内容4</a></li>
</ul>
</p>
</p>
ul,li{
  margin:0;
  padding:0;
  list-style:none;
}
.container{
  width:400px;
  height:300px;
  background-color:silver;
}
.tab-content{
  width:100%;
  height:80%;
  overflow:hidden;
}
.tab-content .item{
  width:100%;
  height:100%;
}
.tab-control{
  width:100%;
  height:20%;
}
.tab-control ul{
  height:100%;
}
.tab-control li{
  width:25%;
  height:100%;
  float:left;
  border:1px solid silver;
  box-sizing:border-box;
  background-color:white;
  cursor: pointer;
}
.tab-control li:hover{
  background-color:#7b7474
}
.tab-control a{
  display:inline-block;
  width:100%;
  height:100%;
  line-height:100%;
  text-align:center;
  text-decoration: none;
}
.tab-control a::after{
  content:"";
  display:inline-block;
  height:100%;
  vertical-align:middle;
}를 사용하고, :target을 사용하여 요소의 Z-색인을 수정합니다. 전환 효과를 얻기 위해(실제로 전환 효과는 요소 표시를 제어하여 얻을 수도 있음)
(2) 레이아웃 2의 경우:
ul,li{
  margin:0;
  padding:0;
  list-style:none;
}
.container{
  width:400px;
  height:300px;
  background-color:silver;
}
.tab-content{
  position:relative;
  width:100%;
  height:80%;
  overflow:hidden;
}
.tab-content .item{
  position:absolute;
  left:0;
  top:0;
  width:100%;
  height:100%;
}
.tab-control{
  width:100%;
  height:20%;
}
.tab-control ul{
  height:100%;
}
.tab-control li{
  width:25%;
  height:100%;
  float:left;
  border:1px solid silver;
  box-sizing:border-box;
  background-color:white;
  cursor: pointer;
}
.tab-control li:hover{
  background-color:#7b7474
}
.tab-control a{
  display:inline-block;
  width:100%;
  height:100%;
  line-height:100%;
  text-align:center;
  text-decoration: none;
}
.tab-control a::after{
  content:"";
  display:inline-block;
  height:100%;
  vertical-align:middle;
}

.tab-content .item:target{
  z-index:1;
  background-color:yellow;
}<p class="container">
<ul>
<li class="item active" id="item1">
<p class="title"><a href="#item1">1</a></p>
<p class="content">1</p>
</li>
<li class="item" id="item2">
<p class="title"><a href="#item2">2</a></p>
<p class="content ml1">2</p>
</li>
<li class="item" id="item3">
<p class="title"><a href="#item3">3</a></p>
<p class="content ml2">3</p>
</li>
<li class="item" id="item4">
<p class="title"><a href="#item4">4</a></p>
<p class="content ml3">4</p>
</li>
</ul>
</p>2.
(1) 레이아웃 1의 경우: 은 CSS를 통해 간단히 달성할 수 없습니다
(2) 레이아웃 2의 경우:
ul,
li,
p {
  margin: 0;
  padding: 0;
  list-style: none;
}

.container {
  width: 400px;
  height: 300px;
  background-color: silver;
  border: 1px solid silver;
}

.container ul {
  width: 100%;
  height: 100%;
  overflow: hidden;
}

.container .item {
  float: left;
  width: 25%;
  height: 100%;
  background-color: white;
}

.container .item .title {
  line-height: 40px;
  border: 1px solid silver;
  box-sizing: border-box;
  text-align: center;
  cursor: pointer;
}
.container .item a {
  display:inline-block;
  width:100%;
  height:100%;
  text-decoration: none;
}

.container .item .content {
  width: 400%;
  height: 100%;
  background-color: yellow;
}

.ml1 {
  margin-left: -100%;
}

.ml2 {
  margin-left: -200%;
}

.ml3 {
  margin-left: -300%;
}

.active {
  position: relative;
  z-index: 1
}

.container .item:target {
  position: relative;
  z-index: 1
}

.container .item:target .title {
  border-bottom: none;
  background-color: yellow;
}<p class="container">
<ul>
<li class="item active">
<p class="title">1</p>
<p class="content">1</p>
</li>
<li class="item">
<p class="title">2</p>
<p class="content ml1">2</p>
</li>
<li class="item">
<p class="title">3</p>
<p class="content ml2">3</p>
</li>
<li class="item">
<p class="title">4</p>
<p class="content ml3">4</p>
</li>
</ul>
</p>3. label 및 :checked 구현
(1) 레이아웃 1의 경우:
ul,li,p{
  margin:0;
  padding:0;
  list-style:none;
}
.container{
  width:400px;
  height:300px;
  background-color:silver;
  border:1px solid silver;
}
.container ul{
  width:100%;
  height:100%;
  overflow:hidden;
}
.container .item{
  float:left;
  width:25%;
  height:100%;
  background-color:white;
}
.container .item .title{
  line-height:40px;
  border:1px solid silver;
  box-sizing:border-box;
  text-align:center;
  cursor:pointer;
}
.container .item .content{
  width:400%;
  height:100%;
  background-color:yellow;
}
.ml1{
  margin-left:-100%;
}
.ml2{
  margin-left:-200%;
}
.ml3{
  margin-left:-300%;
}
.active{
  position:relative;
  z-index:1
}
.container .item:hover{
  position:relative;
  z-index:1
}
.container .item:hover .title{
  border-bottom:none;
  background-color:yellow;
}<p class="container">
<p class="tab-content">
<input type="radio" name="item" class="radio-item" id="item1" checked/>
<p class="item">内容1</p>
<input type="radio" name="item" class="radio-item" id="item2" />
<p class="item">内容2</p>
<input type="radio" name="item" class="radio-item" id="item3" />
<p class="item">内容3</p>
<input type="radio" name="item" class="radio-item" id="item4" />
<p class="item">内容4</p>
</p>
<p class="tab-control">
<ul>
<li><label for="item1">内容1</label></li>
<li><label for="item2">内容2</label></li>
<li><label for="item3">内容3</label></li>
<li><label for="item4">内容4</label></li>
</ul>
</p>
</p>(2) 레이아웃 2의 경우:
ul,
li {
  margin: 0;
  padding: 0;
  list-style: none;
}

.container {
  width: 400px;
  height: 300px;
  background-color: silver;
}

.tab-content {
  position: relative;
  width: 100%;
  height: 80%;
  overflow: hidden;
}

input {
  margin: 0;
  width: 0;
}

.tab-content .item {
  position: absolute;
  left: 0;
  top: 0;
  width: 100%;
  height: 100%;
}

.tab-control {
  width: 100%;
  height: 20%;
}

.tab-control ul {
  height: 100%;
}

.tab-control li {
  width: 25%;
  height: 100%;
  float: left;
  border: 1px solid silver;
  box-sizing: border-box;
  background-color: white;
}

.tab-control li:hover {
  background-color: #7b7474
}

.tab-control label {
  display: inline-block;
  width: 100%;
  height: 100%;
  line-height: 100%;
  text-align: center;
  text-decoration: none;
  cursor: pointer;
}

.tab-control label::after {
  content: "";
  display: inline-block;
  height: 100%;
  vertical-align: middle;
}
.tab-content .radio-item{
  display:none;
}
.tab-content .radio-item:checked+.item {
  z-index: 1;
  background-color: yellow;
}아아아아
위 내용은 탭 레이아웃의 CSS 구현을 위한 샘플 코드 공유(그림)의 상세 내용입니다. 자세한 내용은 PHP 중국어 웹사이트의 기타 관련 기사를 참조하세요!