

HTML5 Canvas를 사용하여 얼굴을 만드는 예제 코드 공유

여기서는 그림을 그릴 때 HTML5의 캔버스를 주로 사용합니다. html5를 사용하여 얼굴을 만드는 예제 코드입니다.
먼저 그리고 싶은 얼굴 렌더링을 살펴보세요.
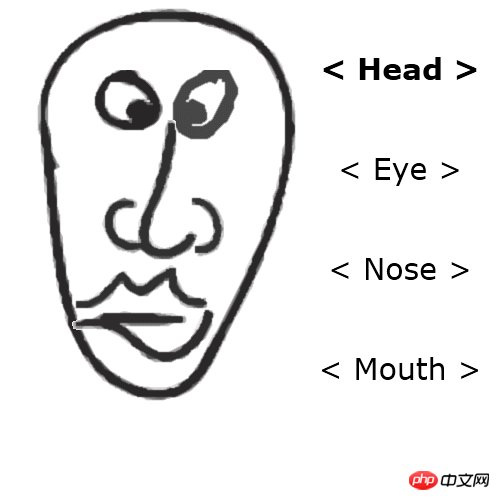
여기에서는 주로 HTML5 Canvas를 사용하여 그림을 그립니다.
전체 그리기 과정을 시작해 보겠습니다.
1. HTML(index.html)
<!DOCTYPE html>
<html lang="en" >
    <head>
        <meta charset="utf-8" />

        <title>HTML5 Face Builder | Script Tutorials</title>

        <link href="css/main.css" rel="stylesheet" type="text/css" />

        <script src="http://code.jquery.com/jquery-latest.min.js"></script>
        <script type="text/javascript" src="js/script.js"></script>
    </head>
    <body>

        <header>
            <h2>HTML5 image crop tool</h2>
            <a href="http://www.script-tutorials.com/html5-face-builder/" class="stuts">Back to original tutorial on <span>Script Tutorials</span></a>

        </header>
        <p class="container">
            <canvas id="scene" width="500" height="500"></canvas>

            <p id="results">
                <h2>Use arrow keys to select your face details (up-down to select category, left-right to switch them), then click Spacebar to export as image.</h2>
                <img id="face_result" />
            </p>

        </p>
    </body>
</html>2.js/script.js
// inner variables
var canvas, ctx;
var oHead, oEye, oNose, oMouth;
var iSel = 0;
// -------------------------------------------------------------
// objects :
function Head(x, y, x2, y2, w, h, image) {
this.x = x;
this.y = y;
this.x2 = x2;
this.y2 = y2;
this.w = w;
this.h = h;
this.image = image;
this.iSpr = 0;
}
function Eye(x, y, x2, y2, w, h, image) {
this.x = x;
this.y = y;
this.x2 = x2;
this.y2 = y2;
this.w = w;
this.h = h;
this.image = image;
this.iSpr = 0;
}
function Nose(x, y, x2, y2, w, h, image) {
this.x = x;
this.y = y;
this.x2 = x2;
this.y2 = y2;
this.w = w;
this.h = h;
this.image = image;
this.iSpr = 0;
}
function Mouth(x, y, x2, y2, w, h, image) {
this.x = x;
this.y = y;
this.x2 = x2;
this.y2 = y2;
this.w = w;
this.h = h;
this.image = image;
this.iSpr = 0;
}
// -------------------------------------------------------------
// draw functions :
function clear() { // clear canvas function
ctx.clearRect(0, 0, ctx.canvas.width, ctx.canvas.height);
}
function drawScene() { // main drawScene function
clear(); // clear canvas
// draw head
ctx.drawImage(oHead.image, oHead.x2 + oHead.iSpr*oHead.w, oHead.y2, oHead.w, oHead.h, oHead.x, oHead.y, oHead.w, oHead.h);
// draw eyes
ctx.drawImage(oEye.image, oEye.x2 + oEye.iSpr*oEye.w, oEye.y2, oEye.w, oEye.h, oEye.x, oEye.y, oEye.w, oEye.h);
// draw nose
ctx.drawImage(oNose.image, oNose.x2 + oNose.iSpr*oNose.w, oNose.y2, oNose.w, oNose.h, oNose.x, oNose.y, oNose.w, oNose.h);
// draw mouth
ctx.drawImage(oMouth.image, oMouth.x2 + oMouth.iSpr*oMouth.w, oMouth.y2, oMouth.w, oMouth.h, oMouth.x, oMouth.y, oMouth.w, oMouth.h);
// draw controls
ctx.textAlign = 'center';
ctx.fillStyle = '#000';
ctx.font = '30px Verdana';
if (iSel == 0)
ctx.font = 'bold 30px Verdana';
ctx.fillText('< Head >', 400, 80);
ctx.font = '30px Verdana';
if (iSel == 1)
ctx.font = 'bold 30px Verdana';
ctx.fillText('< Eye >', 400, 180);
ctx.font = '30px Verdana';
if (iSel == 2)
ctx.font = 'bold 30px Verdana';
ctx.fillText('< Nose >', 400, 280);
ctx.font = '30px Verdana';
if (iSel == 3)
ctx.font = 'bold 30px Verdana';
ctx.fillText('< Mouth >', 400, 380);
}
// -------------------------------------------------------------
// initialization
$(function(){
canvas = document.getElementById('scene');
ctx = canvas.getContext('2d');
// initialization of dragon
var oHeadImage = new Image();
oHeadImage.src = 'images/image.png';
oHeadImage.onload = function() {};
oHead = new Head(0, 0, 0, 755, 300, 405, oHeadImage);
oEye = new Eye(40, 70, 0, 120, 235, 80, oHeadImage);
oNose = new Nose(70, 120, 0, 276, 180, 140, oHeadImage);
oMouth = new Mouth(60, 260, 0, 546, 170, 120, oHeadImage);
$(window).keydown(function(event){
switch (event.keyCode) {
case 38: // Up key
iSel--;
if (iSel < 0) {
iSel = 3;
}
break;
case 40: // Up key
iSel++;
if (iSel >= 4) {
iSel = 0;
}
break;
case 37: // Left key
// update sprite positions
if (iSel == 0) {
oHead.iSpr--;
if (oHead.iSpr < 0) {
oHead.iSpr = 3;
}
}
if (iSel == 1) {
oEye.iSpr--;
if (oEye.iSpr < 0) {
oEye.iSpr = 4;
}
}
if (iSel == 2) {
oNose.iSpr--;
if (oNose.iSpr < 0) {
oNose.iSpr = 4;
}
}
if (iSel == 3) {
oMouth.iSpr--;
if (oMouth.iSpr < 0) {
oMouth.iSpr = 4;
}
}
break;
case 39: // Right key
// update sprite positions
if (iSel == 0) {
oHead.iSpr++;
if (oHead.iSpr >= 4) {
oHead.iSpr = 0;
}
}
if (iSel == 1) {
oEye.iSpr++;
if (oEye.iSpr >= 5) {
oEye.iSpr = 0;
}
}
if (iSel == 2) {
oNose.iSpr++;
if (oNose.iSpr >= 5) {
oNose.iSpr = 0;
}
}
if (iSel == 3) {
oMouth.iSpr++;
if (oMouth.iSpr >= 5) {
oMouth.iSpr = 0;
}
}
break;
case 32: // Spacebar key - export results
var temp_ctx, temp_canvas;
temp_canvas = document.createElement('canvas');
temp_ctx = temp_canvas.getContext('2d');
temp_canvas.width = 360;
temp_canvas.height = 410;
// draw head
temp_ctx.drawImage(oHead.image, oHead.iSpr*oHead.w, oHead.y2, oHead.w, oHead.h, oHead.x, oHead.y, oHead.w, oHead.h);
// draw eyes
temp_ctx.drawImage(oEye.image, oEye.iSpr*oEye.w, oEye.y2, oEye.w, oEye.h, oEye.x, oEye.y, oEye.w, oEye.h);
// draw nose
temp_ctx.drawImage(oNose.image, oNose.iSpr*oNose.w, oNose.y2, oNose.w, oNose.h, oNose.x, oNose.y, oNose.w, oNose.h);
// draw mouth
temp_ctx.drawImage(oMouth.image, oMouth.iSpr*oMouth.w, oMouth.y2, oMouth.w, oMouth.h, oMouth.x, oMouth.y, oMouth.w, oMouth.h);
var vData = temp_canvas.toDataURL();
$('#face_result').attr('src', vData);
break;
}
});
setInterval(drawScene, 40); // loop drawScene
});관련 추천사항】
위 내용은 HTML5 Canvas를 사용하여 얼굴을 만드는 예제 코드 공유의 상세 내용입니다. 자세한 내용은 PHP 중국어 웹사이트의 기타 관련 기사를 참조하세요!

핫 AI 도구

Undresser.AI Undress
사실적인 누드 사진을 만들기 위한 AI 기반 앱

AI Clothes Remover
사진에서 옷을 제거하는 온라인 AI 도구입니다.

Undress AI Tool
무료로 이미지를 벗다

Clothoff.io
AI 옷 제거제

AI Hentai Generator
AI Hentai를 무료로 생성하십시오.

인기 기사
뜨거운 도구

메모장++7.3.1
사용하기 쉬운 무료 코드 편집기

SublimeText3 중국어 버전
중국어 버전, 사용하기 매우 쉽습니다.

스튜디오 13.0.1 보내기
강력한 PHP 통합 개발 환경

드림위버 CS6
시각적 웹 개발 도구

SublimeText3 Mac 버전
신 수준의 코드 편집 소프트웨어(SublimeText3)
뜨거운 주제
 7338
7338
 9
1627
14
1352
46
1265
25
1210
29
9
1627
14
1352
46
1265
25
1210
29

 HTML의 테이블 테두리
Sep 04, 2024 pm 04:49 PM
HTML의 테이블 테두리
Sep 04, 2024 pm 04:49 PM
HTML의 테이블 테두리 안내. 여기에서는 HTML의 테이블 테두리 예제를 사용하여 테이블 테두리를 정의하는 여러 가지 방법을 논의합니다.
 HTML의 중첩 테이블
Sep 04, 2024 pm 04:49 PM
HTML의 중첩 테이블
Sep 04, 2024 pm 04:49 PM
HTML의 Nested Table에 대한 안내입니다. 여기에서는 각 예와 함께 테이블 내에 테이블을 만드는 방법을 설명합니다.
 HTML 여백-왼쪽
Sep 04, 2024 pm 04:48 PM
HTML 여백-왼쪽
Sep 04, 2024 pm 04:48 PM
HTML 여백-왼쪽 안내. 여기에서는 HTML margin-left에 대한 간략한 개요와 코드 구현과 함께 예제를 논의합니다.
 HTML 테이블 레이아웃
Sep 04, 2024 pm 04:54 PM
HTML 테이블 레이아웃
Sep 04, 2024 pm 04:54 PM
HTML 테이블 레이아웃 안내. 여기에서는 HTML 테이블 레이아웃의 값에 대해 예제 및 출력 n 세부 사항과 함께 논의합니다.
 HTML에서 텍스트 이동
Sep 04, 2024 pm 04:45 PM
HTML에서 텍스트 이동
Sep 04, 2024 pm 04:45 PM
HTML에서 텍스트 이동 안내. 여기서는 Marquee 태그가 구문과 함께 작동하는 방식과 구현할 예제에 대해 소개합니다.
 HTML 정렬 목록
Sep 04, 2024 pm 04:43 PM
HTML 정렬 목록
Sep 04, 2024 pm 04:43 PM
HTML 순서 목록에 대한 안내입니다. 여기서는 HTML Ordered 목록 및 유형에 대한 소개와 각각의 예에 대해서도 설명합니다.
 HTML 온클릭 버튼
Sep 04, 2024 pm 04:49 PM
HTML 온클릭 버튼
Sep 04, 2024 pm 04:49 PM
HTML onclick 버튼에 대한 안내입니다. 여기에서는 각각의 소개, 작업, 예제 및 다양한 이벤트의 onclick 이벤트에 대해 설명합니다.
 HTML 입력 자리 표시자
Sep 04, 2024 pm 04:54 PM
HTML 입력 자리 표시자
Sep 04, 2024 pm 04:54 PM
HTML 입력 자리 표시자 안내. 여기서는 코드 및 출력과 함께 HTML 입력 자리 표시자의 예를 논의합니다.
