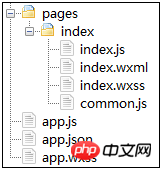
이 글에서는 WeChat 애플릿을 사용하여 날씨 예보 기능을 개발하는 방법을 소개합니다.

{  "pages":[    "pages/index/index"
  ],  "window":{    "backgroundTextStyle":"light",    "navigationBarBackgroundColor": "#fff",    "navigationBarTitleText": "天气预报",    "navigationBarTextStyle":"black"
  },  "networkTimeout": {    "request": 10000
}, "debug": true}디버그 모드를 활성화하세요.
3. 미니 프로그램 로직 레이어 먼저 common.js의 Get User's Current Geographic Location 인터페이스 를 사용하여 사용자의 좌표 주소를 가져오고 gcj02를 선택합니다. 좌표 유형. //
현재 위치 가져오기좌표
function getLocation(callback) {
    wx.getLocation({
        type: 'gcj02',
        success: function(res) {
            callback(true, res.latitude, res.longitude);
        },
        fail: function() {
            callback(false);
        }
    })
}함수에 반환됩니다. 실패하면 콜백 함수에 false를 전달합니다. 좌표를 얻은 후 Baidu 인터페이스
를 사용하여 날씨를 쿼리합니다. 해당 쿼리 코드는 아래와 같습니다.
function getWeather(latitude, longitude, callback) {    var ak = "";//换成自己的ak,不要用方倍工作室的
    var url = "https://api.map.baidu.com/telematics/v3/weather?location=" + longitude + "," + latitude + "&output=json&ak=" + ak;
    wx.request({
        url: url,
        success: function(res){
            console.log(res);
            callback(res.data);
        }
    });
}다음으로 위의 인터페이스를 결합하여 애플리케이션 계층에 대한 인터페이스를 구성합니다.
function loadWeatherData(callback) {
    getLocation(function(success, latitude, longitude){
        getWeather(latitude, longitude, function(weatherData){
            callback(weatherData);
        });
    });
}module.exports = {
loadWeatherData: loadWeatherData
}require를 사용하여 공개 코드를 소개합니다. 코드는 아래와 같습니다.
//index.jsvar common = require('common.js')

Page({
    data: {
        weather: {}
    },
    onLoad: function () {        var that = this;
        common.loadWeatherData(function(data){
            that.setData({
                weather: data
            });
        });
    }
})페이지의 인터페이스 구현에서 해당 코드는 다음과 같습니다.
<!--index.wxml--><view class="container">
  <view class="header">
      <view class="title">{{weather.results[0].currentCity}}</view>
      <view class="desc">{{weather.date}}</view>
  </view>

  <view class="menu-list">
      <view class="menu-item" wx:for="{{weather.results[0].weather_data}}" wx:key="*this">
        <view class="menu-item-main">
          <text class="menu-item-name">{{item.date}} {{item.weather}} {{item.wind}} {{item.temperature}}</text>
          <image class="menu-item-arrow" src="{{item.dayPictureUrl}}"></image>
        </view>
      </view>
</view></view>페이지의 스타일시트 구현은 다음과 같습니다.
.header {
  padding: 30rpx;
  line-height: 1;
}.title {
  font-size: 52rpx;
}.desc {
  margin-top: 10rpx;
  color: #888888;
  font-size: 28rpx;
}.menu-list {
  display: flex;
  flex-direction: column;
  background-color: #fbf9fe;
  margin-top: 10rpx;
}.menu-item {
  color: #000000;
  display: flex;
  background-color: #fff;
  margin: 10rpx 30rpx;
  flex-direction: column;
}.menu-item-main {
  display: flex;
  padding: 40rpx;
  border-radius: 10rpx;
  align-items: center;
  font-size: 32rpx;
  justify-content: space-between;
}.menu-item-arrow {
  width: 96rpx;
  height: 96rpx;
  transition: 400ms;
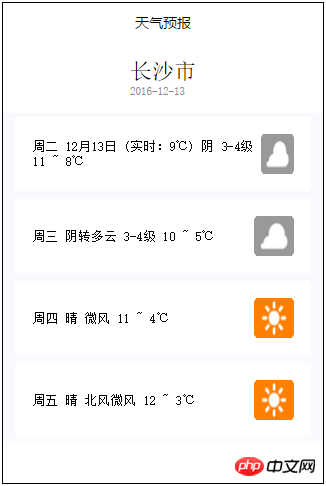
}날씨 예보 애플릿의 최종 효과는 그림에 나와 있습니다.

WeChat 미니 프로그램 데모: Guoku 및 새 버전
위 내용은 미니 프로그램 개발 일기 예보의 상세 내용입니다. 자세한 내용은 PHP 중국어 웹사이트의 기타 관련 기사를 참조하세요!