

.properties를 읽고 소스 코드를 자리 표시자 ${...}로 바꾸는 방법 소개

이 글에서는 주로 .properties 파일 읽기 및 자리 표시자 ${...} 대체 소스 코드 분석에 대한 관련 지식을 소개하며 이는 매우 좋은 참고 가치를 가지고 있습니다. 아래 에디터로 살펴보겠습니다
머리말
Bean의 일부 매개변수는 상대적으로 고정되어 있는 경우가 많습니다. 일반적으로 .properties 파일에서 이러한 매개변수를 구성하는 데 사용되며, Bean이 인스턴스화되면 자리 표시자 "${}"를 Spring으로 대체하여 .properties 파일에 구성된 매개변수를 읽어 해당 매개변수로 설정합니다. 콩의.
이 접근 방식의 가장 일반적인 예는 JDBC 구성입니다. 이 기사에서는 .properties 파일을 읽고 자리 표시자 "${}"를 바꾸는 소스 코드를 연구합니다. 먼저 코드부터 시작하여 DataSource를 정의합니다. 시뮬레이션 네 가지 JDBC 매개변수를 살펴보겠습니다.
public class DataSource {

  /**
   * 驱动类
   */
  private String driveClass;

  /**
   * jdbc地址
   */
  private String url;

  /**
   * 用户名
   */
  private String userName;

  /**
   * 密码
   */
  private String password;

  public String getDriveClass() {
    return driveClass;
  }

  public void setDriveClass(String driveClass) {
    this.driveClass = driveClass;
  }

  public String getUrl() {
    return url;
  }

  public void setUrl(String url) {
    this.url = url;
  }

  public String getUserName() {
    return userName;
  }

  public void setUserName(String userName) {
    this.userName = userName;
  }

  public String getPassword() {
    return password;
  }

  public void setPassword(String password) {
    this.password = password;
  }

  @Override
  public String toString() {
    return "DataSource [driveClass=" + driveClass + ", url=" + url + ", userName=" + userName + ", password=" + password + "]";
  }
}db.properties 파일 정의:
 driveClass=0
 url=1
 userName=2
 password=3
properties.xml 파일 정의:
<?xml version="1.0" encoding="UTF-8"?>
<beans xmlns="http://www.springframework.org/schema/beans"
  xmlns:xsi="http://www.w3.org/2001/XMLSchema-instance"
  xmlns:aop="http://www.springframework.org/schema/aop"
  xmlns:tx="http://www.springframework.org/schema/tx"
  xsi:schemaLocation="http://www.springframework.org/schema/beans
    http://www.springframework.org/schema/beans/spring-beans-3.0.xsd
    http://www.springframework.org/schema/aop
    http://www.springframework.org/schema/aop/spring-aop-3.0.xsd">

  <bean class="org.springframework.beans.factory.config.PropertyPlaceholderConfigurer">
    <property name="location" value="properties/db.properties"></property>
  </bean>

  <bean id="dataSource" class="org.xrq.spring.action.properties.DataSource">
    <property name="driveClass" value="${driveClass}" />
    <property name="url" value="${url}" />
    <property name="userName" value="${userName}" />
    <property name="password" value="${password}" />
  </bean>
</beans>테스트 코드 작성:
public class TestProperties {

  @Test
  public void testProperties() {
    ApplicationContext ac = new ClassPathXmlApplicationContext("spring/properties.xml");

    DataSource dataSource = (DataSource)ac.getBean("dataSource");
    System.out.println(dataSource);
  }
}실행 결과는 게시되지 않습니다. 당연히 Spring이 속성 파일에서 속성을 읽고 "${}" 자리 표시자를 바꾸는 방법을 분석해 보겠습니다.
PropertyPlaceholderConfigurer 클래스 분석
property.xml 파일에는 PropertyPlaceholderConfigurer 클래스가 있습니다. 이름에서 알 수 있듯이 속성 자리 표시자 구성자입니다. 이 클래스를 살펴보세요. 상속 관계 다이어그램:
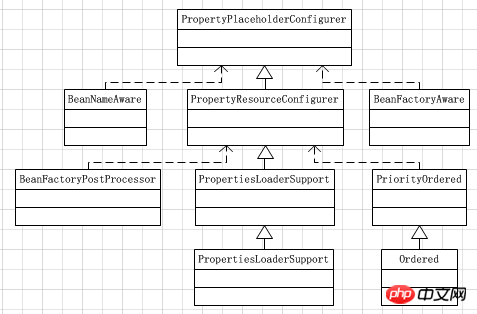
이 다이어그램에서 볼 수 있듯이 우리가 분석할 수 있는 가장 중요한 것은 PropertyPlaceholderConfigurer가 BeanFactoryPostProcessor 인터페이스 구현 클래스라는 것입니다. , Spring 컨텍스트는 모든 bean 정의가 로드된 후 bean이 인스턴스화되기 전에 postProcessBeanFactory 메서드를 통해 한 번에 "${}"<를 대체해야 한다고 상상해 보세요.
.properties 파일 읽기 소스 코드 분석
postProcessBeanFactory 메소드 구현을 살펴보겠습니다.public void postProcessBeanFactory(ConfigurableListableBeanFactory beanFactory) throws BeansException {
try {
Properties mergedProps = mergeProperties();
// Convert the merged properties, if necessary.
convertProperties(mergedProps);
// Let the subclass process the properties.
processProperties(beanFactory, mergedProps);
}
catch (IOException ex) {
throw new BeanInitializationException("Could not load properties", ex);
}
}protected Properties mergeProperties() throws IOException {
Properties result = new Properties();
if (this.localOverride) {
// Load properties from file upfront, to let local properties override.
loadProperties(result);
}
if (this.localProperties != null) {
for (Properties localProp : this.localProperties) {
CollectionUtils.mergePropertiesIntoMap(localProp, result);
}
}
if (!this.localOverride) {
// Load properties from file afterwards, to let those properties override.
loadProperties(result);
}
return result;
}protected void loadProperties(Properties props) throws IOException {
if (this.locations != null) {
for (Resource location : this.locations) {
if (logger.isInfoEnabled()) {
logger.info("Loading properties file from " + location);
}
InputStream is = null;
try {
is = location.getInputStream();
String filename = null;
try {
filename = location.getFilename();
} catch (IllegalStateException ex) {
// resource is not file-based. See SPR-7552.
}
if (filename != null && filename.endsWith(XML_FILE_EXTENSION)) {
this.propertiesPersister.loadFromXml(props, is);
}
else {
if (this.fileEncoding != null) {
this.propertiesPersister.load(props, new InputStreamReader(is, this.fileEncoding));
}
else {
this.propertiesPersister.load(props, is);
}
}
}
catch (IOException ex) {
if (this.ignoreResourceNotFound) {
if (logger.isWarnEnabled()) {
logger.warn("Could not load properties from " + location + ": " + ex.getMessage());
}
}
else {
throw ex;
}
}
finally {
if (is != null) {
is.close();
}
}
}
}
}자리 표시자 "${...}"는 소스 코드 구문 분석을 대체합니다.
위에서 .properties 파일을 읽는 프로세스를 본 후 "${}" "자리 표시자, postProcessBeanFactory 메소드로 돌아가겠습니다:public void postProcessBeanFactory(ConfigurableListableBeanFactory beanFactory) throws BeansException {
try {
Properties mergedProps = mergeProperties();
// Convert the merged properties, if necessary.
convertProperties(mergedProps);
// Let the subclass process the properties.
processProperties(beanFactory, mergedProps);
}
catch (IOException ex) {
throw new BeanInitializationException("Could not load properties", ex);
}
}BeanFactoryPostProcessor 클래스의 postProcessBeanFactory 메서드는 Bean 정의가 구문 분석된 후에 호출됩니다. , 그래서 현재 beanFactory 매개변수에는 이미 모든 Bean 정의 가 있습니다. Bean 구문 분석 프로세스에 익숙한 친구들은 이것을 잘 알고 있을 것입니다. 9행의 processProperties 메소드를 따르십시오.
protected void processProperties(ConfigurableListableBeanFactory beanFactoryToProcess, Properties props)
    throws BeansException {

  StringValueResolver valueResolver = new PlaceholderResolvingStringValueResolver(props);
  BeanDefinitionVisitor visitor = new BeanDefinitionVisitor(valueResolver);

  String[] beanNames = beanFactoryToProcess.getBeanDefinitionNames();
  for (String curName : beanNames) {
    // Check that we're not parsing our own bean definition,
    // to avoid failing on unresolvable placeholders in properties file locations.
    if (!(curName.equals(this.beanName) && beanFactoryToProcess.equals(this.beanFactory))) {
      BeanDefinition bd = beanFactoryToProcess.getBeanDefinition(curName);
      try {
        visitor.visitBeanDefinition(bd);
      }
      catch (Exception ex) {
        throw new BeanDefinitionStoreException(bd.getResourceDescription(), curName, ex.getMessage());
      }
    }
  }

  // New in Spring 2.5: resolve placeholders in alias target names and aliases as well.
  beanFactoryToProcess.resolveAliases(valueResolver);
  // New in Spring 3.0: resolve placeholders in embedded values such as annotation attributes.
  beanFactoryToProcess.addEmbeddedValueResolver(valueResolver);
}문자열 값 구문 분석기입니다. .
5행 BeanDefinitionVistor, 위의 StringValueResolver를 전달합니다. 이름에서 알 수 있듯이 이는 문자열 값 파서를 보유하는 Bean 정의 액세스 도구입니다.가 BeanDefinitionVistor를 통해 Bean 정의에 액세스할 수 있다고 상상해 보세요. 구문 분석해야 하는 문자열을 사용하는 경우 생성자 에서 전달한 StringValueResolver를 사용하여 문자열을 구문 분석합니다.
Line 7은 BeanFactory를 통해 모든 Bean 정의의 이름을 가져옵니다. 8행은 모든 Bean 정의의 이름을 순회하기 시작합니다. 11행의 첫 번째 판단에 주의하세요."!(curName.equals(this.beanName)" , this.beanName은 PropertyPlaceholderConfigurer를 참조합니다. 이는 PropertyPlaceholderConfigurer 자체가 자리 표시자 "${...}"를 구문 분석하지 않음을 의미합니다. 着重跟14行的代码,BeanDefinitionVistor的visitBeanDefinition方法,传入BeanDefinition: 看到这个方法轮番访问 获取属性数组进行遍历,第4行的代码对属性值进行解析获取新属性值,第5行判断新属性值与原属性值不等,第6行的代码用新属性值替换原属性值。因此跟一下第4行的resolveValue方法: 这里主要对value类型做一个判断,我们配置文件里面配置的是字符串,因此就看字符串相关代码,即34行的判断进去,其余的差不多,可以自己看一下源码是怎么做的。第35~第36行的代码就是获取属性值,第38行的代码resolveStringValue方法解析字符串: 继续跟第6行的方法,valueResolver前面说过了,是传入的一个PlaceholderResolvingStringValueResolver,看一下resolveStringValue方法实现: 第2行的replacePlaceholders方法顾名思义,替换占位符,它位于PropertyPlaceholderHelper类中,跟一下这个方法: 继续跟第3行的parseStringValue方法,即追踪到了替换占位符的核心代码中: 过一下此流程: 获取占位符前缀"${"的位置索引startIndex 占位符前缀"${"存在,从"${"后面开始获取占位符后缀"}"的位置索引endIndex 如果占位符前缀位置索引startIndex与占位符后缀的位置索引endIndex都存在,截取中间的部分placeHolder 从Properties中获取placeHolder对应的值propVal 如果propVal不存在,尝试对placeHolder使用":"进行一次分割,如果分割出来有结果,那么前面一部分命名为actualPlaceholder,后面一部分命名为defaultValue,尝试从Properties中获取actualPlaceholder对应的value,如果存在则取此value,如果不存在则取defaultValue,最终赋值给propVal 返回propVal,就是替换之后的值 流程很长,通过这样一整个的流程,将占位符"${...}"中的内容替换为了我们需要的值。 【相关推荐】 1. Java免费视频教程 2. JAVA教程手册 3. 全面解析Java注解 위 내용은 .properties를 읽고 소스 코드를 자리 표시자 ${...}로 바꾸는 방법 소개의 상세 내용입니다. 자세한 내용은 PHP 중국어 웹사이트의 기타 관련 기사를 참조하세요!public void visitBeanDefinition(BeanDefinition beanDefinition) {
visitParentName(beanDefinition);
visitBeanClassName(beanDefinition);
visitFactoryBeanName(beanDefinition);
visitFactoryMethodName(beanDefinition);
visitScope(beanDefinition);
visitPropertyValues(beanDefinition.getPropertyValues());
ConstructorArgumentValues cas = beanDefinition.getConstructorArgumentValues();
visitIndexedArgumentValues(cas.getIndexedArgumentValues());
visitGenericArgumentValues(cas.getGenericArgumentValues());
}protected void visitPropertyValues(MutablePropertyValues pvs) {
PropertyValue[] pvArray = pvs.getPropertyValues();
for (PropertyValue pv : pvArray) {
Object newVal = resolveValue(pv.getValue());
if (!ObjectUtils.nullSafeEquals(newVal, pv.getValue())) {
pvs.add(pv.getName(), newVal);
}
}
}protected Object resolveValue(Object value) {
if (value instanceof BeanDefinition) {
visitBeanDefinition((BeanDefinition) value);
}
else if (value instanceof BeanDefinitionHolder) {
visitBeanDefinition(((BeanDefinitionHolder) value).getBeanDefinition());
}
else if (value instanceof RuntimeBeanReference) {
RuntimeBeanReference ref = (RuntimeBeanReference) value;
String newBeanName = resolveStringValue(ref.getBeanName());
if (!newBeanName.equals(ref.getBeanName())) {
return new RuntimeBeanReference(newBeanName);
}
}
else if (value instanceof RuntimeBeanNameReference) {
RuntimeBeanNameReference ref = (RuntimeBeanNameReference) value;
String newBeanName = resolveStringValue(ref.getBeanName());
if (!newBeanName.equals(ref.getBeanName())) {
return new RuntimeBeanNameReference(newBeanName);
}
}
else if (value instanceof Object[]) {
visitArray((Object[]) value);
}
else if (value instanceof List) {
visitList((List) value);
}
else if (value instanceof Set) {
visitSet((Set) value);
}
else if (value instanceof Map) {
visitMap((Map) value);
}
else if (value instanceof TypedStringValue) {
TypedStringValue typedStringValue = (TypedStringValue) value;
String stringValue = typedStringValue.getValue();
if (stringValue != null) {
String visitedString = resolveStringValue(stringValue);
typedStringValue.setValue(visitedString);
}
}
else if (value instanceof String) {
return resolveStringValue((String) value);
}
return value;
}protected String resolveStringValue(String strVal) {
if (this.valueResolver == null) {
throw new IllegalStateException("No StringValueResolver specified - pass a resolver " +
"object into the constructor or override the 'resolveStringValue' method");
}
String resolvedValue = this.valueResolver.resolveStringValue(strVal);
// Return original String if not modified.
return (strVal.equals(resolvedValue) ? strVal : resolvedValue);
} public String resolveStringValue(String strVal) throws BeansException {
String value = this.helper.replacePlaceholders(strVal, this.resolver);
return (value.equals(nullValue) ? null : value);
} public String replacePlaceholders(String value, PlaceholderResolver placeholderResolver) {
Assert.notNull(value, "Argument 'value' must not be null.");
return parseStringValue(value, placeholderResolver, new HashSet<String>());
}protected String parseStringValue(
String strVal, PlaceholderResolver placeholderResolver, Set<String> visitedPlaceholders) {
StringBuilder buf = new StringBuilder(strVal);
int startIndex = strVal.indexOf(this.placeholderPrefix);
while (startIndex != -1) {
int endIndex = findPlaceholderEndIndex(buf, startIndex);
if (endIndex != -1) {
String placeholder = buf.substring(startIndex + this.placeholderPrefix.length(), endIndex);
if (!visitedPlaceholders.add(placeholder)) {
throw new IllegalArgumentException(
"Circular placeholder reference '" + placeholder + "' in property definitions");
}
// Recursive invocation, parsing placeholders contained in the placeholder key.
placeholder = parseStringValue(placeholder, placeholderResolver, visitedPlaceholders);
// Now obtain the value for the fully resolved key...
String propVal = placeholderResolver.resolvePlaceholder(placeholder);
if (propVal == null && this.valueSeparator != null) {
int separatorIndex = placeholder.indexOf(this.valueSeparator);
if (separatorIndex != -1) {
String actualPlaceholder = placeholder.substring(0, separatorIndex);
String defaultValue = placeholder.substring(separatorIndex + this.valueSeparator.length());
propVal = placeholderResolver.resolvePlaceholder(actualPlaceholder);
if (propVal == null) {
propVal = defaultValue;
}
}
}
if (propVal != null) {
// Recursive invocation, parsing placeholders contained in the
// previously resolved placeholder value.
propVal = parseStringValue(propVal, placeholderResolver, visitedPlaceholders);
buf.replace(startIndex, endIndex + this.placeholderSuffix.length(), propVal);
if (logger.isTraceEnabled()) {
logger.trace("Resolved placeholder '" + placeholder + "'");
}
startIndex = buf.indexOf(this.placeholderPrefix, startIndex + propVal.length());
}
else if (this.ignoreUnresolvablePlaceholders) {
// Proceed with unprocessed value.
startIndex = buf.indexOf(this.placeholderPrefix, endIndex + this.placeholderSuffix.length());
}
else {
throw new IllegalArgumentException("Could not resolve placeholder '" + placeholder + "'");
}
visitedPlaceholders.remove(placeholder);
}
else {
startIndex = -1;
}
}
return buf.toString();
}

핫 AI 도구

Undresser.AI Undress
사실적인 누드 사진을 만들기 위한 AI 기반 앱

AI Clothes Remover
사진에서 옷을 제거하는 온라인 AI 도구입니다.

Undress AI Tool
무료로 이미지를 벗다

Clothoff.io
AI 옷 제거제

Video Face Swap
완전히 무료인 AI 얼굴 교환 도구를 사용하여 모든 비디오의 얼굴을 쉽게 바꾸세요!

인기 기사
뜨거운 도구

메모장++7.3.1
사용하기 쉬운 무료 코드 편집기

SublimeText3 중국어 버전
중국어 버전, 사용하기 매우 쉽습니다.

스튜디오 13.0.1 보내기
강력한 PHP 통합 개발 환경

드림위버 CS6
시각적 웹 개발 도구

SublimeText3 Mac 버전
신 수준의 코드 편집 소프트웨어(SublimeText3)
뜨거운 주제
 7647
7647
 15
1392
52
91
11
73
19
36
110
15
1392
52
91
11
73
19
36
110


 자바의 웨카
Aug 30, 2024 pm 04:28 PM
자바의 웨카
Aug 30, 2024 pm 04:28 PM
Java의 Weka 가이드. 여기에서는 소개, weka java 사용 방법, 플랫폼 유형 및 장점을 예제와 함께 설명합니다.
 Java의 스미스 번호
Aug 30, 2024 pm 04:28 PM
Java의 스미스 번호
Aug 30, 2024 pm 04:28 PM
Java의 Smith Number 가이드. 여기서는 정의, Java에서 스미스 번호를 확인하는 방법에 대해 논의합니다. 코드 구현의 예.
 Java Spring 인터뷰 질문
Aug 30, 2024 pm 04:29 PM
Java Spring 인터뷰 질문
Aug 30, 2024 pm 04:29 PM
이 기사에서는 가장 많이 묻는 Java Spring 면접 질문과 자세한 답변을 보관했습니다. 그래야 면접에 합격할 수 있습니다.
 Java 8 Stream foreach에서 나누거나 돌아 오시겠습니까?
Feb 07, 2025 pm 12:09 PM
Java 8 Stream foreach에서 나누거나 돌아 오시겠습니까?
Feb 07, 2025 pm 12:09 PM
Java 8은 스트림 API를 소개하여 데이터 컬렉션을 처리하는 강력하고 표현적인 방법을 제공합니다. 그러나 스트림을 사용할 때 일반적인 질문은 다음과 같은 것입니다. 기존 루프는 조기 중단 또는 반환을 허용하지만 스트림의 Foreach 메소드는이 방법을 직접 지원하지 않습니다. 이 기사는 이유를 설명하고 스트림 처리 시스템에서 조기 종료를 구현하기위한 대체 방법을 탐색합니다. 추가 읽기 : Java Stream API 개선 스트림 foreach를 이해하십시오 Foreach 메소드는 스트림의 각 요소에서 하나의 작업을 수행하는 터미널 작동입니다. 디자인 의도입니다
 Java의 날짜까지의 타임스탬프
Aug 30, 2024 pm 04:28 PM
Java의 날짜까지의 타임스탬프
Aug 30, 2024 pm 04:28 PM
Java의 TimeStamp to Date 안내. 여기서는 소개와 예제와 함께 Java에서 타임스탬프를 날짜로 변환하는 방법에 대해서도 설명합니다.
 캡슐의 양을 찾기위한 Java 프로그램
Feb 07, 2025 am 11:37 AM
캡슐의 양을 찾기위한 Java 프로그램
Feb 07, 2025 am 11:37 AM
캡슐은 3 차원 기하학적 그림이며, 양쪽 끝에 실린더와 반구로 구성됩니다. 캡슐의 부피는 실린더의 부피와 양쪽 끝에 반구의 부피를 첨가하여 계산할 수 있습니다. 이 튜토리얼은 다른 방법을 사용하여 Java에서 주어진 캡슐의 부피를 계산하는 방법에 대해 논의합니다. 캡슐 볼륨 공식 캡슐 볼륨에 대한 공식은 다음과 같습니다. 캡슐 부피 = 원통형 볼륨 2 반구 볼륨 안에, R : 반구의 반경. H : 실린더의 높이 (반구 제외). 예 1 입력하다 반경 = 5 단위 높이 = 10 단위 산출 볼륨 = 1570.8 입방 단위 설명하다 공식을 사용하여 볼륨 계산 : 부피 = π × r2 × h (4
 미래를 창조하세요: 완전 초보자를 위한 Java 프로그래밍
Oct 13, 2024 pm 01:32 PM
미래를 창조하세요: 완전 초보자를 위한 Java 프로그래밍
Oct 13, 2024 pm 01:32 PM
Java는 초보자와 숙련된 개발자 모두가 배울 수 있는 인기 있는 프로그래밍 언어입니다. 이 튜토리얼은 기본 개념부터 시작하여 고급 주제를 통해 진행됩니다. Java Development Kit를 설치한 후 간단한 "Hello, World!" 프로그램을 작성하여 프로그래밍을 연습할 수 있습니다. 코드를 이해한 후 명령 프롬프트를 사용하여 프로그램을 컴파일하고 실행하면 "Hello, World!"가 콘솔에 출력됩니다. Java를 배우면 프로그래밍 여정이 시작되고, 숙달이 깊어짐에 따라 더 복잡한 애플리케이션을 만들 수 있습니다.
