

이미지 캐러셀 구현 방법에 대한 자세한 설명은 무엇입니까?

오늘 저는 객체 지향 프로그래밍을 검토했습니다.
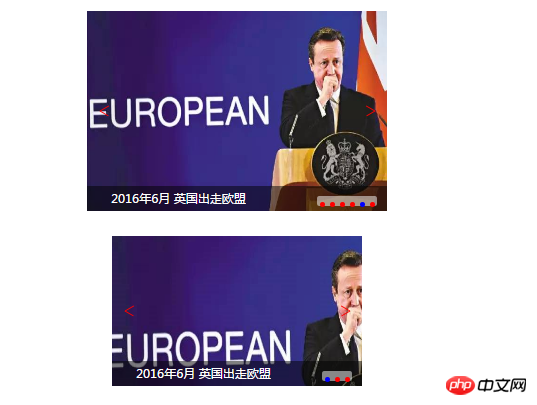
이 그림을 보면 아무것도 아니라고 생각할 것입니다. 그러면 코드로 이동하세요:
HTML 부분:
1 <!DOCTYPE html> 2 <html lang="en"> 3 <head> 4 <meta charset="UTF-8"> 5 <title>Document</title> 6 <style> 7 ul,ol,li{padding:0;margin:0;list-style: none;} 8 .container1{ 9 width: 600px;10 height: 400px;11 margin:50px auto;12 position: relative;13 }14 15 .container2{16 width: 500px;17 height: 300px;18 margin:50px auto;19 position: relative;20 }21 22 </style>23 <link rel="stylesheet" href="slider.css?1.1.11">24 <script src="Tq.js?1.1.11"></script>25 <script src="sliderIIFE.js?1.1.11"></script>26 </head>27 <body>28 <div class="container1 slider" id="slide1">29 <ul>30 <li><a href=""><img src="img/1.jpg" alt="2016年6月 英国出走欧盟"></a></li>31 <li><a href=""><img src="img/2.jpg" alt="2016年11月 特朗普当选美国总统"></a></li>32 <li><a href=""><img src="img/1.jpg" alt="2016年6月 英国出走欧盟"></a></li>33 34 <li><a href=""><img src="img/3.jpg" alt="双11"></a></li>35 <li><a href=""><img src="img/1.jpg" alt="2016年6月 英国出走欧盟"></a></li>36 37 <li><a href=""><img src="img/4.jpg" alt="G20峰会"></a></li>38 </ul>39 </div>40 41 42 <div class="container2 slider" id="slide2">43 <ul>44 <li><a href=""><img src="images/1.png" alt="2016年6月 英国出走欧盟"></a></li>45 <li><a href=""><img src="images/2.png" alt="2016年11月 特朗普当选美国总统"></a></li>46 <li><a href=""><img src="images/3.png" alt="双11"></a></li>47 48 </ul>49 </div>50 51 52 <script>53 54 var s1 = new Slider("slide1",{startIndex:0,speed:50});55 var s2 = new Slider("slide2",{startIndex:2});56 console.info(s1);57 console.info(s2);58 59 </script>60 </body>61 </html>필요한 CSS 코드
.slider ul li a{display: block;width: 100%;height: 100%;}
.slider ul,.slider ul li,.slider ul img{width: 100%;height: 100%;}


.slider ol{position: absolute;bottom:10px;background: rgba(255,255,255,.5);height: 20px;border-radius: 5px;right:20px;z-index:999;}
.slider ol li{margin:0 5px;width:10px;height:10px;border-radius:5px;display: inline-block;line-height:10px;background: red;font-size:0;vertical-align: middle;position:relative;top:-3px;}
.slider .mask{
	position: absolute;
	bottom:10px;
	width: 100%;
	height: 50px;
	line-height: 50px;
	text-align: center;
	background: rgba(0,0,0,.5);
	color:#fff;
}
.slider span{
	width:50px;
	height:50px;
	border-radius : 25px;
	position : absolute;
	top : 50%;
	transform: translateY(-50%);
	transition: background-color .5s;
	background-color: rgba(255,255,255,0);
}
.slider span.btnright{
	right:10px;
}
.slider span.btnleft{
	left:10px;
}
.slider span:hover{
	background-color: rgba(255,255,255,1);
}
.slider span.btnleft:after,span.btnright:after{
	transition: transform .5s;
	position: absolute;
	top:24px;
	left:15px;
	transform-origin: left top;
	transform: rotate(30deg);
	content: "";display: block;width: 20px;height: 2px;background-color: red;
}
.slider span.btnright:after{
	left:auto;
	right:15px;
	transform-origin: right top;

}
.slider .btnleft:before,.btnright:before{
	transition: transform .5s;
	position: absolute;
	top:24px;
	left:15px;
	transform-origin: left top;
	transform: rotate(-30deg);
	content: "";display: block;width: 20px;height: 2px;background-color: red;
}
.slider .btnright:before{
	transform-origin: right top;

	left: auto;
	right:15px;
	transform: rotate(-30deg);
}
.slider .btnleft:hover:after{
	transform: rotate(45deg);
}
.slider .btnleft:hover:before{
	transform: rotate(-45deg);
}
.slider .mask{
	position:absolute;
	bottom:0;
	height:50px;
	line-height:50px;
	color:#fff;
	text-align: left;
	text-indent: 2em;
	background-color:rgba(0,0,0,.5);
}JS 부분:
function $(id){
	return document.getElementById(id);
}

/**
 * 2.0
 * 在指定的容器中去找某一个TagName的html标签集合
 * containerId 可以是一个字符串,也可以是一个 dom对象。
 * @param  {[type]} containerId [description]
 * @param  {[type]} tagName     [description]
 * @return {[type]}             [description]
 *
 */
function $get(containerId,tagName){
	if(typeof containerId =="string" && $(containerId)){
		return $(containerId).getElementsByTagName(tagName);
	}
	else if(typeof containerId=="object")
	{
		return containerId.getElementsByTagName(tagName);
	}
	else{
		throw ("你写的第一个参数不是一个ID");
	}
}

//<span id="span" className="leftBtn" stlye="width:100px;height:100px;">按钮</span>
function $create(tagName,attr,style){
	var dom = document.createElement(tagName);
	for(var pName in attr){
		dom[pName] = attr[pName];
	}

	for(var pName in style){
		dom.style[pName] = style[pName];
	}
	return dom;
}
function info(obj){
	console.info(obj);
}

function getH(obj){
	//debugger;
	if(obj.currentStyle){
		getH = function(obj){
			return parseInt ( obj.currentStyle.height );
		}
	}else{
		getH=function(obj){
			return parseInt ( window.getComputedStyle(obj, null).height );
		}
	}
	getH(obj) ;


}

//对对象进行拓展
function extend(defaultConf,userConf){
	//对于在defaultConf这个对象中的每一个属性,
	//如果这个属性名在userConf中的也存在,则使用userConf中的那个属性值

	for(var pName in defaultConf){
		if(userConf.hasOwnProperty(pName)){
			defaultConf[pName] = userConf[pName];
		}
	}
}Carousel js
  1 ;(function(window){  2   3     //有问题,请自行改正!!!! 参考slider.js  4     var defaultConf = {  5         "isAuto":true,  6         "speed":"normal",  7         "startIndex":0,  8         "isClickable":true  9     }; 10  11     var speedList={ 12         "faster":2000, 13         "slower":4000, 14         "normal":3000 15     }; 16  17     function Slider(containerId,conf){ 18          19         // if(conf) 20         //     extend(defaultConf,conf); //这一句后,defaultConf这个对象中就会包含用户的设置 21  22         conf && extend(defaultConf,conf); 23  24         this.container = $(containerId); 25         this.slideList = $get($get(this.container,"ul")[0],"li");// 26         //this.indexList = $get($get(this.container,"ol")[0],"li");//数字指示条 27         this.num = this.slideList.length; 28         this.indexList = createIndexList.call(this);//数字指示条 29  30         this.leftBtn = createLinkBtn.call(this,"left"); //创建按钮 31         this.rightBtn = createLinkBtn.call(this,"right"); //创建按钮 32      33         this.txtDiv = createTxtDiv.call(this);//创建文字说明的区域 34          35         this.currentIndex = defaultConf.startIndex;        //当前整个轮播图中显示的 第几 张 36  37         init.call(this,this.currentIndex);                //初始化 把其它的li都隐藏,把第一个显示出来 38  39         this.timer ;
 40  41         if(typeof defaultConf.speed =="string") 42             this.speed = speedList[defaultConf.speed] || 2000; 43         else if (typeof defaultConf.speed =="number") { 44             this.speed = defaultConf.speed; 45         } 46         if( defaultConf.isAuto ) 47             this.auto(); 48  49         bindEvent.call(this);           //绑定事件 50     } 51  52     var createTxtDiv = function (){ 53  54         console.info(this); 55  56         //1.创建div,设置基本属性及样式 57         var div = $create("div",{className:"mask"},{}) 58         div.innerHTML = ""; 59         //2.添加到容器中 60         this.container.appendChild(div); 61         //3.返回 62         return div; 63     } 64  65     Slider.prototype.auto = function(){ 66         var that = this; 67         this.timer = setInterval(function(){ 68             that.rightBtn.onclick(); 69             //that.rightBtn.click(); 70  71         },that.speed); 72  73         console.info("定时器"+this.timer+"开动"); 74     } 75     var createLinkBtn = function(dir){ 76         //1.创建一个dom元素 设置基本的属性,同时设置样式。 77         var span = $create("span",{className:"btn"+dir},{ 78              79         }); 80          81         //3.把它添加到容器中 82         this.container.appendChild(span); 83         //4.返回 84          85         return span; 86     } 87     var createIndexList = function(){    //创建ol li结构 88         //ol>li 89         var ol = $create("ol"); //创建ol 90  91         var lis=[];                //保存所有的ol中的li 92         for (var i = 0; i < this.num; i++) { 93             var li = $create("li"); 94             ol.appendChild(li); 95             lis.push(li);        //加到数组中 96         } 97         this.container.appendChild(ol); 98         return lis; 99     }100 101     Slider.prototype.moveto = function(indexabc){102         for(var i = 0; i< this.num; i++){103             this.slideList[i].style.display = "none";104             this.indexList[i].style.backgroundColor="red";105         }106         this.slideList[indexabc].style.display = "block";107         this.indexList[indexabc].style.backgroundColor="blue";108 109         //更新当前的索引110         this.currentIndex = indexabc;111 112         //更新文字说明113         var txt = $get(this.slideList[indexabc],"img")[0].alt ;114         this.txtDiv.innerHTML = txt;115     //    console.info("当前是:"+this.currentIndex);116     }117     var bindEvent = function(){118         var that = this; /*var 能不能省*/119         //绑定指示条的事件120         121         if( defaultConf.isClickable){122             for (var i = 0; i < this.num; i++) {123                 this.indexList[i].index = i;124                 this.indexList[i].onmouseenter = function(){125                     that.moveto(this.index);126                 }127             }
128 }129 130 this.rightBtn.onclick = function(){131 //向右,显示下一张 当前的索引值要+1132 var i = that.currentIndex + 1;133 // i = (i== that.num) ? 0 : i; 134 i = i % that.num;135 that.moveto(i);136 }137 138 //绑定按钮的事件139 this.leftBtn.onclick = function(){140 //btnLeft 向左,显示上一张141 var i = that.currentIndex - 1; //上一张的编号142 //如果它等于-1,应该要显示最后一张,最后一张的索引值是that.num-1。143 //i = (i==-1) ? that.num-1 : i;144 i = (i+that.num) % that.num;145 //i = i < 0 ? that.num+i : i;146 that.moveto(i);147 }148 if(defaultConf.isAuto) {149 this.container.onmouseenter = function(){150 // console.info("stop");151 clearInterval(that.timer);152 153 }154 this.container.onmouseleave = function(){155 // console.info("go on");156 157 that.auto();158 }159 }160 }161 var init = function(yourlikeIndex){162 if( yourlikeIndex)163 this.moveto(yourlikeIndex);164 else165 this.moveto(0);166 }167 168 window.Slider = Slider;169 170 })(window);모든 사람에게 도움이 되기를 바랍니다. 이는 jQuery를 기반으로 한 것이 아니며 제가 직접 간단한 방법을 캡슐화했습니다.
앞으로 우리의 이미지 캐러셀은
1 <div class="container1 slider" id="slide1"> 2 <ul> 3 <li><a href=""><img src="img/1.jpg" alt="2016年6月 英国出走欧盟"></a></li> 4 <li><a href=""><img src="img/2.jpg" alt="2016年11月 特朗普当选美国总统"></a></li> 5 <li><a href=""><img src="img/1.jpg" alt="2016年6月 英国出走欧盟"></a></li> 6 7 <li><a href=""><img src="img/3.jpg" alt="双11"></a></li> 8 <li><a href=""><img src="img/1.jpg" alt="2016年6月 英国出走欧盟"></a></li> 9 10 <li><a href=""><img src="img/4.jpg" alt="G20峰会"></a></li>11 </ul>12 </div>13 <script>14 15 var s1 = new Slider("slide1",{startIndex:0,speed:50});16 17 18 </script>을 사용할 수 있으며, 이는 더 많은 캐러셀 구성요소가 있는 웹사이트에서 사용할 수 있습니다. 물론, 우리 방법의 js를 압축하면 더 강력하게 만들 수 있습니다. end , 변수 이름은 간단합니다. 그러면 효과가 더 좋아질 것입니다.
위 내용은 이미지 캐러셀 구현 방법에 대한 자세한 설명은 무엇입니까?의 상세 내용입니다. 자세한 내용은 PHP 중국어 웹사이트의 기타 관련 기사를 참조하세요!

핫 AI 도구

Undresser.AI Undress
사실적인 누드 사진을 만들기 위한 AI 기반 앱

AI Clothes Remover
사진에서 옷을 제거하는 온라인 AI 도구입니다.

Undress AI Tool
무료로 이미지를 벗다

Clothoff.io
AI 옷 제거제

AI Hentai Generator
AI Hentai를 무료로 생성하십시오.

인기 기사
뜨거운 도구

메모장++7.3.1
사용하기 쉬운 무료 코드 편집기

SublimeText3 중국어 버전
중국어 버전, 사용하기 매우 쉽습니다.

스튜디오 13.0.1 보내기
강력한 PHP 통합 개발 환경

드림위버 CS6
시각적 웹 개발 도구

SublimeText3 Mac 버전
신 수준의 코드 편집 소프트웨어(SublimeText3)
뜨거운 주제
 7563
7563
 15
1385
52
84
11
61
19
28
99
15
1385
52
84
11
61
19
28
99

 정규 표현식을 사용하여 PHP 배열에서 중복 값 제거
Apr 26, 2024 pm 04:33 PM
정규 표현식을 사용하여 PHP 배열에서 중복 값 제거
Apr 26, 2024 pm 04:33 PM
정규식을 사용하여 PHP 배열에서 중복 값을 제거하는 방법: 정규식 /(.*)(.+)/i를 사용하여 중복 항목을 일치시키고 바꿉니다. 배열 요소를 반복하고 preg_match를 사용하여 일치하는지 확인합니다. 일치하면 값을 건너뛰고, 그렇지 않으면 중복 값이 없는 새 배열에 추가합니다.
 MySQL 쿼리 결과 배열을 객체로 변환하는 방법은 무엇입니까?
Apr 29, 2024 pm 01:09 PM
MySQL 쿼리 결과 배열을 객체로 변환하는 방법은 무엇입니까?
Apr 29, 2024 pm 01:09 PM
MySQL 쿼리 결과 배열을 객체로 변환하는 방법은 다음과 같습니다. 빈 객체 배열을 만듭니다. 결과 배열을 반복하고 각 행에 대해 새 개체를 만듭니다. foreach 루프를 사용하여 각 행의 키-값 쌍을 새 개체의 해당 속성에 할당합니다. 개체 배열에 새 개체를 추가합니다. 데이터베이스 연결을 닫습니다.
 PHP에서 배열과 객체의 차이점은 무엇입니까?
Apr 29, 2024 pm 02:39 PM
PHP에서 배열과 객체의 차이점은 무엇입니까?
Apr 29, 2024 pm 02:39 PM
PHP에서 배열은 순서가 지정된 시퀀스이며 요소는 인덱스로 액세스됩니다. 객체는 new 키워드를 통해 생성된 속성과 메서드가 있는 엔터티입니다. 배열 액세스는 인덱스를 통해 이루어지며, 객체 액세스는 속성/메서드를 통해 이루어집니다. 배열 값이 전달되고 객체 참조가 전달됩니다.
 PDF를 JPG 형식으로 변환(빠름)
Apr 19, 2024 am 08:13 AM
PDF를 JPG 형식으로 변환(빠름)
Apr 19, 2024 am 08:13 AM
PDF 형식의 문서는 디지털 시대에 다양한 분야에서 널리 사용되지만 때로는 특정 요구에 맞게 JPG 이미지 형식으로 변환해야 할 때도 있습니다. 일반적인 문제에 대한 해결책뿐만 아니라 이 기사에서는 실용적인 도구를 사용하여 PDF 파일을 고품질의 무손실 JPG 이미지로 변환하는 방법을 자세히 소개합니다. 적절한 PDF-JPG 변환 도구와 그 특성 및 적용 가능한 시나리오, 데스크톱 소프트웨어 및 모바일 애플리케이션을 선택하고 온라인 변환을 포함하여 몇 가지 일반적인 PDF-JPG 변환 도구를 소개합니다. 작동 단계, 일반적인 온라인 변환기인 Smallpdf 및 Zamzar에 대한 자세한 소개, 업로드 제한 사항 및 변환 품질 등을 포함한 Adobe Acrobat Online과 같은 온라인 변환기에 대한 소개입니다. 데스크탑 소프트웨어 권장 사항 및 사용 Ni
 프로그래밍이란 무엇을 위한 것이며 프로그래밍을 배워서 무슨 소용이 있습니까?
Apr 28, 2024 pm 01:34 PM
프로그래밍이란 무엇을 위한 것이며 프로그래밍을 배워서 무슨 소용이 있습니까?
Apr 28, 2024 pm 01:34 PM
1. 프로그래밍은 웹사이트, 모바일 애플리케이션, 게임, 데이터 분석 도구 등 다양한 소프트웨어와 애플리케이션을 개발하는 데 사용될 수 있습니다. 응용 분야는 매우 광범위하여 과학 연구, 의료, 금융, 교육, 엔터테인먼트 등 거의 모든 산업을 포괄합니다. 2. 프로그래밍을 배우면 문제 해결 능력과 논리적 사고 능력을 향상하는 데 도움이 됩니다. 프로그래밍하는 동안 우리는 문제를 분석 및 이해하고, 해결책을 찾고, 이를 코드로 변환해야 합니다. 이러한 사고방식은 우리의 분석적이고 추상적인 능력을 키우고 실제적인 문제를 해결하는 능력을 향상시킬 수 있습니다.
 C++ 함수가 객체를 반환할 때 무엇에 주의해야 합니까?
Apr 19, 2024 pm 12:15 PM
C++ 함수가 객체를 반환할 때 무엇에 주의해야 합니까?
Apr 19, 2024 pm 12:15 PM
C++에서는 함수가 객체를 반환할 때 주의해야 할 세 가지 사항이 있습니다. 객체의 수명 주기는 메모리 누수를 방지하기 위해 호출자가 관리합니다. 매달린 포인터를 피하고 메모리를 동적으로 할당하거나 개체 자체를 반환하여 함수가 반환된 후에도 개체가 유효한지 확인하세요. 컴파일러는 성능을 향상시키기 위해 반환된 개체의 복사 생성을 최적화할 수 있지만 개체가 값 의미 체계에 따라 전달되는 경우 복사 생성이 필요하지 않습니다.
 PHP 함수는 어떻게 객체를 반환하나요?
Apr 10, 2024 pm 03:18 PM
PHP 함수는 어떻게 객체를 반환하나요?
Apr 10, 2024 pm 03:18 PM
PHP 함수는 return 문과 객체 인스턴스를 사용하여 객체를 반환함으로써 데이터를 사용자 정의 구조로 캡슐화할 수 있습니다. 구문: functionget_object():object{}. 이를 통해 사용자 정의 속성과 메소드를 사용하여 객체를 생성하고 객체 형태로 데이터를 처리할 수 있습니다.
 C++ 프로그래밍 퍼즐 모음: 사고를 자극하고 프로그래밍 기술을 향상시킵니다.
Jun 01, 2024 pm 10:26 PM
C++ 프로그래밍 퍼즐 모음: 사고를 자극하고 프로그래밍 기술을 향상시킵니다.
Jun 01, 2024 pm 10:26 PM
C++ 프로그래밍 퍼즐은 피보나치 수열, 계승, 해밍 거리, 배열의 최대값과 최소값 등과 같은 알고리즘 및 데이터 구조 개념을 다룹니다. 이러한 퍼즐을 풀면 C++ 지식을 통합하고 알고리즘 이해 및 프로그래밍 기술을 향상시킬 수 있습니다.
