Python으로 그래픽을 그리는 예제에 대한 자세한 설명
1. 1.System : Windows10
python 버전 : Python3.6.1ibraries 사용 : Numpy 라이브러리가 무작위 숫자를 생성하는 몇 가지 방법이 있습니다. .randomrand(d0, d1, ..., dn)
In [2]: x=np.random.rand(2,5)
In [3]: xOut[3 ]: 배열([[ 0.84286554, 0.50007593, 0.66500549, 0.97387807, 0.03993009],
[ 0.46391661, 0.50717355, 0.21527461, 0. 17, 0.2567891 ]])
randn(d0, d1, ..., dn) 쿼리 결과는 표준 정규 분포 [-0.20229338, 1.44852833, -0.10858996, -1.65034606, -0.39793 635]]) In [4]: x=np.random.randn(2,5)
array([[ -0.77195196, 0.26651203, -0.35045793, -0.0210377, 0.89749635],
In [5]: x
Out[5]:randint(low,high,size) 는 다음 사이에서 생성됩니다. 낮음 및 높음(절반 개방 간격[낮음, 높음)), 크기 데이터
In [6]: x=np.random.randint(1,8,4)
In [7]: x
Out[7] : array([ 4, 4, 2, 7])random_integers(low,high,size) 낮음과 높음 사이에서 생성(닫힌 간격 [낮음, 높음)), 크기 데이터
In [ 10] : x=np.random.random_integers(2,10,5)
In [11]: x
Out[11]: array([7, 4, 5, 4, 2])4. 꺾은선형 차트 3. 산점도
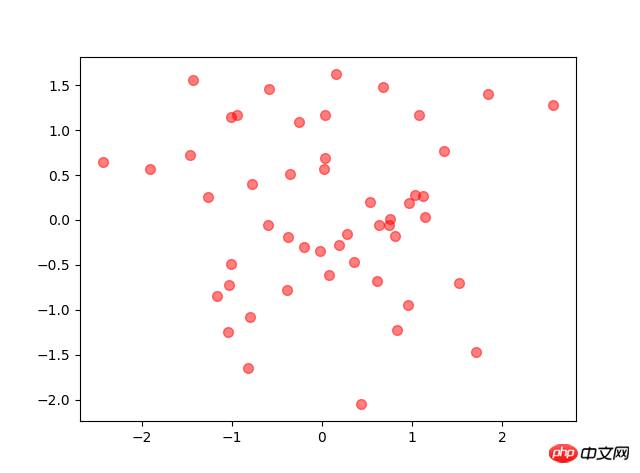
import numpy as np로그인 후 복사x x轴 y y轴 s 圆点面积 c 颜色 marker 圆点形状 alpha 圆点透明度 #其他图也类似这种配置로그인 후 복사
N=50# height=np.random.randint(150,180,20)# weight=np.random.randint(80,150,20)
x=np.random.randn(N)
y=np.random.randn(N)
plt.scatter(x,y,s=50,c='r',marker='o',alpha=0.5)
plt.show()
5. 막대 차트
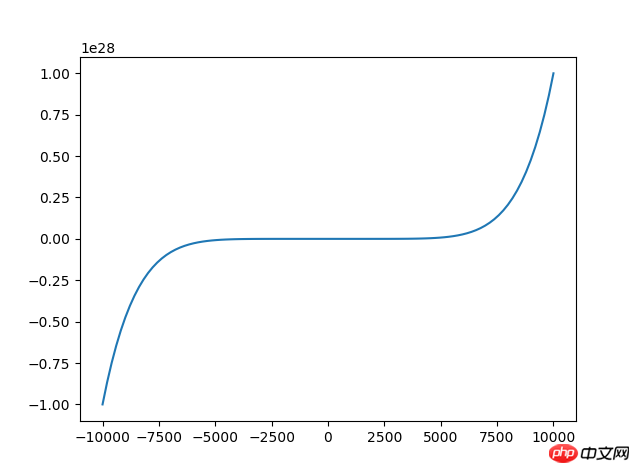
<code class="python hljs"># 来源:百度网盘搜索 <br/>x=np.linspace(<span class="hljs-number">-10000,<span class="hljs-number">10000,<span class="hljs-number">100) <span class="hljs-comment">#将-10到10等区间分成100份
y=x**<span class="hljs-number">2+x**<span class="hljs-number">3+x**<span class="hljs-number">7
plt.plot(x,y)
plt.show()</span></span></span></span></span></span></span></code>
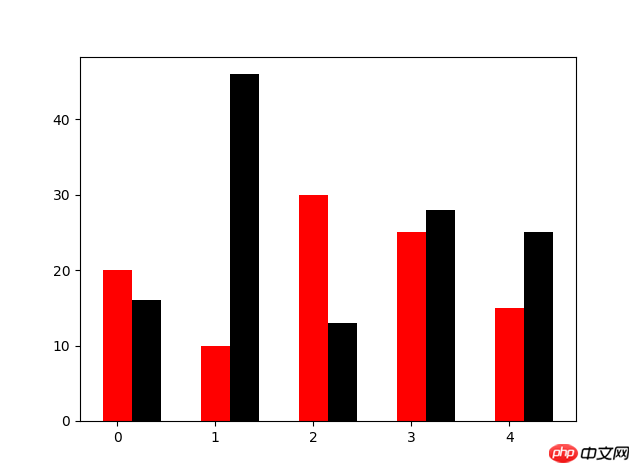
방향 설정 가로 막대형 차트N=5 y=[20,10,30,25,15] y1=np.random.randint(10,50,5) x=np.random.randint(10,1000,N) index=np.arange(N) plt.bar(left=index,height=y,color='red',width=0.3) plt.bar(left=index+0.3,height=y1,color='black',width=0.3) plt.show()로그인 후 복사
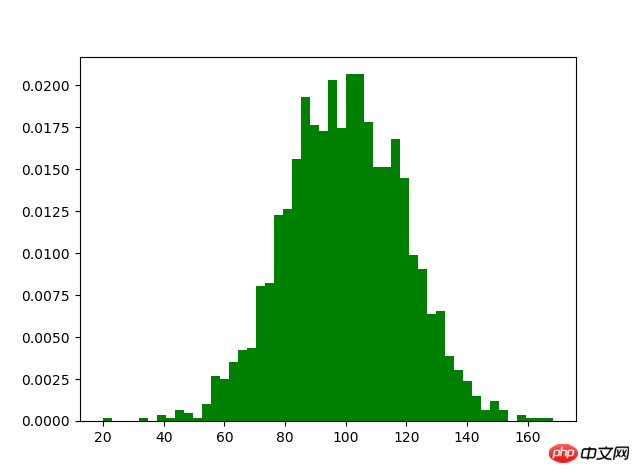
6. 히스토그램
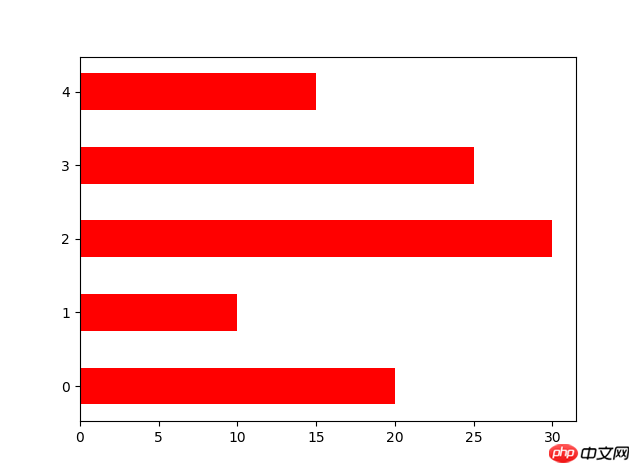
N=5
y=[20,10,30,25,15]
y1=np.random.randint(10,50,5)
x=np.random.randint(10,1000,N)
index=np.arange(N)# plt.bar(left=index,height=y,color='red',width=0.3)# plt.bar(left=index+0.3,height=y1,color='black',width=0.3)#plt.barh() 加了h就是横向的条形图,不用设置orientation
plt.bar(left=0,bottom=index,width=y,color='red',height=0.5,orientation='horizontal')
plt.show()
로그인 후 복사m1=100 sigma=20 x=m1+sigma*np.random.randn(2000) plt.hist(x,bins=50,color="green",normed=True) plt.show()로그인 후 복사# #双变量的直方图# #颜色越深频率越高# #研究双变量的联合分布로그인 후 복사
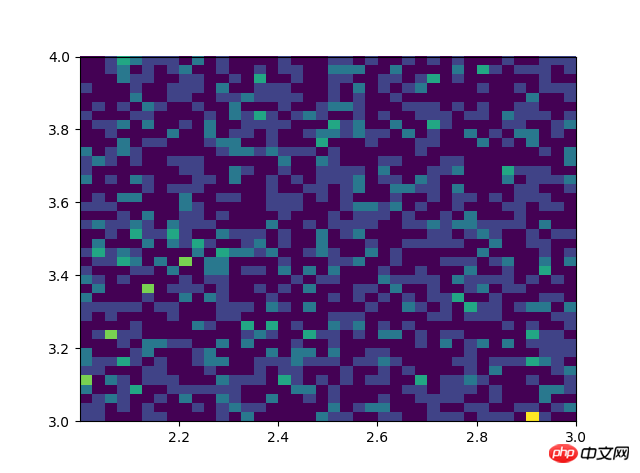
7. #双变量的直方图#颜色越深频率越高#研究双变量的联合分布
x=np.random.rand(1000)+2
y=np.random.rand(1000)+3
plt.hist2d(x,y,bins=40)
plt.show()
#设置x,y轴比例为1:1,从而达到一个正的圆
8.box 사진을 입력하세요
#labels标签参数,x是对应的数据列表,autopct显示每一个区域占的比例,explode突出显示某一块,shadow阴影로그인 후 복사labes=['A','B','C','D'] fracs=[15,30,45,10] explode=[0,0.1,0.05,0]#设置x,y轴比例为1:1,从而达到一个正的圆 plt.axes(aspect=1)#labels标签参数,x是对应的数据列表,autopct显示每一个区域占的比例,explode突出显示某一块,shadow阴影 plt.pie(x=fracs,labels=labes,autopct="%.0f%%",explode=explode,shadow=True) plt.show()로그인 후 복사
위 내용은 Python으로 그래픽을 그리는 예제에 대한 자세한 설명의 상세 내용입니다. 자세한 내용은 PHP 중국어 웹사이트의 기타 관련 기사를 참조하세요!

핫 AI 도구

Undresser.AI Undress
사실적인 누드 사진을 만들기 위한 AI 기반 앱

AI Clothes Remover
사진에서 옷을 제거하는 온라인 AI 도구입니다.

Undress AI Tool
무료로 이미지를 벗다

Clothoff.io
AI 옷 제거제

AI Hentai Generator
AI Hentai를 무료로 생성하십시오.

인기 기사

뜨거운 도구

메모장++7.3.1
사용하기 쉬운 무료 코드 편집기

SublimeText3 중국어 버전
중국어 버전, 사용하기 매우 쉽습니다.

스튜디오 13.0.1 보내기
강력한 PHP 통합 개발 환경

드림위버 CS6
시각적 웹 개발 도구

SublimeText3 Mac 버전
신 수준의 코드 편집 소프트웨어(SublimeText3)

뜨거운 주제
 7476
7476
 15
15
 1377
1377
 52
52
 77
77
 11
11
 49
49
 19
19
 19
19
 31
31
 MySQL은 지불해야합니다
Apr 08, 2025 pm 05:36 PM
MySQL에는 무료 커뮤니티 버전과 유료 엔터프라이즈 버전이 있습니다. 커뮤니티 버전은 무료로 사용 및 수정할 수 있지만 지원은 제한되어 있으며 안정성이 낮은 응용 프로그램에 적합하며 기술 기능이 강합니다. Enterprise Edition은 안정적이고 신뢰할 수있는 고성능 데이터베이스가 필요하고 지원 비용을 기꺼이 지불하는 응용 프로그램에 대한 포괄적 인 상업적 지원을 제공합니다. 버전을 선택할 때 고려 된 요소에는 응용 프로그램 중요도, 예산 책정 및 기술 기술이 포함됩니다. 완벽한 옵션은없고 가장 적합한 옵션 만 있으므로 특정 상황에 따라 신중하게 선택해야합니다.
 설치 후 MySQL을 사용하는 방법
Apr 08, 2025 am 11:48 AM
이 기사는 MySQL 데이터베이스의 작동을 소개합니다. 먼저 MySQLworkBench 또는 명령 줄 클라이언트와 같은 MySQL 클라이언트를 설치해야합니다. 1. MySQL-Uroot-P 명령을 사용하여 서버에 연결하고 루트 계정 암호로 로그인하십시오. 2. CreateABase를 사용하여 데이터베이스를 작성하고 데이터베이스를 선택하십시오. 3. CreateTable을 사용하여 테이블을 만들고 필드 및 데이터 유형을 정의하십시오. 4. InsertInto를 사용하여 데이터를 삽입하고 데이터를 쿼리하고 업데이트를 통해 데이터를 업데이트하고 DELETE를 통해 데이터를 삭제하십시오. 이러한 단계를 마스터하고 일반적인 문제를 처리하는 법을 배우고 데이터베이스 성능을 최적화하면 MySQL을 효율적으로 사용할 수 있습니다.
 다운로드 후 MySQL을 설치할 수 없습니다
Apr 08, 2025 am 11:24 AM
MySQL 설치 실패의 주된 이유는 다음과 같습니다. 1. 권한 문제, 관리자로 실행하거나 Sudo 명령을 사용해야합니다. 2. 종속성이 누락되었으며 관련 개발 패키지를 설치해야합니다. 3. 포트 충돌, 포트 3306을 차지하는 프로그램을 닫거나 구성 파일을 수정해야합니다. 4. 설치 패키지가 손상되어 무결성을 다운로드하여 확인해야합니다. 5. 환경 변수가 잘못 구성되었으며 운영 체제에 따라 환경 변수를 올바르게 구성해야합니다. 이러한 문제를 해결하고 각 단계를 신중하게 확인하여 MySQL을 성공적으로 설치하십시오.
 MySQL 다운로드 파일이 손상되어 설치할 수 없습니다. 수리 솔루션
Apr 08, 2025 am 11:21 AM
MySQL 다운로드 파일은 손상되었습니다. 어떻게해야합니까? 아아, mySQL을 다운로드하면 파일 손상을 만날 수 있습니다. 요즘 정말 쉽지 않습니다! 이 기사는 모든 사람이 우회를 피할 수 있도록이 문제를 해결하는 방법에 대해 이야기합니다. 읽은 후 손상된 MySQL 설치 패키지를 복구 할 수있을뿐만 아니라 향후에 갇히지 않도록 다운로드 및 설치 프로세스에 대해 더 깊이 이해할 수 있습니다. 파일 다운로드가 손상된 이유에 대해 먼저 이야기합시다. 이에 대한 많은 이유가 있습니다. 네트워크 문제는 범인입니다. 네트워크의 다운로드 프로세스 및 불안정성의 중단으로 인해 파일 손상이 발생할 수 있습니다. 다운로드 소스 자체에도 문제가 있습니다. 서버 파일 자체가 고장 났으며 물론 다운로드하면 고장됩니다. 또한 일부 안티 바이러스 소프트웨어의 과도한 "열정적 인"스캔으로 인해 파일 손상이 발생할 수 있습니다. 진단 문제 : 파일이 실제로 손상되었는지 확인하십시오
 MySQL은 인터넷이 필요합니까?
Apr 08, 2025 pm 02:18 PM
MySQL은 기본 데이터 저장 및 관리를위한 네트워크 연결없이 실행할 수 있습니다. 그러나 다른 시스템과의 상호 작용, 원격 액세스 또는 복제 및 클러스터링과 같은 고급 기능을 사용하려면 네트워크 연결이 필요합니다. 또한 보안 측정 (예 : 방화벽), 성능 최적화 (올바른 네트워크 연결 선택) 및 데이터 백업은 인터넷에 연결하는 데 중요합니다.
 고로드 애플리케이션의 MySQL 성능을 최적화하는 방법은 무엇입니까?
Apr 08, 2025 pm 06:03 PM
MySQL 데이터베이스 성능 최적화 안내서 리소스 집약적 응용 프로그램에서 MySQL 데이터베이스는 중요한 역할을 수행하며 대규모 트랜잭션 관리를 담당합니다. 그러나 응용 프로그램 규모가 확장됨에 따라 데이터베이스 성능 병목 현상은 종종 제약이됩니다. 이 기사는 일련의 효과적인 MySQL 성능 최적화 전략을 탐색하여 응용 프로그램이 고 부하에서 효율적이고 반응이 유지되도록합니다. 실제 사례를 결합하여 인덱싱, 쿼리 최적화, 데이터베이스 설계 및 캐싱과 같은 심층적 인 주요 기술을 설명합니다. 1. 데이터베이스 아키텍처 설계 및 최적화 된 데이터베이스 아키텍처는 MySQL 성능 최적화의 초석입니다. 몇 가지 핵심 원칙은 다음과 같습니다. 올바른 데이터 유형을 선택하고 요구 사항을 충족하는 가장 작은 데이터 유형을 선택하면 저장 공간을 절약 할 수있을뿐만 아니라 데이터 처리 속도를 향상시킬 수 있습니다.
 MySQL 설치 후 시작할 수없는 서비스에 대한 솔루션
Apr 08, 2025 am 11:18 AM
MySQL이 시작을 거부 했습니까? 당황하지 말고 확인합시다! 많은 친구들이 MySQL을 설치 한 후 서비스를 시작할 수 없다는 것을 알았으며 너무 불안했습니다! 걱정하지 마십시오.이 기사는 침착하게 다루고 그 뒤에있는 마스터 마인드를 찾을 수 있습니다! 그것을 읽은 후에는이 문제를 해결할뿐만 아니라 MySQL 서비스에 대한 이해와 문제 해결 문제에 대한 아이디어를 향상시키고보다 강력한 데이터베이스 관리자가 될 수 있습니다! MySQL 서비스는 시작되지 않았으며 간단한 구성 오류에서 복잡한 시스템 문제에 이르기까지 여러 가지 이유가 있습니다. 가장 일반적인 측면부터 시작하겠습니다. 기본 지식 : 서비스 시작 프로세스 MySQL 서비스 시작에 대한 간단한 설명. 간단히 말해서 운영 체제는 MySQL 관련 파일을로드 한 다음 MySQL 데몬을 시작합니다. 여기에는 구성이 포함됩니다
 MySQL 설치 후 데이터베이스 성능을 최적화하는 방법
Apr 08, 2025 am 11:36 AM
MySQL 성능 최적화는 설치 구성, 인덱싱 및 쿼리 최적화, 모니터링 및 튜닝의 세 가지 측면에서 시작해야합니다. 1. 설치 후 innodb_buffer_pool_size 매개 변수와 같은 서버 구성에 따라 my.cnf 파일을 조정해야합니다. 2. 과도한 인덱스를 피하기 위해 적절한 색인을 작성하고 Execution 명령을 사용하여 실행 계획을 분석하는 것과 같은 쿼리 문을 최적화합니다. 3. MySQL의 자체 모니터링 도구 (showprocesslist, showstatus)를 사용하여 데이터베이스 건강을 모니터링하고 정기적으로 백업 및 데이터베이스를 구성하십시오. 이러한 단계를 지속적으로 최적화함으로써 MySQL 데이터베이스의 성능을 향상시킬 수 있습니다.


