Android에는 기본 레이아웃이 있습니다: FrameLayout, LinearLayout, TableLayout, RelativeLayout, AbsoluteLayout.
Android 개발자 Google 문서 http://android.xsoftlab.net/reference/android/view/ViewGroup.html
FrameLayout
<FrameLayout
android:layout_width="" //取值范围"match_parent"、"wrap_content"、"XXdp"  布局整体宽度
android:layout_height=""//取值范围"match_parent"、"wrap_content"、"XXdp"  布局整体高度
android:layout_weight=""//取值示例"1.0"  布局所占比重
android:layout_gravity="" //取值范围"center"、"top"、"bottom"、"left"、"right"、"right|bottom" 布局位置
android:layout_margin="" //取值示例"0dp" 距离父控件四个方向距离
android:layout_marginLeft="" //取值示例"0dp" 距离父控件左间距
android:layout_marginTop="" //取值示例"0dp" 距离父控件上间距
android:layout_marginRight="" //取值示例"0dp" 距离父控件右间距
android:layout_marginBottom="" //取值示例"0dp" 距离父控件下间距
android:layout_marginStart="" //取值示例"-50dp" "50dp"  控件离父控件开始的位置的距离(前者不显示前50dp)
android:layout_marginEnd=""   //取值示例"-50dp" "50dp"  控件离父控件结束的位置的距离(前者不显示后50dp)
android:addStatesFromChildren="" //取值范围"true" 、"false" viewgroup的drawable属性是否把它的子类的drawable的state包含进来。测试中linearlayout如果不包含该属性(false),当子widget被点击时不会出现被选中的状态。也就是子类的state不会被传递给父类了
android:descendantFocusability="" //见下
android:splitMotionEvents=""  //取值范围"true" "false" 定义布局是否传递touch事件到子布局
android:layoutMode="" //取值范围 "clipBounds" "opticalBounds"  见下
android:id=""
android:tag="" //listView中区别Item非常有用的Tag标签(key-value)
android:scrollX="" //The initial horizontal scroll offset, in pixels. [dimension]最初的水平滚动的偏移,以像素为单位。
android:scrollY="" //The initial virtual scroll offset, in pixels. [dimension]最初的竖直滚动的偏移,以像素为单位。
android:background=""
android:padding="" //取值示例"0dp" 控件内容(文本图片子控件等)距离控件四个方向边界的距离
android:paddingLeft=""
android:paddingTop=""
android:paddingRight=""
android:paddingBottom=""
android:paddingStart="" //见下  文字对齐方式详解
android:paddingEnd="" //见下  文字对齐方式详解
android:foreground="" //设置布局的前景图,前景图不会被子元素覆盖
android:foregroundGravity="" //设置布局前景图的位置
android:foregroundInsidePadding="" //
android:focusable="" //取值"true" "false"  能否获得焦点(按键)
android:focusableInTouchMode="" //取值"true" "false"  是否可以通过touch获取到焦点(android:focusable 为先决条件)
android:fitsSystemWindows="" //取值"true" "false"  设置布局调整时是否考虑系统窗口(如状态栏)
android:fadeScrollbars="" //取值"true" "false" 滚动条自动隐藏
android:fadingEdge=""  //设置拉滚动条时 ,边框渐变的方向。none(边框颜色不变),horizontal(水平方向颜色变淡),vertical(垂直方向颜色变淡)。
android:fadingEdgeLength="" //滚动条渐变长度
android:filterTouchesWhenObscured="" //取值范围  "true" "false"所在窗口被其它可见窗口遮住时,是否过滤触摸事件
android:visibility="" //取值范围 "gone" "visible" "invisible"(虽不可见,但占据布局位置)
android:scrollbars=""//取值范围 "none" "horizontal" "vertical" 设置滚动条
android:scrollbar //outsideInset :  该ScrollBar显示在视图(view)的边缘,增加了view的padding. 如果可能的话,该ScrollBar仅仅覆盖这个view的背景.                                  insideInset :该ScrollBar显示在padding区域里面,增加了控件的padding区域,该ScrollBar不会和视图的内容重叠.                                                    outsideOverlay :  该ScrollBar显示在视图(view)的边缘,不增加view的padding,该ScrollBar将被半透明覆盖                                                         insideOverlay : 该ScrollBar显示在内容区域里面,不会增加了控件的padding区域,该ScrollBar以半透明的样式覆盖在视图(view)的内容
android:isScrollContainer=""  //取值范围 "true""false" 设置当前View是否为滚动容器(是否可以为输入法腾出空间而隐藏)
android:scrollbarFadeDuration="" //褪色时间
android:scrollbarDefaultDelayBeforeFade="" //设置滚动条N毫秒后开始淡化,以毫秒为单位。
android:scrollbarSize="" //设置滚动条大小
android:scrollbarThumbHorizontal="@drawable" //设置水平滚动条的drawable
android:scrollbarThumbVertical="@drawable" //设置垂直滚动条的drawable.
android:scrollbarTrackHorizontal="@drawable"//设置水平滚动条背景(轨迹)的色drawable
android:scrollbarTrackVertical="@deawable" //设置垂直滚动条背景(轨迹)的drawable注意直接
android:scrollbarAlwaysDrawHorizontalTrack="true/false" //设置水平滚动条是否含有轨道
android:scrollbarAlwaysDrawVerticalTrack="true/false"  // 设置垂直滚动条是否含有轨道
android:requiresFadingEdge="none/horizontal/vertical" //定义褪色时滚动边缘
android:nextFocusLeft="@+id/" //Up键按下之后,哪一个控件获得焦点(被选中)
android:nextFocusRight="@+id/"
android:nextFocusUp="@+id/"
android:nextFocusDown="@+id/"
android:nextFocusForward="@+id/"
android:clickable="true/false"
android:longClickable="true/false"
android:saveEnabled="true/false" //设置是否在窗口冻结时(如旋转屏幕)保存View的数据
android:drawingCacheQuality="auto|low|hight" //设置绘图缓存质量
android:keepScreenOn="true/false" //View在可见的情况下是否保持唤醒状态
android:duplicateParentState="true/false"  如果设置此属性,将直接从父容器中获取绘图状态(光标,按下等)。 注意根据目前测试情况仅仅是获取绘图状态,而没有获取事件,也就是你点一下LinearLayout时Button有被点击的效果,但是不执行点击事件。
android:minHeight=""
android:minWidth=""
android:soundEffectsEnabled="true/false" // 设置点击或触摸时是否有声音效果
android:hapticFeedbackEnabled="true/false" // 实现单击某个视图,系统提供一个触力反馈(震动一下)
android:contentDescription="@string/"        //图片不可见时的文字描述(盲人)
android:onClick=""
android:overScrollMode="ifContentScrolls/always/never" //滚动到边界时的效果
android:alpha="0.1" //透明度
android:translationX="" //X轴的偏移距离
android:translationY=""
android:transformPivotX="" //从某点的X轴偏移距离
android:transformPivotY=""
android:rotation=""  //旋转
android:rotationX=""
android:rotationY=""
android:scaleX="" //设置X轴缩放比例
android:scaleY=""
android:verticalScrollbarPosition="defaultPosition/left/right"  //设置垂直滚动条的位置
android:layerType="none/hardware/software" //绘图是否开启硬件加速
android:layoutDirection="" //定义布局图纸的方向
android:textDirection=""  //
android:textAlignment="inherit/....."   //文字对齐方式
android:importantForAccessibility="noHideDescendants/...."    //设置可达性的重要行
android:accessibilityLiveRegion=""
android:labelFor=""   //添加标签
android:measureAllChildren=""  //见下
android:animateLayoutChanges="true"   //添加默认布局动画
android:clipChildren="" //见下
android:clipToPadding="" //见下转载
android:layoutAnimation="" //设置layout动画
android:animationCache=""
android:persistentDrawingCache="" android:alwaysDrawnWithCache="" />
개발 시 매우 일반적인 문제입니다. 프로젝트의 목록 보기는 단순한 텍스트가 아닙니다. 자체 어댑터가 BaseAdapter를 상속하고 요구 사항에 따라 이를 작성해야 하는 경우가 많습니다. . 아마도 각 항목을 클릭해도 반응이 없고 포커스를 얻을 수 없는 경우가 발생할 수 있습니다. 그 이유는 주로 정의한 Item에 ImageButton, Button, CheckBox(Button 또는 Checkable의 하위 유형 컨트롤이라고도 할 수 있음)와 같은 하위 컨트롤이 있기 때문입니다. 포커스가 맞춰져 있어서 클릭을 많이 하는 편인데, 아이템이 바뀌는 건 서브 컨트롤이고, 아이템 자체를 클릭해도 아무런 반응이 없습니다.
이때,descendantFocusability를 사용하여 해결할 수 있습니다. API 설명은 다음과 같습니다.
포커스를 취할 뷰를 찾을 때 ViewGroup과 해당 하위 항목 간의 관계를 정의합니다. .
다음 상수 값 중 하나여야 합니다.

이 속성은 뷰에 포커스가 있을 때 viewGroup과 해당 하위 컨트롤 간의 관계를 정의합니다.
속성에는 세 가지 값이 있습니다.
beforeDescendants: viewgroup은 하위 클래스 컨트롤에 우선순위를 부여하고 포커스를 얻습니다.
afterDescendants: viewgroup은 하위 클래스 컨트롤이 필요하지 않을 때만 포커스를 얻습니다. 집중하세요
보기 그룹은 하위 클래스 컨트롤을 덮어쓰고 직접 포커스를 얻습니다
보통 우리는 항목 레이아웃의 루트 레이아웃에 android:descendantFocusability="blocksDescendants" 속성을 추가하는 세 번째 유형을 사용합니다.
레이아웃 모드를 정의합니다. 이 viewground의 값은 footowing 상수 값 중 하나입니다.
| descripting | clipBounds | |
|---|---|---|
이 컨테이너를 배치할 때 하위 클립 경계를 사용하세요. 경계를 자르려면 하위 컨트롤을 사용하세요. clipBounds | 0 | Use the children's clip bounds when laying out this container.铺设这种容器时,使用子控件剪辑边界。 |
opticalBounds | 1 |
이는 TextView 및 EditText 요소의 전역 속성 리소스 기호 layoutMode.
오른쪽에서 왼쪽 레이아웃
RTL(오른쪽에서 왼쪽) 레이아웃 구현 거울 반사용 , 다음 단계만 수행하면 됩니다.
1. 애플리케이션 선언 파일(매니페스트)에서 RTL 미러링 지원을 활성화하도록 선언합니다. 구체적인 방법은 다음과 같습니다. 매니페스트.xml 선언 파일의
2를 추가합니다. 애플리케이션의 모든 "왼쪽/오른쪽" 레이아웃 속성을 수정합니다. 해당 "시작/끝" 레이아웃
1) 애플리케이션이 Android 4.2 대상 플랫폼(애플리케이션의 targetSdkVersion 또는 minSdkVersion이 17 이상)용인 경우 원래 "왼쪽" 및 "오른쪽"을 "시작" 및 "끝"으로 바꿔야 합니다. 예를 들어 android:paddingLeft는 android:paddingStart로 대체되어야 합니다.
2) 애플리케이션이 Android 4.2 이전 버전(즉, targetSdkVersion 또는 minSdkVersion 16 이하)과 계속 호환되도록 하려면 "start"와 "end"를 모두 추가해야 합니다. "left" 및 " 오른쪽". 예를 들어 adnroid:paddingLeft와 android:paddingStart를 모두 작성해야 합니다.
애플리케이션이 UI에 텍스트를 쓰는 순서(왼쪽에서 오른쪽 또는 오른쪽에서 왼쪽)를 보다 정확하게 제어하기 위해 Android 4.2에서는 다음 API를 도입했습니다.
android:layoutDirection - 이 속성은 구성요소의 레이아웃 방향
android:textDirection — 이 속성은 컴포넌트
android:textAlignment의 텍스트 정렬 방향을 설정합니다. 이 속성은 텍스트 정렬을 설정합니다.
getLayoutDirectionFromLocale() — 이 메소드는 지정된 영역의 사용자 정의 레이아웃을 가져오는 데 사용됩니다
오른쪽에서 왼쪽 정렬을 사용하면 사용자 정의 레이아웃, 그리기 가능한 객체 및 다른 자원. 리소스 일치자 "ldrtl"을 사용하여 리소스를 간단히 식별하면 리소스를 "오른쪽에서 왼쪽으로 쓰는 리소스"로 정의할 수 있습니다. 오른쪽에서 왼쪽 레이아웃 디버깅 및 최적화 측면에서 HierarchyViewer는 현재 시작/끝 속성, 레이아웃 방향, 텍스트 방향, 텍스트 정렬 등과 같은 모든 정보의 계층적 표시를 지원합니다.
그런 다음 텍스트 언어 습관이 왼쪽에서 오른쪽인지 오른쪽에서 왼쪽인지에 관계없이 모든 사용자를 위한 아름다운 Android 앱을 개발할 때입니다. 우리는 이 아름다운 애플리케이션이 실제로 구현되는 것을 정말 기대하고 있습니다!
android:foreground 设置布局的前景图,前景图不会被子元素覆盖
android:foregroundGravity 设置布局前景图的位置
对于FrameLayout.LayoutParams,这里仅有android:layout_gravity属性,可以查看前面文章
http://isux.tencent.com/learn-android-from-zero-session3.html
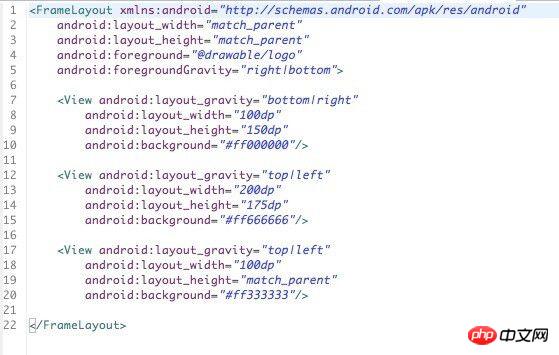
我们可以实践一下:
新建一个Android项目,然后在layout文件夹找到布局xml文件并写入以下布局
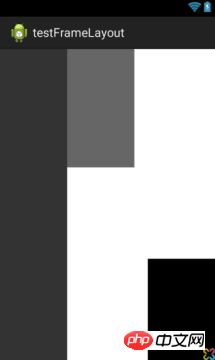
运行效果如下:
viewFlipper中的item如何动态设置高度?
例如:
<ViewFlipperandroid:layout_width="match_parent"android:layout_height="wrap_content"android:layout_gravity="bottom"><include layout="@layout/layoutone"/><include layout="@layout/layouttwo"/><include layout="@layout/layoutthree"/></ViewFlipper>
假如想做成一个layoutone是50dp,layouttwo是50dp,layoutthree是80dp高度的话,你会发现在子布局中设置高度后,ViewFlipper切换时总是以子view中高度最大的值为其高度值,也就是80dp。但是又不想让layoutone和layouttwo太高,开始的时候想通过LayoutParams动态设置吧,可惜不行(把viewflipper单独出来才行),然后找到需要设置android:measureAllChildren="false",或者代码调用setMeasureAllChildren(false);即可,因为默认情况下measureAllChildren=true。设置后各个view的高度就不同了。该属性也适合FrameLayout等。
原因:参见FrameLayout#onMeasure(int, int)的源码,android:measureAllChildren="true"时,将所有children加入到mMeasureAllChildren的链表中,然后再重新measure下。
android:clipChildren
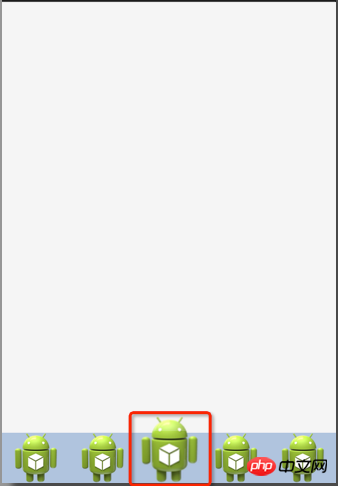
效果图

이 사진을 보면 만약 여러분이 이 효과를 어떻게 얻을 수 있을지 먼저 생각해 보세요. 즉시 RelativeLayout 사용을 생각하셨나요? NO,NO,NO,,,
2. 구현 코드
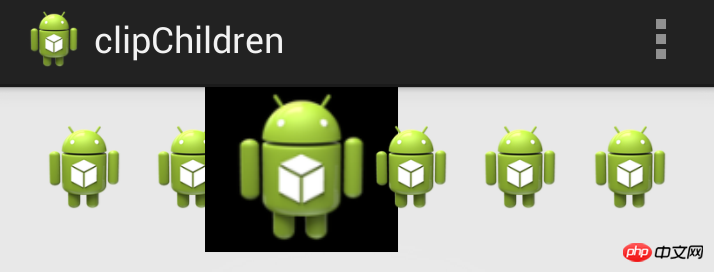
xml version="1.0" encoding="utf-8"?> 2. clipToPadding用来定义ViewGroup是否允许在padding中绘制。默认情况下,cliptopadding被设置为ture, 也就是把padding中的值都进行裁切了。1.clipChild用来定义他的子控件是否要在他应有的边界内进行绘制。 默认情况下,clipChild被设置为true。 也就是不允许进行扩展绘制。 还有该功能是android第一个版本就已经提供的方法。 所有可以跨任意android版本使用。 这两个属性联合起来能干什么呢? 哈, 用来做一些类似于心形放大等点击特效非常合适啊。 不用去更改布局, 只需加入这两个属相,并引入动画效果就完成了。 按照上面的思路,做个demo吧。 先看看最后的效果吧, 点击第三个机器人就会播放一个变大的效果(类似于心变大的效果) 废话不多说,上关键代码: 1. 布局代码(核心) 主要看设的两个关键属性android:clipChildren和android:clipToPadding均为false。 这就让点击第三个小人时,可以跨边界进行绘制,并且允许其在padding区域内绘制。 2. 其他辅助代码,如动画和act等内容 3. 除了这种应用,网上还有其他人对这两个属性的妙用: 用viewPaper来实现一个Gallery效果:http://www.iteye.com/topic/1129898 위 내용은 Android 레이아웃 레이아웃 속성에 대한 전체 설명의 상세 내용입니다. 자세한 내용은 PHP 중국어 웹사이트의 기타 관련 기사를 참조하세요!
<LinearLayout xmlns:android="http://schemas.android. com/apk/res/android"
android:layout_width="match_parent"
android:layout_height="match_parent"
android:clipChildren="false"
android:방향 ="세로" >
<android.support.v4.view.ViewPager
android:id="@+id/view_pager"
안드로이드: layout_width="match_parent"
android:layout_height="0dip"
android:layout_weight="1.0" />
<LinearLayout
android:layout_width="match_parent"
android:layout_height="48dip"
android:Background="#B0C4DE"
및 roid:orientation="horizontal" >
<ImageView
android:layout_width="0dip"
android:layout_height ="fill_parent"
android:layout_weight="1.0"
android:scaleType="fitCenter"
android:src="@drawable/ic_launcher" />
< ImageView
android:layout_width="0dip"
android:layout_height="fill_parent"
android :layout_weight="1.0"
android:scaleType="fitCenter"
android:src="@drawable/ic_launcher" />
<ImageView
android:layout_width="0dip"
android:layout_height ="64dip"
android:layout_gravity="bottom"
android:layout_weight="1.0"
android:scaleType="fitCenter"
android:src= "@drawable/ic_launcher" />
<ImageView
android:layout_width="0dip"
android:layout_height="fill_parent"
android:src="@drawable/ic_launcher"
/>
android:layout_height ="fill_parent" android:layout_weight ="1.0" D Android: scaletype
= "Fitcenter" Android: src
= "@Drawable/IC_LAUNCHER" /& gt; & &&Linearlayout
& gt; +
2 android:layout_gravity를 통해 초과 부분이 표시되는 방식을 제어할 수 있습니다.
3 android:clipChildren의 의미: 자녀를 해당 범위로 제한할지 여부
문서를 살펴보고 다음 소개를 찾아보세요
android:clipChildren setClipChildren(boolean) Defines whether a child is limited to draw inside of its bounds or not.
android:clipToPadding setClipToPadding(boolean)Defines whether the ViewGroup will clip its drawing surface so as to exclude the padding area. 
<LinearLayout xmlns:android="http://schemas.android.com/apk/res/android"
    xmlns:tools="http://schemas.android.com/tools"
    android:layout_width="match_parent"
    android:layout_height="match_parent"
    android:paddingBottom="@dimen/activity_vertical_margin"
    android:paddingLeft="@dimen/activity_horizontal_margin"
    android:paddingRight="@dimen/activity_horizontal_margin"
    android:paddingTop="@dimen/activity_vertical_margin"
    tools:context=".MainActivity"
    android:clipChildren="false"
    android:clipToPadding="false">

    <ImageView        android:id="@+id/img1"
        android:layout_width="wrap_content"
        android:layout_height="wrap_content"
        android:layout_weight="1"
        android:src="@drawable/ic_launcher" />

    <ImageView        android:id="@+id/img2"
        android:layout_width="wrap_content"
        android:layout_height="wrap_content"
        android:layout_weight="1"
        android:src="@drawable/ic_launcher" />

    <ImageView        android:id="@+id/img3"
        android:onClick="AA"
        android:layout_width="wrap_content"
        android:layout_height="wrap_content"
        android:layout_weight="1"
        android:background="@android:color/black"
        android:src="@drawable/ic_launcher" />

    <ImageView        android:id="@+id/img4"
        android:layout_width="wrap_content"
        android:layout_height="wrap_content"
        android:layout_weight="1"
        android:src="@drawable/ic_launcher" />

    <ImageView        android:id="@+id/img5"
        android:layout_width="wrap_content"
        android:layout_height="wrap_content"
        android:layout_weight="1"
        android:src="@drawable/ic_launcher" />

    <ImageView        android:id="@+id/img6"
        android:layout_width="wrap_content"
        android:layout_height="wrap_content"
        android:layout_weight="1"
        android:src="@drawable/ic_launcher" /></LinearLayout>
<?xml version="1.0" encoding="utf-8"?><scale    xmlns:android="http://schemas.android.com/apk/res/android"
    android:fromXScale="1.0"
    android:fromYScale="1.0"
    android:toXScale="3.0"
    android:toYScale="3.0"
    android:duration="2000"
       android:pivotX="50%"
       android:pivotY="50%"
    ></scale>
package com.example.clipchildren;import android.os.Bundle;import android.app.Activity;import android.view.Menu;import android.view.View;import android.view.animation.Animation;import android.view.animation.AnimationUtils;import android.widget.ImageView;import android.widget.Toast;public class MainActivity extends Activity {    //只对第三个小人做放大动作
    ImageView image3 =null;
    @Override    protected void onCreate(Bundle savedInstanceState) {        super.onCreate(savedInstanceState);
        setContentView(R.layout.activity_main);
        image3 = (ImageView) findViewById(R.id.img3);
    }


    @Override    public boolean onCreateOptionsMenu(Menu menu) {        // Inflate the menu; this adds items to the action bar if it is present.        getMenuInflater().inflate(R.menu.main, menu);        return true;
    }
    public void AA(View view) {
        Toast.makeText(this, "aa", Toast.LENGTH_SHORT).show();
        Animation an = AnimationUtils.loadAnimation(getApplicationContext(), R.anim.anims);
        image3.startAnimation(an);
    }

}