
이 기사에서는 주로 ASP.NET MVC가 RazorViewEngine을 다시 작성하여 다중 테마 전환을 달성하는 방법을 자세히 소개합니다. 이는 특정 참조 가치가 있습니다. 관심 있는 친구가 참조할 수 있습니다.
ASP.NET MVC에서 테마 전환 구현 일반적으로 두 가지 방법이 있습니다. 스킨의 CSS와 js 참조를 전환하는 것이고, 다른 하나는 뷰 엔진을 다시 작성하는 것입니다. 뷰 엔진을 다시 작성하면 더 유연해집니다. 다양한 테마에서 다양한 레이아웃과 스타일을 가질 수 있을 뿐만 아니라 다양한 테마에 표시되는 데이터 항목을 일관되지 않게 만들어 특정 테마에 개인화된 콘텐츠를 추가할 수 있기 때문입니다.
이 기사에서는 뷰 엔진을 다시 작성하여 설명하겠습니다. 이 작업을 수행하기 전에 먼저 MVC의 기본 사항을 살펴보겠습니다.
로그인한 후 시스템은 다음과 같습니다. 기본 테마를 클릭하여 테마를 전환하면 왼쪽 메뉴 표시줄의 레이아웃이 변경되고 오른쪽 콘텐츠의 스타일도 변경되지만 주소 표시줄은 변경되지 않습니다. Metronic은 인터페이스 UI로 사용됩니다. 공식 웹사이트에서는 유료이지만 중국에서는 항상 무료로 찾을 수 있습니다. 공식 주소 : http://keenthemes.com/preview/metronic/
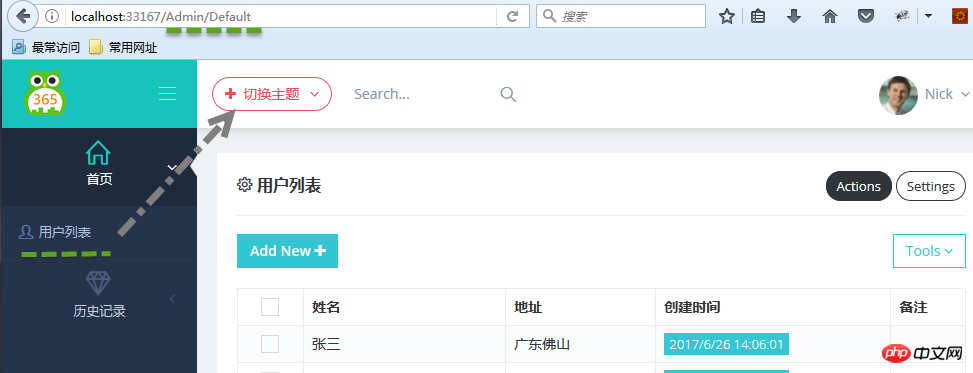
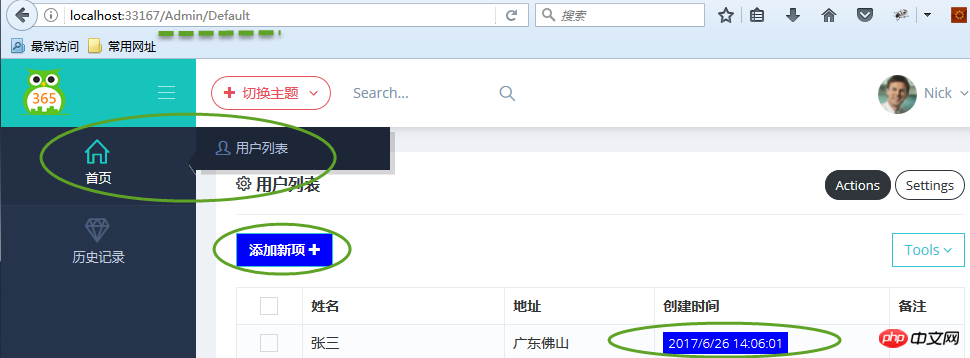
여기서는 영역과 모듈(독립적인 업무 기능에 따라 구분)로 나누는 방식을 사용합니다. , 여기서 Secom.Emx.Admin 및 Secom.Emx.History는 두 개의 독립적인 모듈이며 관리 및 기록 영역이 각각 생성됩니다.
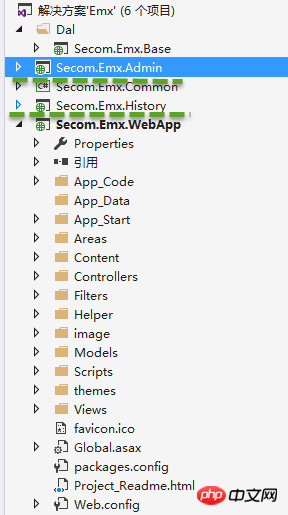

Secom.Emx.Admin 모델 아래의 Areas 디렉터리가 Secom.Emx.WebApp의 디렉터리와 정확히 동일하다는 것을 알 수 있습니다. 사실 처음에는 모듈에 뷰를 추가하고 싶지 않았습니다. 프로젝트이지만 독립적인 배포의 편의를 위해 계속 추가되었습니다.
Secom.Emx.Admin 프로젝트를 마우스 오른쪽 버튼으로 클릭하고 "속성" - "이벤트 생성"을 선택한 후 다음 코드를 추가하세요.
xcopy /e/r/y $(ProjectDir)Areas\Admin\Views
$(SolutionDir)Secom.Emx.WebApp\Areas\Admin\Views
이 명령은 실제로 Secom.Emx 프로젝트를 컴파일할 때 매우 간단합니다. .Admin, 프로젝트의 뷰를 Secom.Emx.WebApp 프로젝트의 지정된 디렉터리에 복사합니다.

Region구성 파일 Secom.Emx.WebApp에 배치했습니다. 실제로 지역 경로를 등록하면 프로젝트가 상속된 모든 파일을 찾기 때문에 독립적으로 클래스 라이브러리 프로젝트에 배치할 수 있습니다. bin 디렉터리 AreaRegistration 클래스 아래에 있는 다음 WebApp에서 이 클래스 라이브러리 프로젝트를 참조하도록 합니다. Secom.Emx.WebApp 프로젝트는 Secom.Emx.Admin 및 Secom.Emx.History에 대한 참조를 추가합니다.
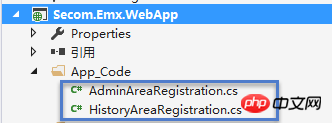
AdminAreaRegistration 코드는 다음과 같습니다.
using System.Web.Mvc;

namespace Secom.Emx.WebApp
{
 public class AdminAreaRegistration : AreaRegistration
 {
  public override string AreaName
  {
   get
   {
    return "Admin";
   }
  }

  public override void RegisterArea(AreaRegistrationContext context)
  {
   context.MapRoute(
    "Admin_default",
    "Admin/{controller}/{action}/{id}",
    new { action = "Index", id = UrlParameter.Optional },
    namespaces:new string[1] { "Secom.Emx.Admin.Areas.Admin.Controllers" }
   );
  }
 }
}namespace 및 namespaces가 나중에 추가되었습니다.new string[1] { "Secom.Emx.Admin.Areas.Admin. Controllers" }, 이 네임스페이스는 독립 모듈 Secom.Emx.Admin 아래의 컨트롤러가 위치한 네임스페이스입니다.
HistoryAreaRegistration 코드는 다음과 같습니다.
using System.Web.Mvc;

namespace Secom.Emx.WebApp
{
 public class HistoryAreaRegistration : AreaRegistration
 {
  public override string AreaName
  {
   get
   {
    return "History";
   }
  }

  public override void RegisterArea(AreaRegistrationContext context)
  {
   context.MapRoute(
    "History_default",
    "History/{controller}/{action}/{id}",
    new { action = "Index", id = UrlParameter.Optional },
    namespaces:new string[1] { "Secom.Emx.History.Areas.History.Controllers" }
   );
  }
 }
}먼저 RazorViewEngine의 원래 생성자 를 다음과 같이 살펴보겠습니다.
public RazorViewEngine(IViewPageActivator viewPageActivator)
  : base(viewPageActivator)
 {
  AreaViewLocationFormats = new[]
  {
   "~/Areas/{2}/Views/{1}/{0}.cshtml",
   "~/Areas/{2}/Views/{1}/{0}.vbhtml",
   "~/Areas/{2}/Views/Shared/{0}.cshtml",
   "~/Areas/{2}/Views/Shared/{0}.vbhtml"
  };
  AreaMasterLocationFormats = new[]
  {
   "~/Areas/{2}/Views/{1}/{0}.cshtml",
   "~/Areas/{2}/Views/{1}/{0}.vbhtml",
   "~/Areas/{2}/Views/Shared/{0}.cshtml",
   "~/Areas/{2}/Views/Shared/{0}.vbhtml"
  };
  AreaPartialViewLocationFormats = new[]
  {
   "~/Areas/{2}/Views/{1}/{0}.cshtml",
   "~/Areas/{2}/Views/{1}/{0}.vbhtml",
   "~/Areas/{2}/Views/Shared/{0}.cshtml",
   "~/Areas/{2}/Views/Shared/{0}.vbhtml"
  };

  ViewLocationFormats = new[]
  {
   "~/Views/{1}/{0}.cshtml",
   "~/Views/{1}/{0}.vbhtml",
   "~/Views/Shared/{0}.cshtml",
   "~/Views/Shared/{0}.vbhtml"
  };
  MasterLocationFormats = new[]
  {
   "~/Views/{1}/{0}.cshtml",
   "~/Views/{1}/{0}.vbhtml",
   "~/Views/Shared/{0}.cshtml",
   "~/Views/Shared/{0}.vbhtml"
  };
  PartialViewLocationFormats = new[]
  {
   "~/Views/{1}/{0}.cshtml",
   "~/Views/{1}/{0}.vbhtml",
   "~/Views/Shared/{0}.cshtml",
   "~/Views/Shared/{0}.vbhtml"
  };

  FileExtensions = new[]
  {
   "cshtml",
   "vbhtml",
  };
}그런 다음 RazorViewEngine에서 상속되는 새 CustomRazorViewEngine을 만들고 다시 작성합니다. View의 라우팅 규칙 라우팅 규칙을 다시 작성할 수 있으므로 모든 규칙을 정의한 다음 정의한 규칙을 준수할 수 있습니다. 라우팅 배열의 순서에 주의해야 하며, 뷰를 검색할 경우 뷰가 발견되면 즉시 반환되며 후속 라우팅 규칙과 일치하지 않습니다. 전체 프로젝트에서 C# 언어를 사용하기 때문에 경로 검색의 효율성을 높이기 위해 여기에서는 vbhtml 라우팅 규칙을 모두 삭제했습니다.
using System.Web.Mvc;

namespace Secom.Emx.WebApp.Helper
{
 public class CustomRazorViewEngine : RazorViewEngine
 {
  public CustomRazorViewEngine(string theme)
  {
   if (!string.IsNullOrEmpty(theme))
   {
    AreaViewLocationFormats = new[]
    {
      //themes
      "~/themes/"+theme+"/views/Areas/{2}/{1}/{0}.cshtml",
      "~/themes/"+theme+"/Shared/{0}.cshtml"

  "~/Areas/{2}/Views/{1}/{0}.cshtml",
  "~/Areas/{2}/Views/Shared/{0}.cshtml"
 };
    AreaMasterLocationFormats = new[]
    {
        //themes
    "~/themes/"+theme+"/views/Areas/{2}/{1}/{0}.cshtml",
    "~/themes/"+theme+"/views/Areas/{2}/Shared/{0}.cshtml",
    "~/themes/"+theme+"/views/Shared/{0}.cshtml",

  "~/Areas/{2}/Views/{1}/{0}.cshtml",
  "~/Areas/{2}/Views/Shared/{0}.cshtml"
 };
    AreaPartialViewLocationFormats = new[]
    {
       //themes
   "~/themes/"+theme+"/views/Shared/{0}.cshtml",

  "~/Areas/{2}/Views/{1}/{0}.cshtml",
  "~/Areas/{2}/Views/Shared/{0}.cshtml"
 };

    ViewLocationFormats = new[]
    {
       //themes
   "~/themes/"+theme+"/views/{1}/{0}.cshtml",

  "~/Views/{1}/{0}.cshtml",
  "~/Views/Shared/{0}.cshtml"
 };
    MasterLocationFormats = new[]
    {
       //themes
   "~/themes/"+theme+"/views/Shared/{0}.cshtml",

  "~/Views/{1}/{0}.cshtml",
  "~/Views/Shared/{0}.cshtml"
 };
    PartialViewLocationFormats = new[]
    {
       //themes
  "~/themes/"+theme+"/views/Shared/{0}.cshtml",

  "~/Views/{1}/{0}.cshtml",
  "~/Views/Shared/{0}.cshtml"
 };

    FileExtensions = new[]{"cshtml"};
   }

  }
 }
}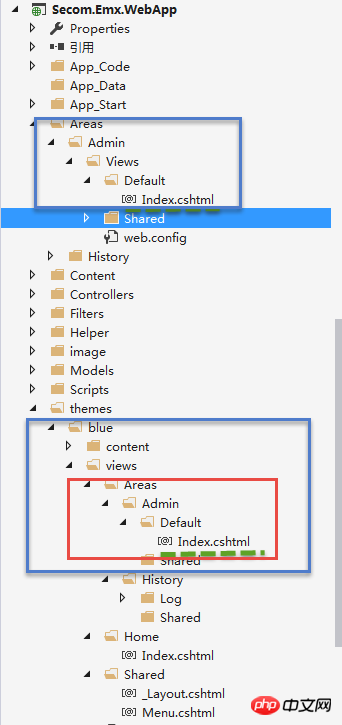
재작성 후 라우팅 규칙은 다음과 같습니다. 주제를 선택하지 않으면 원래 라우팅 규칙이 사용되고 주제가 선택되면 다시 작성된 라우팅 규칙이 사용됩니다.
새로운 라우팅 규칙: 테마가 선택되면 먼저 테마/테마 이름/뷰/영역/영역 이름/컨트롤러 이름/뷰 이름.cshtml을 검색하세요. 찾을 수 없으면 기본 라우팅 규칙, 즉 영역을 따릅니다. /영역 이름/뷰/컨트롤러 이름/뷰 이름.cshtml
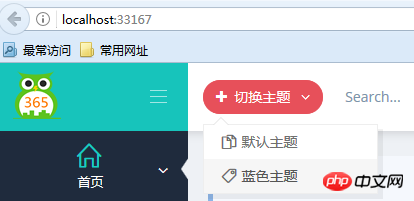
切换主题View代码:
<p class="btn-group">
<button type="button" class="btn btn-circle btn-outline red dropdown-toggle" data-toggle="dropdown">
<i class="fa fa-plus"></i>
<span class="hidden-sm hidden-xs">切换主题 </span>
<i class="fa fa-angle-down"></i>
</button>
<ul class="dropdown-menu" role="menu">
<li>
<a href="javascript:setTheme('default')">
<i class="icon-docs"></i> 默认主题
</a>
</li>
<li>
<a href="javascript:setTheme('Blue')">
<i class="icon-tag"></i> 蓝色主题
</a>
</li>
</ul>
</p>
<script type="text/javascript">
function setTheme(themeName)
{
window.location.href = "/Home/SetTheme?themeName=" + themeName + "&href=" + window.location.href;
}
</script>当用户登录成功的时候,从Cookie中读取所选主题信息,当Cookie中没有读取到主题记录时,则从Web.config配置文件中读取配置的主题名称,如果都没有读取到,则说明是默认主题,沿用原有的视图引擎规则。
在后台管理界面,每次选择了主题,我都将主题名称存储到Cookie中,默认保存一年,这样当下次再登录的时候,就能够记住所选的主题信息了。
using System;
using System.Web.Mvc;
using Secom.Emx.WebApp.Helper;
using System.Web;
using Secom.Emx.Common.Controllers;

namespace Secom.Emx.WebApp.Controllers
{
 public class HomeController : BaseController
 {
  string themeCookieName = "Theme";
  public ActionResult Index()
  {
   ViewData["Menu"] = GetMenus();
   return View();
  }
  public ActionResult SetTheme(string themeName,string href)
  {
   if (!string.IsNullOrEmpty(themeName))
   {
    Response.Cookies.Set(new HttpCookie(themeCookieName, themeName) { Expires = DateTime.Now.AddYears(1) });
   }
   else
   {
    themeName = Request.Cookies[themeCookieName].Value ?? "".Trim();
   }
   Utils.ResetRazorViewEngine(themeName);
   return string.IsNullOrEmpty(href)? Redirect("~/Home/Index"):Redirect(href);
  }
  public ActionResult Login()
  {
   string themeName = Request.Cookies[themeCookieName].Value ?? "".Trim();
   if (!string.IsNullOrEmpty(themeName))
   {
    Utils.ResetRazorViewEngine(themeName);
   }
   return View();
  }
 }
}Utils类:
using System.Configuration;
using System.Web.Mvc;

namespace Secom.Emx.WebApp.Helper
{
 public class Utils
 {
  private static string _themeName;

  public static string ThemeName
  {
   get
   {
    if (!string.IsNullOrEmpty(_themeName))
    {
     return _themeName;
    }
    //模板风格
    _themeName =string.IsNullOrEmpty(ConfigurationManager.AppSettings["Theme"])? "" : ConfigurationManager.AppSettings["Theme"];
    return _themeName;
   }
  }
  public static void ResetRazorViewEngine(string themeName)
  {
   themeName = string.IsNullOrEmpty(themeName) ? Utils.ThemeName : themeName;
   if (!string.IsNullOrEmpty(themeName))
   {
    ViewEngines.Engines.Clear();
    ViewEngines.Engines.Add(new CustomRazorViewEngine(themeName));
   }
  }
 }
}实现方式实在是太简单,简单得我不知道如何表述才好,我还是记下来,方便有需要的人可以查阅,希望可以帮到你们。由于项目引入了庞大的各种相关文件以致文件比较大,网速原因无法上传源码还望见谅!
위 내용은 ASP.NET MVC 재작성 예제 튜토리얼의 상세 내용입니다. 자세한 내용은 PHP 중국어 웹사이트의 기타 관련 기사를 참조하세요!