Vue 요소에 대한 애니메이션 전환 효과의 예에 대한 자세한 설명
이 글에서는 애니메이션 전환 효과를 달성하기 위한 Vue 요소를 주로 소개합니다. 편집자는 이것이 꽤 좋다고 생각합니다. 이제 공유하고 참고하겠습니다. 편집기를 따라 살펴보겠습니다
1 vue에서 v-show 또는 를 사용할 때 단일 하위 요소를 포함하려면 <code> <transition> 태그를 사용하세요. v-if 가 표시 및 숨기기를 전환하기 전에 먼저 하위 요소와 일치할 수 있는 해당 클래스 스타일이 있는지 확인합니다. <transition> 标签包含着的单个子元素在使用 v-show 或 v-if 切换显示隐藏前,会先判断是否有对应的 class 样式能匹配到该子元素上:
<script src="/public/javascripts/vuejs"></script>
<style>
red {background-color: red; width: 100px; height: 100px;}
redv-leave { margin-top: 50px; }
redv-leave-active { transition: all 3s;}
redv-leave-to { margin-top: 100px; opacity: 0;}
redv-enter { margin-top: 50px; }
redv-enter-active { transition: all 3s;}
redv-enter-to { margin-top: 10px; opacity: 0;}
</style>
<body>
<p id="app">
<transition>
<p class="red" v-show="show"></p>
</transition>
<button v-on:click="change">button</button>
</p>
<script>
new Vue({
el: '#app',
data: {
show: true
},
methods: {
change: function(){
thisshow = !thisshow;
}
}
});
</script>
</script>
</body>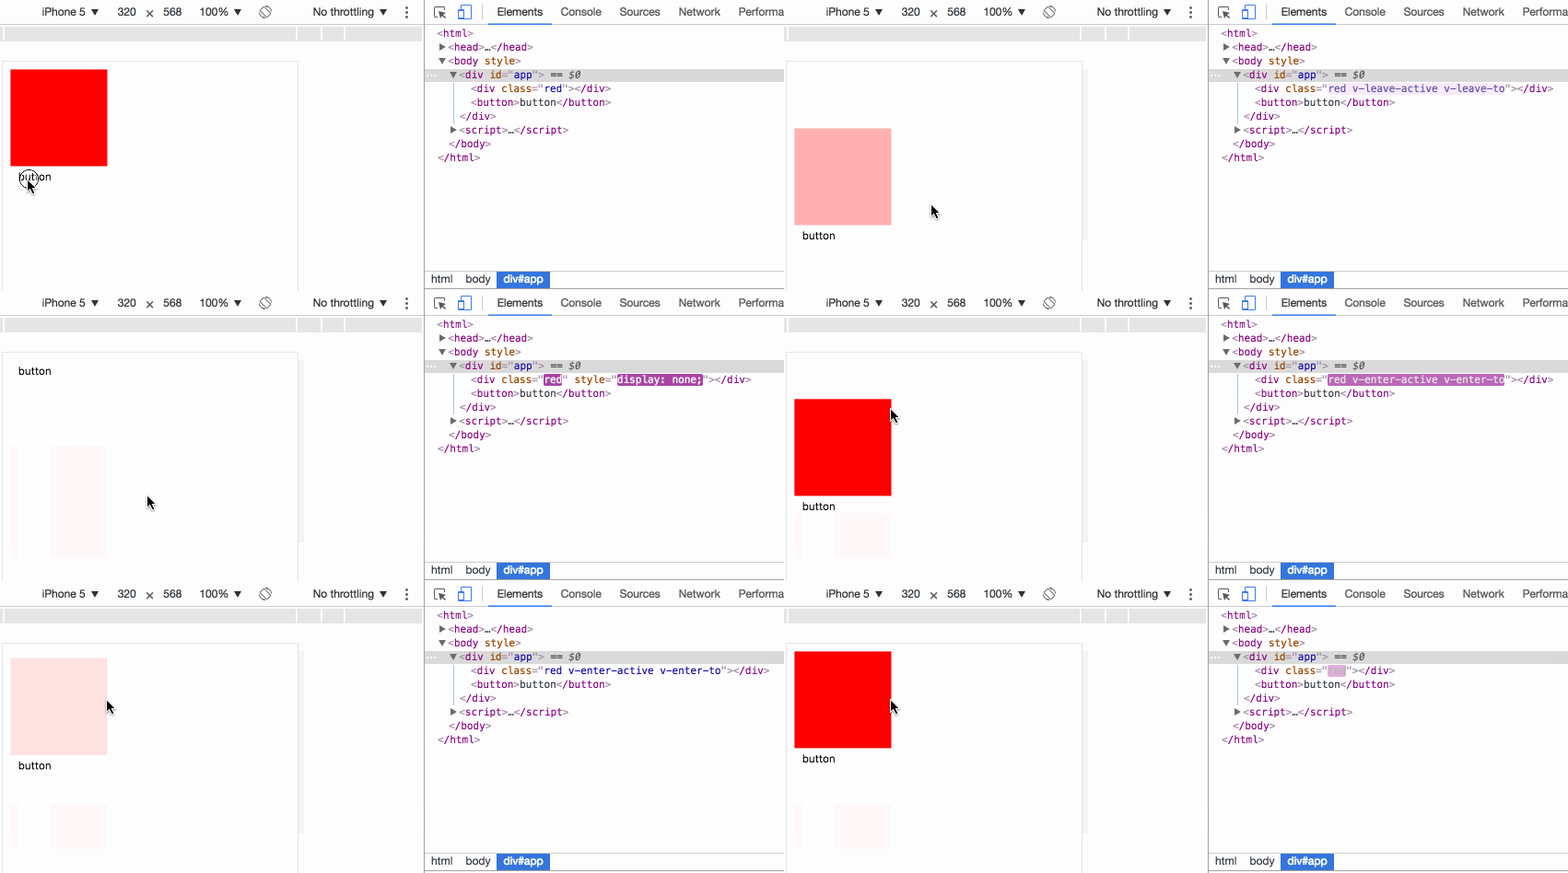
v-leave 当前元素准备从显示转变成隐藏,在动画开始前添加到元素上,动画一旦开始会立即删除;
v-leave-active 在动画过渡过程中,元素一直拥有该样式,直到动画结束则自动删除,用于设置过渡的效果;
v-leave-to 在动画过渡过程中,元素一直拥有该样式,直到动画结束则自动删除,用于设置动画最终的效果;
事例中,当点击 button,p 并不会马上 display: none, 而是首先设置 v-leave ,下一刻即删除 v-leave ,同时添加 v-leave-active v-leave-to,当 v-leave-active 中的过渡时间执行完成,则删除 v-leave-active v-leave-to,同时添加 display: none。
v-enter 当前元素准备从隐藏转变成显示,在动画开始前添加到元素上,动画一旦开始会立即删除;
v-enter-active 在动画过渡过程中,元素一直拥有该样式,直到动画结束则自动删除,用于设置过渡的效果;
v-enter-to 在动画过渡过程中,元素一直拥有该样式,直到动画结束则自动删除,用于设置动画最终的效果;
事例中,当点击 button,p 马上清除 display: none, 然后设置 v-enter ,下一刻即删除 v-enter ,同时添加 v-enter-active v-enter-to,当 v-enter-active 中的过渡时间执行完成,则删除 v-enter-active v-enter-to。
2 自定义动画类名:
<script src="/public/javascripts/vuejs"></script>
<style>
red {background-color: red; width: 100px; height: 100px;}
redslide-leave { margin-top: 50px; }
redslide-leave-active { transition: all 3s;}
redslide-leave-to { margin-top: 100px; opacity: 0;}
redslide-enter { margin-top: 50px; }
redslide-enter-active { transition: all 3s;}
redslide-enter-to { margin-top: 10px; opacity: 0;}
</style>
<body>
<p id="app">
<transition name="slide">
<p class="red" v-show="show"></p>
</transition>
<button v-on:click="change">button</button>
</p>
<script>
new Vue({
el: '#app',
data: {
show: true
},
methods: {
change: function(){
thisshow = !thisshow;
}
}
});
</script>该效果与上一例效果完全一致的,transition 元素可以使用 name 属性来指定使用的类名前缀,从而代替 v-字段,例如事例中的 name="slide" 使本来的 v-enter 变成了 slide-enter
<script src="/public/javascripts/vuejs"></script>
<style>
@keyframes aslide {
0% {
margin-left: 10px;
}
100% {
margin-left: 100px;
}
}
red {background-color: red; width: 100px; height: 100px;}
blue {background-color: blue; width: 100px; height: 100px;}
v-leave { margin-top: 50px; }
v-leave-active { transition: all 3s; animation: aslide 5s;}
v-leave-to { margin-top: 100px;}
</style>
<body>
<p id="app">
<transition type="transition" >
<p class="red" v-show="show"></p>
</transition>
<br>
<transition type="animation" >
<p class="blue" v-show="show"></p>
</transition>
<button v-on:click="change">button</button>
</p>
<script>
new Vue({
el: '#app',
data: {
show: true
},
methods: {
change: function(){
thisshow = !thisshow;
}
}
});
</script>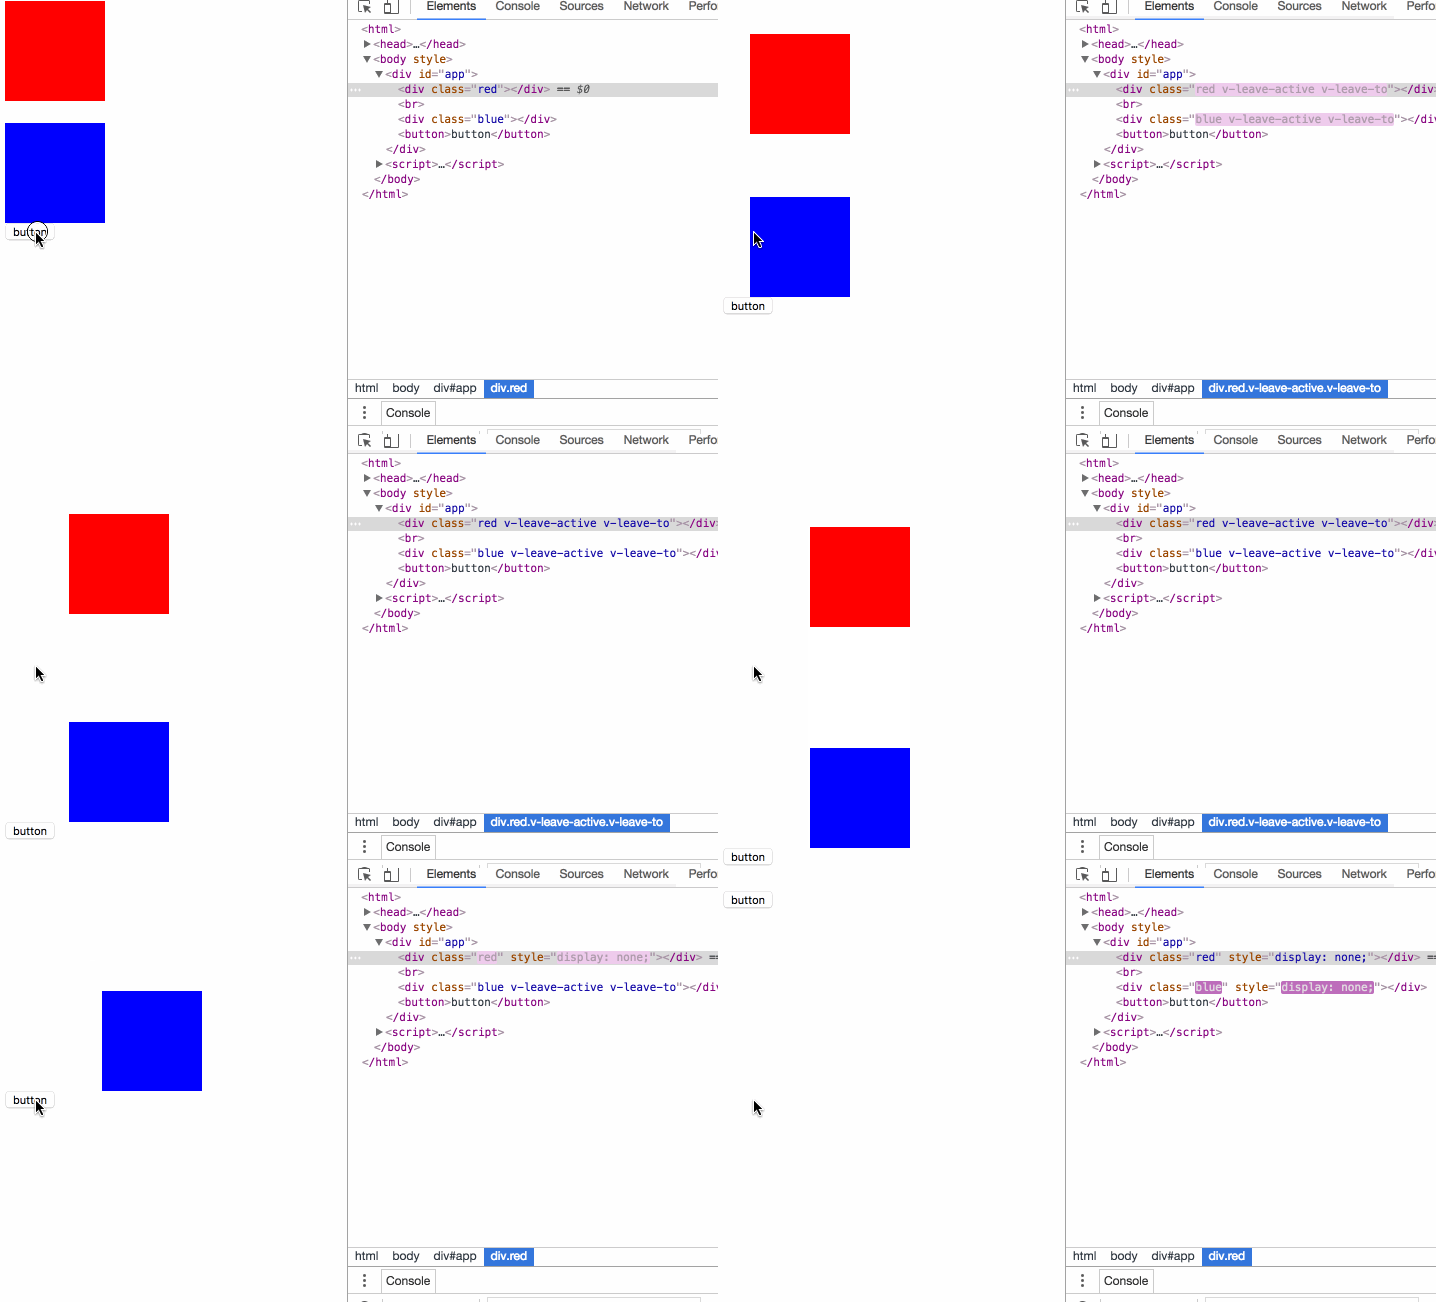
v-leave 현재 요소는 표시에서 숨김으로 변경될 준비가 되었습니다. 애니메이션이 시작되기 전에 요소에 추가되면 애니메이션이 시작되면 즉시 삭제됩니다.

v-leave-active 애니메이션 전환 과정에서 요소는 항상 이 스타일을 가지며 애니메이션이 시작될 때까지 자동으로 삭제됩니다.
v-leave -to 애니메이션 전환 과정에서 요소는 항상 이 스타일을 가지며 애니메이션이 끝날 때까지 자동으로 삭제됩니다. 애니메이션의 최종 효과를 설정하려면
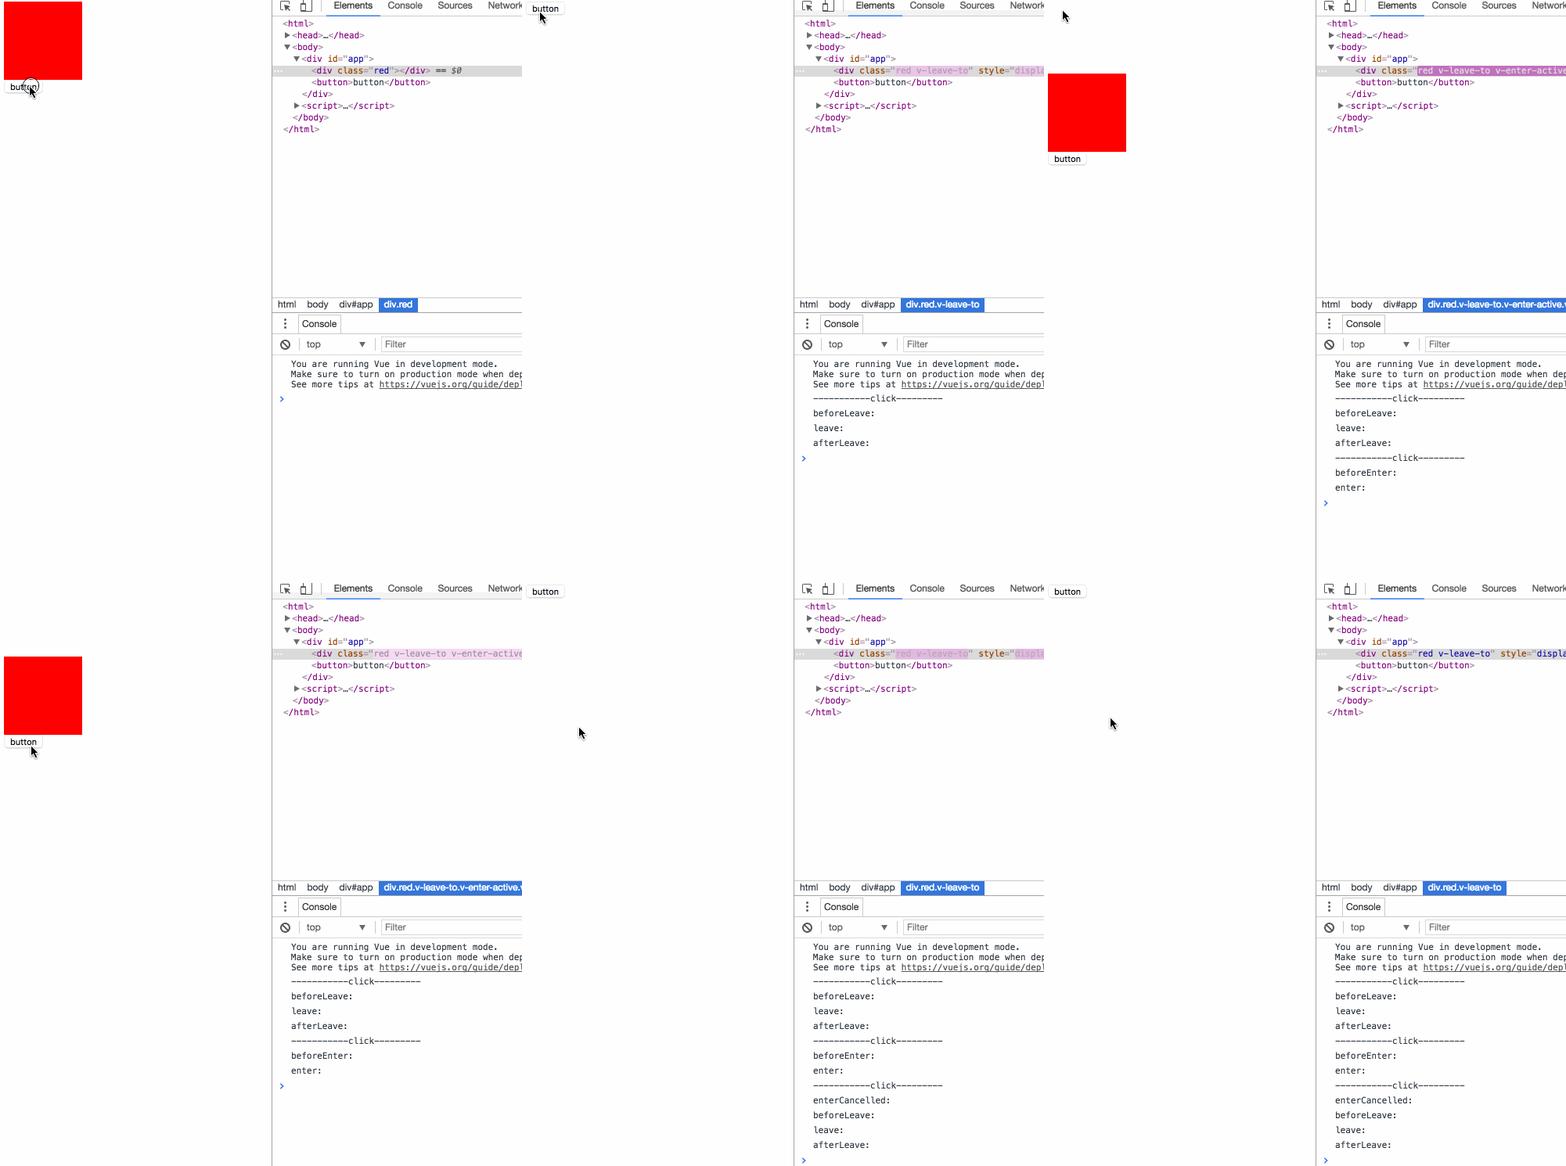
- v-enter 현재 요소는 숨김에서 표시로 변경될 준비가 되어 있습니다. 애니메이션이 시작되기 전에 요소에 추가됩니다.
v-enter-active 동안; 애니메이션 전환 과정에서 요소는 항상 이 스타일이 애니메이션이 끝날 때까지 자동으로 삭제되며 전환 효과를 설정하는 데 사용됩니다.
v-enter-to 애니메이션 전환 과정에서 요소는 항상 다음과 같습니다. 이 스타일은 애니메이션이 끝날 때까지 자동으로 삭제됩니다. 애니메이션의 최종 효과를 설정하는 데 사용됩니다.
이 경우 버튼을 클릭하면 p가 즉시 표시를 지웁니다. v-enter를 설정하고 다음 순간에 v-enter를 삭제하고 v-enter-active v-enter-to를 추가합니다. v -enter-active의 전환 시간이 완료되면 v-enter-active v-enter-to 삭제됩니다. 
- 2 사용자 정의 애니메이션 클래스 이름:
- 이 효과는 이전 예제와 정확히 동일합니다.
<script src="/public/javascripts/vuejs"></script> <style> red {background-color: red; width: 100px; height: 100px;} v-leave { margin-top: 50px; } v-leave-active { transition: all 3s;} v-leave-to { margin-top: 100px;} </style> <body> <p id="app"> <transition v-on:before-enter="beforeEnter" v-on:enter="enter" v-on:after-enter="afterEnter" v-on:enter-cancelled="enterCancelled" v-on:before-leave="beforeLeave" v-on:leave="leave" v-on:after-leave="afterLeave" v-on:leave-cancelled="leaveCancelled" > <p class="red" v-show="show"></p> </transition> <button v-on:click="change">button</button> </p> <script> new Vue({ el: '#app', data: { show: true }, methods: { change: function() { thisshow = !thisshow; consolelog('-----------click---------'); }, beforeEnter: function (el) { consolelog('beforeEnter:'); }, enter: function (el, done) { consolelog('enter:'); // done() }, afterEnter: function (el) { consolelog('afterEnter:'); }, enterCancelled: function (el) { consolelog('enterCancelled:'); }, beforeLeave: function (el) { consolelog('beforeLeave:'); }, leave: function (el, done) { consolelog('leave:'); done() }, afterLeave: function (el) { consolelog('afterLeave:'); }, leaveCancelled: function (el) { consolelog('leaveCancelled:'); } } }); </script>로그인 후 복사transition요소는name속성을 사용하여 클래스를 지정할 수 있습니다. 이름을 사용하여v-필드를 대체합니다. 예를 들어 예제의name="slide"는 원래v-enter <를 만듭니다. /code>는 <code> 슬라이드 입력이 됩니다. 3 전환과 애니메이션을 동시에 사용하는 경우
- 이 경우 애니메이션은 전환 및 애니메이션 애니메이션을 모두 지정하며 전환 요소의 유형 속성은 어떤 애니메이션 시간이 사용되는지 지정할 수 있습니다. 요소의 종료 시간. 그렇지 않은 경우 애니메이션 모니터링 방법을 지정하면 가장 긴 시간이 사용됩니다.
<script src="/public/javascripts/vuejs"></script>
<style>
@keyframes aslide {
0% {
margin-left: 10px;
}
100% {
margin-left: 100px;
}
}
red {background-color: red; width: 100px; height: 100px;}
apper { margin-top: 50px; }
apper-active { margin-top: 100px; animation: aslide 4s; transition: all 3s;}
</style>
<body>
<p id="app">
<transition
appear
appear-class="apper"
appear-active-class="apper-active"
v-on:before-appear="customBeforeAppearHook"
v-on:appear="customAppearHook"
v-on:after-appear="customAfterAppearHook" >
<p class="red" ></p>
</transition>
<button v-on:click="change">button</button>
</p>
<script>
new Vue({
el: '#app',
data: {
show: true
},
methods: {
change: function() {
thisshow = !thisshow;
consolelog('-----------click---------');
},
customBeforeAppearHook: function (el) {
consolelog('customBeforeAppearHook:');
},
customAppearHook: function (el) {
consolelog('customAppearHook:');
// done()
},
customAfterAppearHook: function (el) {
consolelog('customAfterAppearHook:');
}
}
});
</script>4 자바스크립트 모니터링 애니메이션
<script src="/public/javascripts/vuejs"></script>
<style>
v-enter-active { transition: all 15s;}
v-enter-to { margin-top: 100px;}
v-leave-active { transition: all 15s;}
v-leave-to { margin-top: 10px;}
</style>
<body>
<p id="app">
<p class="show1">
<transition>
<button v-if="show1" @click="show1 = false">on</button>
<button v-else @click="show1 = true">off</button>
</transition>
</p>
<p class="show2">
<transition>
<button v-if="show2" key="on" @click="show2 = false">on</button>
<button v-else key="off" @click="show2 = true">off</button>
</transition>
</p>
</p>
<script>
var app = new Vue({
el: '#app',
data: {
show1: true,
show2: true
}
});
</script>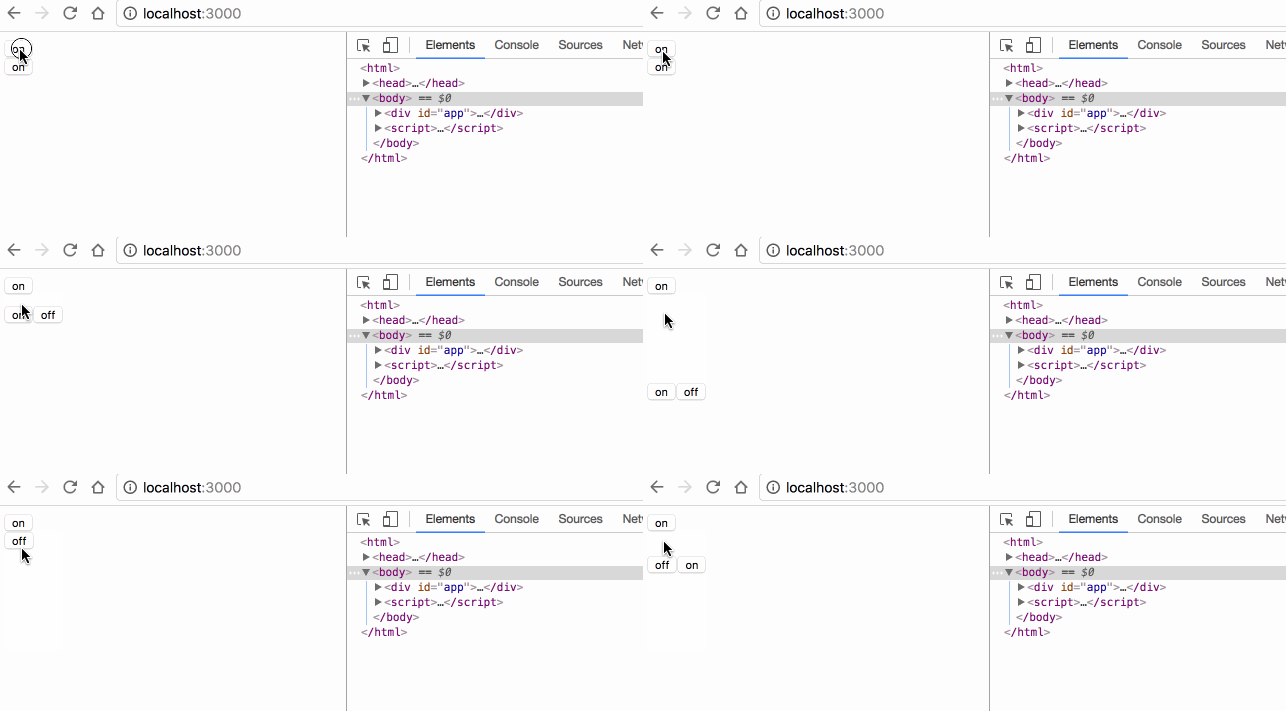
에 v-bind:css="false"를 설정하면 CSS 애니메이션 이벤트 콜백을 모니터링하고 성능을 향상시키기 위한 vue의 내부 메커니즘이 필요하지 않습니다.
Enter 및 Leave 이벤트는 done 메서드를 수동으로 호출해야 합니다. 그렇지 않으면 이벤트가 이후 이벤트를 호출하지 않지만 다른 이벤트가 시작되면 애니메이션이 취소된 것으로 간주됩니다.
🎜🎜🎜5 페이지 초기화 중 애니메이션: 🎜🎜<script src="/public/javascripts/vuejs"></script>
<style>
v-enter { margin-left: 100px;}
v-enter-active { transition: all 5s;}
v-enter-to { margin-left: 10px;}
v-leave { margin-left: 10px;}
v-leave-active { transition: all 5s;}
v-leave-to { margin-left: 100px;}
</style>
<body>
<p id="app">
<p class="default">
<transition>
<button v-if="show" key="on" @click="show = false">on</button>
<button v-else key="off" @click="show = true">off</button>
</transition>
</p>
<p class="inout">
<transition mode="in-out">
<button v-if="show" key="on" @click="show = false">on</button>
<button v-else key="off" @click="show = true">off</button>
</transition>
</p>
<p class="outin">
<transition mode="out-in">
<button v-if="show" key="on" @click="show = false">on</button>
<button v-else key="off" @click="show = true">off</button>
</transition>
</p>
</p>
<script>
var app = new Vue({
el: '#app',
data: {
show: true
}
});
</script><script src="/public/javascripts/vuejs"></script>
<style>
v-enter { margin-left: 100px;}
v-enter-active { transition: all 2s;}
v-enter-to { margin-left: 10px;}
</style>
<body>
<p id="app">
<transition-group>
<li v-for="item in items" :key="item">{{item}}</li>
</transition-group>
<transition-group tag="ul">
<li v-for="item in items" :key="item">{{item}}</li>
</transition-group>
<button @click="itemspush(itemslength)">add</button>
</p>
<script>
var app = new Vue({
el: '#app',
data: {
items: [0,1]
}
});
</script><script src="/public/javascripts/vuejs"></script>
<style>
v-enter { margin-left: 100px;}
v-enter-active { transition: all 5s;}
v-enter-to { margin-left: 10px;}
v-leave { margin-left: 10px;}
v-leave-active { transition: all 5s;}
v-leave-to { margin-left: 100px;}
</style>
<body>
<p id="app">
<p class="default">
<transition>
<button v-if="show" key="on" @click="show = false">on</button>
<button v-else key="off" @click="show = true">off</button>
</transition>
</p>
<p class="inout">
<transition mode="in-out">
<button v-if="show" key="on" @click="show = false">on</button>
<button v-else key="off" @click="show = true">off</button>
</transition>
</p>
<p class="outin">
<transition mode="out-in">
<button v-if="show" key="on" @click="show = false">on</button>
<button v-else key="off" @click="show = true">off</button>
</transition>
</p>
</p>
<script>
var app = new Vue({
el: '#app',
data: {
show: true
}
});
</script>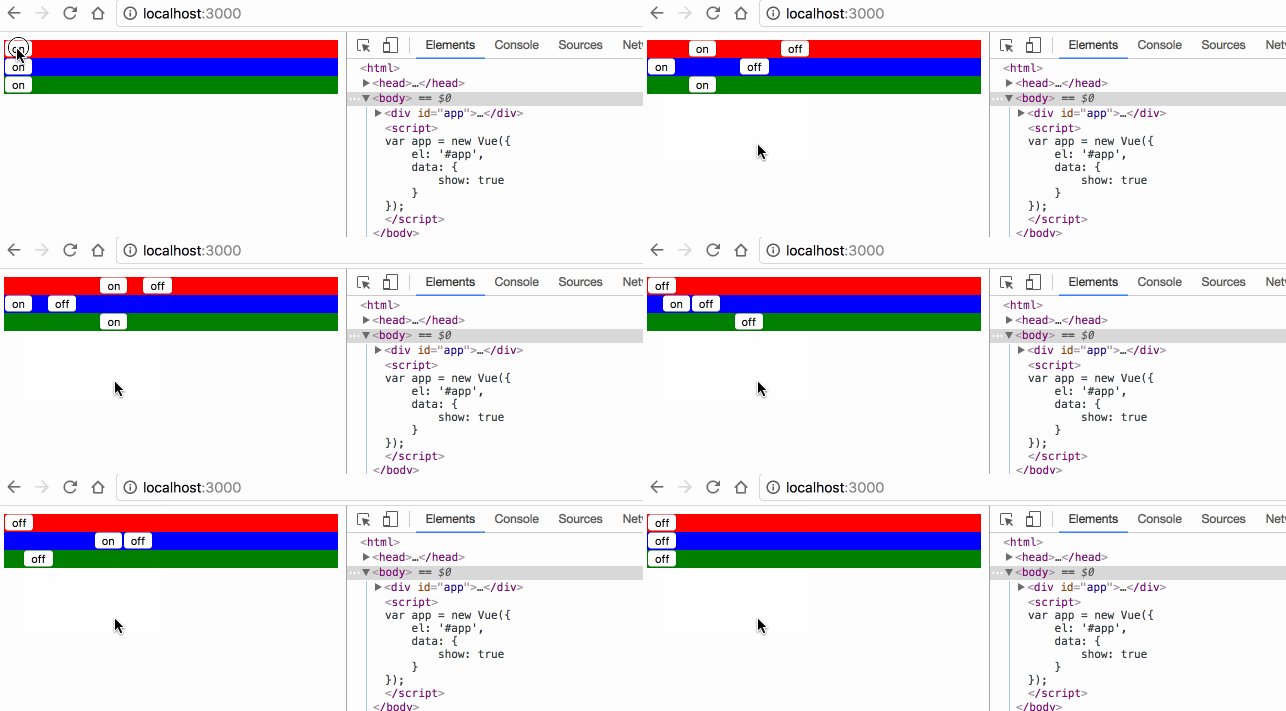
transition 默认是同时执行2个元素的切换动画的,案例中红色的 off 按钮其实是会同时向左移动的,只是因为布局上没有脱离布局流,被 on 按钮顶住,无法移动;
mode="in-out" 可以使切换元素先执行将要显示元素的动画,再执行将要隐藏元素的动画;
mode="out-in" 可以使切换元素先执行将要隐藏元素的动画,再执行将要显示元素的动画;
8 多元素动画:
<script src="/public/javascripts/vuejs"></script>
<style>
v-enter { margin-left: 100px;}
v-enter-active { transition: all 2s;}
v-enter-to { margin-left: 10px;}
</style>
<body>
<p id="app">
<transition-group>
<li v-for="item in items" :key="item">{{item}}</li>
</transition-group>
<transition-group tag="ul">
<li v-for="item in items" :key="item">{{item}}</li>
</transition-group>
<button @click="itemspush(itemslength)">add</button>
</p>
<script>
var app = new Vue({
el: '#app',
data: {
items: [0,1]
}
});
</script>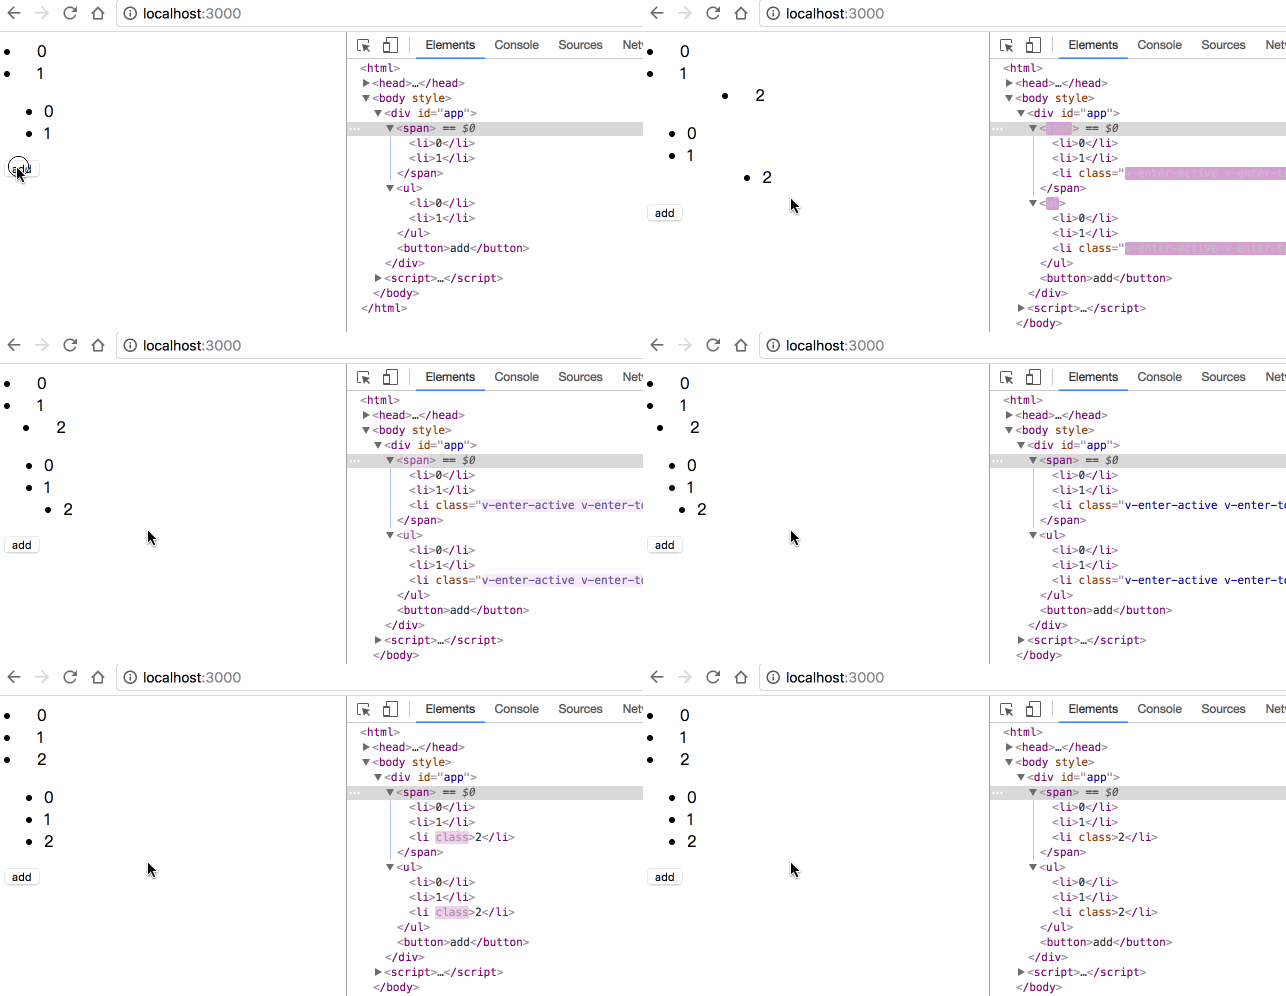
transition 里面只能放置单个元素或使用 v-if v-show 切换的单个元素,要想使用多个元素的动画,必须使用 transition-group;
transition-group 默认会在 DOM 里渲染成 span 标签,可使用 tag="ul" 指定渲染成其他标签;
transition-group 必须为每一个子元素指定 key;
8 多元素的位移动画:
<script src="/public/javascripts/vuejs"></script>
<style>
v-move { transition: all 1s; }
</style>
<body>
<p id="app">
<transition-group tag="ul" >
<li v-for="item in items" :key="item">{{item}}</li>
</transition-group>
<button @click="itemsreverse()">reverse</button>
</p>
<script>
var app = new Vue({
el: '#app',
data: {
items: [0,1,2,3]
}
});
</script>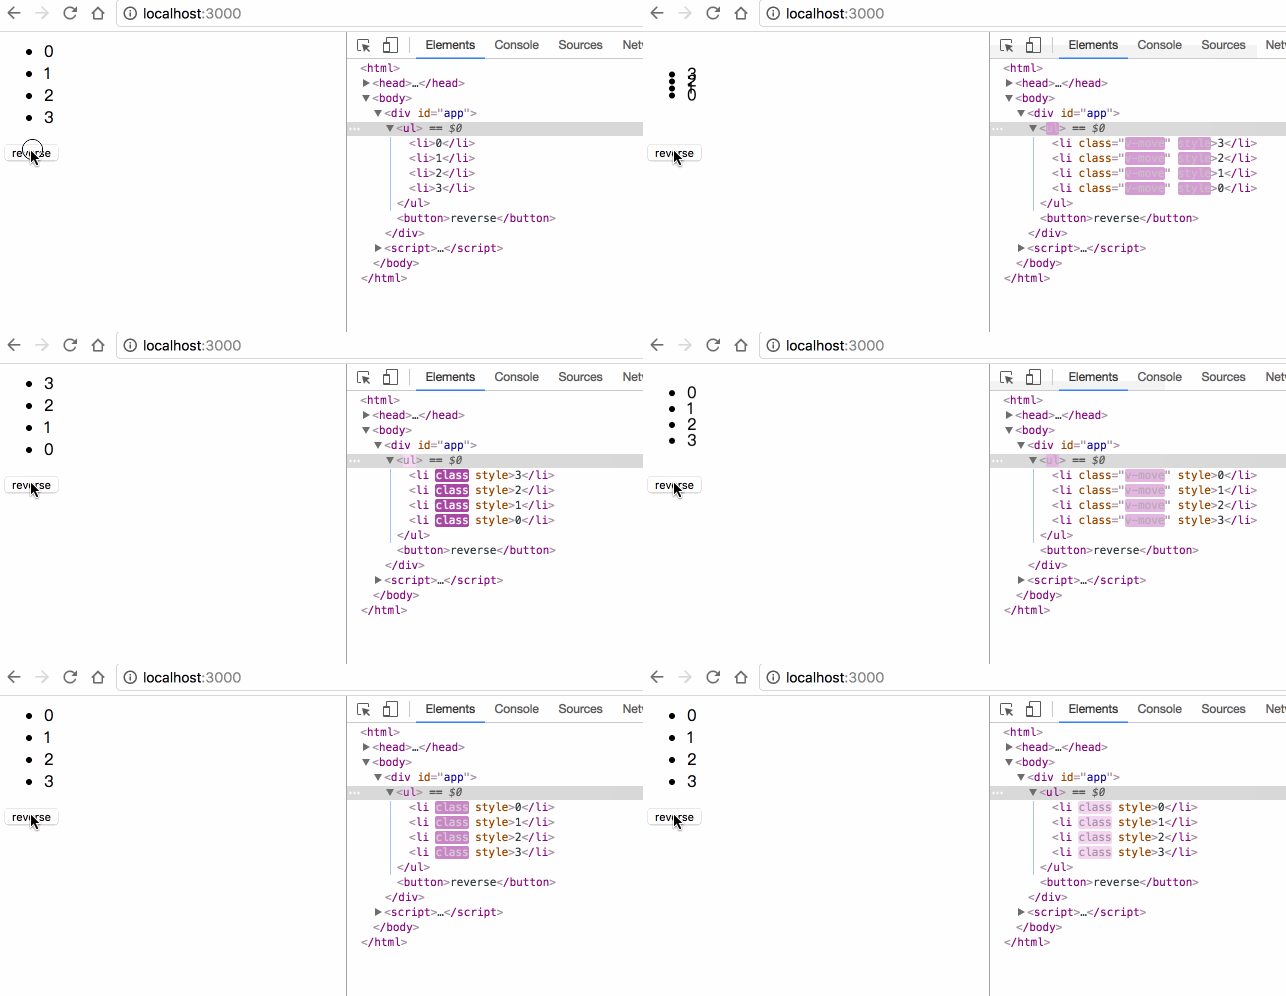
transition-group 允许在每个元素移动时,添加 v-move 的样式,移动完成后自动清除该样式;
transition 的属性, transition-group 都有,包括 name enter leave;
위 내용은 Vue 요소에 대한 애니메이션 전환 효과의 예에 대한 자세한 설명의 상세 내용입니다. 자세한 내용은 PHP 중국어 웹사이트의 기타 관련 기사를 참조하세요!

핫 AI 도구

Undresser.AI Undress
사실적인 누드 사진을 만들기 위한 AI 기반 앱

AI Clothes Remover
사진에서 옷을 제거하는 온라인 AI 도구입니다.

Undress AI Tool
무료로 이미지를 벗다

Clothoff.io
AI 옷 제거제

AI Hentai Generator
AI Hentai를 무료로 생성하십시오.

인기 기사

뜨거운 도구

메모장++7.3.1
사용하기 쉬운 무료 코드 편집기

SublimeText3 중국어 버전
중국어 버전, 사용하기 매우 쉽습니다.

스튜디오 13.0.1 보내기
강력한 PHP 통합 개발 환경

드림위버 CS6
시각적 웹 개발 도구

SublimeText3 Mac 버전
신 수준의 코드 편집 소프트웨어(SublimeText3)

뜨거운 주제
 7564
7564
 15
15
 1386
1386
 52
52
 87
87
 11
11
 61
61
 19
19
 28
28
 101
101
 사용자에게 드문 결함 발생: Samsung Watch 스마트워치에서 갑자기 흰색 화면 문제가 발생함
Apr 03, 2024 am 08:13 AM
스마트폰 화면에 녹색 줄이 나타나는 문제를 겪어보셨을 텐데요. 한 번도 본 적이 없더라도 인터넷에서 관련 사진을 본 적이 있을 것입니다. 그렇다면 스마트워치 화면이 하얗게 변하는 상황을 겪어보신 적 있으신가요? CNMO는 지난 4월 2일 외신을 통해 한 Reddit 사용자가 소셜 플랫폼에 삼성 워치 시리즈 스마트워치 화면이 하얗게 변하는 사진을 공유했다는 사실을 접했습니다. 해당 이용자는 "떠날 때 충전 중이었는데, 돌아올 때 이랬다. 재시작을 하려고 했는데, 삼성워치 스마트워치 화면이 하얗게 변했다"고 적었다. Reddit 사용자가 특정 모델을 지정하지 않았습니다. 하지만 사진으로 보면 삼성 워치5가 될 것 같습니다. 이전에 다른 Reddit 사용자도 보고했습니다.
 CSS 애니메이션: 요소의 플래시 효과를 얻는 방법
Nov 21, 2023 am 10:56 AM
CSS 애니메이션: 요소의 플래시 효과를 얻으려면 특정 코드 예제가 필요합니다. 웹 디자인에서 애니메이션 효과는 때때로 페이지에 좋은 사용자 경험을 가져올 수 있습니다. 반짝이 효과는 요소를 더욱 눈길을 끌 수 있는 일반적인 애니메이션 효과입니다. 다음은 CSS를 사용하여 요소의 플래시 효과를 얻는 방법을 소개합니다. 1. 플래시의 기본 구현 먼저 CSS의 애니메이션 속성을 사용하여 플래시 효과를 구현해야 합니다. animation 속성의 값은 애니메이션 이름, 애니메이션 실행 시간, 애니메이션 지연 시간을 지정해야 합니다.
![PowerPoint에서 애니메이션이 작동하지 않음 [수정됨]](https://img.php.cn/upload/article/000/887/227/170831232982910.jpg?x-oss-process=image/resize,m_fill,h_207,w_330) PowerPoint에서 애니메이션이 작동하지 않음 [수정됨]
Feb 19, 2024 am 11:12 AM
PowerPoint에서 애니메이션이 작동하지 않음 [수정됨]
Feb 19, 2024 am 11:12 AM
프레젠테이션을 만들려고 하는데 애니메이션을 추가할 수 없나요? Windows PC의 PowerPoint에서 애니메이션이 작동하지 않는 경우 이 문서가 도움이 될 것입니다. 이것은 많은 사람들이 불평하는 일반적인 문제입니다. 예를 들어 Microsoft Teams에서 프레젠테이션을 진행하거나 화면을 녹화하는 동안 애니메이션이 작동하지 않을 수 있습니다. 이 가이드에서는 Windows용 PowerPoint에서 애니메이션이 작동하지 않는 문제를 해결하는 데 도움이 되는 다양한 문제 해결 기술을 살펴보겠습니다. PowerPoint 애니메이션이 작동하지 않는 이유는 무엇입니까? Windows에서 PowerPoint의 애니메이션이 작동하지 않는 문제를 일으킬 수 있는 몇 가지 가능한 이유는 다음과 같습니다.
 CSS 전환 효과: 요소의 페이드인 및 페이드아웃 효과를 얻는 방법
Nov 21, 2023 am 08:03 AM
CSS 전환 효과: 요소의 페이드 인 및 페이드 아웃 효과를 얻는 방법 소개: 웹 디자인에서 요소에 전환 효과를 만드는 것은 사용자 경험을 향상시키는 중요한 수단 중 하나입니다. 페이드인-페이드아웃 효과는 요소가 처음부터 얕은 것부터 깊은 것까지 나타나도록 할 수 있는 일반적이고 간결한 전환 효과입니다. 이 기사에서는 CSS를 사용하여 요소의 페이드인 및 페이드아웃 효과를 얻는 방법을 소개하고 구체적인 코드 예제를 제공합니다. 1. 요소의 페이드 인 및 페이드 아웃 효과를 얻으려면 전환 속성을 사용하십시오. CSS의 전환 속성은 요소에 요소를 추가할 수 있습니다.
 Kyushu Fengshen Assassin 4S 라디에이터 리뷰 공냉식 'Assassin Master' 스타일
Mar 28, 2024 am 11:11 AM
ASSASSIN이라고 하면, 플레이어들은 확실히 "Assassin's Creed"에 나오는 암살의 대가들을 떠올릴 것이라고 생각합니다. 그들은 숙련될 뿐만 아니라 "어둠에 헌신하고 빛을 섬기는" 신념을 가지고 있습니다. 국내에서 잘 알려진 섀시/전원 공급 장치/냉각 가전 브랜드 DeepCool의 ASSASSIN 플래그십 공냉식 라디에이터 시리즈는 서로 일치합니다. 최근 이 시리즈의 최신 제품인 ASSASSIN4S가 출시되었습니다. "Assassin in Suit, Advanced"는 고급 플레이어에게 새로운 공냉식 경험을 선사합니다. 외관은 디테일이 가득합니다. Assassin 4S 라디에이터는 이중 타워 구조 + 단일 팬 내장 디자인을 채택했으며, 외부는 큐브 모양의 페어링으로 덮여 있어 전체적으로 강렬한 느낌을 줍니다. 다양한 컬러를 만나보세요.
 먼저 들어가서 종료되도록 PPT 애니메이션을 설정하는 방법
Mar 20, 2024 am 09:30 AM
우리는 일상 업무에서 PPT를 자주 사용하는데, PPT의 모든 조작 기능에 대해 잘 알고 계시나요? 예를 들면: ppt에서 애니메이션 효과를 설정하는 방법, 전환 효과를 설정하는 방법, 각 애니메이션의 효과 지속 시간은 어떻게 되나요? 각 슬라이드가 자동으로 재생되고, ppt 애니메이션에 들어갔다가 나올 수 있는지 등이 있습니다. 이번 호에서는 먼저 ppt 애니메이션에 들어가고 나가는 구체적인 단계를 알려드리겠습니다. 친구 여러분, 한 번 살펴보세요. 바라보다! 1. 먼저 컴퓨터에서 ppt를 열고 텍스트 상자 밖을 클릭하여 텍스트 상자를 선택합니다(아래 그림의 빨간색 원 참조). 2. 그런 다음 메뉴 바에서 [애니메이션]을 클릭하고 [삭제] 효과를 선택합니다(그림의 빨간색 원 참조). 3. 다음으로 [
 봄의 절묘한 빛과 그림자 예술, Haqu H2는 비용 효율적인 선택입니다.
Apr 17, 2024 pm 05:07 PM
봄이 오면 모든 것이 되살아나고 모든 것이 활력과 활력으로 가득 차 있습니다. 이 아름다운 계절에 가정 생활에 색상을 추가하는 방법은 무엇입니까? 정교한 디자인과 뛰어난 비용 효율성을 갖춘 Haqu H2 프로젝터는 올 봄에 없어서는 안 될 아름다움이 되었습니다. 이 H2 프로젝터는 콤팩트하면서도 스타일리시합니다. 거실 TV장 위에 놓거나 침실 침대협탁 옆에 놓아도 아름다운 풍경이 될 수 있습니다. 본체는 유백색 무광택 질감으로 만들어져 있어 프로젝터가 더욱 고급스러워 보일 뿐만 아니라 촉감의 편안함도 향상됩니다. 베이지색 가죽 느낌의 소재가 전체적인 외관에 따뜻함과 우아함을 더해줍니다. 이러한 색상과 소재의 조합은 현대 주택의 미적 트렌드에 부합할 뿐만 아니라 다음과 같은 인테리어에도 통합될 수 있습니다.
 2년의 연기 끝에 국내 3D 애니메이션 영화 '얼랑선:심해룡'이 7월 13일 개봉 예정이다.
Jan 26, 2024 am 09:42 AM
이 사이트는 1월 26일 국내 3D 애니메이션 영화 '얼랑선:심해룡'이 최신 스틸컷을 공개하며 7월 13일 개봉을 공식 발표했다고 보도했다. "얼랑신: 심해 용"은 Mihuxing (Beijing) Animation Co., Ltd., Horgos Zhonghe Qiancheng Film Co., Ltd., Zhejiang Hengdian Film Co., Ltd., Zhejiang Gongying Film에서 제작한 것으로 이해됩니다. Co., Ltd., Chengdu Tianhuo Technology Co., Ltd.와 Huawen Image (Beijing) Film Co., Ltd.가 제작하고 Wang Jun이 감독한 애니메이션 영화는 원래 2022년 7월 22일 중국 본토에서 개봉될 예정이었습니다. . 이 사이트의 음모 개요 : 봉신 전투 후 강자야는 "봉신 목록"을 가져와 신을 나누고, 봉신 목록은 큐슈 심해 아래 천상 법원에서 봉인했습니다. 비밀 영역. 실제로, 신의 직위를 수여하는 것 외에도 부여신 목록에 봉인된 강력한 악령도 많이 있습니다.


