코드는 다음과 같습니다.
<!DOCTYPE html>
<html lang="en">
<head>
<meta charset="UTF-8">
<title>Document</title>
<style>#box{
width:200px;
height:200px;
position: absolute;
top:0;
left:200px;
background:lightblue;
}
.btn{
position:absolute;
top:200px;
left:100px;
height:50px;
}
.btn input{
display:inline-block;
margin-left:50px;
outline: none;
width:100px;
height:50px;
border:1px solid green;
cursor:pointer;
}</style>
</head>
<body>
<div id='box'></div>
<div class='btn'>
<input type="button" value='向左' id='btnLeft'>
<input type="button" value='向右' id='btnRight'>
</div>
<script>var oBox = document.getElementById("box");var minLeft = 0;var maxLeft = utils.win('clientWidth')-oBox.offsetWidth;var step = 5;var timer = null;function move(target){//target:告诉我要运动的目标位置 window.clearTimeout(timer);var curLeft = utils.css(oBox,"left");if(curLeft<target){//向右走if(curLeft+step>target){//边界utils.css(oBox,"left",target);return;
}
curLeft+=step;
utils.css(oBox,"left",curLeft)
}else if(curLeft>target){//向左走if(curLeft-step<target){//边界utils.css(oBox,"left",target);return;
}
curLeft-=step;
utils.css(oBox,"left",curLeft)
}else{//不需要运动return;
}// timer = window.setTimeout(move,10)//这里有一个问题,点击按钮第一次target的值是有的,但是第二次通过setTimeout执行的时候没有给target进行传值。是undefinedtimer = window.setTimeout(function(){
move(target);
},10)//这样使用匿名函数包裹一下,就解决了上面的问题,但是这样写性能不好,因为每一次到达时间的时候,都需要执行一次匿名函数(形成一个私有的作用域),在匿名函数中再执行move,但是move中需要用到的数据值在第一次执行的move方法中,需要把匿名函数形成的这个私有的作用域作为跳板找到之前的,这样就导致了匿名函数形成的这个私有的作用域不能销毁 }
document.getElementById('btnLeft').onclick = function(){
move(minLeft)
}
document.getElementById('btnRight').onclick = function(){
move(maxLeft)
} </script>
</body>
</html>위의 성능 저하 문제를 해결하기 위해 최적화된 코드는 다음과 같습니다. 함수 래퍼를 사용하므로 이동 함수에 의해 생성된 개인 범위만 허용됩니다. _move가 실행되면 move는 자연스럽게 소멸됩니다.
<!DOCTYPE html>
<html lang="en">
<head>
<meta charset="UTF-8">
<title>Document</title>
<style>#box{
width:200px;
height:200px;
position: absolute;
top:0;
left:200px;
background:lightblue;
}
.btn{
position:absolute;
top:200px;
left:100px;
height:50px;
}
.btn input{
display:inline-block;
margin-left:50px;
outline: none;
width:100px;
height:50px;
border:1px solid green;
cursor:pointer;
}</style>
</head>
<body>
<div id='box'></div>
<div class='btn'>
<input type="button" value='向左' id='btnLeft'>
<input type="button" value='向右' id='btnRight'>
</div>
<script>var oBox = document.getElementById("box");var minLeft = 0;var maxLeft = utils.win('clientWidth')-oBox.offsetWidth;var step = 5;var timer = null;function move(target){//target:告诉我要运动的目标位置 _move();function _move(){
window.clearTimeout(timer);var curLeft = utils.css(oBox,"left");if(curLeft<target){//向右走if(curLeft+step>target){//边界utils.css(oBox,"left",target);return;
}
curLeft+=step;
utils.css(oBox,"left",curLeft)
}else if(curLeft>target){//向左走if(curLeft-step<target){//边界utils.css(oBox,"left",target);return;
}
curLeft-=step;
utils.css(oBox,"left",curLeft)
}else{//不需要运动return;
}
timer = window.setTimeout(_move,10);
}
}
document.getElementById('btnLeft').onclick = function(){
move(minLeft)
}
document.getElementById('btnRight').onclick = function(){
move(maxLeft)
} </script>
</body>
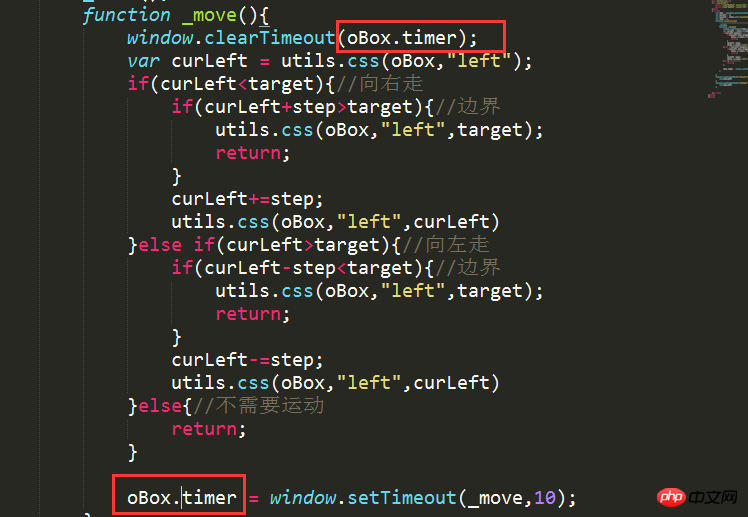
</html>참고: 현재 요소가 동시에 하나의 애니메이션만 실행하도록 하려면(다음 애니메이션이 시작될 때 먼저 이전 애니메이션의 타이머를 지움): 현재 요소의 모든 애니메이션이 타이머를 수신하는지 확인하세요. 반환 값 변수는 두 가지 방법으로 공유되어야 합니다. 1. 전역적으로 수신 (예: 위 코드 var 타이머 = null) 2. 요소에 사용자 정의 속성 추가 (아래 그림 참조) )

요약: 위에서부터 애니메이션 최적화를 위한 네 가지 규칙을 도출할 수 있습니다.
1 경계 판단 및 단계 크기
2. 쓸모없는 타이머 지우기
3. 외부 레이어 함수가 매개변수를 전달해야 하는 경우 범위 누적을 피하기 위해 함수 레이어를 내부에 중첩할 수 있습니다.
4. 전역 변수 충돌과 동시에 여러 애니메이션 실행을 방지하기 위해 요소의 맞춤 속성에 타이머의 반환 값을 저장합니다
위 내용은 js----리바운드 애니메이션 구현의 상세 내용입니다. 자세한 내용은 PHP 중국어 웹사이트의 기타 관련 기사를 참조하세요!