

파이썬 요새 기계 생산
<br>
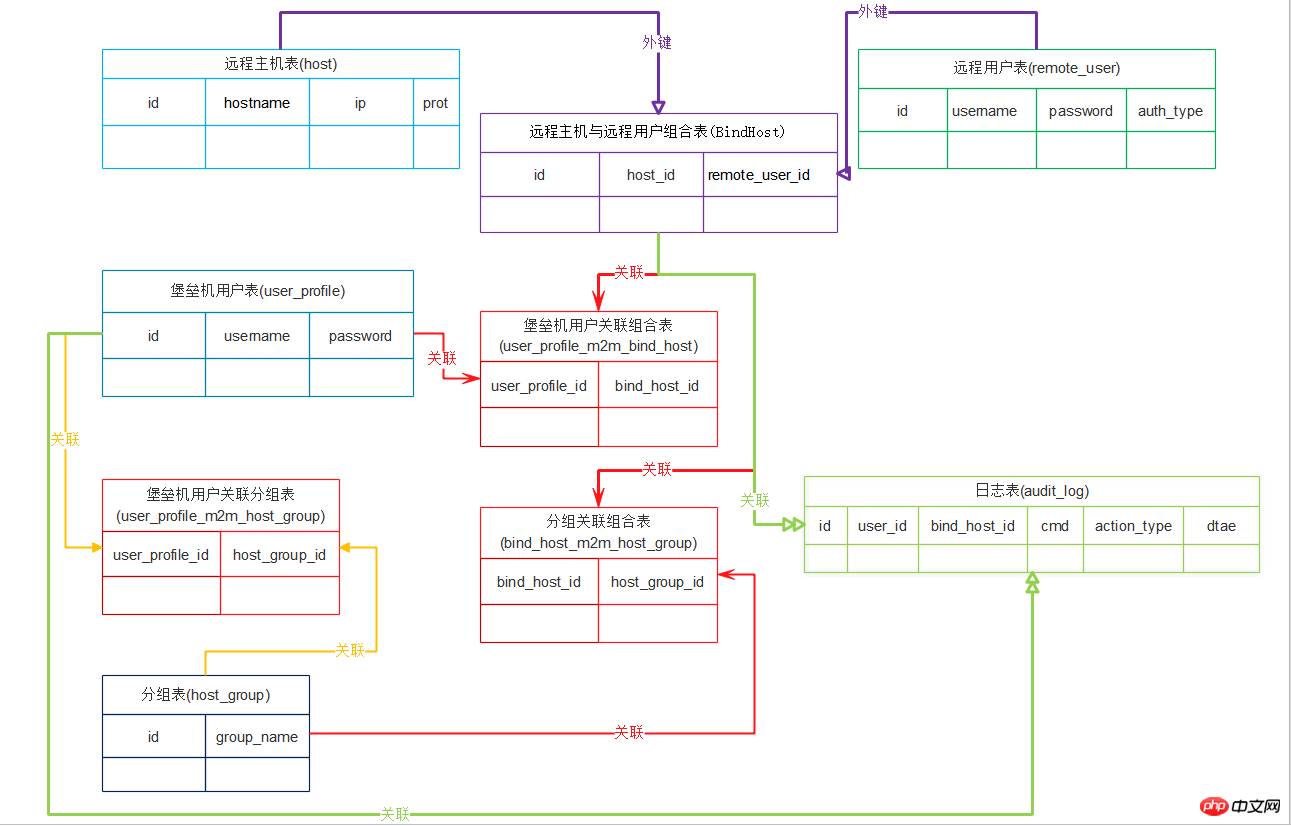
堡垒机
windows ,linux 都通过测试
初始化说明:
    #进入根目录
    1、初始化表结构   #python3 bin/start.py syncdb
    2、创建堡垒机用户 #python3 bin/start.py create_users -f share/examples/new_user.yml
    3、创建分组       #python3 bin/start.py create_groups -f share/examples/new_groups.yml
    4、创建远程主机   #python3 bin/start.py create_hosts -f share/examples/new_hosts.yml
    5、创建远程主机用户(绑定堡垒机用户与分组)#python3 bin/start.py create_remoteusers -f share/examples/new_remoteusers.yml
    6、绑定远程主机与远程主机用户【远程绑定组合】(关联远程绑定组合与堡垒机用户、关联远程绑定组合与分组)
        #python3 bin/start.py create_bindhosts -f share/examples/new_bindhosts.yml
    7、登陆堡垒机    #python3 bin/start.py start_session  (示例用户: uge3 密码:uge3)
    8、查看用户日志      #python3 bin/start.py audit -n uge3


plj/#程序目录
|- - -__init__.py
|- - -bin/#启动目录
|      |- - -__init__.py
|      |- - -start.py#启动
|
|- - -conf/#配置目录
|      |- - -__init__.py
|      |- - -action_registers.py#开始参数配置文件
|      |- - -settings.py#配置文件
|
|- - -modules/#主逻辑目录
|      |- - -__init__.py
|      |- - -actions.py#开始函数 帮助信息
|      |- - -db_conn.py#数据库连接配置
|      |- - -interactive.py#ssh命令重写
|      |- - -models.py#表结构 类
|      |- - -ssh_login.py#登陆远程主机调用
|      |- - -utils.py#工具函数
|      |- - -views.py#主要逻辑函数
|
|- - -REDMAE
|
|- - -share/#添加堡垒机用户\远程主机\分组\远程主机用户 目录
|      |- - -examples/#文件目录
|              |- - -new_bindhosts.yml/#远程主机用户与远程主机 组合表(组合表与 分组)(堡垒机用户与组合表) 创建 示例
|              |- - -new_groups.yml/#分组创建 示例( 堡垒机用户与 分组)
|              |- - -new_hosts.yml/#远程主机创建 示例
|              |- - -new_remoteusers.yml/#远程主机用户创建 示例
|              |- - -new_user.yml/#堡垒机用户机创建 示例
plj/#程序目录
|- - -__init__.py
|- - -bin/#启动目录
|      |- - -__init__.py
|      |- - -start.py#启动


1 #!/usr/bin/env python 2 #_*_coding:utf-8_*_ 3 #Python 4 #17-7-14 下午6:22 5 #__author__='Administrator' 6 7 import os,sys 8 9 BASE_DIR = os.path.dirname(os.path.dirname(os.path.abspath(__file__)))10 11 #print(BASE_DIR)12 sys.path.append(BASE_DIR)#加入环境变量13 14 if __name__ == '__main__':15 from modules.actions import excute_from_command_line16 excute_from_command_line(sys.argv)
|- - -conf/#配置目录
|      |- - -__init__.py
|      |- - -action_registers.py#开始参数配置文件


1 #_*_coding:utf-8_*_ 2 import os,sys 3 4 BASE_DIR = os.path.dirname(os.path.dirname(os.path.abspath(__file__))) 5 6 sys.path.append(BASE_DIR)#加入环境变量 7 8 from modules import views 9 10 '''11 actions = {12 'start_session': views.start_session,#开始程序13 'stop': views.stop_server,#停止14 'syncdb': views.syncdb,#创建表结构15 'create_users': views.create_users,16 'create_groups': views.create_groups,17 'create_hosts': views.create_hosts,18 'create_bindhosts': views.create_bindhosts,19 'create_remoteusers': views.create_remoteusers,20 }21 '''22 actions = {23 'audit':views.audit,#查看日志24 'start_session': views.start_session,#开始程序25 'stop': views.stop_server,#停止26 'syncdb': views.syncdb,#创建表结构27 'create_users': views.create_users,#创建堡垒机用户28 'create_groups': views.create_groups,#创建分组29 'create_hosts': views.create_hosts,#创建远程主机30 'create_remoteusers': views.create_remoteusers,# #创建远程主机用户31 'create_bindhosts': views.create_bindhosts,# 远程主机与远程主机用户 绑定 关联堡垒机用户与32 #'ass_bind_group': views.ass_bindhost_group,#远程主机与远程主机用户组合 与 分组33 34 35 }36 37 actionses = {38 'audit [查看日志]':views.audit,#查看日志39 'start_session [开始程序]': views.start_session,#开始程序40 'stop [停止]': views.stop_server,#停止41 'syncdb [创建表结构]': views.syncdb,#创建表结构42 'create_users [创建堡垒机用户]': views.create_users,#创建堡垒机用户43 'create_groups [创建分组]': views.create_groups,#创建分组44 'create_hosts [创建远程主机]': views.create_hosts,#创建远程主机45 'create_remoteusers [创建远程主机用户]': views.create_remoteusers,# #创建远程主机用户46 'create_bindhosts [绑定堡垒机用户与远程主机用户]': views.create_bindhosts,#绑定堡垒机用户与远程主机用户47 #'ass_bind_group [绑定远程主机+远程主机用户组合与分组]': views.ass_bindhost_group,#远程主机与远程主机用户组合 与 分组48 49 50 }| |- - -settings.py#配置文件


1 import os,sys 2 3 BASE_DIR = os.path.dirname(os.path.dirname(os.path.abspath(__file__))) 4 5 USER='root'#用户名 6 PASSWORD='root'#密码 7 HOST_IP='127.0.0.1'#数据库地址 8 PORT="3306"#数据库端口 9 DB='little_finger'#库名10 DB_CONN ="mysql+pymysql://"+USER+":"+PASSWORD+"@"+HOST_IP+":"+PORT+"/"+DB+"?charset=utf8"#连接参数11 #DB_CONN ="mysql+pymysql://root:root@localhost:3306/"+DB+"?charset=utf8"#连接参数
|- - -modules/#主逻辑目录
|      |- - -__init__.py
|      |- - -actions.py#开始函数 帮助信息


1 #!/usr/bin/env python 2 #_*_coding:utf-8_*_ 3 #Python 4 #17-7-14 下午6:25 5 #__author__='Administrator' 6 import os,sys 7 8 BASE_DIR = os.path.dirname(os.path.dirname(os.path.abspath(__file__))) 9 10 sys.path.append(BASE_DIR)#加入环境变量11 12 from conf import settings13 from conf import action_registers14 from modules import utils15 16 17 def help_msg():#帮助信息18 '''19 print help msgs20 :return:21 '''22 print("\033[31;1mAvailable commands:\033[0m")23 for key in action_registers.actionses:#打印配置文件中的帮助信息24 print("\t",key)25 26 27 def excute_from_command_line(argvs):#接收输入的命令28 if len(argvs) < 2: #如果小于两个词29 help_msg()#打印帮助信息30 exit()31 if argvs[1] not in action_registers.actions:32 utils.print_err("Command [%s] does not exist!" % argvs[1], quit=True)33 action_registers.actions[argvs[1]](argvs[1:])#获取到命令| |- - -db_conn.py#数据库连接配置


1 from sqlalchemy import create_engine,Table 2 from sqlalchemy.orm import sessionmaker 3 4 from conf import settings 5 6 7 #engine = create_engine(settings.DB_CONN) 8 engine = create_engine(settings.DB_CONN,echo=True)#数据库连接通道 9 10 SessionCls = sessionmaker(bind=engine) #创建与数据库的会话session class ,注意,这里返回给session的是个class,不是实例11 session = SessionCls()
| |- - -interactive.py#ssh命令重写


1 import socket 2 import sys 3 from paramiko.py3compat import u 4 from modules import models 5 import datetime 6 7 # windows does not have termios... 8 try: 9 import termios 10 import tty 11 has_termios = True 12 except ImportError: 13 has_termios = False 14 15 #记录日志相关 堡垒机用户 连接主机 命令 写入日志 16 def interactive_shell(chan,user_obj,bind_host_obj,cmd_caches,log_recording): 17 if has_termios: 18 posix_shell(chan,user_obj,bind_host_obj,cmd_caches,log_recording) 19 else: 20 windows_shell(chan) 21 22 23 def posix_shell(chan,user_obj,bind_host_obj,cmd_caches,log_recording): 24 import select 25 26 oldtty = termios.tcgetattr(sys.stdin) 27 try: 28 tty.setraw(sys.stdin.fileno()) 29 tty.setcbreak(sys.stdin.fileno()) 30 chan.settimeout(0.0) 31 cmd = '' 32 tab_key = False 33 while True: 34 r, w, e = select.select([chan, sys.stdin], [], [])#select 连接传入命令返回 三个变量 35 if chan in r:#如果命令存在 36 try: 37 x = u(chan.recv(1024))#连接返回数据 38 if tab_key: 39 if x not in ('\x07' , '\r\n'): #判断空格 和回车 40 #print('tab:',x) 41 cmd += x 42 tab_key = False 43 if len(x) == 0: 44 sys.stdout.write('\r\n*** EOF\r\n') 45 break 46 sys.stdout.write(x) 47 sys.stdout.flush()#实时输出到屏幕 48 except socket.timeout: 49 pass 50 if sys.stdin in r: 51 x = sys.stdin.read(1) 52 if '\r' != x: 53 cmd +=x 54 else: 55 56 print('cmd->:',cmd)#命令 57 log_item = models.AuditLog(user_id=user_obj.id, 58 bind_host_id=bind_host_obj.id, 59 action_type='cmd', 60 cmd=cmd , 61 date=datetime.datetime.now() 62 ) 63 cmd_caches.append(log_item)#添加到列表 64 cmd = '' 65 66 if len(cmd_caches)>=10:#每十条写入日志 67 log_recording(user_obj,bind_host_obj,cmd_caches) 68 cmd_caches = [] 69 if '\t' == x: 70 tab_key = True 71 if len(x) == 0: 72 break 73 chan.send(x)#发送命令 74 75 finally: 76 termios.tcsetattr(sys.stdin, termios.TCSADRAIN, oldtty) 77 78 79 # thanks to Mike Looijmans for this code 80 def windows_shell(chan): 81 import threading 82 83 sys.stdout.write("Line-buffered terminal emulation. Press F6 or ^Z to send EOF.\r\n\r\n") 84 85 def writeall(sock): 86 while True: 87 data = sock.recv(256) 88 if not data: 89 sys.stdout.write('\r\n*** EOF ***\r\n\r\n') 90 sys.stdout.flush() 91 break 92 sys.stdout.write(data.decode())##windows下要转成str 93 sys.stdout.flush()#实时输出到屏幕 94 95 writer = threading.Thread(target=writeall, args=(chan,)) 96 writer.start() 97 98 try: 99 while True:100 d = sys.stdin.read(1)101 if not d:102 break103 chan.send(d)104 except EOFError:105 # user hit ^Z or F6106 pass| |- - -models.py#表结构 类


1 #!/usr/bin/env python 2 #_*_coding:utf-8_*_ 3 #Python 4 #17-7-12 上午10:54 5 #__author__='Administrator' 6 7 # 创建表 8 import os ,sys 9 BASE_DIR=os.path.dirname(os.path.dirname(os.path.abspath(__file__)))#获取相对路径转为绝对路径赋于变量 10 sys.path.append(BASE_DIR)#增加环境变量 11 from sqlalchemy.ext.declarative import declarative_base 12 from sqlalchemy import Column, Integer, String, ForeignKey, UniqueConstraint, Index,Table,DATE,DateTime 13 from sqlalchemy.orm import sessionmaker, relationship 14 from sqlalchemy import create_engine 15 from sqlalchemy import func #统计 16 from sqlalchemy_utils import ChoiceType,PasswordType # 17 from conf import settings 18 Base = declarative_base()#生成orm 基类 19 20 # #创建堡垒机用户关联--联合表,自动维护 21 user_profile_m2m_bind_host = Table('user_profile_m2m_bind_host', Base.metadata, 22 Column('user_profile_id',Integer,ForeignKey('user_profile.id')),#关联,用户id 23 Column('bind_host_id',Integer,ForeignKey('bind_host.id')),#关联,联合表id 24 ) 25 # #创建联合表--分组,自动维护 26 bind_host_m2m_host_group = Table('bind_host_m2m_host_group', Base.metadata, 27 Column('bind_host_id',Integer,ForeignKey('bind_host.id')),#关联,联合表id 28 Column('host_group_id',Integer,ForeignKey('host_group.id')),#关联,分组id 29 ) 30 # #创建堡垒机用户--分组,自动维护 31 user_profile_m2m_host_group = Table('user_profile_m2m_host_group', Base.metadata, 32 Column('user_profile_id',Integer,ForeignKey('user_profile.id')),#关联,堡垒机用户id 33 Column('host_group_id',Integer,ForeignKey('host_group.id')),#关联,分组id 34 ) 35 #主机表 36 class Host(Base):#主机表 37 __tablename__='host' 38 id=Column(Integer,primary_key=True) 39 hostname=Column(String(64),unique=True)#主机名 40 ip=Column(String(64),unique=True)#ip 41 port=Column(Integer,default=22)#端口默认为22 42 def __repr__(self): 43 return self.hostname#输出主机名 44 45 #服务器远程主机用户名密码 46 class RemoteUser(Base): 47 __tablename__='remote_user' 48 49 id=Column(Integer,primary_key=True) 50 AuthType=[ 51 ('ssh-passwd','SSH-Password'), 52 ('ssh-key','SSH-Key'), 53 ] 54 auth_type=Column(ChoiceType(AuthType))#认证类型 55 username=Column(String(64))#用户名 不用唯一 56 password=Column(String(64)) 57 __table_args__=(UniqueConstraint('auth_type','username','password',name='user_password_type'),)#联合只唯一 58 def __repr__(self): 59 return self.username#用户名 60 61 #绑定远程主机-远程用户关联表 62 class BindHost(Base): 63 __tablename__='bind_host' 64 __table_args__=(UniqueConstraint('host_id',"remote_user_id",name='host_id_remote'),)#联合唯一 65 id=Column(Integer,primary_key=True) 66 host_id=Column(Integer,ForeignKey('host.id'))#外键--〉主机表 67 remote_user_id=Column(Integer,ForeignKey('remote_user.id'))#外键--〉主机用户表 68 host=relationship('Host',backref='bind_hosts')#外键 主机表 查询与反查 69 remote_user=relationship('RemoteUser',backref='bind_hosts')#外键 用户表 查询与反查 70 def __repr__(self): 71 return '[主机:%s----->登陆用户:%s]'%(self.host.ip,self.remote_user.username)# 72 73 74 #主机分组 75 class HostGroup(Base): 76 __tablename__='host_group' 77 id=Column(Integer,primary_key=True) 78 group_name=Column(String(64),unique=True)#主机分组名 79 bind_host=relationship('BindHost',secondary=bind_host_m2m_host_group,backref='host_groups')#分组表 远程联合表 查询与反查 80 def __repr__(self): 81 return self.group_name#输出主机名 82 83 #堡垒机用户, 84 class UserProfile(Base): 85 __tablename__='user_profile' 86 id=Column(Integer,primary_key=True) 87 username=Column(String(64),unique=True)#用户名 88 password=Column(String(256)) 89 bind_hosts = relationship('BindHost',secondary=user_profile_m2m_bind_host,backref='user_profiles')#调用关联绑定表查看 堡垒机用户名 90 host_group = relationship('HostGroup',secondary=user_profile_m2m_host_group,backref='user_profiles')#调用关联 分组查看 堡垒机用户名 91 #audit_logs = relationship('AuditLog')#查日志 92 def __repr__(self): 93 return self.username#用户名 94 95 #日志类 96 class AuditLog(Base): 97 __tablename__ = 'audit_log' 98 id = Column(Integer,primary_key=True) 99 user_id = Column(Integer,ForeignKey('user_profile.id'))#外键 堡垒机用户ID100 bind_host_id = Column(Integer,ForeignKey('bind_host.id'))#外键 远程主机ID101 action_choices = [102 (u'cmd',u'CMD'),#命令103 (u'login',u'Login'),#登陆104 (u'logout',u'Logout'),#退出105 ]106 action_type = Column(ChoiceType(action_choices))#日志类型107 cmd = Column(String(255))#命令108 date = Column(DateTime)#日期时间109 user_profile = relationship("UserProfile",backref='audit_logs')#关联堡垒机用户 查询110 bind_host = relationship("BindHost",backref='audit_logs')#关联远程主机 查询| |- - -ssh_login.py#登陆远程主机调用


1 #!usr/bin/env python 2 #-*-coding:utf-8-*- 3 # Author calmyan 4 #python 5 #2017/7/15 19:44 6 #__author__='Administrator' 7 8 9 import base6410 import getpass11 import os12 import socket13 import sys14 import traceback15 from paramiko.py3compat import input16 from modules import models17 import datetime18 19 import paramiko20 try:21 import interactive22 except ImportError:23 from . import interactive24 25 #登陆远程主机26 def ssh_login(user_obj,bind_host_obj,mysql_engine,log_recording):#ssh进入远程主机27 # now, connect and use paramiko Client to negotiate SSH2 across the connection28 try:29 client = paramiko.SSHClient()30 client.load_system_host_keys()31 client.set_missing_host_key_policy(paramiko.WarningPolicy())32 print('*** Connecting...')#开始连接33 #client.connect(hostname, port, username, password)34 client.connect(bind_host_obj.host.ip,35 bind_host_obj.host.port,36 bind_host_obj.remote_user.username,37 bind_host_obj.remote_user.password,38 timeout=30)#超时30秒39 40 cmd_caches = []#定义一个列表,暂时保存命令41 chan = client.invoke_shell()42 print(repr(client.get_transport()))43 print('*** Here we go!\n')44 cmd_caches.append(models.AuditLog(user_id=user_obj.id,45 bind_host_id=bind_host_obj.id,46 action_type='login',47 date=datetime.datetime.now()48 ))49 log_recording(user_obj,bind_host_obj,cmd_caches)50 interactive.interactive_shell(chan,user_obj,bind_host_obj,cmd_caches,log_recording)#传入 堡垒机用户, 连接远程主机 命令 记当日志函数51 chan.close()52 client.close()53 54 except Exception as e:55 print('*** Caught exception: %s: %s' % (e.__class__, e))56 traceback.print_exc()57 try:58 client.close()59 except:60 pass61 sys.exit(1)| |- - -utils.py#工具函数


1 from conf import settings 2 import yaml 3 try: 4 from yaml import CLoader as Loader, CDumper as Dumper 5 except ImportError: 6 from yaml import Loader, Dumper 7 8 def print_err(msg,quit=False):#错误提示输出 9 output = "\033[31;1mError: %s\033[0m" % msg10 if quit:11 exit(output)12 else:13 print(output)14 15 16 def yaml_parser(yml_filename):17 '''18 load yaml file and return19 :param yml_filename:20 :return:21 '''22 #yml_filename = "%s/%s.yml" % (settings.StateFileBaseDir,yml_filename)23 try:24 yaml_file = open(yml_filename,'r')#打开文件25 data = yaml.load(yaml_file)#load 成一个对象26 return data#返回数据27 except Exception as e:28 print_err(e)
| |- - -views.py#主要逻辑函数


1 #_*_coding:utf-8_*_ 2 import os,sys 3 BASE_DIR = os.path.dirname(os.path.dirname(os.path.abspath(__file__))) 4 5 sys.path.append(BASE_DIR)#加入环境变量 6 from modules import models 7 from modules.db_conn import engine,session 8 from modules.utils import print_err,yaml_parser 9 #from modules import common_filt 10 from modules import ssh_login 11 from sqlalchemy import create_engine,Table 12 from sqlalchemy.orm import sessionmaker 13 14 from conf import settings 15 16 #用户登陆函数 17 def auth(): 18 ''' 19 do the user login authentication 20 :return: 21 ''' 22 count = 0 23 while count <3:#用户输入三次机会 24 username = input("\033[32;1mUsername:\033[0m").strip() 25 if len(username) ==0:continue 26 password = input("\033[32;1mPassword:\033[0m").strip() 27 if len(password) ==0:continue 28 user_obj = session.query(models.UserProfile).filter(models.UserProfile.username==username, 29 models.UserProfile.password==password).first()#从数据库中获取堡垒机用户信息 30 if user_obj: 31 return user_obj 32 else: 33 print("wrong username or password, you have %s more chances." %(3-count-1)) 34 count +=1 35 else: 36 print_err("too many attempts.") 37 38 39 #欢迎界面 40 def welcome_msg(user): 41 WELCOME_MSG = '''\033[32;1m 42 ------------- Welcome [%s] login LittleFinger ------------- 43 \033[0m'''% user.username 44 print(WELCOME_MSG) 45 46 47 #写入数据库 日志 48 def log_recording(user_obj,bind_host_obj,logs): 49 ''' 50 flush user operations on remote host into DB 51 :param user_obj: 52 :param bind_host_obj: 53 :param logs: list format [logItem1,logItem2,...] 54 :return: 55 ''' 56 print("\033[41;1m--logs:\033[0m",logs) 57 session.add_all(logs) 58 session.commit() 59 60 #开始函数 61 def start_session(argvs): 62 print('going to start sesssion ') 63 user = auth()#判断用户名 并返回用户对应信息 64 if user: 65 welcome_msg(user)#打印欢迎界面 66 #print(user.id)#用户ID 67 #print(user.bind_hosts)#绑定主机 68 #print(user.host_group)#所在组 69 #log_recording(user,user.bind_hosts,user.host_group,logs) 70 exit_flag = False#设定点 为假 71 while not exit_flag:#如果设定点 为假 说明登陆成功 72 if user.bind_hosts:#有绑定远程主机 打印远程主机 73 print('\033[32;1mz.\tungroupped hosts (%s)\033[0m' %len(user.bind_hosts) ) 74 for index,group in enumerate(user.host_group):#打印当前用户所在组 75 print('\033[32;1m%s.\t%s (%s)\033[0m' %(index,group.group_name, len(group.bind_host)) ) 76 77 print('(q)=quit') 78 choice = input("[%s]:" % user.username).strip()#开始获取输入的命令 79 80 if len(choice) == 0:continue#如果没有输入跳过 81 if choice == 'q': 82 exit_flag=True 83 #if choice=='exit': exit()#退出 84 if choice == 'z':#如果输入 z 85 print("------ Group: ungroupped hosts ------" )#输出所有的未分组的主机 86 for index,bind_host in enumerate(user.bind_hosts): 87 print(" %s.\t%s@%s(%s)"%(index, 88 bind_host.remote_user.username,#绑定的用户名 89 bind_host.host.hostname,#主机名 90 bind_host.host.ip,#IP地址 91 )) 92 print("----------- END -----------" ) 93 elif choice.isdigit():#如果是选择数字 94 choice = int(choice) 95 if choice < len(user.host_group): 96 print("------ Group: %s ------" % user.host_group[choice].group_name ) 97 for index,bind_host in enumerate(user.host_group[choice].bind_host):#打印出选择组的包括的 98 print(" %s.\t%s@%s(%s)"%(index, 99 bind_host.remote_user.username,#绑定的用户名100 bind_host.host.hostname,#主机名101 bind_host.host.ip,#IP地址102 ))103 print("----------- END -----------" )104 105 #host selection106 while not exit_flag:107 user_option = input("[(b)back, (q)quit, select host to login]:").strip()108 if len(user_option)==0:continue109 if user_option == 'b':break110 if user_option == 'q':111 exit_flag=True112 if user_option.isdigit():113 user_option = int(user_option)114 if user_option < len(user.host_group[choice].bind_host) :#查看分组所绑定的远程 主机115 print('host:',user.host_group[choice].bind_host[user_option])116 print('audit log:',user.host_group[choice].bind_host[user_option].audit_logs)117 ssh_login.ssh_login(user,118 user.host_group[choice].bind_host[user_option],119 session,120 log_recording)121 else:122 print("no this option..")123 124 #停止退出125 def stop_server(argvs):126 exit()127 128 #创建表结构129 def syncdb(argvs):130 print("Syncing DB....[创建所有表结构]")131 models.Base.metadata.create_all(engine) #创建所有表结构132 133 '''======创建四个基础表==== '''134 #堡垒机用户添加135 def create_users(argvs):136 if '-f' in argvs:#判断参数 -f 是否存在137 user_file = argvs[argvs.index("-f") +1 ]#获取文件位置138 else:139 print_err("invalid usage, should be:\ncreateusers -f <the new users file>",quit=True)140 source = yaml_parser(user_file)#获取文件内容数据141 if source:#如果获取成功142 for key,val in source.items():143 print(key,val)144 obj = models.UserProfile(username=key,password=val.get('password'))#创建新数据145 session.add(obj)146 session.commit()147 148 #分组添加149 def create_groups(argvs):150 if '-f' in argvs:#判断参数 -f 是否存在151 group_file = argvs[argvs.index("-f") +1 ]152 else:153 print_err("invalid usage, should be:\ncreategroups -f <the new groups file>",quit=True)154 source = yaml_parser(group_file)#通过yaml 获取文件中的数据,155 if source:156 for key,val in source.items():157 print(key,val)158 obj = models.HostGroup(group_name=key)#创建一条新数据159 if val.get('bind_hosts'):#160 bind_hosts = bind_hosts_filter(val)#绑定的远程主机组合表161 obj.bind_host = bind_hosts162 if val.get('user_profiles'):#堡垒机用户163 user_profiles = user_profiles_filter(val)#堡垒机用户164 obj.user_profiles = user_profiles165 session.add(obj)166 session.commit()167 168 #远程主机添加169 def create_hosts(argvs):170 if '-f' in argvs:#判断参数 -f 是否存在171 hosts_file = argvs[argvs.index("-f") +1 ]172 else:173 print_err("invalid usage, should be:\ncreate_hosts -f <the new hosts file>",quit=True)#退出函数174 source = yaml_parser(hosts_file)#通过yaml 获取文件中的数据,175 if source:#如果获取成功,不为空176 for key,val in source.items():#进行数据的解析177 print(key)178 print(val)179 obj = models.Host(hostname=key,ip=val.get('ip'), port=val.get('port') or 22)#port 端口默认为22180 session.add(obj)#写入到数据库181 session.commit()#关闭 确认写入182 183 #创建远程主机用户184 def create_remoteusers(argvs):185 if '-f' in argvs:186 remoteusers_file = argvs[argvs.index("-f") +1 ]187 else:188 print_err("invalid usage, should be:\ncreate_remoteusers -f <the new remoteusers file>",quit=True)189 source = yaml_parser(remoteusers_file)#通过yaml 获取文件中的数据,190 if source:191 for key,val in source.items():#进行数据的解析192 print(key,val)193 obj = models.RemoteUser(username=val.get('username'),auth_type=val.get('auth_type'),password=val.get('password'))194 session.add(obj)#写入数据库195 session.commit()196 197 198 '''====远程主机与远程主机用户组合表====='''199 ##远程主机用户名密码与远程主机组合绑定 关联 到堡垒机用户200 def create_bindhosts(argvs):201 if '-f' in argvs:202 bindhosts_file = argvs[argvs.index("-f") +1 ]203 else:204 print_err("invalid usage, should be:\ncreate_hosts -f <the new bindhosts file>",quit=True)205 source = yaml_parser(bindhosts_file)#通过yaml 获取文件中的数据,206 if source:207 for key,val in source.items():208 print(key,val)209 host_obj = session.query(models.Host).filter(models.Host.hostname==val.get('hostname')).first()#获取对应主机数据210 assert host_obj#断言 当前主机一定要存在才能往下执行211 for item in val['remote_users']:#输出存在的远程主机用户212 print(item )213 assert item.get('auth_type')#断言 一定要存在才能往下执行214 if item.get('auth_type') == 'ssh-passwd':#判断ssh连接类型 从数据库选出合条件的数据215 remoteuser_obj = session.query(models.RemoteUser).filter(216 models.RemoteUser.username==item.get('username'),217 models.RemoteUser.password==item.get('password')218 ).first()#获取主机数据 返回对象219 else:220 remoteuser_obj = session.query(models.RemoteUser).filter(221 models.RemoteUser.username==item.get('username'),222 models.RemoteUser.auth_type==item.get('auth_type'),223 ).first()224 if not remoteuser_obj:#如果远程主机用户不存在225 print_err("RemoteUser obj %s does not exist." % item,quit=True )226 bindhost_obj = models.BindHost(host_id=host_obj.id,remote_user_id=remoteuser_obj.id)#创建一条新数据227 session.add(bindhost_obj)228 #for groups this host binds to229 if source[key].get('groups'):#如果有分组标志230 #获取分组信息231 group_objs = session.query(models.HostGroup).filter(models.HostGroup.group_name.in_(source[key].get('groups') )).all()232 assert group_objs#断言 分组一定要存在才能往下执行233 print('groups:', group_objs)234 bindhost_obj.host_groups = group_objs#主机加到分组235 #for user_profiles this host binds to236 if source[key].get('user_profiles'):#如果有堡垒机用户标志237 #获取堡垒机用信息238 userprofile_objs = session.query(models.UserProfile).filter(models.UserProfile.username.in_(239 source[key].get('user_profiles')240 )).all()241 assert userprofile_objs#断言 堡垒机用户一定要存在才能往下执行242 print("userprofiles:",userprofile_objs)243 bindhost_obj.user_profiles = userprofile_objs#主机与堡垒机用户绑定244 #print(bindhost_obj)245 session.commit()246 247 248 #远程主机组合表查看249 def bind_hosts_filter(vals):#远程主机组合表查看250 print('**>',vals.get('bind_hosts') )251 bind_hosts = session.query(models.BindHost).filter(models.Host.hostname.in_(vals.get('bind_hosts'))).all()252 if not bind_hosts:253 print_err("none of [%s] exist in bind_host table." % vals.get('bind_hosts'),quit=True)254 return bind_hosts255 256 #堡垒机用户查看257 def user_profiles_filter(vals):258 user_profiles = session.query(models.UserProfile).filter(models.UserProfile.username.in_(vals.get('user_profiles'))).all()259 if not user_profiles:260 print_err("none of [%s] exist in user_profile table." % vals.get('user_profiles'),quit=True)261 return user_profiles262 263 264 265 #查看用户日志266 def audit(argvs):267 if '-n' in argvs:268 user_name = argvs[argvs.index("-n") +1 ]#获取要查看的用户名269 else:270 print_err("invalid usage, should be:\n输入参数 -n <用户名/user_name >",quit=True)271 print(user_name)272 user_obj = session.query(models.UserProfile).filter(models.UserProfile.username==user_name).first()#取到273 print(user_obj.id)274 log_obj = session.query(models.AuditLog).filter(models.AuditLog.user_id==user_obj.id).all()275 for i in log_obj:276 print('堡垒机用户:【%s】,远程主机【%s】,远程用户:【%s】命令:【%s】,日期:【%s】'%(i.user_profile,i.bind_host.host,i.bind_host.remote_user,i.cmd,i.date))277 input('========')
|- - -share/#添加堡垒机用户\远程主机\分组\远程主机用户 目录
|      |- - -examples/#文件目录
|              |- - -new_bindhosts.yml/#远程主机用户与远程主机 组合表(组合表与 分组)(堡垒机用户与组合表) 创建 示例


1 bind0: 2 hostname: ubuntu test 3 remote_users: 4 - user0: 5 username: root 6 auth_type: ssh-passwd 7 password: root 8 groups: 9 - test_group10 user_profiles:11 - uge312 - alex13 14 15 bind1:16 hostname: server117 remote_users:18 - user1:19 username: root20 auth_type: ssh-key21 #password: 12322 - user0:23 username: root24 auth_type: ssh-passwd25 password: root26 - user4:27 username: calmyan28 auth_type: ssh-passwd29 password: yjj30 groups:31 - bj_group32 user_profiles:33 - uge334 35 bind2:36 hostname: server237 remote_users:38 - user1:39 username: alex40 auth_type: ssh-passwd41 password: alex371442 groups:43 - bj_group44 - sh_group45 user_profiles:46 - rain
| |- - -new_groups.yml/#分组创建 示例( 堡垒机用户与 分组)


1 bj_group: 2 user_profiles: 3 - alex 4 - uge3 5 6 sh_group: 7 user_profiles: 8 - jack 9 - alex10 - rain11 - uge312 test_group:13 user_profiles:14 - uge3
| |- - -new_hosts.yml/#远程主机创建 示例


1 ubuntu test: 2 ip: 192.168.11.50 3 port: 22 4 5 server1: 6 ip: 192.168.11.51 7 8 9 server2:10 ip: 10.4.4.2211 port: 30000
| |- - -new_remoteusers.yml/#远程主机用户创建 示例


1 user0: 2 auth_type: ssh-passwd 3 username: root 4 password: root 5 6 user1: 7 auth_type: ssh-passwd 8 username: root 9 password: alex!3432110 11 user2:12 auth_type: ssh-key13 username: root14 #password: abc!2315 16 user3:17 auth_type: ssh-passwd18 username: alex19 password: alex371420 21 user4:22 auth_type: ssh-passwd23 username: calmyan24 password: yjj
| |- - -new_user.yml/#堡垒机用户机创建 示例


1 alex: 2 password: alex123 3 uge3: 4 password: uge3 5 6 jack: 7 password: jack123 8 9 rain:10 password: rain123
<br><br>
위 내용은 파이썬 요새 기계 생산의 상세 내용입니다. 자세한 내용은 PHP 중국어 웹사이트의 기타 관련 기사를 참조하세요!

핫 AI 도구

Undresser.AI Undress
사실적인 누드 사진을 만들기 위한 AI 기반 앱

AI Clothes Remover
사진에서 옷을 제거하는 온라인 AI 도구입니다.

Undress AI Tool
무료로 이미지를 벗다

Clothoff.io
AI 옷 제거제

AI Hentai Generator
AI Hentai를 무료로 생성하십시오.

인기 기사
뜨거운 도구

메모장++7.3.1
사용하기 쉬운 무료 코드 편집기

SublimeText3 중국어 버전
중국어 버전, 사용하기 매우 쉽습니다.

스튜디오 13.0.1 보내기
강력한 PHP 통합 개발 환경

드림위버 CS6
시각적 웹 개발 도구

SublimeText3 Mac 버전
신 수준의 코드 편집 소프트웨어(SublimeText3)
뜨거운 주제
 7514
7514
 15
1378
52
79
11
53
19
19
64
15
1378
52
79
11
53
19
19
64

 2 시간의 파이썬 계획 : 현실적인 접근
Apr 11, 2025 am 12:04 AM
2 시간의 파이썬 계획 : 현실적인 접근
Apr 11, 2025 am 12:04 AM
2 시간 이내에 Python의 기본 프로그래밍 개념과 기술을 배울 수 있습니다. 1. 변수 및 데이터 유형을 배우기, 2. 마스터 제어 흐름 (조건부 명세서 및 루프), 3. 기능의 정의 및 사용을 이해하십시오. 4. 간단한 예제 및 코드 스 니펫을 통해 Python 프로그래밍을 신속하게 시작하십시오.
 Redis 대기열을 읽는 방법
Apr 10, 2025 pm 10:12 PM
Redis 대기열을 읽는 방법
Apr 10, 2025 pm 10:12 PM
Redis의 대기열을 읽으려면 대기열 이름을 얻고 LPOP 명령을 사용하여 요소를 읽고 빈 큐를 처리해야합니다. 특정 단계는 다음과 같습니다. 대기열 이름 가져 오기 : "큐 :"와 같은 "대기열 : my-queue"의 접두사로 이름을 지정하십시오. LPOP 명령을 사용하십시오. 빈 대기열 처리 : 대기열이 비어 있으면 LPOP이 NIL을 반환하고 요소를 읽기 전에 대기열이 존재하는지 확인할 수 있습니다.
 Redis의 서버 버전을 보는 방법
Apr 10, 2025 pm 01:27 PM
Redis의 서버 버전을 보는 방법
Apr 10, 2025 pm 01:27 PM
질문 : Redis 서버 버전을 보는 방법은 무엇입니까? 명령 줄 도구 Redis-Cli를 사용하여 연결된 서버의 버전을보십시오. 정보 서버 명령을 사용하여 서버의 내부 버전을보고 정보를 구문 분석하고 반환해야합니다. 클러스터 환경에서 각 노드의 버전 일관성을 확인하고 스크립트를 사용하여 자동으로 확인할 수 있습니다. 스크립트를 사용하여 Python 스크립트와 연결 및 인쇄 버전 정보와 같은보기 버전을 자동화하십시오.
 Redis로 서버를 시작하는 방법
Apr 10, 2025 pm 08:12 PM
Redis로 서버를 시작하는 방법
Apr 10, 2025 pm 08:12 PM
Redis 서버를 시작하는 단계에는 다음이 포함됩니다. 운영 체제에 따라 Redis 설치. Redis-Server (Linux/MacOS) 또는 Redis-Server.exe (Windows)를 통해 Redis 서비스를 시작하십시오. Redis-Cli Ping (Linux/MacOS) 또는 Redis-Cli.exe Ping (Windows) 명령을 사용하여 서비스 상태를 확인하십시오. Redis-Cli, Python 또는 Node.js와 같은 Redis 클라이언트를 사용하여 서버에 액세스하십시오.
 비즈니스 요구에 따라 Redis 메모리 크기를 설정하는 방법은 무엇입니까?
Apr 10, 2025 pm 02:18 PM
비즈니스 요구에 따라 Redis 메모리 크기를 설정하는 방법은 무엇입니까?
Apr 10, 2025 pm 02:18 PM
Redis 메모리 크기 설정은 다음 요소를 고려해야합니다. 데이터 볼륨 및 성장 추세 : 저장된 데이터의 크기 및 성장 속도를 추정하십시오. 데이터 유형 : 다른 유형 (예 : 목록, 해시)은 다른 메모리를 차지합니다. 캐싱 정책 : 전체 캐시, 부분 캐시 및 단계 정책은 메모리 사용에 영향을 미칩니다. 비즈니스 피크 : 트래픽 피크를 처리하기에 충분한 메모리를 남겨 두십시오.
 메모리에 대한 Redis 지속성의 영향은 무엇입니까?
Apr 10, 2025 pm 02:15 PM
메모리에 대한 Redis 지속성의 영향은 무엇입니까?
Apr 10, 2025 pm 02:15 PM
Redis Persistence는 추가 메모리를 차지하고 RDB는 스냅 샷을 생성 할 때 메모리 사용량을 일시적으로 증가시키고 AOF는 로그를 추가 할 때 계속 메모리를 차지합니다. 영향 요인에는 데이터 볼륨, 지속성 정책 및 Redis 구성이 포함됩니다. 영향을 완화하려면 RDB 스냅 샷 정책을 합리적으로 구성하고 구성 최적화, 하드웨어 업그레이드 및 메모리 사용을 모니터링 할 수 있습니다. 또한 성능과 데이터 보안 사이의 균형을 찾는 것이 중요합니다.
 Python vs. C : 응용 및 사용 사례가 비교되었습니다
Apr 12, 2025 am 12:01 AM
Python vs. C : 응용 및 사용 사례가 비교되었습니다
Apr 12, 2025 am 12:01 AM
Python은 데이터 과학, 웹 개발 및 자동화 작업에 적합한 반면 C는 시스템 프로그래밍, 게임 개발 및 임베디드 시스템에 적합합니다. Python은 단순성과 강력한 생태계로 유명하며 C는 고성능 및 기본 제어 기능으로 유명합니다.
 Redis 메모리 구성 매개 변수는 무엇입니까?
Apr 10, 2025 pm 02:03 PM
Redis 메모리 구성 매개 변수는 무엇입니까?
Apr 10, 2025 pm 02:03 PM
** Redis 메모리 구성의 핵심 매개 변수는 MaxMemory로 Redis가 사용할 수있는 메모리의 양을 제한합니다. 이 한계가 초과 될 때, Redis는 Maxmemory-Policy에 따라 제거 전략을 실행합니다. 다른 관련 매개 변수로는 MaxMemory-Samples (LRU 샘플 수량), RDB- 압축이 있습니다
