

Node.js의 다양한 확장 메서드 코드 예제 요약

Node.js 확장
Init 메서드
Node.js 확장을 생성하려면 node::ObjectWrap을 상속하는 C++ 클래스를 작성해야 합니다. ObjectWrap은 Javascript와 더 쉽게 상호 작용할 수 있도록 하는 공용 메서드를 구현합니다.
먼저 클래스의 기본 프레임워크를 작성해 보겠습니다.
#include <v8.h> // v8 is the Javascript engine used by QNode
#include <node.h>
// We will need the following libraries for our GTK+ notification
#include <string>
#include <gtkmm.h>
#include <libnotifymm.h>

using namespace v8;

class Gtknotify : node::ObjectWrap {
 private:
 public:
  Gtknotify() {}
  ~Gtknotify() {}
  static void Init(Handle<Object> target) {
   // This is what Node will call when we load the extension through require(), see boilerplate code below.
  }
};

/*
 * WARNING: Boilerplate code ahead.
 * Thats it for actual interfacing with v8, finally we need to let Node.js know how to dynamically load our code.
 * Because a Node.js extension can be loaded at runtime from a shared object, we need a symbol that the dlsym function can find,
 * so we do the following:
 */

v8::Persistent<FunctionTemplate> Gtknotify::persistent_function_template;
extern "C" { // Cause of name mangling in C++, we use extern C here
 static void init(Handle<Object> target) {
  Gtknotify::Init(target);
 }
 NODE_MODULE(gtknotify, init);
}이제 Init() 메서드에 다음 코드를 작성해야 합니다.
생성자를 선언합니다. 그리고 이를 목표 변수에 바인딩합니다. var n = require("notification"); 알림()을 n:n.notification().
// Wrap our C++ New() method so that it's accessible from Javascript
  // This will be called by the new operator in Javascript, for example: new notification();
  v8::Local<FunctionTemplate> local_function_template = v8::FunctionTemplate::New(New);

  // Make it persistent and assign it to persistent_function_template which is a static attribute of our class.
  Gtknotify::persistent_function_template = v8::Persistent<FunctionTemplate>::New(local_function_template);

  // Each JavaScript object keeps a reference to the C++ object for which it is a wrapper with an internal field.
  Gtknotify::persistent_function_template->InstanceTemplate()->SetInternalFieldCount(1); // 1 since a constructor function only references 1 object
  // Set a "class" name for objects created with our constructor
  Gtknotify::persistent_function_template->SetClassName(v8::String::NewSymbol("Notification"));

  // Set the "notification" property of our target variable and assign it to our constructor function
target->Set(String::NewSymbol("notification"), Gtknotify::persistent_function_template->GetFunction());에 바인딩합니다. 속성 선언: n.title 및 n.icon.
  // Set property accessors
  // SetAccessor arguments: Javascript property name, C++ method that will act as the getter, C++ method that will act as the setter
  Gtknotify::persistent_function_template->InstanceTemplate()->SetAccessor(String::New("title"), GetTitle, SetTitle);
  Gtknotify::persistent_function_template->InstanceTemplate()->SetAccessor(String::New("icon"), GetIcon, SetIcon);
// For instance, n.title = "foo" will now call SetTitle("foo"), n.title will now call GetTitle()프로토타입 메서드 선언: n . send()
  // This is a Node macro to help bind C++ methods to Javascript methods (see https://github.com/joyent/node/blob/v0.2.0/src/node.h#L34)
  // Arguments: our constructor function, Javascript method name, C++ method name
  NODE_SET_PROTOTYPE_METHOD(Gtknotify::persistent_function_template, "send", Send);
이제 Init() 메서드는 다음과 같아야 합니다.
// Our constructor
static v8::Persistent<FunctionTemplate> persistent_function_template;

static void Init(Handle<Object> target) {
 v8::HandleScope scope; // used by v8 for garbage collection

 // Our constructor
 v8::Local<FunctionTemplate> local_function_template = v8::FunctionTemplate::New(New);
 Gtknotify::persistent_function_template = v8::Persistent<FunctionTemplate>::New(local_function_template);
 Gtknotify::persistent_function_template->InstanceTemplate()->SetInternalFieldCount(1); // 1 since this is a constructor function
 Gtknotify::persistent_function_template->SetClassName(v8::String::NewSymbol("Notification"));

 // Our getters and setters
 Gtknotify::persistent_function_template->InstanceTemplate()->SetAccessor(String::New("title"), GetTitle, SetTitle);
 Gtknotify::persistent_function_template->InstanceTemplate()->SetAccessor(String::New("icon"), GetIcon, SetIcon);

 // Our methods
 NODE_SET_PROTOTYPE_METHOD(Gtknotify::persistent_function_template, "send", Send);

 // Binding our constructor function to the target variable
 target->Set(String::NewSymbol("notification"), Gtknotify::persistent_function_template->GetFunction());
}남은 일은 Init 메서드에서 사용하는 C++ 메서드(New, GetTitle, SetTitle, GetIcon, SetIcon,Send
)를 작성하는 것입니다.
생성자 메소드: New()
New() 메소드는 사용자 정의 클래스(Gtknotify 객체)의 새 인스턴스를 생성하고 일부 초기 값을 설정한 다음 객체의 JavaScript 처리를 반환합니다. 이는 new 연산자를 사용하여 생성자를 호출하는 JavaScript의 예상되는 동작입니다.
 std::string title;
std::string icon;

// new notification()
static Handle<Value> New(const Arguments& args) {
 HandleScope scope;
 Gtknotify* gtknotify_instance = new Gtknotify();
 // Set some default values
 gtknotify_instance->title = "Node.js";
 gtknotify_instance->icon = "terminal";

 // Wrap our C++ object as a Javascript object
 gtknotify_instance->Wrap(args.This());

 return args.This();
}
getters 和 setters: GetTitle(), SetTitle(), GetIcon(), SetIcon()다음은 대부분 C++와 JavaScript(v8) 간의 값 변환으로 귀결되는 상용구 코드입니다.
// this.title
static v8::Handle<Value> GetTitle(v8::Local<v8::String> property, const v8::AccessorInfo& info) {
 // Extract the C++ request object from the JavaScript wrapper.
 Gtknotify* gtknotify_instance = node::ObjectWrap::Unwrap<Gtknotify>(info.Holder());
 return v8::String::New(gtknotify_instance->title.c_str());
}
// this.title=
static void SetTitle(Local<String> property, Local<Value> value, const AccessorInfo& info) {
 Gtknotify* gtknotify_instance = node::ObjectWrap::Unwrap<Gtknotify>(info.Holder());
 v8::String::Utf8Value v8str(value);
 gtknotify_instance->title = *v8str;
}
// this.icon
static v8::Handle<Value> GetIcon(v8::Local<v8::String> property, const v8::AccessorInfo& info) {
 // Extract the C++ request object from the JavaScript wrapper.
 Gtknotify* gtknotify_instance = node::ObjectWrap::Unwrap<Gtknotify>(info.Holder());
 return v8::String::New(gtknotify_instance->icon.c_str());
}
// this.icon=
static void SetIcon(Local<String> property, Local<Value> value, const AccessorInfo& info) {
 Gtknotify* gtknotify_instance = node::ObjectWrap::Unwrap<Gtknotify>(info.Holder());
 v8::String::Utf8Value v8str(value);
 gtknotify_instance->icon = *v8str;
}프로토타입 메서드: Send()
먼저 C++ 개체의 참조를 추출한 다음 개체의 속성을 사용하여 알림을 작성하고 표시합니다.
// this.send()
static v8::Handle<Value> Send(const Arguments& args) {
 v8::HandleScope scope;
 // Extract C++ object reference from "this"
 Gtknotify* gtknotify_instance = node::ObjectWrap::Unwrap<Gtknotify>(args.This());

 // Convert first argument to V8 String
 v8::String::Utf8Value v8str(args[0]);

 // For more info on the Notify library: http://library.gnome.org/devel/libnotify/0.7/NotifyNotification.html
 Notify::init("Basic");
 // Arguments: title, content, icon
 Notify::Notification n(gtknotify_instance->title.c_str(), *v8str, gtknotify_instance->icon.c_str()); // *v8str points to the C string it wraps
 // Display the notification
 n.show();
 // Return value
 return v8::Boolean::New(true);
}Compile Extensions
node-waf는 waf의 기본 패키지인 Node Extensions를 컴파일하는 데 사용되는 빌드 도구입니다. 빌드 프로세스는 wscript라는 파일을 통해 구성할 수 있습니다.
def set_options(opt):
 opt.tool_options("compiler_cxx")

def configure(conf):
 conf.check_tool("compiler_cxx")
 conf.check_tool("node_addon")
 # This will tell the compiler to link our extension with the gtkmm and libnotifymm libraries.
 conf.check_cfg(package='gtkmm-2.4', args='--cflags --libs', uselib_store='LIBGTKMM')
 conf.check_cfg(package='libnotifymm-1.0', args='--cflags --libs', uselib_store='LIBNOTIFYMM')

def build(bld):
 obj = bld.new_task_gen("cxx", "shlib", "node_addon")
 obj.cxxflags = ["-g", "-D_FILE_OFFSET_BITS=64", "-D_LARGEFILE_SOURCE", "-Wall"]
 # This is the name of our extension.
 obj.target = "gtknotify"
 obj.source = "src/node_gtknotify.cpp"
obj.uselib = ['LIBGTKMM', 'LIBNOTIFYMM']이제 빌드를 시작할 준비가 되었습니다. 최상위 디렉터리에서 다음 명령을 실행하세요.
node-wafconfigure && node-waf build
모든 것이 순조롭게 진행되면 다음 위치에 컴파일된 확장 프로그램이 생성됩니다. ./ build/default/gtknotify.node, 시도해 보세요:
$ node
> var notif = require('./build/default/gtknotify.node');
> n = new notif.notification();
{ icon: 'terminal', title: 'Node.js' }
> n.send("Hello World!");
true위 코드는 화면 오른쪽 상단에 알림 메시지를 표시합니다.
npm 패키지로 빌드하세요
정말 멋지네요. 그런데 노력의 결과를 Node 커뮤니티와 어떻게 공유하시나요? 이것이 npm의 주요 목적입니다: 확장 및 배포를 더 쉽게 만드는 것입니다.
npm 확장 패키지 빌드는 매우 간단합니다. 확장에 대한 정보가 포함된 package.json 파일을 최상위 디렉터리에 생성하기만 하면 됩니다.{
// 扩展的名称 (不要在名称中包含node 或者 js, 这是隐式关键字).
// 这是通过require() 导入扩展的名称.
"name" : "notify",
// Version should be http://semver.org/ compliant
"version" : "v0.1.0"
// 这些脚本将在调用npm安装和npm卸载的时候运行.
, "scripts" : {
"preinstall" : "node-waf configure && node-waf build"
, "preuninstall" : "rm -rf build/*"
}
// 这是构建我们扩展的相对路径.
, "main" : "build/default/gtknotify.node"
// 以下是可选字段:
, "description" : "Description of the extension...."
, "homepage" : "https://github.com/olalonde/node-notify"
, "author" : {
"name" : "Olivier Lalonde"
, "email" : "olalonde@gmail.com"
, "url" : "http://www.syskall.com/"
}
, "repository" : {
"type" : "git"
, "url" : "https://github.com/olalonde/node-notify.git"
}
}
$ npm adduser
$ npm publish
위 내용은 Node.js의 다양한 확장 메서드 코드 예제 요약의 상세 내용입니다. 자세한 내용은 PHP 중국어 웹사이트의 기타 관련 기사를 참조하세요!

핫 AI 도구

Undresser.AI Undress
사실적인 누드 사진을 만들기 위한 AI 기반 앱

AI Clothes Remover
사진에서 옷을 제거하는 온라인 AI 도구입니다.

Undress AI Tool
무료로 이미지를 벗다

Clothoff.io
AI 옷 제거제

Video Face Swap
완전히 무료인 AI 얼굴 교환 도구를 사용하여 모든 비디오의 얼굴을 쉽게 바꾸세요!

인기 기사
뜨거운 도구

메모장++7.3.1
사용하기 쉬운 무료 코드 편집기

SublimeText3 중국어 버전
중국어 버전, 사용하기 매우 쉽습니다.

스튜디오 13.0.1 보내기
강력한 PHP 통합 개발 환경

드림위버 CS6
시각적 웹 개발 도구

SublimeText3 Mac 버전
신 수준의 코드 편집 소프트웨어(SublimeText3)
뜨거운 주제
 7707
7707
 15
1640
14
1394
52
1288
25
1232
29
15
1640
14
1394
52
1288
25
1232
29

 win7 드라이버 코드 28을 해결하는 방법
Dec 30, 2023 pm 11:55 PM
win7 드라이버 코드 28을 해결하는 방법
Dec 30, 2023 pm 11:55 PM
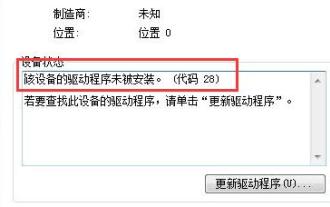
일부 사용자는 장치를 설치할 때 오류 코드 28을 표시하는 오류가 발생했습니다. 실제로 이는 주로 드라이버 때문입니다. win7 드라이버 코드 28의 문제만 해결하면 됩니다. 수행해야 할 작업을 살펴보겠습니다. 그것. win7 드라이버 코드 28로 수행할 작업: 먼저 화면 왼쪽 하단에 있는 시작 메뉴를 클릭해야 합니다. 그런 다음 팝업 메뉴에서 "제어판" 옵션을 찾아 클릭하세요. 이 옵션은 일반적으로 메뉴 하단이나 그 근처에 있습니다. 클릭하면 시스템이 자동으로 제어판 인터페이스를 엽니다. 제어판에서는 다양한 시스템 설정 및 관리 작업을 수행할 수 있습니다. 이것이 향수 청소 수준의 첫 번째 단계입니다. 도움이 되기를 바랍니다. 그런 다음 계속해서 시스템에 들어가야 합니다.
 블루 스크린 코드 0x0000001이 발생하는 경우 대처 방법
Feb 23, 2024 am 08:09 AM
블루 스크린 코드 0x0000001이 발생하는 경우 대처 방법
Feb 23, 2024 am 08:09 AM
블루 스크린 코드 0x0000001로 수행할 작업 블루 스크린 오류는 컴퓨터 시스템이나 하드웨어에 문제가 있을 때 나타나는 경고 메커니즘입니다. 코드 0x0000001은 일반적으로 하드웨어 또는 드라이버 오류를 나타냅니다. 사용자가 컴퓨터를 사용하는 동안 갑자기 블루 스크린 오류가 발생하면 당황하고 당황할 수 있습니다. 다행히도 대부분의 블루 스크린 오류는 몇 가지 간단한 단계를 통해 문제를 해결하고 처리할 수 있습니다. 이 기사에서는 독자들에게 블루 스크린 오류 코드 0x0000001을 해결하는 몇 가지 방법을 소개합니다. 먼저, 블루 스크린 오류가 발생하면 다시 시작해 보세요.
 컴퓨터에 블루 스크린이 자주 발생하고 코드가 매번 다릅니다.
Jan 06, 2024 pm 10:53 PM
컴퓨터에 블루 스크린이 자주 발생하고 코드가 매번 다릅니다.
Jan 06, 2024 pm 10:53 PM
win10 시스템은 매우 뛰어난 지능 시스템으로 사용자에게 최고의 사용자 경험을 제공할 수 있습니다. 정상적인 상황에서는 사용자의 win10 시스템 컴퓨터에 아무런 문제가 없습니다! 그러나 우수한 컴퓨터에서는 다양한 오류가 발생하는 것은 불가피합니다. 최근 친구들은 win10 시스템에서 블루 스크린이 자주 발생한다고 보고했습니다. 오늘 편집자는 Windows 10 컴퓨터에서 자주 블루 스크린을 발생시키는 다양한 코드에 대한 솔루션을 제공합니다. 매번 다른 코드로 자주 나타나는 컴퓨터 블루 스크린에 대한 해결 방법: 다양한 오류 코드의 원인 및 해결 방법 제안 1. 0×000000116 오류의 원인: 그래픽 카드 드라이버가 호환되지 않는 것이어야 합니다. 해결책: 원래 제조업체의 드라이버를 교체하는 것이 좋습니다. 2,
 코드 0xc000007b 오류 해결
Feb 18, 2024 pm 07:34 PM
코드 0xc000007b 오류 해결
Feb 18, 2024 pm 07:34 PM
종료 코드 0xc000007b 컴퓨터를 사용하는 동안 때때로 다양한 문제와 오류 코드가 발생할 수 있습니다. 그 중 종료코드가 가장 충격적이며, 특히 종료코드 0xc000007b가 가장 충격적이다. 이 코드는 애플리케이션이 제대로 시작되지 않아 사용자에게 불편을 초래함을 나타냅니다. 먼저 종료코드 0xc000007b의 의미를 알아보겠습니다. 이 코드는 32비트 응용 프로그램이 64비트 운영 체제에서 실행을 시도할 때 일반적으로 발생하는 Windows 운영 체제 오류 코드입니다. 그래야 한다는 뜻이다
 0x0000007f 블루 스크린 코드의 원인과 해결 방법에 대한 자세한 설명
Dec 25, 2023 pm 02:19 PM
0x0000007f 블루 스크린 코드의 원인과 해결 방법에 대한 자세한 설명
Dec 25, 2023 pm 02:19 PM
블루 스크린은 시스템을 사용할 때 자주 발생하는 문제입니다. 오류 코드에 따라 다양한 원인과 해결 방법이 있습니다. 예를 들어 stop: 0x0000007f 문제가 발생하면 하드웨어 또는 소프트웨어 오류일 수 있습니다. 편집기를 따라 해결책을 찾아보겠습니다. 0x000000c5 블루 스크린 코드 이유: 답변: 메모리, CPU 및 그래픽 카드가 갑자기 오버클럭되었거나 소프트웨어가 잘못 실행되고 있습니다. 해결 방법 1: 1. 부팅할 때 F8을 계속 눌러 들어가고 안전 모드를 선택한 다음 Enter를 눌러 들어갑니다. 2. 안전모드 진입 후 win+r을 눌러 실행창을 열고 cmd를 입력한 후 Enter를 누릅니다. 3. 명령 프롬프트 창에서 "chkdsk /f /r"을 입력하고 Enter를 누른 다음 y 키를 누릅니다. 4.
 모든 장치에서 GE 범용 원격 코드 프로그램
Mar 02, 2024 pm 01:58 PM
모든 장치에서 GE 범용 원격 코드 프로그램
Mar 02, 2024 pm 01:58 PM
장치를 원격으로 프로그래밍해야 하는 경우 이 문서가 도움이 될 것입니다. 우리는 모든 장치 프로그래밍을 위한 최고의 GE 범용 원격 코드를 공유할 것입니다. GE 리모콘이란 무엇입니까? GEUniversalRemote는 스마트 TV, LG, Vizio, Sony, Blu-ray, DVD, DVR, Roku, AppleTV, 스트리밍 미디어 플레이어 등과 같은 여러 장치를 제어하는 데 사용할 수 있는 리모컨입니다. GEUniversal 리모컨은 다양한 기능과 기능을 갖춘 다양한 모델로 제공됩니다. GEUniversalRemote는 최대 4개의 장치를 제어할 수 있습니다. 모든 장치에서 프로그래밍할 수 있는 최고의 범용 원격 코드 GE 리모컨에는 다양한 장치에서 작동할 수 있는 코드 세트가 함께 제공됩니다. 당신은 할 수있다
 블루 스크린 코드 0x000000d1은 무엇을 나타냅니까?
Feb 18, 2024 pm 01:35 PM
블루 스크린 코드 0x000000d1은 무엇을 나타냅니까?
Feb 18, 2024 pm 01:35 PM
0x000000d1 블루 스크린 코드는 무엇을 의미합니까? 최근 몇 년 동안 컴퓨터의 대중화와 인터넷의 급속한 발전으로 인해 운영 체제의 안정성 및 보안 문제가 점점 더 부각되고 있습니다. 일반적인 문제는 블루 스크린 오류이며, 코드 0x000000d1이 그 중 하나입니다. 블루 스크린 오류 또는 "죽음의 블루 스크린"은 컴퓨터에 심각한 시스템 오류가 발생할 때 발생하는 상태입니다. 시스템이 오류로부터 복구할 수 없는 경우 Windows 운영 체제는 화면에 오류 코드와 함께 블루 스크린을 표시합니다. 이러한 오류 코드
 Python 그림 학습을 위한 빠른 가이드: 얼음 조각 그리기를 위한 코드 예제
Jan 13, 2024 pm 02:00 PM
Python 그림 학습을 위한 빠른 가이드: 얼음 조각 그리기를 위한 코드 예제
Jan 13, 2024 pm 02:00 PM
Python 그리기를 빠르게 시작하세요: 그리기를 위한 코드 예제 Bingdundun Python은 배우기 쉽고 강력한 프로그래밍 언어입니다. Python의 그리기 라이브러리를 사용하면 다양한 그리기 요구 사항을 쉽게 실현할 수 있습니다. 이 기사에서는 Python의 그리기 라이브러리 matplotlib를 사용하여 간단한 얼음 그래프를 그릴 것입니다. 빙둔둔은 귀여운 이미지를 지닌 판다로 어린이들에게 인기가 매우 높습니다. 먼저 matplotlib 라이브러리를 설치해야 합니다. 터미널에서 실행하면 됩니다.
