> 백엔드 개발 > PHP 튜토리얼 > thinkPHP5는 Laypage 페이징 플러그인을 사용하여 목록 페이징 function_php 예제를 구현합니다.

thinkPHP5는 Laypage 페이징 플러그인을 사용하여 목록 페이징 function_php 예제를 구현합니다.

韦小宝
풀어 주다: 2023-03-17 18:16:01
원래의
2532명이 탐색했습니다.

이 글에서는 주로 thinkPHP5를 목록 페이징 기능 구현을 위한 Laypage 페이징 플러그인을 사용하여 자세히 소개합니다. thinkPHP5에 관심이 있는 친구들은 참고해서 살펴보세요. thinkPHP5 레이아웃을 페이지로 매기자

1. 배경

thinkPHP 프레임워크를 사용하여 프로젝트를 수행할 때 목록 내용의 페이지 매김을 자주 접하게 됩니다. thinkPHP 프레임워크에는 페이징 기능이 있지만 결함이 있습니다. 이 결함은 각 페이지의 데이터가 페이지로 반환될 때마다 페이지에 필요한 JS, CSS 및 기타 리소스를 다시 로드해야 한다는 것입니다. 페이지에 JS가 너무 많이 포함되어 있고 크기가 너무 크면 트래픽 압박이 증가합니다. 그래서 우리는laypage 플러그인을 사용합니다. ajax를 사용하여 매번 각 페이지의 데이터를 요청하면 됩니다. 페이지를 반복적으로 로드할 필요가 없습니다.

2. 페이징 프로세스

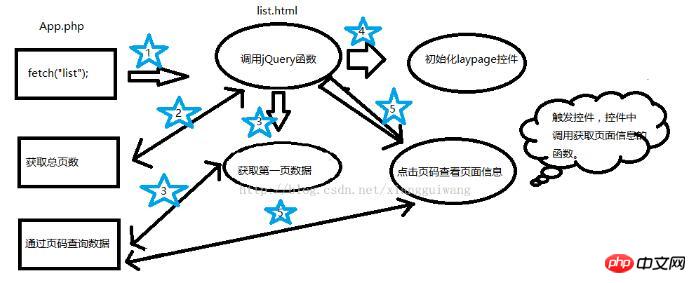
는 아래 그림과 같습니다.

프로세스 설명:


1) fetch 함수를 호출하는 App.php의 함수를 조사합니다. fetch 함수는 list.html을 렌더링합니다.

2) list.html은 함수를 호출하여 총 페이지 수를 가져오고 총 페이지 수를 가져옵니다.
3) 데이터의 첫 번째 페이지를 가져옵니다.
4) 레이페이지 페이징 플러그인을 초기화합니다.
5) 페이지 번호를 클릭하면 페이징 쿼리가 실행됩니다.

3. 페이징 기능 구현과 관련된 코드

1. App.php 컨트롤러 코드


//fetch渲染页面 
public function index() 
{ 
 return $this->fetch('list'); 
} 


 //根据页面传入的页码查询数据 
 public function getPage() 
 { 
   
   <span style="color:#FF0000;">// 获取页面传入的页码 </span>      
   $nowpage = input("page"); 
   //每页显示10条数据 
   $limits = 10; 
 
   $app = new appInfo(); 
   $page_info = $app->limit(($nowpage * $limits), $limits)->select(); 
 
   // ajax 分页输出 
   $info = [&#39;pageinfo&#39;=>$page_info,&#39;nowpage&#39;=>$nowpage,&#39;nowpage&#39;=>$nowpage]; 
 
  return json($info); 
 
 
 } 
 
 
 //获取所有页数 
public function getAllPage(){ 
 
 try{ 
  $count = appInfo::count(); 
 
  $limits = 10; 
  // 计算总页面 
  $allpage = ceil($count / $limits); 
 
  $info =[&#39;allpage&#39;=>$allpage]; 
 }catch (\Exception $e){ 
  abort(500,$e->getMessage(),[&#39;result&#39;=>TopsecGWErrer::TOPSEC_GW_ERR_NO_UNKNOWN]); 
 } 
 
 return json($info); 
}
로그인 후 복사


2.list.html


<p class="box-body"> 
  <table id="table1" class="table table-bordered table-striped"> 
   <thead> 
   <tr> 
    <th>应用名称</th> 
    <th>应用类型</th> 
    <th>应用图像</th> 
    <th>创建日期</th> 
    <th>修改日期</th> 
    <th>操作</th> 
   </tr> 
   </thead> 
   <tbody id="table_body"></tbody> 
   <tfoot> 
 
   </tfoot> 
  </table> 
  <p id="result"></p> 
  <p class=" "> 
   <button id="add_app" type="button" class="btn btn-primary col-xs-offset-5" > 
    <span class=&#39;fa fa-tasks white&#39;></span>丨添加应用 
   </button> 
  </p> 
  <p id="content"> </p> 
  <p class="box-body"> 
 
   <button id="add_img" type="button" class="btn btn-primary col-xs-offset-5" > 
    <span class=&#39;fa fa-tasks white&#39;></span>丨添加图片 
   </button> 
  </p> 
 
  <!-- /.box-body --> 
 </p>
로그인 후 복사


3. list.html의 jQuery 코드


//pageCount:总页数。用于初始化laypage分页控件。 
//pageIndex:初始化当前页。显示第一页。 
//currentPage:当前页数。 
//getPageData:获取每页数据的函数。 
//url:获取每页数据的方法的路径。由控制器和函数名组成。 
 function jsonPage(pageCount, pageIndex,currentPage, getPageData,url) { 
  var laypageindex = laypage({ 
   cont: &#39;result&#39;, //容器。值支持id名、原生dom对象,jquery对象。 
   skin: &#39;#3c8dbc&#39;, 
   pages: pageCount, //通过后台拿到的总页数 
   curr: pageIndex, //初始化当前页 
   prev: &#39;上一页&#39;, //若不显示,设置false即可 
   next: &#39;下一页&#39;, //若不显示,设置false即可 
   skip: true, //是否开启跳页 
   jump: function (obj, first) { //触发分页后的回调 
    //getPageData(1); 
    if (!first) { //点击跳页触发函数自身,并传递当前页:obj.curr 
     getPageData(url,obj.curr); 
     currentPage = obj.curr; 
    } 
   } 
  }); 
 } 
 
 
/url:获取总页数据的方法的路径。由控制器和函数名组成。  
 function getAllpage(url){ 
 
  var tmp ; 
  $.ajax({ 
   type: "GET", 
   dataType: "json", 
   async: false, 
   url: PUBLIC_BASE+url, 
   success: function(json) { 
    var data = eval(json); 
    tmp=data.allpage; 
   }, 
   error: function(json) { 
 
   } 
 
  }); 
  return tmp; 
 
 } 
 
 //data:每页的数据。由JSON对象组成。 
 function instantiation(data) { 
  //begin $.each 
  $.each(data.pageinfo, function (index, item) { 
   $("#table_body").append($(&#39;<tr class="table_tr"/>&#39;) 
    .append($("<td/>").html(item.name)) 
    .append($("<td/>").html(item.desc)) 
    .append($("<td/>").html("<img src=&#39;"+item.appImg+"&#39; />")) 
    .append($("<td/>").html(item.create_time)) 
    .append($("<td/>").html(item.update_time)) 
    .append( 
     $("<td />") 
      .append($("<a class=&#39;yellow&#39; id=&#39;view"+item.id+"&#39;><i class=&#39;fa fa-eye fa-fw&#39;></i>查看丨 </a>")) 
      .append($("<a class=&#39;green&#39; id=&#39;edit"+item.id+"&#39;><i class=&#39;fa fa-edit fa-fw&#39;></i>编辑丨 </a>")) 
      .append($("<a class=&#39;red&#39; id=&#39;delete"+item.id+"&#39;><i class=&#39;fa fa-remove fa-fw&#39;></i>删除丨 </a>")) 
      .append($("<a class=&#39;blue&#39; id=&#39;forbid" + item.id + "&#39;><i class=&#39;fa fa-ban fa-fw&#39;></i>禁用</a>")) 
 
    ) 
 
   ); 
 
   $("#view"+item.id).click(function() { 
    fillMainContent("/application/application?model=view&id="+item.id); 
   }) 
 
   $("#edit"+item.id).click(function() { 
    fillMainContent("/application/application?model=edit&id="+item.id); 
   }) 
 
   $("#delete"+item.id).click(function() { 
 
    deleteApp(item.id); 
    alert("删除成功"); 
 
   }) 
 
   $("#forbid"+item.id).click(function() { 
    deleteApp(item.id); 
    alert("删除成功"); 
    getPageData(currentPage); 
   }) 
 
  }); 
  //end $.each 
   
 }  
 //获取每页的数据。curr:页码 ,curl:获取数据的路径。 
 function getPageData(url,curr) { 
  curr = curr-1; 
  $.ajax({ 
 
   type: "GET", 
   dataType: "json", 
   data: {page:curr}, 
   url: PUBLIC_BASE+url, 
   success: function(json) { 
    $(&#39;#table_body&#39;).empty(); 
    var data = eval(json); 
    console.log(data); 
 
    instantiation(data); 
   }, 
 
   error: function(json) { 
 
    var data = eval(json); 
    console.log(data); 
 
   } 
 
  }); 
 
 } 
 
 <span style="color:#FF0000;">//调用函数实现分页</span> 
//获取总页数,用于初始化分页控件总页数 
 pageCount= getAllpage("/application/getAllPage"); 
 //获取第一页数据 
 getPageData("/application/getpage",1); 
 //初始化分页控件并分页 
 jsonPage(pageCount,pageIndex,currentPage,getPageData,"/application/getpage");
로그인 후 복사


4. 참고 자료

http://laypage.layui.com/


위 내용은 이 글의 전체 내용입니다. 모든 분들의 공부에 도움이 되었으면 좋겠습니다.

관련 추천:

Xiaobai의 레이페이지 페이징 사용에 대한 간략한 소개

laypage+laytpl 예제

thinkphp5 페이징 스타일, tp5 페이징 스타일

위 내용은 thinkPHP5는 Laypage 페이징 플러그인을 사용하여 목록 페이징 function_php 예제를 구현합니다.의 상세 내용입니다. 자세한 내용은 PHP 중국어 웹사이트의 기타 관련 기사를 참조하세요!

관련 라벨:
원천:php.cn
본 웹사이트의 성명
본 글의 내용은 네티즌들의 자발적인 기여로 작성되었으며, 저작권은 원저작자에게 있습니다. 본 사이트는 이에 상응하는 법적 책임을 지지 않습니다. 표절이나 침해가 의심되는 콘텐츠를 발견한 경우 admin@php.cn으로 문의하세요.
인기 튜토리얼
더>
최신 다운로드
더>
웹 효과
웹사이트 소스 코드
웹사이트 자료
프론트엔드 템플릿