Linux VLAN 구성에 대한 자세한 설명
이 글은 주로 Linux 가상 네트워크 장비의 VLAN 구성에 대한 관련 정보를 소개합니다. 샘플 코드를 통해 매우 자세하게 소개되어 있어 모든 사람의 학습이나 업무에 도움이 되기를 바랍니다.
소개
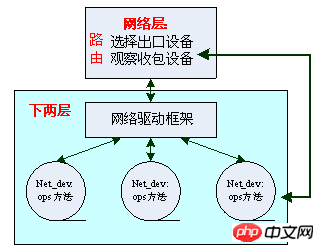
VLAN은 네트워크 스택의 추가 기능으로 하위 2계층에 위치합니다. 먼저 Linux에서 네트워크 스택의 하위 2개 레이어 구현을 알아보고 VLAN 기능을 추가하는 방법을 살펴보겠습니다. 다음 두 계층에는 특정 하드웨어 장치가 포함됩니다. 점점 더 완벽해지는 Linux 커널은 우수한 코드 격리를 달성했으며 다음 그림과 같이 네트워크 장치 드라이버에서도 마찬가지입니다.

여기서 주목해야 할 점은 Linux 네트워크 장치 net_dev는 반드시 실제 하드웨어 장치와 일치할 필요는 없습니다. 구조체 net_device{} 구조(netdevice.h)가 커널에 등록되어 있는 한 네트워크 장치는 존재합니다. 이 구조는 매우 크고 장치의 프로토콜 주소(IP의 경우 IP 주소)를 포함하므로 네트워크 계층에서 인식되고 라우팅 시스템에 참여할 수 있으며 그 중 가장 유명한 것이 루프백 장치입니다. 다양한 장치(하드웨어 및 비하드웨어 포함)에는 드라이버 자체에 의해 구현되는 다양한 작업 작동 방법이 있습니다. 일부 일반적인 장치 독립적인 작동 절차(예: 장치 잠금 등)는 Linux에서 추출되며 드라이버 프레임워크라고 합니다.
Linux 가상 네트워크 장치의 VLAN 구성
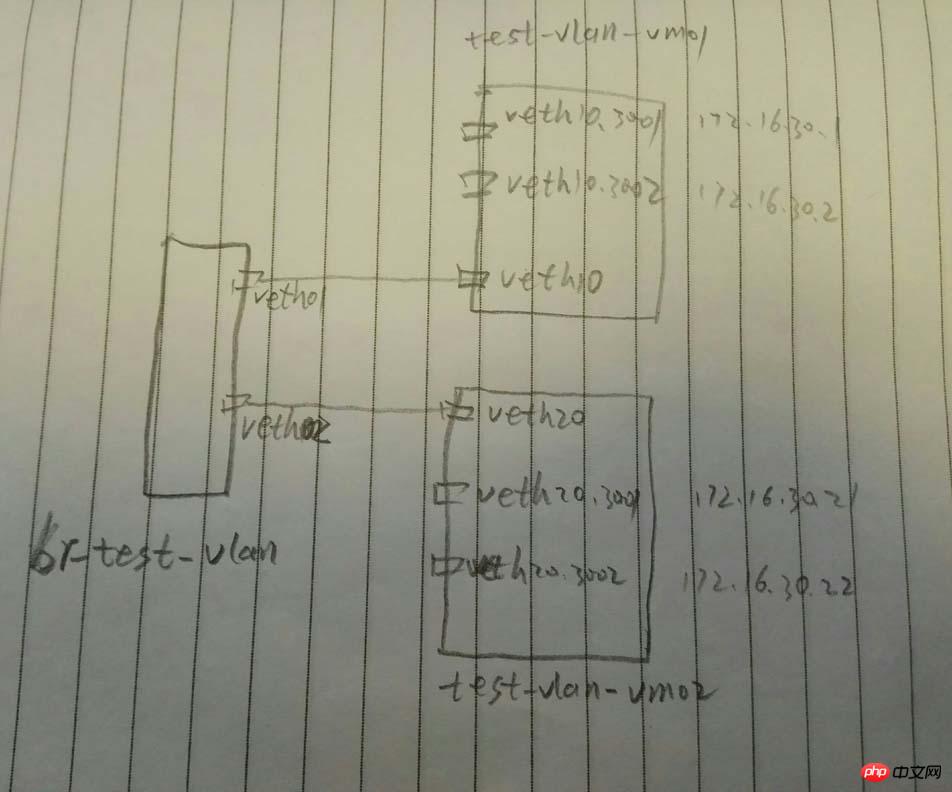
브리지와 두 개의 장치 쌍을 통해 두 개의 네트워크 네임스페이스를 연결하고 각 네임스페이스에 두 개의 VLAN을 생성합니다

vconfig를 사용하여 VLAN을 구성합니다.
#创建网桥
brctl addbr br-test-vlan
#创建veth对儿
ip link add veth01 type veth peer name veth10
ip link add veth02 type veth peer name veth20
#将veth对儿的一段添加到网桥
brctl addif br-test-vlan veth01
brctl addif br-test-vlan veth02
#启动设备
ip link set dev br-test-vlan up
ip link set dev veth01 up
ip link set dev veth02 up
ip link set dev veth10 up
ip link set dev veth20 up
#创建网络名字空间
ip netns add test-vlan-vm01
ip netns add test-vlan-vm02
#将设备对儿的另一端添加到另个名字空间(其实在一个名字空间也能玩,只是两个名字空间更加形象)
ip link set veth10 netns test-vlan-vm01
ip link set veth20 netns test-vlan-vm02
#分别进入两个名字空间创建vlan和配置ip
#配置名字空间test-vlan-vm01
ip netns exec test-vlan-vm01 bash
#配置vlan 3001 和 vlan 3002
vconfig add veth10 3001
vconfig add veth10 3002
#启动两个vlan的设备
ip link set veth10.3001 up
ip link set veth10.3002 up
#分别在两个vlan上配置ip (这里简单起见,使用了同一个网段了IP,缺点是,需要了解一点儿路由的知识)
ip a add 172.16.30.1/24 dev veth10.3001
ip a add 172.16.30.2/24 dev veth10.3002
#添加路由
route add 172.16.30.21 dev veth10.3001
route add 172.16.30.22 dev veth10.3002
#配置名字空间test-vlan-vm02
ip netns exec test-vlan-vm02 bash
#配置vlan 3001 和 vlan 3002
vconfig add veth20 3001
vconfig add veth20 3002
#启动两个vlan的设备
ip link set veth20.3001 up
ip link set veth20.3002 up
#分别在两个vlan上配置ip (这里简单起见,使用了同一个网段了IP,缺点是,需要了解一点儿路由的知识)
ip a add 172.16.30.21/24 dev veth20.3001
ip a add 172.16.30.22/24 dev veth20.3002
#添加路由
route add 172.16.30.1 dev veth20.3001
route add 172.16.30.2 dev veth20.3002
Vlan 구성을 확인합니다.
# cat /proc/net/vlan/config
VLAN Dev name | VLAN ID
Name-Type: VLAN_NAME_TYPE_RAW_PLUS_VID_NO_PAD
veth10.3001 | 3001 | veth10
veth10.3002 | 3002 | veth10
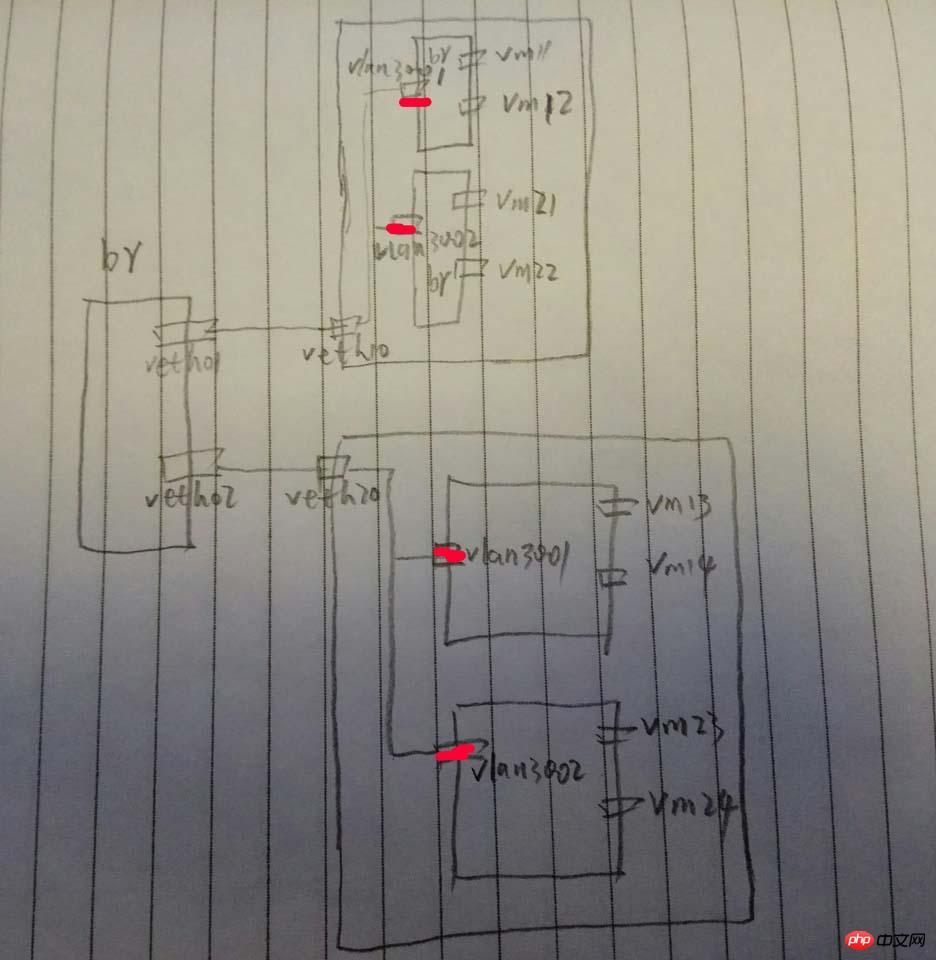
이제 두 네임스페이스에서 각각 다른 네임스페이스의 두 IP를 핑할 수 있습니다. 두 IP 모두 성공적으로 핑할 수 있지만 사용된 VLAN도 서로 다릅니다. veth01/veth10/veth02/veth20/br-test-vlan, 그러면 VLAN 정보가 표시됩니다:
# tcpdump -i veth10 -nn -e
tcpdump: verbose output suppressed, use -v or -vv for full protocol decode
listening on veth10, link-type EN10MB (Ethernet), capture size 262144 bytes
15:38:18.381010 82:f7:0e:2d:3f:62 > 9e:58:72:fa:11:15, ethertype 802.1Q (0x8100), length 102: vlan <span style="color: #ff0000;">3001</span>, p 0, ethertype IPv4, <strong><span style="color: #ff0000;">172.16.30.1 > 172.16.30.21</span></strong>: ICMP echo request, id 19466, seq 1, length 64
15:38:18.381183 9e:58:72:fa:11:15 > 82:f7:0e:2d:3f:62, ethertype 802.1Q (0x8100), length 102: vlan <span style="color: #ff0000;"><strong>3001</strong></span>, p 0, ethertype IPv4, 172.16.30.21 > 172.16.30.1: ICMP echo reply, id 19466, seq 1, length 64
15:38:19.396796 82:f7:0e:2d:3f:62 > 9e:58:72:fa:11:15, ethertype 802.1Q (0x8100), length 102: vlan 3001, p 0, ethertype IPv4, 172.16.30.1 > 172.16.30.21: ICMP echo request, id 19466, seq 2, length 64
15:38:19.396859 9e:58:72:fa:11:15 > 82:f7:0e:2d:3f:62, ethertype 802.1Q (0x8100), length 102: vlan 3001, p 0, ethertype IPv4, 172.16.30.21 > 172.16.30.1: ICMP echo reply, id 19466, seq 2, length 64
15:38:23.162052 82:f7:0e:2d:3f:62 > 9e:58:72:fa:11:15, ethertype 802.1Q (0x8100), length 102: vlan 3002, p 0, ethertype IPv4, 172.16.30.2 > <strong><span style="color: #ff0000;">172.16.30.22</span></strong>: ICMP echo request, id 19473, seq 1, length 64
15:38:23.162107 9e:58:72:fa:11:15 > 82:f7:0e:2d:3f:62, ethertype 802.1Q (0x8100), length 102: vlan 3002, p 0, ethertype IPv4, <strong><span style="color: #ff0000;">172.16.30.22 > 172.16.30.2</span></strong>: ICMP echo reply, id 19473, seq 1, length 64
veth10.3001에서 172.16.30.22로 ping을 시도하면 서로 다르기 때문에 작동하지 않습니다. vlans:
# ping -I veth10.3001 172.16.30.22
PING 172.16.30.22 (172.16.30.22) from 172.16.30.1 veth10.3001: 56(84) bytes of data.
^C
--- 172.16.30.22 ping statistics ---
9 packets transmitted, 0 received, 100% packet loss, time 8231ms
vconfig에 대한 솔루션은 적용되지 않습니다.
ip link add link veth10 name veth10.3001 type vlan id 3001
또 다른: vlan은 일반적으로 장치 이름.vlanid를 따서 명명되지만, 다음과 같이 vlan3003의 이름을 지정해도 괜찮습니다.
# ip link add link veth10 name vlan3003 type vlan id 3003
참고: 있을 수 있습니다. 메인 장치에 동일한 VLAN을 가진 최대 하나의 하위 장치만 있어야 합니다
# ip link add link veth10 name vlan3001 type vlan id 3001
 RTNETLINK answers: File exists
일반적으로 말하자면 다음과 같습니다:

관련 권장 사항:
위 내용은 Linux VLAN 구성에 대한 자세한 설명의 상세 내용입니다. 자세한 내용은 PHP 중국어 웹사이트의 기타 관련 기사를 참조하세요!

핫 AI 도구

Undresser.AI Undress
사실적인 누드 사진을 만들기 위한 AI 기반 앱

AI Clothes Remover
사진에서 옷을 제거하는 온라인 AI 도구입니다.

Undress AI Tool
무료로 이미지를 벗다

Clothoff.io
AI 옷 제거제

AI Hentai Generator
AI Hentai를 무료로 생성하십시오.

인기 기사

뜨거운 도구

메모장++7.3.1
사용하기 쉬운 무료 코드 편집기

SublimeText3 중국어 버전
중국어 버전, 사용하기 매우 쉽습니다.

스튜디오 13.0.1 보내기
강력한 PHP 통합 개발 환경

드림위버 CS6
시각적 웹 개발 도구

SublimeText3 Mac 버전
신 수준의 코드 편집 소프트웨어(SublimeText3)

뜨거운 주제
 7530
7530
 15
15
 1379
1379
 52
52
 82
82
 11
11
 54
54
 19
19
 21
21
 76
76
 Centos와 Ubuntu의 차이
Apr 14, 2025 pm 09:09 PM
Centos와 Ubuntu의 주요 차이점은 다음과 같습니다. Origin (Centos는 Red Hat, Enterprise의 경우, Ubuntu는 Debian에서 시작하여 개인의 경우), 패키지 관리 (Centos는 안정성에 중점을 둡니다. Ubuntu는 APT를 사용하여 APT를 사용합니다), 지원주기 (Ubuntu는 5 년 동안 LTS 지원을 제공합니다), 커뮤니티에 중점을 둔다 (Centos Conciors on ubuntu). 튜토리얼 및 문서), 사용 (Centos는 서버에 편향되어 있으며 Ubuntu는 서버 및 데스크탑에 적합), 다른 차이점에는 설치 단순성 (Centos는 얇음)이 포함됩니다.
 Centos를 설치하는 방법
Apr 14, 2025 pm 09:03 PM
CentOS 설치 단계 : ISO 이미지를 다운로드하고 부팅 가능한 미디어를 실행하십시오. 부팅하고 설치 소스를 선택하십시오. 언어 및 키보드 레이아웃을 선택하십시오. 네트워크 구성; 하드 디스크를 분할; 시스템 시계를 설정하십시오. 루트 사용자를 만듭니다. 소프트웨어 패키지를 선택하십시오. 설치를 시작하십시오. 설치가 완료된 후 하드 디스크에서 다시 시작하고 부팅하십시오.
 Centos는 유지 보수를 중지합니다. 2024
Apr 14, 2025 pm 08:39 PM
Centos는 2024 년에 상류 분포 인 RHEL 8이 종료 되었기 때문에 폐쇄 될 것입니다. 이 종료는 CentOS 8 시스템에 영향을 미쳐 업데이트를 계속받지 못하게합니다. 사용자는 마이그레이션을 계획해야하며 시스템을 안전하고 안정적으로 유지하기 위해 Centos Stream, Almalinux 및 Rocky Linux가 포함됩니다.
 Centos에서 Gitlab의 백업 방법은 무엇입니까?
Apr 14, 2025 pm 05:33 PM
CentOS 시스템 하에서 Gitlab의 백업 및 복구 정책 데이터 보안 및 복구 가능성을 보장하기 위해 CentOS의 Gitlab은 다양한 백업 방법을 제공합니다. 이 기사는 완전한 GITLAB 백업 및 복구 전략을 설정하는 데 도움이되는 몇 가지 일반적인 백업 방법, 구성 매개 변수 및 복구 프로세스를 자세히 소개합니다. 1. 수동 백업 gitlab-rakegitlab : 백업 : 명령을 작성하여 수동 백업을 실행하십시오. 이 명령은 gitlab 저장소, 데이터베이스, 사용자, 사용자 그룹, 키 및 권한과 같은 주요 정보를 백업합니다. 기본 백업 파일은/var/opt/gitlab/backups 디렉토리에 저장됩니다. /etc /gitlab을 수정할 수 있습니다
 Docker 원리에 대한 자세한 설명
Apr 14, 2025 pm 11:57 PM
Docker는 Linux 커널 기능을 사용하여 효율적이고 고립 된 응용 프로그램 실행 환경을 제공합니다. 작동 원리는 다음과 같습니다. 1. 거울은 읽기 전용 템플릿으로 사용되며, 여기에는 응용 프로그램을 실행하는 데 필요한 모든 것을 포함합니다. 2. Union 파일 시스템 (Unionfs)은 여러 파일 시스템을 스택하고 차이점 만 저장하고 공간을 절약하고 속도를 높입니다. 3. 데몬은 거울과 컨테이너를 관리하고 클라이언트는 상호 작용을 위해 사용합니다. 4. 네임 스페이스 및 CGroup은 컨테이너 격리 및 자원 제한을 구현합니다. 5. 다중 네트워크 모드는 컨테이너 상호 연결을 지원합니다. 이러한 핵심 개념을 이해 함으로써만 Docker를 더 잘 활용할 수 있습니다.
 센토에 하드 디스크를 장착하는 방법
Apr 14, 2025 pm 08:15 PM
Centos Hard Disk Mount는 다음 단계로 나뉩니다. 하드 디스크 장치 이름 (/dev/sdx)을 결정하십시오. 마운트 포인트를 만듭니다 ( /mnt /newdisk를 사용하는 것이 좋습니다); 마운트 명령을 실행합니다 (mount /dev /sdx1 /mnt /newdisk); 영구 마운트 구성을 추가하려면 /etc /fstab 파일을 편집하십시오. Umount 명령을 사용하여 장치를 제거하여 프로세스가 장치를 사용하지 않도록하십시오.
 Docker Desktop을 사용하는 방법
Apr 15, 2025 am 11:45 AM
Docker Desktop을 사용하는 방법? Docker Desktop은 로컬 머신에서 Docker 컨테이너를 실행하는 도구입니다. 사용 단계는 다음과 같습니다. 1. Docker Desktop 설치; 2. Docker Desktop을 시작하십시오. 3. Docker 이미지를 만듭니다 (Dockerfile 사용); 4. Docker Image 빌드 (Docker 빌드 사용); 5. 도커 컨테이너를 실행하십시오 (Docker Run 사용).
 Centos 후해야 할 일은 유지 보수를 중단합니다
Apr 14, 2025 pm 08:48 PM
Centos가 중단 된 후 사용자는 다음과 같은 조치를 취할 수 있습니다. Almalinux, Rocky Linux 및 Centos 스트림과 같은 호환되는 분포를 선택하십시오. Red Hat Enterprise Linux, Oracle Linux와 같은 상업 분포로 마이그레이션합니다. Centos 9 Stream : 롤링 분포로 업그레이드하여 최신 기술을 제공합니다. Ubuntu, Debian과 같은 다른 Linux 배포판을 선택하십시오. 컨테이너, 가상 머신 또는 클라우드 플랫폼과 같은 다른 옵션을 평가하십시오.


