이 글은 위챗 미니 프로그램 결제의 C# 백그라운드 구현 방법에 대한 관련 정보를 주로 소개합니다. 도움이 필요한 친구들이 모두 참고할 수 있기를 바랍니다.
WeChat 애플릿 결제 C# 백그라운드 구현
오늘은 상대적으로 간단한 결제 백그라운드 처리를 가져왔습니다
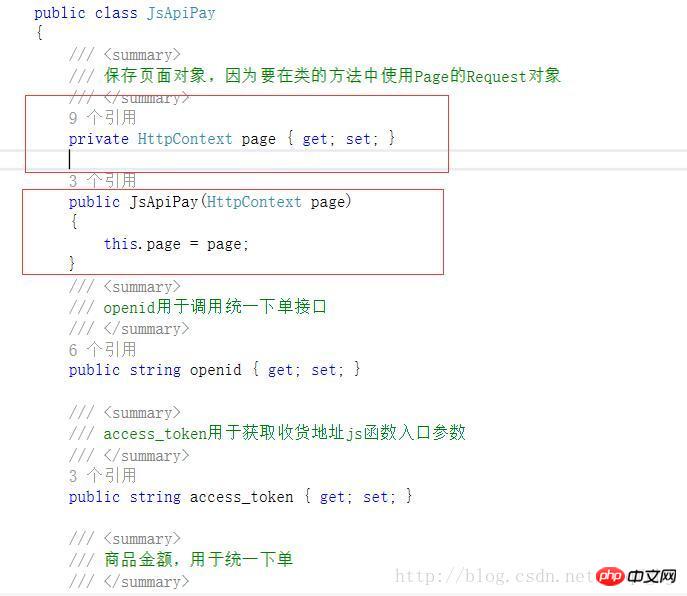
먼저 공식 C# 템플릿(WxPayAPI)을 다운로드하고 템플릿(WxPayAPI)을 서버에 추가한 다음 WxPayAPI를 사용하세요. 두 개의 "일반 처리기"(GetOpenid.ashx, pay.ashx로 이름 변경) 그런 다음 비즈니스 디렉터리에서 JsApiPay.cs를 열고 JsApiPay.cs에서 다음 두 위치를 수정합니다. 그런 다음 GetOpenid.ashx에 다음 코드를 추가합니다. :
public class GetOpenid : IHttpHandler
  {
    public string openid { get; set; }

    public void ProcessRequest(HttpContext context)
    {

      string code = HttpContext.Current.Request.QueryString["code"];
      WxPayData data = new WxPayData();
      data.SetValue("appid", WxPayConfig.APPID);
      data.SetValue("secret", WxPayConfig.APPSECRET);
      data.SetValue("code", code);
      data.SetValue("grant_type", "authorization_code");
      string url = "https://api.weixin.qq.com/sns/oauth2/access_token?" + data.ToUrl();

      //请求url以获取数据
      string result = HttpService.Get(url);

      Log.Debug(this.GetType().ToString(), "GetOpenidAndAccessTokenFromCode response : " + result);

      //保存access_token,用于收货地址获取
      JsonData jd = JsonMapper.ToObject(result);
      //access_token = (string)jd["access_token"];

      //获取用户openid
      openid = (string)jd["openid"];
      context.Response.Write(openid);//获取H5调起JS API参数

} pay.ashx에 다음 코드를 추가하세요:
 public class pay : IHttpHandler
{
public void ProcessRequest(HttpContext context)
{
context.Response.ContentType = "text/plain";
string openid = HttpContext.Current.Request.QueryString["openid"];
string total_fee = HttpContext.Current.Request.QueryString["total_fee"];
JsApiPay jsApiPay = new JsApiPay(context);
jsApiPay.openid = openid;
jsApiPay.total_fee = int.Parse(total_fee);
WxPayData unifiedOrderResult = jsApiPay.GetUnifiedOrderResult();
context.Response.Write(jsApiPay.GetJsApiParameters());//获取H5调起JS API参数
}WeChat 애플릿 코드는 다음과 같습니다.
wxpay: function () {
  var that = this
  //登陆获取code
  wx.login({
   success: function (res) {
    console.log(res.code)
    //获取openid
    that.getOpenId(res.code)
   }
  });
 },
 getOpenId: function (code) {
//获取openID

  var that = this;
  wx.request({
   url: 'http://*******/WxPayAPI/GetOpenid.ashx?code='+ code , //改为自己的域名
   data: {},
  // method: 'GET',
   success: function (res) {
   var a12=res.data
   that.generateOrder(a12)
   //console.log(a12)
   },
   fail: function () {
    // fail
   },
   complete: function () {
    // complete
   }
  })
 },
/**生成商户订单 */
 generateOrder: function (openid) {
  var that = this;
  //console.log(openid)
  //统一支付
  wx.request({
   url: 'http://*******/WxPayAPI/pay.ashx', //改为自己的域名
   //method: 'GET',
   data: {
    total_fee: 1,//1分
    openid: openid,
   },
   header: {
    'content-type': 'application/json'
   },

   success: function (res) {

    var pay = res.data
    //发起支付

    var timeStamp = pay.timeStamp;
    var packages = pay.package;
    var paySign = pay.paySign;
    var nonceStr = pay.nonceStr;
    var param = { "timeStamp": timeStamp, "package": packages, "paySign": paySign, "signType": "MD5", "nonceStr": nonceStr };

    that.pay(param)
   },
  })
 },

 /* 支付  */
 pay: function (param) {

  wx.requestPayment({
   timeStamp: param.timeStamp,
   nonceStr: param.nonceStr,
   package: param.package,
   signType: param.signType,
   paySign: param.paySign,
   success: function (res) {
    // success

    wx.navigateBack({
     delta: 1, // 回退前 delta(默认为1) 页面
     success: function (res1) {
      wx.showToast({
       title: '支付成功',
       icon: 'success',
       duration: 2000
      });

     },
     fail: function () {
      // fail

     },
     complete: function () {

     }
    })
   },
   fail: function (res) {
    // fail
   },
   complete: function () {
    // complete
   }
  })
},관련 추천 :
WeChat 미니 프로그램 결제 및 환불 처리 예시 공유php에서 WeChat 미니 프로그램 결제 및 환불 구현 방법
WeChat 미니 프로그램 결제 기능 상세 설명 개발 오류 요약
위 내용은 WeChat 미니 프로그램 결제의 C# 배경 구현 방법 예시에 대한 자세한 설명의 상세 내용입니다. 자세한 내용은 PHP 중국어 웹사이트의 기타 관련 기사를 참조하세요!