간단한 팝업 창 예제의 jQuery 구현
이 글은 주로 jQuery 팝업창의 간단한 구현 코드를 자세히 소개하고 있습니다. 관심 있는 친구들이 참고하면 도움이 될 것입니다.
오늘 우리는 Jquery 팝업 창의 구성과 사용법에 대해 이야기했습니다.
먼저 참조 파일의 코드를 작성합니다:
// 每个弹窗的标识
var x =0;
var idzt = new Array();
var Window = function(config){
//ID不重复
idzt[x] = "zhuti"+x; //弹窗ID
//初始化,接收参数
this.config = {
width : config.width || 300, //宽度
height : config.height || 200, //高度
buttons : config.buttons || '', //默认无按钮
title : config.title || '标题', //标题
content : config.content || '内容', //内容
isMask : config.isMask == false?false:config.isMask || true, //是否遮罩
isDrag : config.isDrag == false?false:config.isDrag || true, //是否移动
};
//加载弹出窗口
var w = ($(window).width()-this.config.width)/2;
var h = ($(window).height()-this.config.height)/2;
var nr = "<p class='zhuti' id='"+idzt[x]+"' bs='"+x+"' style='width:"+this.config.width+"px; height:"+this.config.height+"px; background-color:white; left:"+w+"px; top:"+h+"px;'></p>";
$("body").append(nr);
//加载弹窗标题
var content ="<p id='title"+x+"' class='title' bs='"+x+"'>"+this.config.title+"<p id='close"+x+"' class='close' bs='"+x+"'>×</p></p>";
//加载弹窗内容
var nrh = this.config.height - 75;
content = content+"<p id='content"+x+"' bs='"+x+"' class='content' style='width:100%; height:"+nrh+"px;'>"+this.config.content+"</p>";
//加载按钮
content = content+"<p id='btnx"+x+"' bs='"+x+"' class='btnx'>"+this.config.buttons+"</p>";
//将标题、内容及按钮添加进窗口
$('#'+idzt[x]).html(content);
//创建遮罩层
if(this.config.isMask)
{
var zz = "<p id='zz'></p>";
$("body").append(zz);
$("#zz").css('display','block');
}
//最大最小限制,以免移动到页面外
var maxX = $(window).width()-this.config.width;
var maxY = $(window).height()-this.config.height;
var minX = 0,
minY = 0;
//窗口移动
if(this.config.isDrag)
{
//鼠标移动弹出窗
$(".title").bind("mousedown",function(e){
var n = $(this).attr("bs"); //取标识
//使选中的到最上层
$(".zhuti").css("z-index",3);
$('#'+idzt[n]).css("z-index",4);
//取初始坐标
var endX = 0, //移动后X坐标
endY = 0, //移动后Y坐标
startX = parseInt($('#'+idzt[n]).css("left")), //弹出层的初始X坐标
startY = parseInt($('#'+idzt[n]).css("top")), //弹出层的初始Y坐标
downX = e.clientX, //鼠标按下时,鼠标的X坐标
downY = e.clientY; //鼠标按下时,鼠标的Y坐标
//绑定鼠标移动事件
$("body").bind("mousemove",function(es){
endX = es.clientX - downX + startX; //X坐标移动
endY = es.clientY - downY + startY; //Y坐标移动
//最大最小限制
if(endX > maxX)
{
endX = maxX;
} else if(endX < 0)
{
endX = 0;
}
if(endY > maxY)
{
endY = maxY;
} else if(endY < 0)
{
endY = 0;
}
$('#'+idzt[n]).css("top",endY+"px");
$('#'+idzt[n]).css("left",endX+"px");
window.getSelection ? window.getSelection().removeAllRanges():document.selection.empty(); //取消选中文本
});
});
//鼠标按键抬起,释放移动事件
$("body").bind("mouseup",function(){
$("body").unbind("mousemove");
});
}
//关闭窗口
$(".close").click(function(){
var m = this.getAttribute("bs"); //找标识
$('#'+idzt[m]).remove(); //移除弹窗
$('#zz').remove(); //移除遮罩
})
x++; //标识增加
}이 JS 파일은 Jquery 팝업 창의 콘텐츠, 스타일, 위치, 버튼 및 마스크 레이어를 가져옵니다. 팝업창을 처리하려면 인용하기 전에 내부 코드를 잘 살펴보는 것이 가장 좋습니다.
다음은 CSS 스타일 시트입니다.
.zhuti
{
 position:absolute;
 z-index:3;
 font-size:14px;
 border-radius:5px;
 box-shadow:0 0 5px white;
 overflow:hidden;
 color:#333;
}
.title
{
 background-color:#3498db;
 vertical-align:middle;
 height:35px;
 width:100%;
 line-height:35px;
 text-indent:1em;
}
.close{
 float:right;
 width:35px;
 height:35px;
 font-weight:bold;
 line-height:35px;
 vertical-align:middle;
 color:white;
 font-size:18px;
 }
.close:hover
{
 cursor:pointer;
}
.content
{
 text-indent:1em;
 padding-top:10px;
}
.btnx
{
 height:30px;
 width:100%;
 text-indent:1em;
}
.btn
{
 height:28px;
 width:80px;
 float:left;
 margin-left:20px;
 color:#333;
}
#zz
{
 width:100%;
 height:100%;
 opacity:0.15;
 display:none;
 background-color:#ccc;
 z-index:2;
 position:absolute;
 top:0px;
 left:0px;
}이 스타일 시트에는 각 태그와 필요한 스타일이 작성되어 있어 메인 페이지의 코드 양을 절약하고 메인 페이지를 매우 깔끔하게 만들 수 있습니다. CSS 스타일 시트에서 수정해야 합니다. 참고: 어떤 파일을 참조하든 Jquery 파일은 맨 앞에 배치되어야 합니다. ! !
다음은 메인 페이지 코드입니다.
<!DOCTYPE html PUBLIC "-//W3C//DTD XHTML 1.0 Transitional//EN" "http://www.w3.org/TR/xhtml1/DTD/xhtml1-transitional.dtd">
<html xmlns="http://www.w3.org/1999/xhtml">
<head>
<meta http-equiv="Content-Type" content="text/html; charset=utf-8" />
<title>无标题文档</title>
<script type="text/javascript" src="jquery-1.11.2.min.js">
</script>
<script type="text/javascript" src="tanchuang.js">
</script>
<link href="tanchuang.css" rel="external nofollow" rel="stylesheet" type="text/css" />
<style type="text/css">
*{
margin: 0px auto;
}
</style>
</head>
<body style="background-color:#999">
<p style="width:200px; margin-top:10px">
<input type="button" value="弹出窗口" id="btntc" style="width:100px; height:30px; font-size:18px;" />
</p>
</body>
<script type="text/javascript">
$(document).ready(function(e) {
$('#btntc').click(function(){
var html = "<p style='color:red'>这是测试的弹窗</p>";
var button ="<input type='button' value='确定' /><input type='button' value='取消' />";
var win = new Window({
width : 400, //宽度
height : 300, //高度
title : '测试弹窗', //标题
content : html, //内容
isMask : false, //是否遮罩
buttons : button, //按钮
isDrag:true, //是否移动
});
})
});
</script>
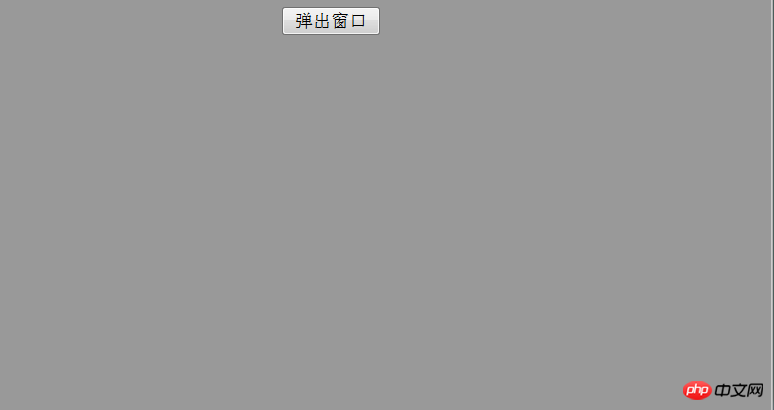
</html>마찬가지로 메인 페이지에도 자세한 설명을 추가해 향후 이해에 도움이 되길 바랍니다. 효과를 살펴보겠습니다:

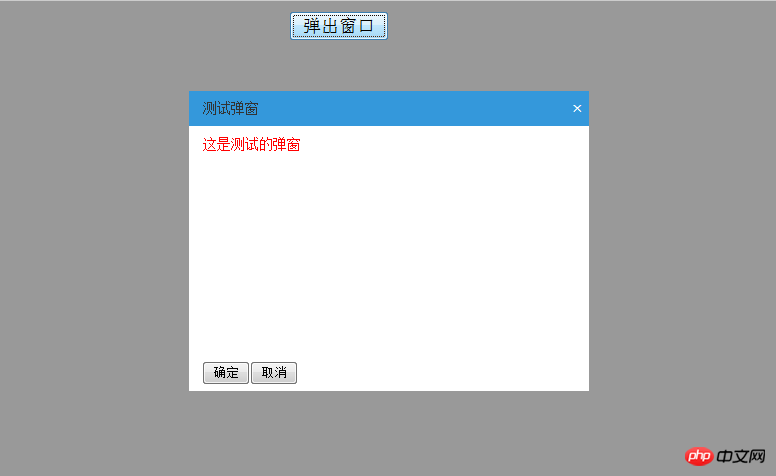
팝업 창을 클릭한 후의 효과:


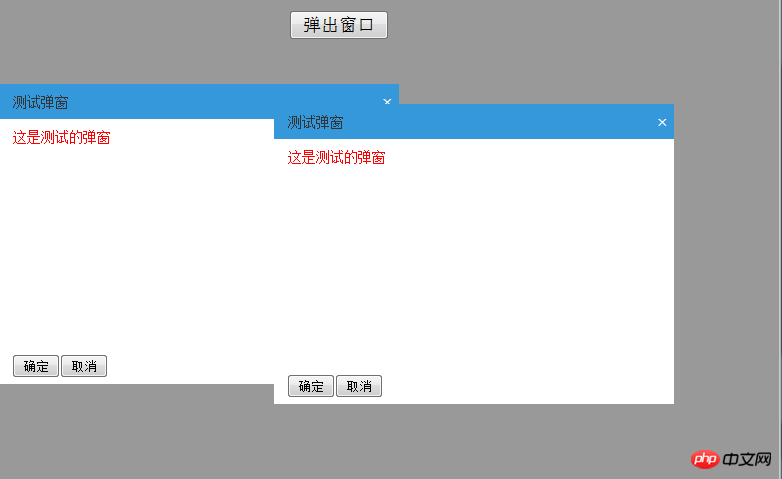
각 팝업 창이 이동할 수 있고, 셀 수 없이 많은 창이 팝업되는 것을 볼 수 있습니다. 마스크가 true인 경우 두 번째 팝업창이 더 이상 나타나지 않도록 레이어를 true로 변경합니다.
많은 버그를 방지할 수 있는 마스크 레이어의 실용성을 꼭 기억하세요. 팝업창을 사용하려면 반드시 테스트를 거쳐야 문제를 방지할 수 있습니다.
관련 권장 사항:
Dreamweaver 웹 페이지에 팝업 창 정보를 추가하는 방법에 대한 자세한 설명
javascript, html5, css3 사용자 정의 팝업 창
Dreamweaver의 사용 및 기술에 대한 전체 목록 JS 팝업창
위 내용은 간단한 팝업 창 예제의 jQuery 구현의 상세 내용입니다. 자세한 내용은 PHP 중국어 웹사이트의 기타 관련 기사를 참조하세요!

핫 AI 도구

Undresser.AI Undress
사실적인 누드 사진을 만들기 위한 AI 기반 앱

AI Clothes Remover
사진에서 옷을 제거하는 온라인 AI 도구입니다.

Undress AI Tool
무료로 이미지를 벗다

Clothoff.io
AI 옷 제거제

AI Hentai Generator
AI Hentai를 무료로 생성하십시오.

인기 기사

뜨거운 도구

메모장++7.3.1
사용하기 쉬운 무료 코드 편집기

SublimeText3 중국어 버전
중국어 버전, 사용하기 매우 쉽습니다.

스튜디오 13.0.1 보내기
강력한 PHP 통합 개발 환경

드림위버 CS6
시각적 웹 개발 도구

SublimeText3 Mac 버전
신 수준의 코드 편집 소프트웨어(SublimeText3)

뜨거운 주제
 7526
7526
 15
15
 1378
1378
 52
52
 81
81
 11
11
 54
54
 19
19
 21
21
 74
74
 매번 새 창을 열도록 Chrome을 설정하는 방법
Mar 06, 2024 pm 06:19 PM
매번 새 창을 열도록 Chrome을 설정하는 방법은 무엇입니까? 악의적인 사용자는 Chrome을 안전하고 빠르며 편리하게 사용하는 것을 좋아합니다. 사용자마다 브라우저 사용에 대한 선호도가 다릅니다. 일부 사용자는 빠른 검색을 위해 Chrome을 새 창으로 여는 것을 좋아합니다. 그것을 설정합니다. 다음으로, 편집기는 Chrome을 열 때마다 새 창 설정에 대한 튜토리얼을 제공합니다. 관심 있는 친구들이 와서 배울 수 있습니다. Google 크롬을 열 때마다 새 창을 설정하는 방법에 대한 튜토리얼 1. 컴퓨터 바탕 화면에서 Google 크롬을 두 번 클릭하여 연 다음 오른쪽 상단에 있는 [점 3개] 아이콘을 클릭합니다. 2. [설정] 옵션을 찾아 해당 페이지로 들어갑니다(그림 참조). 3. 구글 크롬으로 이동
 jQuery 참조 방법에 대한 자세한 설명: 빠른 시작 가이드
Feb 27, 2024 pm 06:45 PM
jQuery 참조 방법에 대한 자세한 설명: 빠른 시작 가이드 jQuery는 웹 사이트 개발에 널리 사용되는 JavaScript 라이브러리로, JavaScript 프로그래밍을 단순화하고 개발자에게 풍부한 기능을 제공합니다. 이 기사에서는 jQuery의 참조 방법을 자세히 소개하고 독자가 빠르게 시작할 수 있도록 구체적인 코드 예제를 제공합니다. jQuery 소개 먼저 HTML 파일에 jQuery 라이브러리를 도입해야 합니다. CDN 링크를 통해 소개하거나 다운로드할 수 있습니다.
 jQuery에서 PUT 요청 방법을 사용하는 방법은 무엇입니까?
Feb 28, 2024 pm 03:12 PM
jQuery에서 PUT 요청 방법을 사용하는 방법은 무엇입니까? jQuery에서 PUT 요청을 보내는 방법은 다른 유형의 요청을 보내는 것과 유사하지만 몇 가지 세부 사항과 매개 변수 설정에 주의해야 합니다. PUT 요청은 일반적으로 데이터베이스의 데이터 업데이트 또는 서버의 파일 업데이트와 같은 리소스를 업데이트하는 데 사용됩니다. 다음은 jQuery에서 PUT 요청 메소드를 사용하는 구체적인 코드 예제입니다. 먼저 jQuery 라이브러리 파일을 포함했는지 확인한 다음 $.ajax({u를 통해 PUT 요청을 보낼 수 있습니다.
 jQuery를 사용하여 요소의 높이 속성을 제거하는 방법은 무엇입니까?
Feb 28, 2024 am 08:39 AM
jQuery를 사용하여 요소의 높이 속성을 제거하는 방법은 무엇입니까? 프런트엔드 개발에서는 요소의 높이 속성을 조작해야 하는 경우가 종종 있습니다. 때로는 요소의 높이를 동적으로 변경해야 할 수도 있고 요소의 높이 속성을 제거해야 하는 경우도 있습니다. 이 기사에서는 jQuery를 사용하여 요소의 높이 속성을 제거하는 방법을 소개하고 구체적인 코드 예제를 제공합니다. jQuery를 사용하여 높이 속성을 연산하기 전에 먼저 CSS의 높이 속성을 이해해야 합니다. height 속성은 요소의 높이를 설정하는 데 사용됩니다.
 jQuery 팁: 페이지에 있는 모든 태그의 텍스트를 빠르게 수정하세요.
Feb 28, 2024 pm 09:06 PM
제목: jQuery 팁: 페이지에 있는 모든 태그의 텍스트를 빠르게 수정하세요. 웹 개발에서는 페이지의 요소를 수정하고 조작해야 하는 경우가 많습니다. jQuery를 사용할 때 페이지에 있는 모든 태그의 텍스트 내용을 한 번에 수정해야 하는 경우가 있는데, 이는 시간과 에너지를 절약할 수 있습니다. 다음은 jQuery를 사용하여 페이지의 모든 태그 텍스트를 빠르게 수정하는 방법을 소개하고 구체적인 코드 예제를 제공합니다. 먼저 jQuery 라이브러리 파일을 도입하고 다음 코드가 페이지에 도입되었는지 확인해야 합니다. <
 jQuery를 사용하여 모든 태그의 텍스트 내용 수정
Feb 28, 2024 pm 05:42 PM
제목: jQuery를 사용하여 모든 태그의 텍스트 내용을 수정합니다. jQuery는 DOM 작업을 처리하는 데 널리 사용되는 인기 있는 JavaScript 라이브러리입니다. 웹 개발을 하다 보면 페이지에 있는 링크 태그(태그)의 텍스트 내용을 수정해야 하는 경우가 종종 있습니다. 이 기사에서는 jQuery를 사용하여 이 목표를 달성하는 방법을 설명하고 구체적인 코드 예제를 제공합니다. 먼저 페이지에 jQuery 라이브러리를 도입해야 합니다. HTML 파일에 다음 코드를 추가합니다.
 jQuery 요소에 특정 속성이 있는지 어떻게 알 수 있나요?
Feb 29, 2024 am 09:03 AM
jQuery 요소에 특정 속성이 있는지 어떻게 알 수 있나요? jQuery를 사용하여 DOM 요소를 조작할 때 요소에 특정 속성이 있는지 확인해야 하는 상황이 자주 발생합니다. 이 경우 jQuery에서 제공하는 메소드를 사용하여 이 기능을 쉽게 구현할 수 있습니다. 다음은 jQuery 요소에 특정 속성이 있는지 확인하기 위해 일반적으로 사용되는 두 가지 방법을 특정 코드 예제와 함께 소개합니다. 방법 1: attr() 메서드와 typeof 연산자를 // 사용하여 요소에 특정 속성이 있는지 확인
 jQuery에서 eq의 역할 및 적용 시나리오 이해
Feb 28, 2024 pm 01:15 PM
jQuery는 웹 페이지에서 DOM 조작 및 이벤트 처리를 처리하는 데 널리 사용되는 인기 있는 JavaScript 라이브러리입니다. jQuery에서 eq() 메서드는 지정된 인덱스 위치에서 요소를 선택하는 데 사용됩니다. 구체적인 사용 및 적용 시나리오는 다음과 같습니다. jQuery에서 eq() 메서드는 지정된 인덱스 위치에 있는 요소를 선택합니다. 인덱스 위치는 0부터 계산되기 시작합니다. 즉, 첫 번째 요소의 인덱스는 0이고 두 번째 요소의 인덱스는 1입니다. eq() 메소드의 구문은 다음과 같습니다: $("s


