

jQuery 1.9.1 소스코드 분석 시리즈(15) 애니메이션 처리_jquery

먼저 큐에 대한 기본 지식이 필요합니다. 이전 장을 참조하세요.
관련 튜토리얼: jQuery에서의 애니메이션 처리 요약: http://www.jb51.net/article/42000.htm
jQuery 1.9.1 소스 코드 분석 시리즈(15) 애니메이션 처리 및 완화 애니메이션 코어 Tween: http://www.jb51.net/article/75821.htm
a. 애니메이션 입력 jQuery.fn.animate 함수 실행 과정에 대한 자세한 설명
---------------------------------- --- ---------------------
먼저 애니메이션 관련 매개변수를 얻기 위해 매개변수에 따라 jQuery.speed를 호출하고, 다음과 유사한 객체를 얻어 애니메이션 실행 함수 doAnimation을 생성합니다.
1 2 3 4 5 6 7 8 9 10 11 12 13 14 15 16 17 18 19 20 21 |
|
1 2 3 4 |
|
b. jQuery 내부 함수 Animation에 대한 자세한 설명
애니메이션(요소, 속성, 옵션) 속성은 애니메이션화할 CSS 기능이고, 옵션은 애니메이션 관련 옵션입니다. "fx"}.
먼저 애니메이션 대기열을 처리하는 데 사용되는 지연 개체를 초기화합니다.
1 2 3 4 |
|
그런 다음 매 시점마다 실행될 함수 틱을 생성합니다(인접한 두 시점 사이의 이벤트 간격은 기본적으로 13밀리초입니다). 이 틱 함수는 jQuery.timers에 저장되며, 이후 매 시점마다 time jQuery.fx.tick이 실행될 때 꺼내서 실행됩니다.
1 2 3 4 5 6 7 8 9 10 11 12 13 14 15 16 17 18 19 20 21 22 23 24 25 |
|
1 |
|
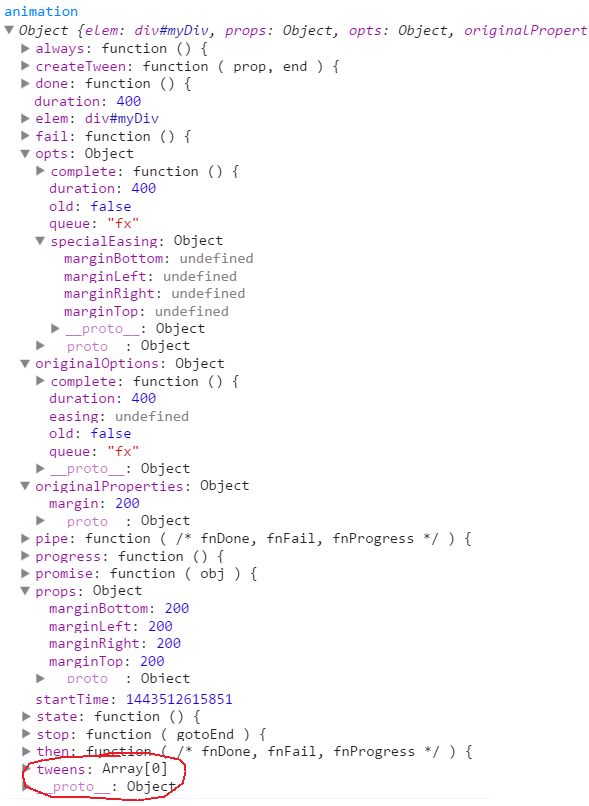
셋째, 애니메이션에 사용되는 모든 기능으로 구성된 객체 애니메이션을 생성합니다(이 객체의 구조는 소스 코드와 같습니다). animation.props에 저장되는 것은 사용자가 전달한 기능입니다. (애니메이션의 최종 목표).
1 2 3 4 5 6 7 8 9 10 11 12 13 14 15 16 17 18 19 20 21 22 23 24 25 26 27 28 29 30 31 32 33 34 35 36 37 |
|
넷째, CSS 기능 이름을 브라우저에서 인식할 수 있도록 propFilter를 호출합니다. borderWidth/padding/margin은 하나의 CSS 기능을 참조하는 것이 아니라 4개(상단, 하단)를 참조합니다. , 왼쪽, 오른쪽)
1 2 |
|
1 2 |
|
1 2 |
|
다섯째, 적응 처리를 위해 defaultPrefilter를 호출합니다. 예를 들어 높이/너비 애니메이션이 효과를 가지려면 표시 및 오버플로가 특정 값이어야 합니다. 예를 들어 표시/숨기기 애니메이션에는 많은 CSS가 필요합니다. 기능 값을 지정하고 함수에서 createTweens를 호출하여 이징 애니메이션을 생성합니다.
1 2 3 4 5 6 7 |
|
1 2 3 4 5 6 7 8 9 10 11 12 13 14 15 16 17 18 |
|
1 2 3 4 5 6 7 8 9 10 11 12 |
|
1 2 3 4 5 6 7 8 9 10 11 12 13 |
|
1 2 3 4 5 6 7 8 9 10 11 12 13 14 15 16 17 18 19 20 21 22 23 24 25 26 27 28 29 30 31 32 33 34 35 36 37 38 39 40 41 42 43 44 45 46 47 48 49 50 51 52 53 |
|
여섯 번째, 이징 애니메이션 생성, 표시/숨기기는 defaultPrefilter 함수(위 소스 코드)에서 처리되었습니다.
1 |
|
我们来看一看createTweens中具体做了什么,先看一下createTweens之前的animation对象
然后看一下经过createTweens之后的animation对象的tweens数组变成了
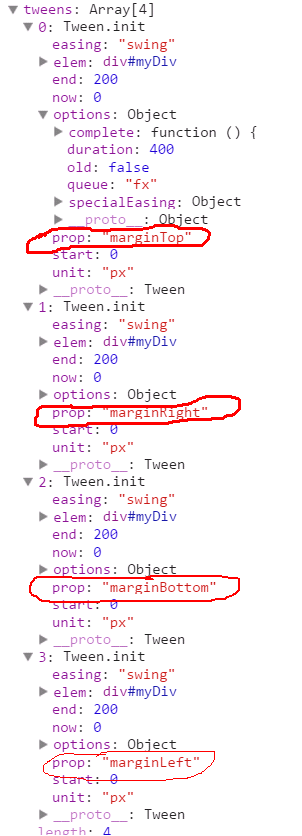
将margin分解成了四个属性(marginTop/Right/Bottom/Left)并且每个属性都有自己的动画特征。
第七,启动动画计时,定时执行tick
1 2 3 4 5 6 7 8 |
|
最后,将传入的动画结束回调加入延时队列
1 2 3 4 5 |
|
Animation函数流程到此为止
拓展:
前面提到的genFx函数是专门用在toggle、hide、show时获取相关的需要动画的特征的
1 2 3 4 5 6 7 8 9 10 11 12 13 14 15 16 17 18 19 20 21 22 23 24 25 26 |
|
Animation函数比较复杂,童鞋们可以随便使用例子去跟踪代码。这个是理解jQuery源码的一种比较好的方式。推荐两个例子:
第一个,有hide/show的例子:$("#id").hide(1000);
第二个,其他例子:$("#id").animate({"marginLeft":500},1000);
jQuery 1.9.1源码分析系列(十五)之动画处理 的全部内容就给大家介绍到这里,有问题随时给我留言,谢谢。!

핫 AI 도구

Undresser.AI Undress
사실적인 누드 사진을 만들기 위한 AI 기반 앱

AI Clothes Remover
사진에서 옷을 제거하는 온라인 AI 도구입니다.

Undress AI Tool
무료로 이미지를 벗다

Clothoff.io
AI 옷 제거제

Video Face Swap
완전히 무료인 AI 얼굴 교환 도구를 사용하여 모든 비디오의 얼굴을 쉽게 바꾸세요!
인기 기사
뜨거운 도구

메모장++7.3.1
사용하기 쉬운 무료 코드 편집기

SublimeText3 중국어 버전
중국어 버전, 사용하기 매우 쉽습니다.

스튜디오 13.0.1 보내기
강력한 PHP 통합 개발 환경

드림위버 CS6
시각적 웹 개발 도구

SublimeText3 Mac 버전
신 수준의 코드 편집 소프트웨어(SublimeText3)
뜨거운 주제
 7742
7742
 15
1643
14
1397
52
1291
25
1234
29
15
1643
14
1397
52
1291
25
1234
29

 프론트 엔드 열 용지 영수증에 대한 차량 코드 인쇄를 만나면 어떻게해야합니까?
Apr 04, 2025 pm 02:42 PM
프론트 엔드 열 용지 영수증에 대한 차량 코드 인쇄를 만나면 어떻게해야합니까?
Apr 04, 2025 pm 02:42 PM
프론트 엔드 개발시 프론트 엔드 열지대 티켓 인쇄를위한 자주 묻는 질문과 솔루션, 티켓 인쇄는 일반적인 요구 사항입니다. 그러나 많은 개발자들이 구현하고 있습니다 ...
 Demystifying JavaScript : 그것이하는 일과 중요한 이유
Apr 09, 2025 am 12:07 AM
Demystifying JavaScript : 그것이하는 일과 중요한 이유
Apr 09, 2025 am 12:07 AM
JavaScript는 현대 웹 개발의 초석이며 주요 기능에는 이벤트 중심 프로그래밍, 동적 컨텐츠 생성 및 비동기 프로그래밍이 포함됩니다. 1) 이벤트 중심 프로그래밍을 사용하면 사용자 작업에 따라 웹 페이지가 동적으로 변경 될 수 있습니다. 2) 동적 컨텐츠 생성을 사용하면 조건에 따라 페이지 컨텐츠를 조정할 수 있습니다. 3) 비동기 프로그래밍은 사용자 인터페이스가 차단되지 않도록합니다. JavaScript는 웹 상호 작용, 단일 페이지 응용 프로그램 및 서버 측 개발에 널리 사용되며 사용자 경험 및 크로스 플랫폼 개발의 유연성을 크게 향상시킵니다.
 누가 더 많은 파이썬이나 자바 스크립트를 지불합니까?
Apr 04, 2025 am 12:09 AM
누가 더 많은 파이썬이나 자바 스크립트를 지불합니까?
Apr 04, 2025 am 12:09 AM
기술 및 산업 요구에 따라 Python 및 JavaScript 개발자에 대한 절대 급여는 없습니다. 1. 파이썬은 데이터 과학 및 기계 학습에서 더 많은 비용을 지불 할 수 있습니다. 2. JavaScript는 프론트 엔드 및 풀 스택 개발에 큰 수요가 있으며 급여도 상당합니다. 3. 영향 요인에는 경험, 지리적 위치, 회사 규모 및 특정 기술이 포함됩니다.
 JavaScript를 사용하여 동일한 ID와 동일한 ID로 배열 요소를 하나의 객체로 병합하는 방법은 무엇입니까?
Apr 04, 2025 pm 05:09 PM
JavaScript를 사용하여 동일한 ID와 동일한 ID로 배열 요소를 하나의 객체로 병합하는 방법은 무엇입니까?
Apr 04, 2025 pm 05:09 PM
동일한 ID로 배열 요소를 JavaScript의 하나의 객체로 병합하는 방법은 무엇입니까? 데이터를 처리 할 때 종종 동일한 ID를 가질 필요가 있습니다 ...
 JavaScript는 배우기가 어렵습니까?
Apr 03, 2025 am 12:20 AM
JavaScript는 배우기가 어렵습니까?
Apr 03, 2025 am 12:20 AM
JavaScript를 배우는 것은 어렵지 않지만 어려운 일입니다. 1) 변수, 데이터 유형, 기능 등과 같은 기본 개념을 이해합니다. 2) 마스터 비동기 프로그래밍 및 이벤트 루프를 통해이를 구현하십시오. 3) DOM 운영을 사용하고 비동기 요청을 처리합니다. 4) 일반적인 실수를 피하고 디버깅 기술을 사용하십시오. 5) 성능을 최적화하고 모범 사례를 따르십시오.
 Shiseido의 공식 웹 사이트와 같은 시차 스크롤 및 요소 애니메이션 효과를 달성하는 방법은 무엇입니까?
또는:
Shiseido의 공식 웹 사이트와 같은 페이지 스크롤과 함께 애니메이션 효과를 어떻게 달성 할 수 있습니까?
Apr 04, 2025 pm 05:36 PM
Shiseido의 공식 웹 사이트와 같은 시차 스크롤 및 요소 애니메이션 효과를 달성하는 방법은 무엇입니까?
또는:
Shiseido의 공식 웹 사이트와 같은 페이지 스크롤과 함께 애니메이션 효과를 어떻게 달성 할 수 있습니까?
Apr 04, 2025 pm 05:36 PM
이 기사에서 시차 스크롤 및 요소 애니메이션 효과 실현에 대한 토론은 Shiseido 공식 웹 사이트 (https://www.shiseido.co.jp/sb/wonderland/)와 유사하게 달성하는 방법을 살펴볼 것입니다.
 Console.log 출력 결과의 차이 : 두 통화가 다른 이유는 무엇입니까?
Apr 04, 2025 pm 05:12 PM
Console.log 출력 결과의 차이 : 두 통화가 다른 이유는 무엇입니까?
Apr 04, 2025 pm 05:12 PM
Console.log 출력의 차이의 근본 원인에 대한 심층적 인 논의. 이 기사에서는 Console.log 함수의 출력 결과의 차이점을 코드에서 분석하고 그에 따른 이유를 설명합니다. � ...
 JavaScript의 진화 : 현재 동향과 미래 전망
Apr 10, 2025 am 09:33 AM
JavaScript의 진화 : 현재 동향과 미래 전망
Apr 10, 2025 am 09:33 AM
JavaScript의 최신 트렌드에는 Typescript의 Rise, 현대 프레임 워크 및 라이브러리의 인기 및 WebAssembly의 적용이 포함됩니다. 향후 전망은보다 강력한 유형 시스템, 서버 측 JavaScript 개발, 인공 지능 및 기계 학습의 확장, IoT 및 Edge 컴퓨팅의 잠재력을 포함합니다.
