Vue 컴포넌트 개발 기술 요약
이번에는 Vue 컴포넌트 개발 스킬에 대한 요약을 가져오겠습니다. Vue 컴포넌트 개발 시 주의사항은 무엇인가요?
머리말
졸업이 가까워지면서 간단한 개인 블로그를 작성했습니다. 프로젝트 주소는 여기를 클릭하여 방문하세요. (그나저나 별표를 요청하세요.) 이 글은 시리즈의 첫 번째 요약입니다. 다음으로 Element의 대화 상자와 팝업 구성 요소의 로우 프로파일 버전을 단계별로 모방해 보겠습니다.
Text
Vue 단일 파일 컴포넌트 개발
vue-cli를 사용하여 프로젝트를 초기화할 때 src/comComponents 폴더에 HelloWorld.vue 파일이 있습니다. 이것이 단일 파일의 기본 개발 모델입니다. 구성 요소.
// 注册
Vue.component('my-component', {
 template: '<p>A custom component!</p>'
})
// 创建根实例
new Vue({
 el: '#example'
})다음으로 대화 구성 요소 작성을 시작합니다.
Dialog
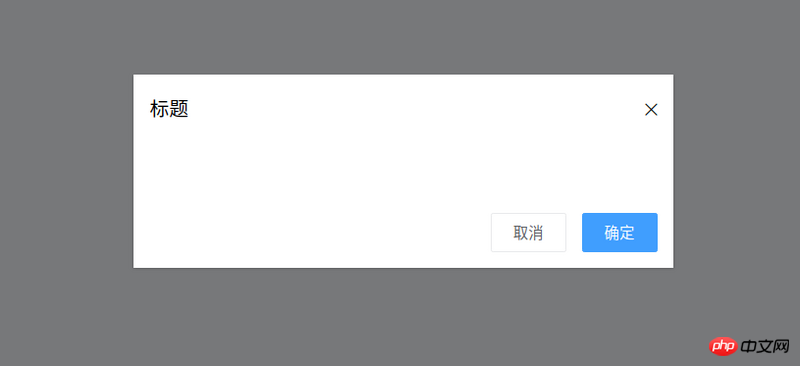
대상 대화 상자 구성 요소의 기본 스타일은 그림과 같습니다.

대상 스타일에 따라 다음과 같이 결론을 내릴 수 있습니다.
dialog 구성 요소에는 표시할 titleprops가 필요합니다. 팝업 창 제목
dialog 구성 요소 OK 버튼을 눌렀을 때 OK 이벤트 를 발생시켜야 합니다(즉, 상위 구성 요소에 OK임을 알리기 위해).
- 마찬가지로, Dialog 구성 요소 취소 이벤트를 내보내야 합니다
- 대화 상자 구성 요소는 간편한 사용자 정의를 위한 슬롯을 제공해야 합니다. Content
<template>
 <p class="ta-dialogwrapper">
 <p class="ta-dialog">
  <p class="ta-dialogheader">
  <span>{{ title }}</span>
  <i class="ios-close-empty" @click="handleCancel()"></i>
  </p>
  <p class="ta-dialogbody">
  <slot></slot>
  </p>
  <p class="ta-dialogfooter">
  <button @click="handleCancel()">取消</button>
  <button @click="handleOk()">确定</button>
  </p>
 </p>
 </p>
</template>
<script>
export default {
 name: 'Dialog',
 props: {
 title: {
  type: String,
  default: '标题'
 },
 },
 methods: {
 handleCancel() {
  this.$emit('cancel')
 },
 handleOk() {
  this.$emit('ok')
 },
 },
}
</script><ta-dialog title="弹窗标题" @ok="handleOk" @cancel="handleCancel"> <p>我是内容</p> </ta-dialog>
<template>
 <transition name="slide-down">
 <p class="ta-dialogwrapper" v-if="isShow">
  // 省略
 </p>
 </transition>
</template>
<script>
export default {
 data() {
 return {
  isShow: true
 }
 },
 methods: {
 handleCancel() {
  this.isShow = false
  this.$emit('cancel')
 },
 handleOk() {
  this.isShow = true
  this.$emit('ok')
 },
 },
}
</script> 핵심 클래스(css className) 스타일을 작성하는 것입니다.
.slide-down-enter-active {
 animation: dialog-enter ease .3s;
}
.slide-down-leave-active {
 animation: dialog-leave ease .5s;
}
@keyframes dialog-enter {
 from {
 opacity: 0;
 transform: translateY(-20px);
 }
 to {
 opacity: 1;
 transform: translateY(0);
 }
}
@keyframes dialog-leave {
 from {
 opacity: 1;
 transform: translateY(0);
 }
 to {
 opacity: 0;
 transform: translateY(-20px);
 }
}대화 상자를 캡슐화하여 MessageBox 만들기
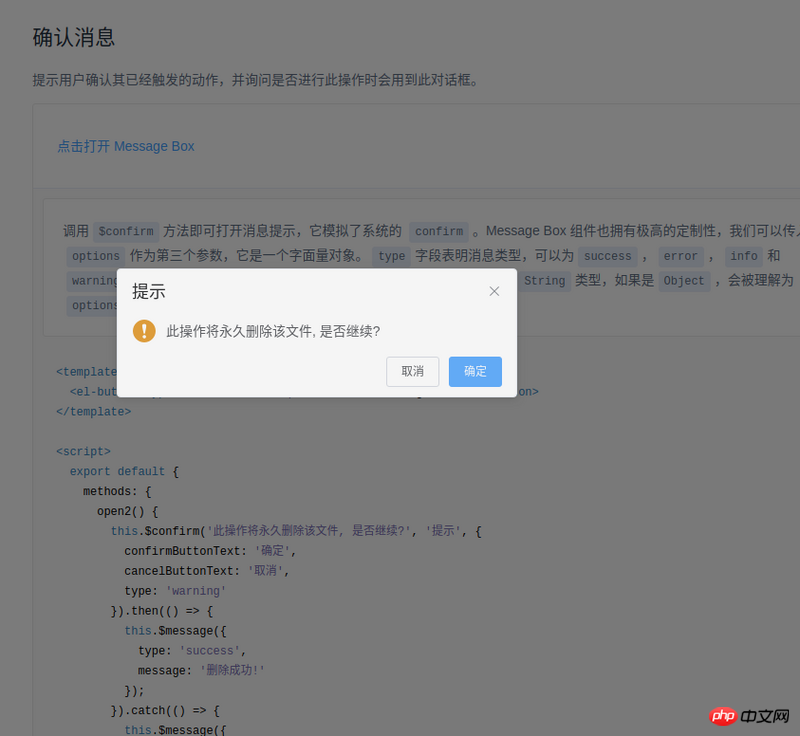
Element의 MessageBox는 다음과 같이 사용됩니다.this.$confirm('此操作将永久删除该文件, 是否继续?', '提示', {
confirmButtonText: '确定',
cancelButtonText: '取消',
type: 'warning'
}).then(() => {
this.$message({
type: 'success',
message: '删除成功!'
});
}).catch(() => {
this.$message({
type: 'info',
message: '已取消删除'
});
});
- Element의 사용 방법은 $confirm입니다. 이것은 단지 Vue의 프로토타입에 걸어두는 문제가 아닌가요?
- Element는 확인을 의미하고, catch는 취소를 의미합니다. 그리고 약속이면 충분해요
import Vue from 'vue'
import MessgaeBox from './src/index'
const Ctur = Vue.extend(MessgaeBox)
let instance = null
const callback = action => {
 if (action === 'confirm') {
 if (instance.showInput) {
  instance.resolve({ value: instance.inputValue, action })
 } else {
  instance.resolve(action)
 }
 } else {
 instance.reject(action)
 }
 instance = null
}
const showMessageBox = (tip, title, opts) => new Promise((resolve, reject) => {
 const propsData = { tip, title, ...opts }
 instance = new Ctur({ propsData }).$mount()
 instance.reject = reject
 instance.resolve = resolve
 instance.callback = callback
 document.body.appendChild(instance.$el)
})
const confirm = (tip, title, opts) => showMessageBox(tip, title, opts)
Vue.prototype.$confirm = confirm그 안에 이름을 붙였습니다. 코드에는 두 가지 A 메소드가 있습니다:
onCancel() {
 this.visible = false
 this.callback && (this.callback.call(this, 'cancel'))
},
onConfirm() {
 this.visible = false
 this.callback && (this.callback.call(this, 'confirm'))
},instance = new Ctur({ propsData }).$mount()document.body.appendChild(instance.$el)
appendChild를 사용할 때 보이지 않게 유지한 다음 다음과 같은 코드를 사용하세요.
Vue.nextTick(() => instance.visible = true)
- 전환과 CSS를 통해 좋은 애니메이션을 구현해보세요. 그중에서 전환 구성 요소의 이름은 CSS 작성을 위한 두 가지 주요 클래스, 즉 [name]-enter-active 및 [name]-leave-active
를 결정합니다.
Vue.extend를 통해 컴포넌트의 constructor를 상속받은 다음(정확하게 말하면 이렇게만 하겠습니다.) 이 생성자를 통해 관련 속성을 커스터마이징할 수 있습니다. (사용 시나리오: js가 컴포넌트를 호출함)
js 컴포넌트를 호출할 때 컴포넌트의 애니메이션 효과를 유지하려면 먼저 document.body.appendChild를 사용한 다음 Vue.nextTick(()을 사용할 수 있습니다. =>instance.visible = true)
이것이 바로 간단한 Vue 컴포넌트 개발 내용을 요약한 것입니다. 제가 작성한 관련 코드는 https://github.com/mvpzx/elapse/에 있습니다. tree/master/be/src/comComponents
이 기사의 사례와 기타 내용을 읽으신 후 방법을 마스터하셨다고 믿습니다. 얼마나 흥미롭습니까? PHP 중국어 웹사이트의 다른 관련 기사도 주목해 주세요!
추천 도서:
위 내용은 Vue 컴포넌트 개발 기술 요약의 상세 내용입니다. 자세한 내용은 PHP 중국어 웹사이트의 기타 관련 기사를 참조하세요!

핫 AI 도구

Undresser.AI Undress
사실적인 누드 사진을 만들기 위한 AI 기반 앱

AI Clothes Remover
사진에서 옷을 제거하는 온라인 AI 도구입니다.

Undress AI Tool
무료로 이미지를 벗다

Clothoff.io
AI 옷 제거제

AI Hentai Generator
AI Hentai를 무료로 생성하십시오.

인기 기사

뜨거운 도구

메모장++7.3.1
사용하기 쉬운 무료 코드 편집기

SublimeText3 중국어 버전
중국어 버전, 사용하기 매우 쉽습니다.

스튜디오 13.0.1 보내기
강력한 PHP 통합 개발 환경

드림위버 CS6
시각적 웹 개발 도구

SublimeText3 Mac 버전
신 수준의 코드 편집 소프트웨어(SublimeText3)

뜨거운 주제
 7488
7488
 15
15
 1377
1377
 52
52
 77
77
 11
11
 52
52
 19
19
 19
19
 40
40
 권장되는 AI 지원 프로그래밍 도구 4가지
Apr 22, 2024 pm 05:34 PM
이 AI 지원 프로그래밍 도구는 급속한 AI 개발 단계에서 유용한 AI 지원 프로그래밍 도구를 많이 발굴했습니다. AI 지원 프로그래밍 도구는 개발 효율성을 높이고, 코드 품질을 향상시키며, 버그 발생률을 줄일 수 있습니다. 이는 현대 소프트웨어 개발 프로세스에서 중요한 보조자입니다. 오늘 Dayao는 4가지 AI 지원 프로그래밍 도구(모두 C# 언어 지원)를 공유하겠습니다. 이 도구가 모든 사람에게 도움이 되기를 바랍니다. https://github.com/YSGStudyHards/DotNetGuide1.GitHubCopilotGitHubCopilot은 더 빠르고 적은 노력으로 코드를 작성하는 데 도움이 되는 AI 코딩 도우미이므로 문제 해결과 협업에 더 집중할 수 있습니다. 힘내
 Win11 팁 공유: Microsoft 계정으로 로그인을 건너뛰는 한 가지 요령
Mar 27, 2024 pm 02:57 PM
Win11 팁 공유: Microsoft 계정 로그인을 건너뛰는 한 가지 요령 Windows 11은 Microsoft가 출시한 최신 운영 체제로, 새로운 디자인 스타일과 많은 실용적인 기능을 갖추고 있습니다. 그러나 일부 사용자의 경우 시스템을 부팅할 때마다 Microsoft 계정에 로그인해야 하는 것이 다소 성가실 수 있습니다. 당신이 그들 중 하나라면, Microsoft 계정 로그인을 건너뛰고 데스크탑 인터페이스로 직접 들어갈 수 있는 다음 팁을 시도해 볼 수도 있습니다. 먼저 로그인하려면 Microsoft 계정 대신 시스템에 로컬 계정을 만들어야 합니다. 이렇게 하면 장점은
 최고의 AI 프로그래머는 누구일까요? Devin, Tongyi Lingma 및 SWE 에이전트의 잠재력을 살펴보세요.
Apr 07, 2024 am 09:10 AM
세계 최초의 AI 프로그래머 데빈(Devin)이 태어난 지 한 달도 채 안 된 2022년 3월 3일, 프린스턴 대학의 NLP팀은 오픈소스 AI 프로그래머 SWE-에이전트를 개발했습니다. GPT-4 모델을 활용하여 GitHub 리포지토리의 문제를 자동으로 해결합니다. SWE-bench 테스트 세트에서 SWE-agent의 성능은 Devin과 유사하며 평균 93초가 걸리고 문제의 12.29%를 해결합니다. SWE-agent는 전용 터미널과 상호 작용하여 파일 내용을 열고 검색하고, 자동 구문 검사를 사용하고, 특정 줄을 편집하고, 테스트를 작성 및 실행할 수 있습니다. (참고: 위 내용은 원문 내용을 약간 조정한 것이지만 원문의 핵심 정보는 그대로 유지되며 지정된 단어 수 제한을 초과하지 않습니다.) SWE-A
 Go 언어를 사용하여 모바일 애플리케이션을 개발하는 방법을 알아보세요.
Mar 28, 2024 pm 10:00 PM
Go 언어 개발 모바일 애플리케이션 튜토리얼 모바일 애플리케이션 시장이 지속적으로 성장함에 따라 점점 더 많은 개발자가 Go 언어를 사용하여 모바일 애플리케이션을 개발하는 방법을 모색하기 시작했습니다. 간단하고 효율적인 프로그래밍 언어인 Go 언어는 모바일 애플리케이션 개발에서도 강력한 잠재력을 보여주었습니다. 이 기사에서는 Go 언어를 사용하여 모바일 애플리케이션을 개발하는 방법을 자세히 소개하고 독자가 빠르게 시작하고 자신의 모바일 애플리케이션 개발을 시작할 수 있도록 특정 코드 예제를 첨부합니다. 1. 준비 시작하기 전에 개발 환경과 도구를 준비해야 합니다. 머리
 베테랑의 필수품: C 언어의 * 및 &에 대한 팁과 주의사항
Apr 04, 2024 am 08:21 AM
C 언어에서는 다른 변수의 주소를 저장하는 포인터를 나타내고, &는 변수의 메모리 주소를 반환하는 주소 연산자를 나타냅니다. 포인터 사용에 대한 팁에는 포인터 정의, 포인터 역참조 및 포인터가 유효한 주소를 가리키는지 확인하는 것이 포함됩니다. 주소 연산자 사용에 대한 팁에는 변수 주소 가져오기 및 배열 요소의 주소를 가져올 때 배열의 첫 번째 요소 주소 반환이 포함됩니다. . 문자열을 반전시키기 위해 포인터 및 주소 연산자를 사용하는 방법을 보여주는 실제 예입니다.
 초보자를 위한 양식 작성 요령은 무엇입니까?
Mar 21, 2024 am 09:11 AM
우리는 엑셀로 표를 생성하고 편집하는 일이 많은데 이제 막 소프트웨어를 접한 초보자로서 엑셀을 이용해 표를 만드는 방법은 생각보다 쉽지 않습니다. 아래에서는 초보자, 즉 초보자가 마스터해야 할 테이블 생성의 몇 가지 단계에 대해 몇 가지 훈련을 수행합니다. 초보자를 위한 샘플 양식은 다음과 같습니다. 작성 방법을 살펴보겠습니다! 1. 새로운 엑셀 문서를 만드는 방법은 두 가지가 있습니다. [바탕화면] - [새로 만들기] - [xls] 파일의 빈 곳을 마우스 오른쪽 버튼으로 클릭하시면 됩니다. [시작]-[모든 프로그램]-[Microsoft Office]-[Microsoft Excel 20**]을 사용할 수도 있습니다. 2. 새 ex를 두 번 클릭합니다.
 VSCode 시작 가이드: 초보자가 사용 기술을 빠르게 익히기 위해 꼭 읽어야 할 책입니다!
Mar 26, 2024 am 08:21 AM
VSCode(Visual Studio Code)는 Microsoft에서 개발한 오픈 소스 코드 편집기로, 강력한 기능과 풍부한 플러그인 지원을 갖추고 있어 개발자가 선호하는 도구 중 하나입니다. 이 기사에서는 초보자가 VSCode 사용 기술을 빠르게 익히는 데 도움이 되는 소개 가이드를 제공합니다. 이번 글에서는 VSCode 설치 방법, 기본적인 편집 작업, 단축키, 플러그인 설치 등을 소개하고, 독자들에게 구체적인 코드 예시를 제공하겠습니다. 1. 먼저 VSCode를 설치하세요.
 VSCode 이해: 이 도구는 어떤 용도로 사용됩니까?
Mar 25, 2024 pm 03:06 PM
"VSCode 이해: 이 도구는 어떤 용도로 사용됩니까?" 》프로그래머로서 초보자이든 숙련된 개발자이든 코드 편집 도구를 사용하지 않으면 할 수 없습니다. 많은 편집 도구 중에서 Visual Studio Code(약칭 VSCode)는 가볍고 강력한 오픈 소스 코드 편집기로 개발자들 사이에서 매우 인기가 높습니다. 그렇다면 VSCode는 정확히 어떤 용도로 사용되나요? 이 기사에서는 VSCode의 기능과 사용법을 자세히 살펴보고 독자에게 도움이 되는 구체적인 코드 예제를 제공합니다.


