jquery 플러그인 uploadify 사용에 대한 자세한 설명
이번에는 jquery 플러그인 uploadify 사용에 대한 자세한 설명을 가져왔습니다. jquery 플러그인 uploadify 사용 시 주의사항은 무엇인가요? 실제 사례를 살펴보겠습니다.
가끔 프로젝트에 파일 일괄 업로드 기능이 필요할 때, Uploadify가 빠르고 쉬운 해결책이라고 생각합니다. 참고용으로 공유합니다. 자세한 내용은 다음과 같습니다
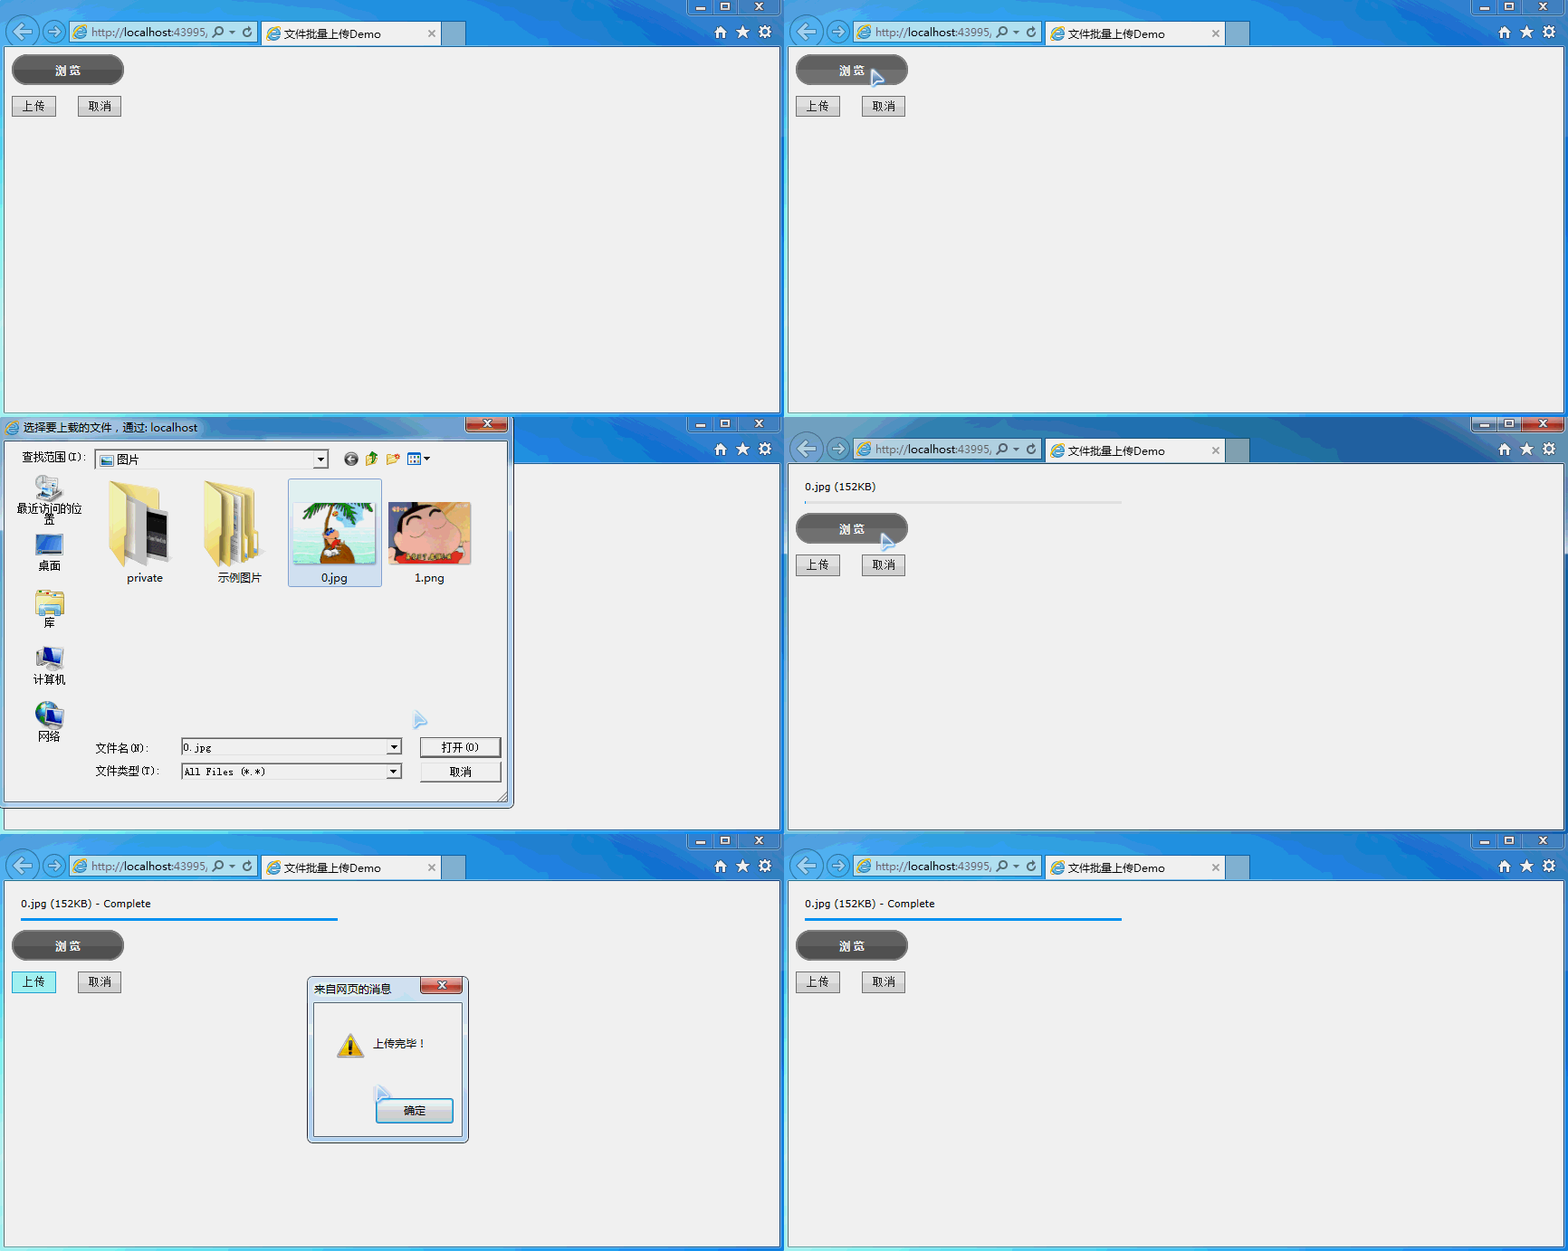
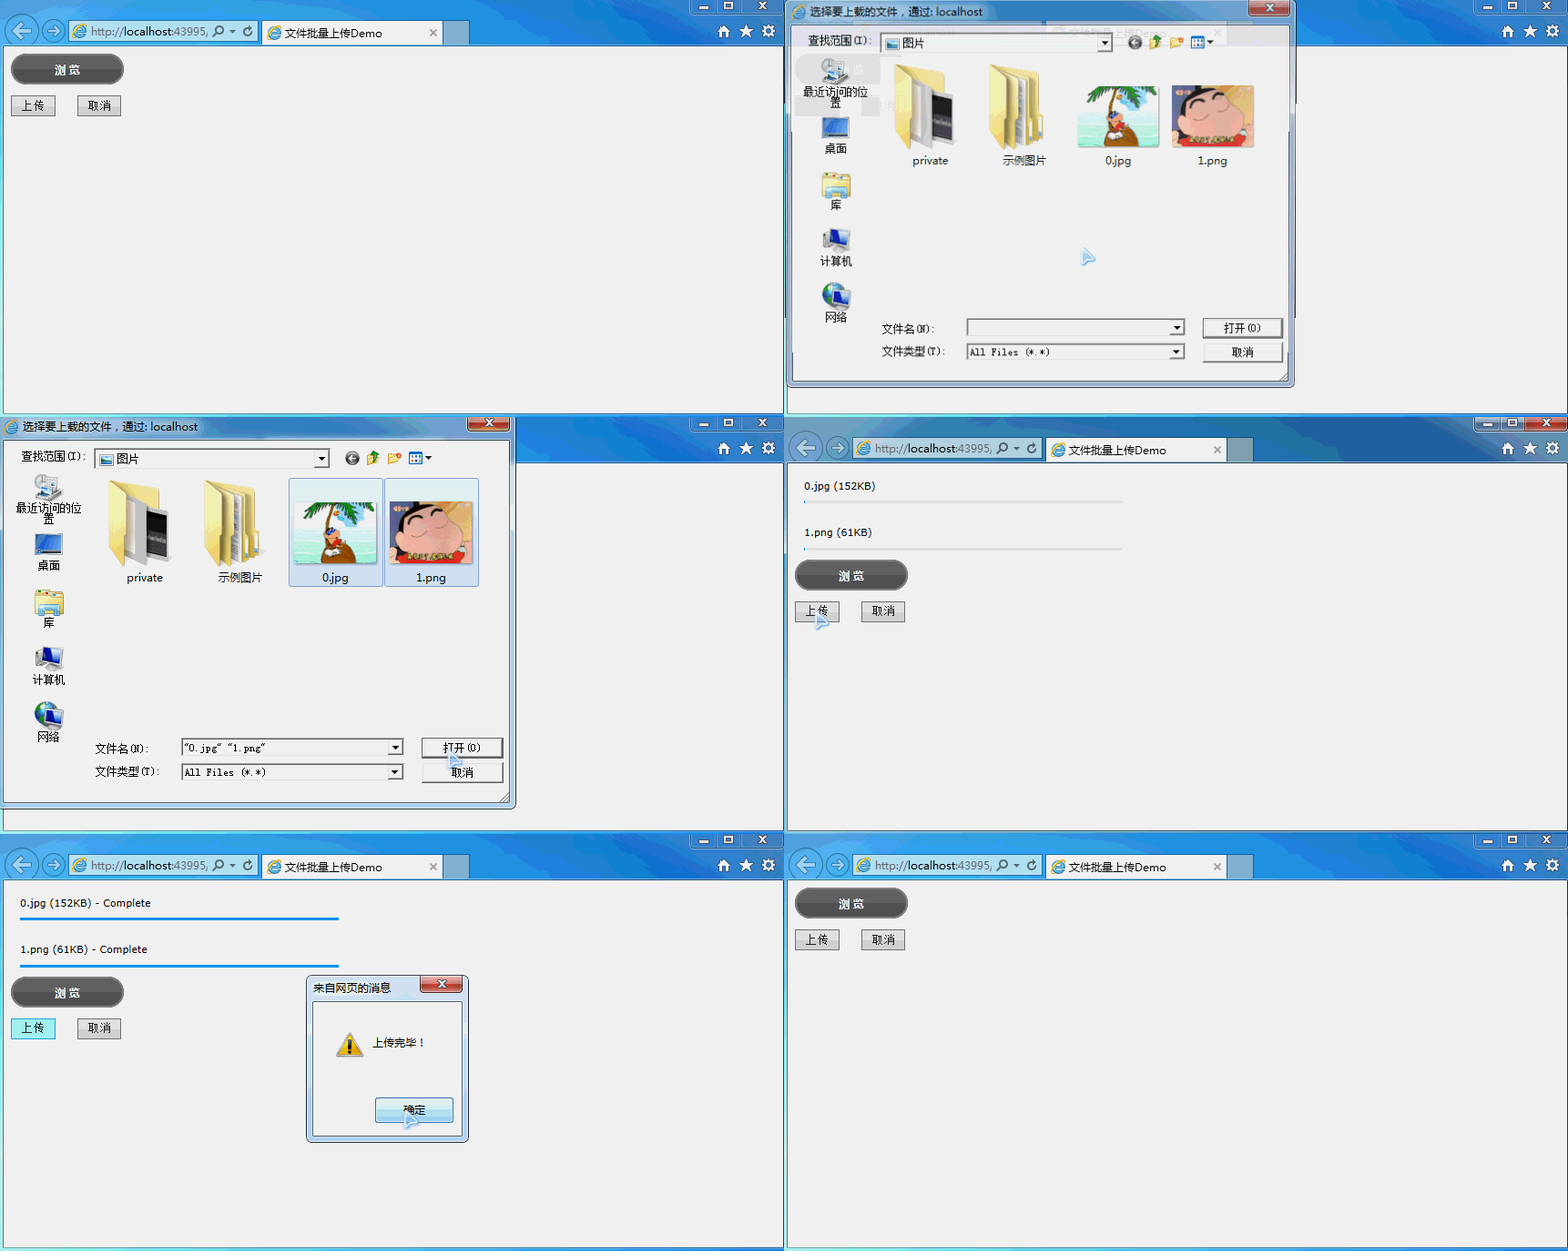
먼저 렌더링은 다음과 같습니다.

 페이지는 다음과 같습니다
<%@ Page Language="C#" AutoEventWireup="true" CodeFile="Default.aspx.cs" Inherits="_Default" %>
<!DOCTYPE html>
<html xmlns="http://www.w3.org/1999/xhtml">
<head runat="server">
<meta http-equiv="Content-Type" content="text/html; charset=utf-8"/>
<title>文件批量上传Demo</title>
<!--引入Jquery-->
<script src="js/jquery-1.11.3.min.js"></script>
<!--引入uploadify-->
<script type="text/javascript" src="uploadify/jquery.uploadify.js"></script>
<link type="text/css" href="uploadify/uploadify.css" rel="stylesheet" />
<script type="text/javascript">
$(function () {
var guid = '<%=Request["guid"] %>';
var type = '<%=Request["type"] %>';
if (guid == null || guid == "") {
guid = newGuid();
}
if (type != null) {
type = type + '/';
}
$('#file_upload').uploadify({
'swf': 'uploadify/uploadify.swf', //FLash文件路径
'buttonText': '浏 览', //按钮文本
'uploader': 'uploadhandler.ashx?guid=' + guid, //处理ASHX页面
'formData': { 'folder': 'picture', 'isCover': 1 }, //传参数
'queueID': 'fileQueue', //队列的ID
'queueSizeLimit': 10, //队列最多可上传文件数量,默认为999
'auto': false, //选择文件后是否自动上传,默认为true
'multi': true, //是否为多选,默认为true
'removeCompleted': true, //是否完成后移除序列,默认为true
'fileSizeLimit': '0', //单个文件大小,0为无限制,可接受KB,MB,GB等单位的字符串值
'fileTypeDesc': 'All Files', //文件描述
'fileTypeExts': '*.*', //上传的文件后缀过滤器
'onQueueComplete': function (queueData) { //所有队列完成后事件
alert("上传完毕!");
},
'onError': function (event, queueId, fileObj, errorObj) {
alert(errorObj.type + ":" + errorObj.info);
},
'onUploadStart': function (file) {
},
'onUploadSuccess': function (file, data, response) { //一个文件上传成功后的响应事件处理
//var data = $.parseJSON(data);//如果data是json格式
//var errMsg = "";
}
});
});
function newGuid() {
var guid = "";
for (var i = 1; i <= 32; i++) {
var n = Math.floor(Math.random() * 16.0).toString(16);
guid += n;
if ((i == 8) || (i == 12) || (i == 16) || (i == 20))
guid += "-";
}
return guid;
}
//执行上传
function doUpload() {
$('#file_upload').uploadify('upload', '*');
}
</script>
</head>
<body>
<form id="form1" runat="server" enctype="multipart/form-data">
<p id="fileQueue" class="fileQueue"></p>
<p>
<input type="file" name="file_upload" id="file_upload" />
<p>
<input type="button" class="shortbutton" id="btnUpload" onclick="doUpload()" value="上传" />
<input type="button" class="shortbutton" id="btnCancelUpload" onclick="$('#file_upload').uploadify('cancel')" value="取消" />
</p>
<p id="p_show_files"></p>
</p>
</form>
</body>
</html> UploadHandler.ashx 코드:
using System;
using System.Web;
using System.IO;
public class UploadHandler : IHttpHandler {

 public void ProcessRequest (HttpContext context) {
  context.Response.ContentType = "text/plain";
  context.Request.ContentEncoding = System.Text.Encoding.GetEncoding("UTF-8");
  context.Response.ContentEncoding = System.Text.Encoding.GetEncoding("UTF-8");
  context.Response.Charset = "UTF-8";
  if (context.Request.Files.Count > 0)
  {
   #region 获取上传路径
   string uploadFolder = GetUploadFolder();
   #endregion
   if (System.IO.Directory.Exists(uploadFolder))
   {//如果上传路径存在
    HttpPostedFile file = context.Request.Files["Filedata"];
    string filePath = Path.Combine(uploadFolder, file.FileName);
    file.SaveAs(filePath);
    context.Response.Write("0");
   }
   else
   {
    context.Response.Write("2");
   }
  }
 }

 public bool IsReusable {
  get {
   return false;
  }
 }
 /// <summary>
 /// 返回不带后缀的文件名
 /// </summary>
 /// <param name="fileName"></param>
 /// <returns></returns>
 public static string GetFirstFileName(string fileName)
 {
  return Path.GetFileNameWithoutExtension(fileName);
 }
 /// <summary>
 /// 获取上传目录
 /// </summary>
 /// <returns></returns>
 public static string GetUploadFolder()
 {
  string rootPath = HttpContext.Current.Server.MapPath("~");
  return Path.Combine(rootPath, "test");
 }
}파일 업로드와 마찬가지로 기본적으로 크기 제한이 있습니다. IIS에서는 기본 요청 크기를 30M로 제한합니다. 예를 들어 IIS를 수정하고 싶지 않지만 이 크기 제한을 초과하려면 1GB 파일을 업로드하세요.
이는 Web.config를 수정하여 달성할 수 있습니다.
<?xml version="1.0" encoding="utf-8"?>
<!--
 -->
<configuration>
 <system.web>
  <compilation debug="true" targetFramework="4.0" />
  <httpRuntime maxRequestLength="1073741824"/>
 </system.web>
 <!--用于设置文件上传的最大允许大小(单位:bytes)-->
 <system.webServer>
  <security>
  <requestFiltering>
   <!--修改服务器允许最大长度(1GB)-->
   <requestLimits maxAllowedContentLength="1073741824"/>
  </requestFiltering>
  </security>
 </system.webServer>

</configuration>
이 기사의 사례를 읽으신 후 방법을 마스터하셨다고 생각합니다. 더 흥미로운 정보를 보려면 PHP 중국어 웹사이트의 다른 관련 기사를 주목하세요!
추천 자료:
jQuery를 사용하면 브라우저가 서로 점프하여 매개변수를 자세히 전달할 수 있습니다.jquery 기본 지식 사용 사항이 자세히 설명되어 있습니다.
위 내용은 jquery 플러그인 uploadify 사용에 대한 자세한 설명의 상세 내용입니다. 자세한 내용은 PHP 중국어 웹사이트의 기타 관련 기사를 참조하세요!

핫 AI 도구

Undresser.AI Undress
사실적인 누드 사진을 만들기 위한 AI 기반 앱

AI Clothes Remover
사진에서 옷을 제거하는 온라인 AI 도구입니다.

Undress AI Tool
무료로 이미지를 벗다

Clothoff.io
AI 옷 제거제

AI Hentai Generator
AI Hentai를 무료로 생성하십시오.

인기 기사

뜨거운 도구

메모장++7.3.1
사용하기 쉬운 무료 코드 편집기

SublimeText3 중국어 버전
중국어 버전, 사용하기 매우 쉽습니다.

스튜디오 13.0.1 보내기
강력한 PHP 통합 개발 환경

드림위버 CS6
시각적 웹 개발 도구

SublimeText3 Mac 버전
신 수준의 코드 편집 소프트웨어(SublimeText3)

뜨거운 주제
 7563
7563
 15
15
 1385
1385
 52
52
 84
84
 11
11
 61
61
 19
19
 28
28
 99
99
 Win11에서 관리자 권한을 얻는 방법에 대한 자세한 설명
Mar 08, 2024 pm 03:06 PM
Windows 운영 체제는 세계에서 가장 인기 있는 운영 체제 중 하나이며, 새로운 버전의 Win11이 많은 주목을 받았습니다. Win11 시스템에서 관리자 권한을 얻는 것은 사용자가 시스템에서 더 많은 작업과 설정을 수행할 수 있도록 하는 중요한 작업입니다. 이번 글에서는 Win11 시스템에서 관리자 권한을 얻는 방법과 권한을 효과적으로 관리하는 방법을 자세히 소개하겠습니다. Win11 시스템에서 관리자 권한은 로컬 관리자와 도메인 관리자의 두 가지 유형으로 나뉩니다. 로컬 관리자는 로컬 컴퓨터에 대한 모든 관리 권한을 갖습니다.
 Oracle SQL의 나누기 연산에 대한 자세한 설명
Mar 10, 2024 am 09:51 AM
OracleSQL의 나눗셈 연산에 대한 자세한 설명 OracleSQL에서 나눗셈 연산은 두 숫자를 나눈 결과를 계산하는 데 사용되는 일반적이고 중요한 수학 연산입니다. 나누기는 데이터베이스 쿼리에 자주 사용되므로 OracleSQL에서 나누기 작업과 사용법을 이해하는 것은 데이터베이스 개발자에게 필수적인 기술 중 하나입니다. 이 기사에서는 OracleSQL의 나누기 작업 관련 지식을 자세히 설명하고 독자가 참고할 수 있는 특정 코드 예제를 제공합니다. 1. OracleSQL의 Division 연산
 jQuery에서 PUT 요청 방법을 사용하는 방법은 무엇입니까?
Feb 28, 2024 pm 03:12 PM
jQuery에서 PUT 요청 방법을 사용하는 방법은 무엇입니까? jQuery에서 PUT 요청을 보내는 방법은 다른 유형의 요청을 보내는 것과 유사하지만 몇 가지 세부 사항과 매개 변수 설정에 주의해야 합니다. PUT 요청은 일반적으로 데이터베이스의 데이터 업데이트 또는 서버의 파일 업데이트와 같은 리소스를 업데이트하는 데 사용됩니다. 다음은 jQuery에서 PUT 요청 메소드를 사용하는 구체적인 코드 예제입니다. 먼저 jQuery 라이브러리 파일을 포함했는지 확인한 다음 $.ajax({u를 통해 PUT 요청을 보낼 수 있습니다.
 PHP 모듈로 연산자의 역할과 사용법에 대한 자세한 설명
Mar 19, 2024 pm 04:33 PM
PHP의 모듈로 연산자(%)는 두 숫자를 나눈 나머지를 구하는 데 사용됩니다. 이 글에서는 모듈로 연산자의 역할과 사용법을 자세히 논의하고 독자의 이해를 돕기 위해 구체적인 코드 예제를 제공합니다. 1. 모듈로 연산자의 역할 수학에서는 정수를 다른 정수로 나누면 몫과 나머지가 나옵니다. 예를 들어 10을 3으로 나누면 몫은 3이고 나머지는 1입니다. 이 나머지를 얻기 위해 모듈로 연산자가 사용됩니다. 2. 모듈러스 연산자의 사용법 PHP에서는 모듈러스를 나타내기 위해 % 기호를 사용합니다.
 jQuery 팁: 페이지에 있는 모든 태그의 텍스트를 빠르게 수정하세요.
Feb 28, 2024 pm 09:06 PM
제목: jQuery 팁: 페이지에 있는 모든 태그의 텍스트를 빠르게 수정하세요. 웹 개발에서는 페이지의 요소를 수정하고 조작해야 하는 경우가 많습니다. jQuery를 사용할 때 페이지에 있는 모든 태그의 텍스트 내용을 한 번에 수정해야 하는 경우가 있는데, 이는 시간과 에너지를 절약할 수 있습니다. 다음은 jQuery를 사용하여 페이지의 모든 태그 텍스트를 빠르게 수정하는 방법을 소개하고 구체적인 코드 예제를 제공합니다. 먼저 jQuery 라이브러리 파일을 도입하고 다음 코드가 페이지에 도입되었는지 확인해야 합니다. <
 jQuery를 사용하여 모든 태그의 텍스트 내용 수정
Feb 28, 2024 pm 05:42 PM
제목: jQuery를 사용하여 모든 태그의 텍스트 내용을 수정합니다. jQuery는 DOM 작업을 처리하는 데 널리 사용되는 인기 있는 JavaScript 라이브러리입니다. 웹 개발을 하다 보면 페이지에 있는 링크 태그(태그)의 텍스트 내용을 수정해야 하는 경우가 종종 있습니다. 이 기사에서는 jQuery를 사용하여 이 목표를 달성하는 방법을 설명하고 구체적인 코드 예제를 제공합니다. 먼저 페이지에 jQuery 라이브러리를 도입해야 합니다. HTML 파일에 다음 코드를 추가합니다.
 jQuery 요소에 특정 속성이 있는지 어떻게 알 수 있나요?
Feb 29, 2024 am 09:03 AM
jQuery 요소에 특정 속성이 있는지 어떻게 알 수 있나요? jQuery를 사용하여 DOM 요소를 조작할 때 요소에 특정 속성이 있는지 확인해야 하는 상황이 자주 발생합니다. 이 경우 jQuery에서 제공하는 메소드를 사용하여 이 기능을 쉽게 구현할 수 있습니다. 다음은 jQuery 요소에 특정 속성이 있는지 확인하기 위해 일반적으로 사용되는 두 가지 방법을 특정 코드 예제와 함께 소개합니다. 방법 1: attr() 메서드와 typeof 연산자를 // 사용하여 요소에 특정 속성이 있는지 확인
 jQuery에서 eq의 역할 및 적용 시나리오 이해
Feb 28, 2024 pm 01:15 PM
jQuery는 웹 페이지에서 DOM 조작 및 이벤트 처리를 처리하는 데 널리 사용되는 인기 있는 JavaScript 라이브러리입니다. jQuery에서 eq() 메서드는 지정된 인덱스 위치에서 요소를 선택하는 데 사용됩니다. 구체적인 사용 및 적용 시나리오는 다음과 같습니다. jQuery에서 eq() 메서드는 지정된 인덱스 위치에 있는 요소를 선택합니다. 인덱스 위치는 0부터 계산되기 시작합니다. 즉, 첫 번째 요소의 인덱스는 0이고 두 번째 요소의 인덱스는 1입니다. eq() 메소드의 구문은 다음과 같습니다: $("s


