JS 구현은 인터페이스 프롬프트 상자에 유지됩니다.
이번에는 인터페이스 프롬프트 상자에 머물기 위한 JS 구현을 소개하겠습니다. 인터페이스 프롬프트 상자에 머물기 위해 JS를 구현하는 데 필요한 주의 사항은 무엇입니까?
비즈니스 시나리오: 마우스를 요소 안으로 이동하면 소개를 위한 프롬프트 상자가 표시됩니다. 마우스를 제거하면 자동으로 사라집니다. ToolTip.js 및 ToolTip.css
Main 메소드 소개: ToolTip.show(반복되지 않는 한 프롬프트되어야 하는 요소의 ID, 프롬프트될 html 텍스트, 너비(선택 사항), 높이(선택 사항) );
ToolTip.show (obj, id, html, width, height);
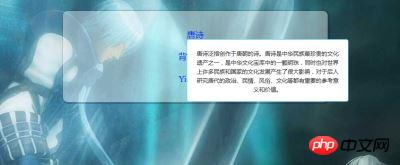
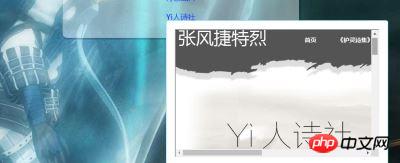
효과는 다음과 같습니다:
1 텍스트 표시:

2: 사진 표시

3: 웹사이트 표시

js 코드: F:Html5PluginsToolTipjsToolTip.js
(function () {
 var ToolTip = {};
 /**
 * 显示函数
 */
 ToolTip._showTip = function (parentId, childId, html, width, height) {
 var parent = document.getElementById(parentId)//要提示的元素
 var child = document.getElementById(childId);
 if (child === null) {//创建
  var toolTip = document.createElement("p");
  toolTip.classList = "ui-tooltip-box";
  toolTip.id = childId;
  toolTip.innerHTML = html;
  parent.appendChild(toolTip);
  toolTip.style.width = width ? width + "px" : "auto"
  toolTip.style.height = height ? height + "px" : "auto"
  //定位:
  toolTip.style.position = "absolute";
  toolTip.style.display = "block";
  var left = parent.offsetLeft;
  var top = parent.offsetTop;
  if (left + toolTip.offsetWidth > document.body.clientWidth) {
  left = document.body.clientWidth / 2;
  }
  toolTip.style.left = left + "px";
  toolTip.style.top = top + 20 + "px";
  parent.onmouseleave = function (ev) {
  setTimeout(function () { //延迟:
   document.getElementById(childId).style.display = "none";//隐藏
  }, 300);
  }
 } else {
  //显示
  document.getElementById(childId).style.display = "block";
 }
 },
 /**
  * 调用入口
  */
 ToolTip.show = function (parentId, childId, html, width, height) {
  var parent = document.getElementById(obj)
  parent.onmouseenter = function (ev) {
  ToolTip._showTip(parentId, childId, html, width, height)
  }
 }
 window.ToolTip = ToolTip;
})();//为防止污染,将方法写在匿名函数中html 코드: F:Html5PluginsToolTipToolTip.html
<!DOCTYPE html>
<html lang="en">
<head>
 <meta charset="UTF-8">
 <title>提示框</title>
 <link rel="stylesheet" type="text/css" href="ToolTip.css" rel="external nofollow" >
</head>
<body>
<p class="ui-tooltip-demo">
 <p><a class="ui-tooltip" id="tooltip-text">唐诗</a></p>
 <p><a class="ui-tooltip" id="tooltip-photo">背景图片</a></p>
 <p><a class="ui-tooltip" id="tooltip-poem">Yi人诗社</a></p>
</p>
<script src="js/ToolTip.js"></script>
<script>
//调用方式
 ToolTip.show("tooltip-text", "01", "唐诗泛指创作于唐朝的诗" +
 "。唐诗是中华民族最珍贵的文化遗产之一,是" +
 "中华文化宝库中的一颗明珠," +
 "同时也对世界上许多民族和国家的文化发展产生了很大影响," +
 "对于后人研究唐代的政治、民情、风俗、" +
 "文化等都有重要的参考意义和价值。",300,90);
 ToolTip.show("tooltip-photo", "02", "<img src=\"imgs/bg.jpg\" height=\"80px\">",150,80);
 var html='<iframe src="http://www.toly.top" width="480px" height="300px"/>'
 ToolTip.show("tooltip-poem", "03", html);
</script>
</body>
</html>css 코드: F:Html5PluginsToolTipToolTip.css
body {
 font-size: 14px;
 line-height: 1.8;
 background-image: url("imgs/bg.jpg");
}
.ui-tooltip-demo {
 width: 500px;
 margin: 30px auto;
 padding: 20px 30px;
 background-color: rgba(100%, 100%, 100%, 0.4);
 border-radius: 10px;
 text-align: center;
 box-shadow: 2px 1px 0px 3px rgba(0, 0, 0, 0.2);
}
.ui-tooltip-demo .ui-tooltip {
 color: #03f;
 font-size: 18px;
 cursor: help;
}
.ui-tooltip-box {
 display: block;
 background: #fff;
 line-height: 1.6;
 border: 1px solid #6cf;
 color: #333;
 padding: 20px;
 font-size: 12px;
 border-radius: 5px;
 overflow: auto;
}믿습니다 당신은 사건을 읽고 그것을 마스터했습니다 이 기사에서 방법, 더 흥미로운 정보를 보려면 PHP에 주목하세요. 기타 관련 기사는 중국 웹사이트에 있습니다!
추천 도서:
위 내용은 JS 구현은 인터페이스 프롬프트 상자에 유지됩니다.의 상세 내용입니다. 자세한 내용은 PHP 중국어 웹사이트의 기타 관련 기사를 참조하세요!

핫 AI 도구

Undresser.AI Undress
사실적인 누드 사진을 만들기 위한 AI 기반 앱

AI Clothes Remover
사진에서 옷을 제거하는 온라인 AI 도구입니다.

Undress AI Tool
무료로 이미지를 벗다

Clothoff.io
AI 옷 제거제

AI Hentai Generator
AI Hentai를 무료로 생성하십시오.

인기 기사

뜨거운 도구

메모장++7.3.1
사용하기 쉬운 무료 코드 편집기

SublimeText3 중국어 버전
중국어 버전, 사용하기 매우 쉽습니다.

스튜디오 13.0.1 보내기
강력한 PHP 통합 개발 환경

드림위버 CS6
시각적 웹 개발 도구

SublimeText3 Mac 버전
신 수준의 코드 편집 소프트웨어(SublimeText3)

뜨거운 주제
 7564
7564
 15
15
 1386
1386
 52
52
 87
87
 11
11
 61
61
 19
19
 28
28
 101
101
 Google Chrome에서 이 탭의 콘텐츠가 공유되고 있다는 메시지가 표시되면 어떻게 해야 하나요?
Mar 13, 2024 pm 05:00 PM
Google Chrome에서 이 탭의 콘텐츠가 공유되고 있다는 메시지가 표시되면 어떻게 해야 하나요? Google Chrome을 사용하여 새 탭을 열 때 가끔 이 탭의 콘텐츠가 공유되고 있다는 메시지가 표시됩니다. 무슨 일이 일어나고 있는 걸까요? 이 사이트는 이 탭의 콘텐츠가 공유되고 있다는 메시지를 표시하는 Google Chrome 문제에 대한 자세한 소개를 사용자에게 제공합니다. Google Chrome에서는 이 탭의 콘텐츠가 공유된다는 메시지를 표시합니다. 해결 방법: 1. Google Chrome을 엽니다. "Google Chrome 사용자 정의 및 제어" 아이콘을 클릭하면 변경됩니다. 아이콘. 2. 클릭하면 아래에 구글 크롬 메뉴창이 뜨고, 마우스가 '도구 더보기'로 이동합니다.
 WebSocket과 JavaScript를 사용하여 온라인 음성 인식 시스템을 구현하는 방법
Dec 17, 2023 pm 02:54 PM
WebSocket 및 JavaScript를 사용하여 온라인 음성 인식 시스템을 구현하는 방법 소개: 지속적인 기술 개발로 음성 인식 기술은 인공 지능 분야의 중요한 부분이 되었습니다. WebSocket과 JavaScript를 기반으로 한 온라인 음성 인식 시스템은 낮은 대기 시간, 실시간, 크로스 플랫폼이라는 특징을 갖고 있으며 널리 사용되는 솔루션이 되었습니다. 이 기사에서는 WebSocket과 JavaScript를 사용하여 온라인 음성 인식 시스템을 구현하는 방법을 소개합니다.
 WebSocket 및 JavaScript: 실시간 모니터링 시스템 구현을 위한 핵심 기술
Dec 17, 2023 pm 05:30 PM
WebSocket과 JavaScript: 실시간 모니터링 시스템 구현을 위한 핵심 기술 서론: 인터넷 기술의 급속한 발전과 함께 실시간 모니터링 시스템이 다양한 분야에서 널리 활용되고 있다. 실시간 모니터링을 구현하는 핵심 기술 중 하나는 WebSocket과 JavaScript의 조합입니다. 이 기사에서는 실시간 모니터링 시스템에서 WebSocket 및 JavaScript의 적용을 소개하고 코드 예제를 제공하며 구현 원칙을 자세히 설명합니다. 1. 웹소켓 기술
 JavaScript 및 WebSocket을 사용하여 실시간 온라인 주문 시스템을 구현하는 방법
Dec 17, 2023 pm 12:09 PM
JavaScript 및 WebSocket을 사용하여 실시간 온라인 주문 시스템을 구현하는 방법 소개: 인터넷의 대중화와 기술의 발전으로 점점 더 많은 레스토랑에서 온라인 주문 서비스를 제공하기 시작했습니다. 실시간 온라인 주문 시스템을 구현하기 위해 JavaScript 및 WebSocket 기술을 사용할 수 있습니다. WebSocket은 TCP 프로토콜을 기반으로 하는 전이중 통신 프로토콜로 클라이언트와 서버 간의 실시간 양방향 통신을 실현할 수 있습니다. 실시간 온라인 주문 시스템에서는 사용자가 요리를 선택하고 주문을 하면
 WebSocket과 JavaScript를 사용하여 온라인 예약 시스템을 구현하는 방법
Dec 17, 2023 am 09:39 AM
WebSocket과 JavaScript를 사용하여 온라인 예약 시스템을 구현하는 방법 오늘날의 디지털 시대에는 점점 더 많은 기업과 서비스에서 온라인 예약 기능을 제공해야 합니다. 효율적인 실시간 온라인 예약 시스템을 구현하는 것이 중요합니다. 이 기사에서는 WebSocket과 JavaScript를 사용하여 온라인 예약 시스템을 구현하는 방법을 소개하고 구체적인 코드 예제를 제공합니다. 1. WebSocket이란 무엇입니까? WebSocket은 단일 TCP 연결의 전이중 방식입니다.
 JavaScript와 WebSocket: 효율적인 실시간 일기예보 시스템 구축
Dec 17, 2023 pm 05:13 PM
JavaScript 및 WebSocket: 효율적인 실시간 일기 예보 시스템 구축 소개: 오늘날 일기 예보의 정확성은 일상 생활과 의사 결정에 매우 중요합니다. 기술이 발전함에 따라 우리는 날씨 데이터를 실시간으로 획득함으로써 보다 정확하고 신뢰할 수 있는 일기예보를 제공할 수 있습니다. 이 기사에서는 JavaScript 및 WebSocket 기술을 사용하여 효율적인 실시간 일기 예보 시스템을 구축하는 방법을 알아봅니다. 이 문서에서는 특정 코드 예제를 통해 구현 프로세스를 보여줍니다. 우리
 Baidu Tieba 앱에서 작업이 너무 자주 발생한다는 메시지가 표시됩니다. 무엇이 문제인가요?
Apr 01, 2024 pm 05:06 PM
Baidu Tieba 앱은 작업이 너무 자주 발생한다는 메시지를 표시합니다. 이 메시지는 일반적으로 플랫폼의 정상적인 작동과 사용자 경험을 유지하고 악의적인 화면 스팸, 광고 스팸 및 기타 부적절한 동작을 방지하기 위한 것입니다. 편집자님이 공유해 주셨습니다. Baidu Tieba 앱에서 작업이 너무 빈번하다는 메시지가 표시됩니다. 처리 방법 공유 1. 시스템에서 [작업이 너무 빈번합니다]라는 메시지가 표시되면 잠시 기다려야 합니다. 불안한 경우 먼저 다른 작업을 수행하면 됩니다. 일반적으로 잠시 기다리면 이 프롬프트 메시지가 자동으로 사라지며 정상적으로 사용할 수 있습니다. 2. 오랜 시간을 기다린 후에도 여전히 [Operation Too 빈번함]이 표시되면 Tieba Emergency Bar, Tieba Feedback Bar 및 기타 공식 Tieba에 게시하여 이 현상을 보고하고 공식 직원에게 해결을 요청할 수 있습니다. 삼.
 자바스크립트에서 insertBefore를 사용하는 방법
Nov 24, 2023 am 11:56 AM
사용법: JavaScript에서 insertBefore() 메서드는 DOM 트리에 새 노드를 삽입하는 데 사용됩니다. 이 방법에는 삽입할 새 노드와 참조 노드(즉, 새 노드가 삽입될 노드)라는 두 가지 매개 변수가 필요합니다.


