

vue-video-player 사용자 정의 플레이어 단계에 대한 자세한 설명
이번에는 vue-video-player 플레이어를 사용자 정의하는 단계에 대해 자세히 설명하겠습니다. vue-video-player 플레이어를 사용자 정의할 때 주의사항은 무엇인가요?
그림 1--사이드바 표시
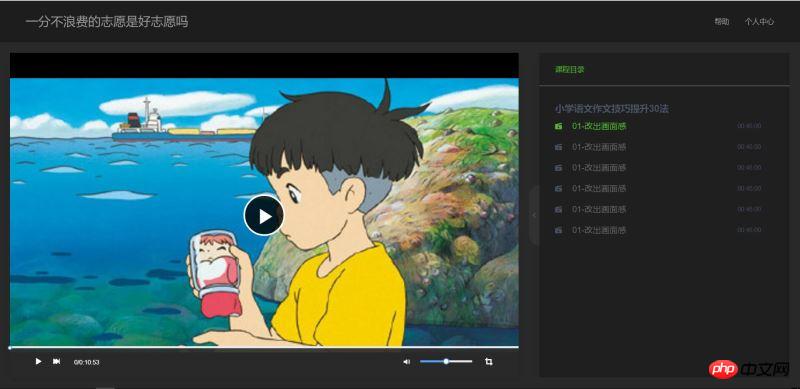
그림 2-사이드바 축소
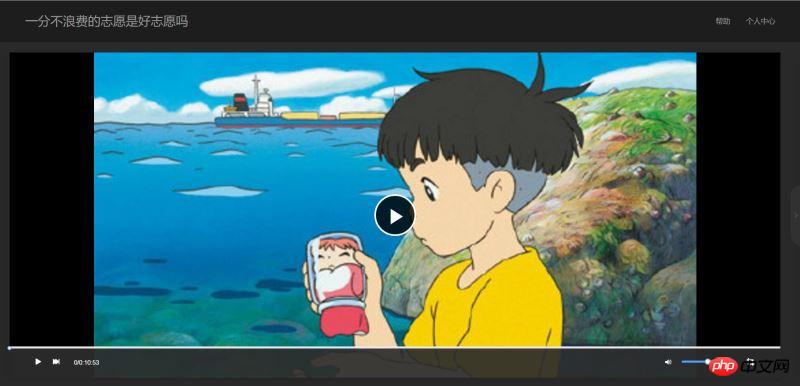
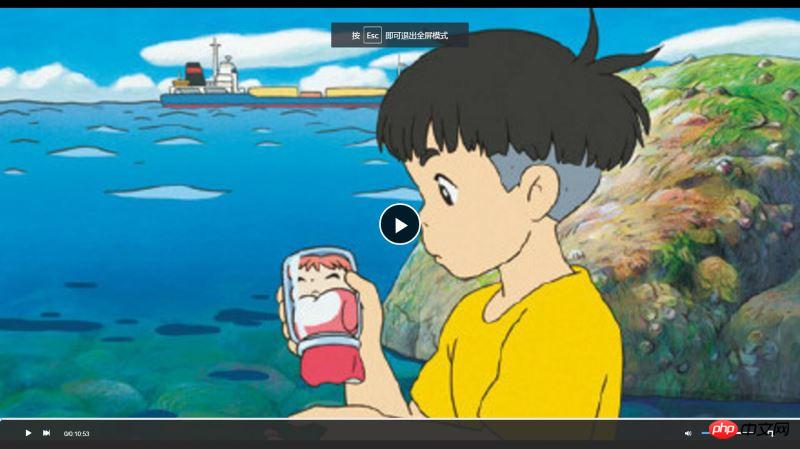
그림 3: 전체 화면.
작성
이 프로젝트에서는 vue와 vue-video-player를 사용해야 하는데 여기서는 ui 프레임워크를 기반으로 하는 것은 중요하지 않습니다. js로 개발된 vue-video-player 사용법과 video.js에서 api를 조작하는 방법입니다.
vue-video-player 프로젝트 주소: https://github.com/surmon-china/vue-video-player.
video.js 문서 주소: http://docs.videojs.com/docs/api/player.html.
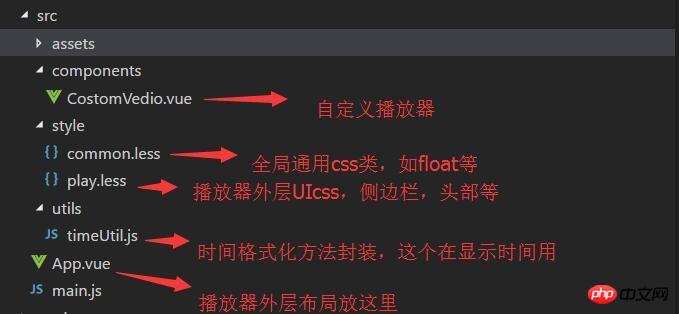
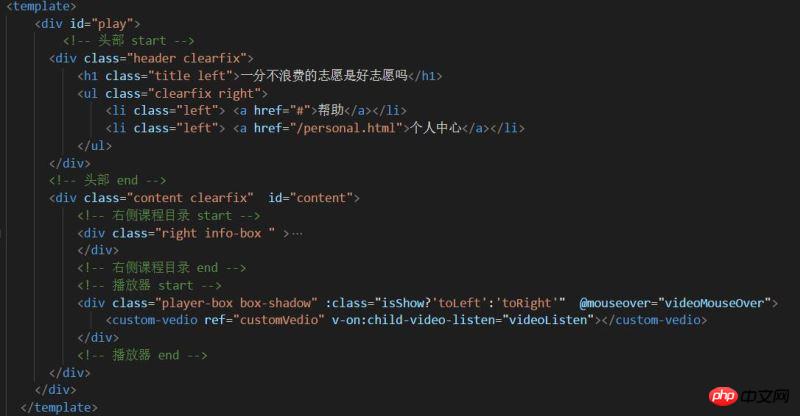
프로젝트 디렉터리:
1. 외부 UI 레이아웃
그림 1에서 볼 수 있듯이 이 프로젝트는 2열 적응형 레이아웃을 사용하며 오른쪽은 고정된 재생 목록입니다. 너비는 500px입니다. 왼쪽에는 플레이어 상자가 있습니다. 핸들 클릭에 따라 재생 목록 상자가 확장되거나 축소될 수 있으며, 플레이어 상자도 재생 목록의 확장/축소에 따라 너비가 조정됩니다.
(녹화한 애니메이션의 용량이 너무 커서 업로드가 힘들기 때문에 제 프로그램을 복제해서 실행하시면 보실 수 있습니다.)
HTML 코드 구조는 다음과 같습니다.
축소 및 확장 시 과도한 애니메이션을 추가합니다. 여기서는 CSS 손으로 쓴 애니메이션을 사용하도록 선택합니다.
[css] view plain copy
.transition{
       transition: all 1s ease;
       -moz-transition: all 1s ease;
       -webkit-transition: all 1s ease;
       -o-transition: all 1s ease;
   }
[css] view plain copy
.toLeft{
        .transition;

margin-right
: 540px !important;
    }
    .toRight{
        .transition;
        margin-right: 40px !important;
    }
    .toHide{
        .transition;
        right: -500px !important;
    }
    .toShow{
        .transition;
        right: 0px !important;
    }
[css] view plain copy
// 播放区
    .player-box{
        margin-right: 540px;
        height: 100%;
        position: relative;

    }
    [css] view plain copy
//侧边信息区
    .info-box{
        width: 520px;
        height: 100%;
        background: transparent;
        position: relative;
        overflow: hidden;
    }
[css] view plain copy
// 内容区
.content{
    background: #292929;
    position: relative;
    padding: 20px 0 20px 20px;

}두 번째, 플레이어 ui
전체 맞춤형 플레이어 ui 구성 요소인 CostomVedio.vue로 캡슐화되어 있습니다. 재생 영역은 vue-video-player 플레이어를 사용하지만 하단 컨트롤 바는 사용자 정의되어 있으며 플레이어와 함께 제공되는 컨트롤 바를 사용하지 않습니다. 디자인 형제의 요청으로 플레이어 UI를 맞춤설정해야 합니다.
html 구조 코드는 다음과 같습니다.
[html] view plain copy
<template>
    <p class="custom-video-outer-box" @mouseover="videoMouseOver">
      <video-player  class="video-player-box"
                 ref="videoPlayer"
                 :options="playerOptions"
                 :playsinline="true"
                 customEventName="customstatechangedeventname"
                 @play="onPlayerPlay($event)"
                 @pause="onPlayerPause($event)"
                 @ended="onPlayerEnded($event)"
                 @waiting="onPlayerWaiting($event)"
                 @playing="onPlayerPlaying($event)"
                 @loadeddata="onPlayerLoadeddata($event)"
                 @timeupdate="onPlayerTimeupdate($event)"
                 @statechanged="playerStateChanged($event)"
                 @ready="playerReadied"
                 >

                  <!-- @canplay="onPlayerCanplay($event)" -->
                   <!-- @canplaythrough="onPlayerCanplaythrough($event)" -->

       </video-player>
       <!-- 底部进度条 start -->
         <transition name="fade">
                <p class="bottomCtrl" v-show="isBottomCtrlShow" id="bottomCtrl">
                    <!--  -->
                    <!-- <p class="bottomCtrl" v-show="false"> -->
                <!-- <p class="bottomCtrl"  > -->

                    <Slider v-model="playerCtrl.currentTimeInt" class="progress-slider" :max="playerCtrl.durationInt" :tip-format="progressTipFormat" @on-change="progressChange"></Slider>
                    <p class="clearfix" >
                        <p class="left">
                                <!-- 暂停 -->
                                <span v-on:click="play" v-if="!playerCtrl.isPlay" class="icon">
                                    <Icon type="play"></Icon>
                                </span>
                                <!-- 播放 -->
                                <span v-else v-on:click="pause" class="icon">
                                     <Icon type="stop"></Icon>
                                </span>

                                <!-- 下一曲 -->
                                <span class="icon" v-on:click="nextClick">
                                    <Icon type="skip-forward"></Icon>
                                </span>
                                      <span>
                                {{playerCtrl.currentTime}}/{{playerCtrl.duration}}
                            </span>
                        </p>
                        <p class="right clearfix">
                                <p class="voice-box clearfix left">
                                    <!-- 音量 -->
                                    <Icon type="volume-medium" class="left icon"></Icon>
                                    <Slider v-model="playerCtrl.voiceSlider" class="voice-slider left " max=100 @on-change="volumeChange"></Slider>
                                </p>
                                 <!-- 全屏 -->
                                 <span class="icon left" @click="fullScreenHandle">
                                    <Icon type="crop" ></Icon>
                                 </span>
                        </p>
                    </p>
                </p>
         </transition>
       </p>
  </template>
具体思路就是,使用播放器铺满播放区,使用position定位将自定义的controlBar固定在播放区的底部,这里注意controlBar的z-index一定要足够大,否则在全屏的时候不在最上层看不到。
css样式:
[css] view plain copy
<style>
    .video-player-box{
        height: 100% !important;
        width: 100% !important;
    }
    //底部进度条
    .bottomCtrl{
        line-height: 60px;
        height: 60px;
        overflow: visible;
        position: absolute;
        bottom: 0;
        left: 0;
        background-color: rgba(45, 45, 45, .92);
        width: 100%;
        padding: 0 50px;
        color: #fff;
        z-index: 999999999999999;

        .icon{
            font-size: 16px;
            line-height: 60px;
            cursor: pointer;
        }

        .icon+.icon{
            margin-left: 20px;
        }
    }
    .custom-video-outer-box{
        position: relative;
        height: 100%;
        width: 100%;
    }
    .progress-slider{
        position: absolute;
        width: 100%;
        top: 0;
        left: 0;
        height: 18px;
        line-height: 18px;
        .ivu-slider-wrap{
            margin: 0 !important;
            border-radius: 0 !important;
        }
        .ivu-slider-button-wrap{
             line-height: normal !important;
        }
        .ivu-slider-button{
            height: 8px !important;
            width: 8px !important;

        }
    }
    .voice-box{
        .voice-slider{
            width: 100px;
            margin-left: 20px;
        }
        .ivu-slider-wrap{
            margin: 27px 0 !important;
        }

    }
    .time{
        margin-left: 25px;
    }
    .full-screen{
       margin-left: 25px;
        line-height: 60px;
    }

    .ivu-progress-outer{
        padding: 0 10px !important;
    }

    .vjs-big-play-button{
        height: 80px !important;
        width: 80px !important;
        line-height: 80px !important;
        text-align: center;
        background:rgba(0, 0, 0, 0.8) !important;
        border-radius: 50% !important;
        top: 50% !important;
        left: 50% !important;
        margin-left: -40px !important;
        margin-top: -40px !important;
    }
    #vjs_video_3{
        max-height: 100% !important;
        width: 100% !important;
        height: 100% !important;
    }
    .video-player-box>p{
        height: 100% !important;
        width: 100% !important;
    }
    .video-js .vjs-big-play-button{
        font-size: 5em !important;
    }
    video{
        max-height: 100% !important;

    }

</style>3. 사용자 정의 controlBar 기능 구현
다음 단계는 재생, 일시 정지, 다음 노래, 재생 진행, 남은 등의 사용자 정의 controlBar 기능을 구현하는 것입니다. 시간, 전체 화면, 볼륨 조절 등
여기서는 먼저 video.js의 해당 API를 살펴봐야 합니다. 비록 영어로 되어 있지만 매우 명확하고 이해하기 쉽습니다.
video.js API 문서 주소: http://docs.videojs.com/docs/api/player.html
1. 재생, 일시정지, 다음곡, 전체화면은 우리가 추가한 커스텀 버튼의 클릭 이벤트를 주로 모니터링합니다. , 플레이어 API를 호출하여 해당 작업을 수행하고 상태를 변경합니다.
[javascript] view plain copy
// 播放
 play(){
     this.player.play();
 },
 // 暂停
 pause(){
      this.player.pause();
 },
 //下一曲
 nextClick(){
     console.log("自定义","下一曲点击");

 },
 //全屏
 fullScreenHandle(){
     console.log("全屏");
     if(!this.player.isFullscreen()){
         this.player.requestFullscreen();
         this.player.isFullscreen(true);
     }else{
          this.player.exitFullscreen();
          this.player.isFullscreen(false);
     }
},물론 vue-video-player의 플레이어는 콜백 메서드의 상태 변화를 모니터링합니다.
[html] view plain copy
<video-player  class="video-player-box"
                ref="videoPlayer"
                :options="playerOptions"
                :playsinline="true"
                customEventName="customstatechangedeventname"
                @play="onPlayerPlay($event)"
                @pause="onPlayerPause($event)"
                @ended="onPlayerEnded($event)"
                @waiting="onPlayerWaiting($event)"
                @playing="onPlayerPlaying($event)"
                @loadeddata="onPlayerLoadeddata($event)"
                @timeupdate="onPlayerTimeupdate($event)"
                @statechanged="playerStateChanged($event)"
                @ready="playerReadied"
                >

                 <!-- @canplay="onPlayerCanplay($event)" -->
                  <!-- @canplaythrough="onPlayerCanplaythrough($event)" -->

</video-player>재생 버튼을 표시하는 동안 "일시 중지"를 표시하는 등 이러한 상태 변화에 따라 UI를 적절하게 변경할 수 있습니다. 일시 정지 시 '재생' 및 기타 기능을 사용할 수 있습니다.
2. 재생 진행률, 남은 시간, 볼륨 조정
재생 진행률은 플레이어의 onPlayerTimeupdate() 콜백 메서드의 currentTime 메서드를 기반으로 합니다. 여기서는 슬라이더를 사용하기 때문에 진행률은 S입니다. 는 정수로 계산되므로 여기에 저장할 두 개의 변수가 필요합니다. 하나는 정수 형식이고 다른 하나는 표시할 시간, 분, 초 형식을 지정한 후 문자열 형식입니다.
[javascript] view plain copy
//时间更新
           onPlayerTimeupdate(player){
               this.playerCtrl.currentTime=timeUtil.secondToDate(player.currentTime());
               this.playerCtrl.currentTimeInt=Math.floor(player.currentTime());
               console.log("当前音量",player.volume());
}, 고정 소수점 재생, 즉 사용자가 진행률 표시줄의 특정 위치를 클릭하여 이 시점에서 재생을 진행합니다. 슬라이더의
[html] 보기 일반 copy
@on-change="progressChange"
이 메서드는 슬라이더 고정점을 모니터링하고
[javascript] view plain copy
//进度条被拉动
           progressChange(val){
               this.player.currentTime(val);
               this.playerCtrl.currentTimeInt=val;
               this.playerCtrl.currentTime=timeUtil.secondToDate(val);
}, 고정점 값을 가져온 다음 플레이어의 currentTime 설정을 통해 고정점 재생으로 점프합니다.
볼륨 조정 방법은 재생 진행과 유사합니다.
一开始初始化的时候记得配置
[javascript] view plain copy
muted:false,//开始声音
来开启声音,否则静音状态下调节声音无效。
使用player.volume(val)这个api设置音量,其中val=0,表示声音off,val=1表示声音最大,0.5表示声音设置在half。
四:总结
最后在app.vue/需要用到这个播放器的地方 引入自定义播放器组件即可。vue-video-player是大神基于video.js开发的适用于vue.js框架的组件,具有良好兼容性,所以我们在vue中使用这个播放器组件本质还是使用video.js,我们要更多的去了解video.js中的api并使用他。
相信看了本文案例你已经掌握了方法,更多精彩请关注php中文网其它相关文章!
推荐阅读:
위 내용은 vue-video-player 사용자 정의 플레이어 단계에 대한 자세한 설명의 상세 내용입니다. 자세한 내용은 PHP 중국어 웹사이트의 기타 관련 기사를 참조하세요!

핫 AI 도구

Undresser.AI Undress
사실적인 누드 사진을 만들기 위한 AI 기반 앱

AI Clothes Remover
사진에서 옷을 제거하는 온라인 AI 도구입니다.

Undress AI Tool
무료로 이미지를 벗다

Clothoff.io
AI 옷 제거제

Video Face Swap
완전히 무료인 AI 얼굴 교환 도구를 사용하여 모든 비디오의 얼굴을 쉽게 바꾸세요!

인기 기사
뜨거운 도구

메모장++7.3.1
사용하기 쉬운 무료 코드 편집기

SublimeText3 중국어 버전
중국어 버전, 사용하기 매우 쉽습니다.

스튜디오 13.0.1 보내기
강력한 PHP 통합 개발 환경

드림위버 CS6
시각적 웹 개발 도구

SublimeText3 Mac 버전
신 수준의 코드 편집 소프트웨어(SublimeText3)
뜨거운 주제
 7622
7622
 15
1389
52
89
11
70
19
31
138
15
1389
52
89
11
70
19
31
138

 Netflix에서 맞춤형 아바타를 빠르게 설정하는 방법
Feb 19, 2024 pm 06:33 PM
Netflix에서 맞춤형 아바타를 빠르게 설정하는 방법
Feb 19, 2024 pm 06:33 PM
Netflix의 아바타는 귀하의 스트리밍 정체성을 시각적으로 표현한 것입니다. 사용자는 기본 아바타를 넘어 자신의 개성을 표현할 수 있습니다. Netflix 앱에서 사용자 지정 프로필 사진을 설정하는 방법을 알아보려면 이 문서를 계속 읽어보세요. Netflix에서 사용자 정의 아바타를 빠르게 설정하는 방법 Netflix에는 프로필 사진을 설정하는 기능이 내장되어 있지 않습니다. 하지만 브라우저에 Netflix 확장 프로그램을 설치하면 이 작업을 수행할 수 있습니다. 먼저, 브라우저에 Netflix 확장 프로그램에 대한 사용자 정의 프로필 사진을 설치하세요. Chrome 스토어에서 구매하실 수 있습니다. 확장 프로그램을 설치한 후 브라우저에서 Netflix를 열고 계정에 로그인하세요. 오른쪽 상단에 있는 프로필로 이동하여
 VLC Chromecast가 Windows PC에서 작동하지 않음
Mar 26, 2024 am 10:41 AM
VLC Chromecast가 Windows PC에서 작동하지 않음
Mar 26, 2024 am 10:41 AM
VLC Chromecast 기능이 Windows PC에서 작동하지 않습니까? 이 문제는 Chromecast 장치와 VLC의 전송 기능 간의 호환성 문제로 인해 발생할 수 있습니다. 이 글에서는 이러한 상황에서 무엇을 할 수 있는지, 그리고 VLC 렌더러가 Chromecast를 찾을 수 없는 경우 어떻게 해야 하는지 알려드리겠습니다. Windows에서 ChromecastVLC를 사용하는 방법 VLC를 사용하여 Windows에서 Chromecast로 비디오를 전송하려면 다음 단계를 따르세요. 미디어 플레이어 앱을 열고 재생 메뉴로 이동하세요. 렌더러 옵션으로 이동하면 감지된 Chromecast 장치를 볼 수 있습니다.
 Win11에서 배경 이미지를 사용자 정의하는 방법
Jun 30, 2023 pm 08:45 PM
Win11에서 배경 이미지를 사용자 정의하는 방법
Jun 30, 2023 pm 08:45 PM
Win11에서 배경 이미지를 사용자 정의하는 방법은 무엇입니까? 새로 출시된 win11 시스템에는 커스텀 기능이 많이 있는데, 이런 기능을 어떻게 사용하는지 모르는 친구들이 많습니다. 일부 친구들은 배경 이미지가 상대적으로 단조롭다고 생각하고 배경 이미지를 사용자 정의하고 싶지만 배경 이미지를 정의하는 방법을 모르는 경우 편집기에서 다음 단계를 컴파일했습니다. 아래 Win11에서 배경 이미지를 사용자 정의하세요. 관심이 있다면 아래를 살펴보세요! Win11에서 배경 이미지를 사용자 정의하는 단계: 1. 그림과 같이 바탕 화면에서 win 버튼을 클릭하고 팝업 메뉴에서 설정을 클릭합니다. 2. 그림과 같이 설정 메뉴에 들어가서 개인 설정을 클릭하세요. 3. 그림과 같이 개인 설정을 입력하고 배경을 클릭하세요. 4. 배경 설정을 입력하고 클릭하여 사진을 찾아보세요.
 Python에서 벤 다이어그램을 만들고 사용자 정의하는 방법은 무엇입니까?
Sep 14, 2023 pm 02:37 PM
Python에서 벤 다이어그램을 만들고 사용자 정의하는 방법은 무엇입니까?
Sep 14, 2023 pm 02:37 PM
벤 다이어그램은 집합 간의 관계를 나타내는 데 사용되는 다이어그램입니다. Venn 다이어그램을 작성하려면 matplotlib를 사용합니다. Matplotlib는 Python에서 대화형 차트와 그래프를 만들기 위해 일반적으로 사용되는 데이터 시각화 라이브러리입니다. 또한 대화형 이미지와 차트를 만드는 데에도 사용됩니다. Matplotlib은 차트와 그래프를 사용자 정의할 수 있는 다양한 기능을 제공합니다. 이 튜토리얼에서는 벤 다이어그램을 사용자 정의하는 세 가지 예를 설명합니다. 예제의 중국어 번역은 다음과 같습니다. 예제 이것은 두 개의 벤 다이어그램의 교차점을 만드는 간단한 예입니다. 먼저 필요한 라이브러리를 가져오고 벤을 가져왔습니다. 그런 다음 데이터 세트를 Python 세트로 생성한 후 "venn2()" 함수를 사용하여 생성합니다.
 Win10 플레이어 진행률 표시줄이 움직이지 않습니다.
Feb 12, 2024 am 08:12 AM
Win10 플레이어 진행률 표시줄이 움직이지 않습니다.
Feb 12, 2024 am 08:12 AM
윈도우 10v1809의 10월 업데이트 버전은 1차 공식 출시 이후 급히 철회됐을 뿐만 아니라, 한 달 동안 재구축을 했는데도 여전히 버그가 가득해 사람들이 마이크로소프트의 품질을 의심하게 만드는 최악의 윈도우 업그레이드를 향해 거침없이 나아가고 있다. 통제가 점점 더 불안해지고 있습니다. 이제 목록에 버그가 하나 더 생겼는데 이번에는 Microsoft 자체 미디어 플레이어인 Windows Media Player입니다. 최근 일부 네티즌들은 최신 패치를 설치한 후 Windows 10v1809의 Windows Media Player에서 재생 진행률 표시줄을 드래그할 수 없는 문제가 발생한다고 제보했습니다. 아직 해결책을 찾지 못했습니다. Microsoft는 KB4에 대한 두 가지 패치와 관련된 버그를 확인했습니다.
 Eclipse에서 바로 가기 키 설정을 사용자 정의하는 방법
Jan 28, 2024 am 10:01 AM
Eclipse에서 바로 가기 키 설정을 사용자 정의하는 방법
Jan 28, 2024 am 10:01 AM
Eclipse에서 바로 가기 키 설정을 사용자 정의하는 방법은 무엇입니까? 개발자로서 단축키를 익히는 것은 Eclipse에서 코딩할 때 효율성을 높이는 열쇠 중 하나입니다. 강력한 통합 개발 환경인 Eclipse는 다양한 기본 바로가기 키를 제공할 뿐만 아니라 사용자가 자신의 기본 설정에 따라 사용자 정의할 수도 있습니다. 이 기사에서는 Eclipse에서 바로 가기 키 설정을 사용자 정의하는 방법을 소개하고 특정 코드 예제를 제공합니다. Eclipse 열기 먼저 Eclipse를 열고 Enter를 누르십시오.
 CakePHP에서 사용자 정의 페이지 매김을 만드는 방법은 무엇입니까?
Jun 04, 2023 am 08:32 AM
CakePHP에서 사용자 정의 페이지 매김을 만드는 방법은 무엇입니까?
Jun 04, 2023 am 08:32 AM
CakePHP는 개발자에게 많은 유용한 도구와 기능을 제공하는 강력한 PHP 프레임워크입니다. 그 중 하나는 페이지 매김입니다. 이를 통해 대량의 데이터를 여러 페이지로 나누어 검색과 조작을 더 쉽게 할 수 있습니다. 기본적으로 CakePHP는 몇 가지 기본적인 페이지 매김 방법을 제공하지만 때로는 사용자 정의 페이지 매김 방법을 만들어야 할 수도 있습니다. 이 기사에서는 CakePHP에서 사용자 정의 페이지 매김을 만드는 방법을 보여줍니다. 1단계: 사용자 정의 페이지 매김 클래스 생성 먼저 사용자 정의 페이지 매김 클래스를 생성해야 합니다. 이것
 iOS 17이 설치된 iPhone의 Apple Music에서 크로스페이드를 활성화하고 사용자 정의하는 방법
Jun 28, 2023 pm 12:14 PM
iOS 17이 설치된 iPhone의 Apple Music에서 크로스페이드를 활성화하고 사용자 정의하는 방법
Jun 28, 2023 pm 12:14 PM
iPhone용 iOS 17 업데이트는 Apple Music에 몇 가지 큰 변화를 가져왔습니다. 여기에는 재생 목록에서 다른 사용자와 공동 작업, CarPlay 사용 시 다른 장치에서 음악 재생 시작 등이 포함됩니다. 이러한 새로운 기능 중 하나는 Apple Music에서 크로스페이드를 사용하는 기능입니다. 이를 통해 트랙 간에 원활하게 전환할 수 있으며, 이는 여러 트랙을 들을 때 매우 유용한 기능입니다. 크로스페이딩은 전반적인 청취 경험을 향상시켜 트랙이 변경될 때 놀라거나 경험에서 벗어나는 일이 없도록 보장합니다. 따라서 이 새로운 기능을 최대한 활용하고 싶다면 iPhone에서 이 기능을 사용하는 방법은 다음과 같습니다. 최신이 필요한 Apple Music용 Crossfade를 활성화하고 사용자 정의하는 방법
