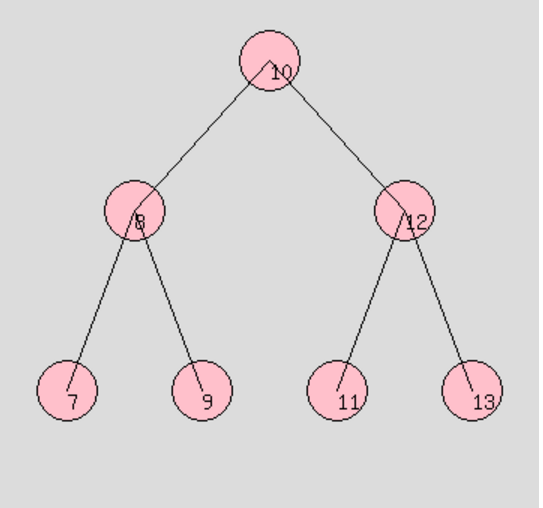
이번에는 PHP에서 이진 트리의 깊이 및 너비 우선 순회를 구현하는 알고리즘 단계에 대해 자세히 설명하겠습니다. PHP에서 이진 트리의 깊이 및 너비 우선 순회를 구현하기 위한 참고사항은 다음과 같습니다. 실제 사례를 살펴보겠습니다.
서문:
깊이 우선 순회: 더 이상 더 이상 들어갈 수 없고 각 노드를 한 번만 방문할 수 있을 때까지 가능한 모든 분기 경로를 자세히 살펴보세요. 이진 트리의 깊이 우선 순회는 특별하며 선순 순회, 순순 순회 및 후순 순회로 세분화될 수 있다는 점에 유의하는 것이 중요합니다. 구체적인 지침은 다음과 같습니다.
사전 순서 탐색: 루트 노드->왼쪽 하위 트리->오른쪽 하위 트리
중간 순서 탐색: 왼쪽 하위 트리->루트 노드->오른쪽 하위 트리
사후 순서 탐색: 왼쪽 하위 트리 트리->오른쪽 하위 트리->루트 노드
폭 우선 순회: 계층적 순회라고도 하며, 각 계층은 위에서 아래로, 왼쪽에서 오른쪽으로 순차적으로 방문됩니다. 오른쪽에서 왼쪽으로) 노드에 접근하고, 한 레벨에 접근한 후 더 이상 접근할 수 없는 노드가 있을 때까지 다음 레벨로 입장합니다.
예를 들어, 이 트리의 경우:

깊이 우선 순회:
선주문 순회: 10 8 7 9 12 11 13
순차 순회: 7 8 9 10 11 12 13
게시물 -순서 순회: 7 9 8 11 13 12 10
너비 우선 순회:
레벨 순회: 10 8 12 7 9 11 13
이진 트리의 비재귀적 깊이 우선 순회에 대한 일반적인 방법은 다음과 같습니다. 스택 및 비재귀적 너비 우선 순회를 사용합니다. 일반적인 접근 방식은 대기열을 사용하는 것입니다.
깊이 우선 순회:
1. 선주문 순회:
/**
* 前序遍历(递归方法)
*/
private function pre_order1($root)
{
    if (!is_null($root)) {
      //这里用到常量FUNCTION,获取当前函数名,好处是假如修改函数名的时候,里面的实现不用修改
      $function = FUNCTION;
      echo $root->key . " ";
      $this->$function($root->left);
      $this->$function($root->right);
    }
}
/**
* 前序遍历(非递归方法)
* 因为当遍历过根节点之后还要回来,所以必须将其存起来。考虑到后进先出的特点,选用栈存储。
*/
private function pre_order2($root)
{
    //    $stack = new splstack();
    //    $stack->push($root);
    //    while(!$stack->isEmpty()){
    //      $node = $stack->pop();
    //      echo $node->key.' ';
    //      if(!is_null($node->right)){
    //        $stack->push($node->right);
    //      }
    //      if(!is_null($node->left)){
    //        $stack->push($node->left);
    //      }
    //    }
    if (is_null($root)) {
      return;
    }
    $stack = new splstack();
    $node = $root;
    while (!is_null($node) || !$stack->isEmpty()) {
      while (!is_null($node)) {
        //只要结点不为空就应该入栈保存,与其左右结点无关
        $stack->push($node);
        echo $node->key . ' ';
        $node = $node->left;
      }
      $node = $stack->pop();
      $node = $node->right;
    }
}
//前序遍历
public function PreOrder()
{
    // 所在对象中的tree属性保存了一个树的引用
    //   $this->pre_order1($this->tree->root);
    $this->pre_order2($this->tree->root);
}설명: 1. 모든 순회 방법을 클래스 순회에 캡슐화했습니다. 2. pre_order2 메소드에서는 스택을 사용할 때 PHP 표준 라이브러리 SPL에서 제공하는 splstack을 사용합니다. 배열 사용에 익숙하신 분들은 <a href="http://www.php.php"를 사용하시면 됩니다. cn/wiki/1001.html" target="_blank">array_push<code><a href="http://www.php.cn/wiki/1001.html" target="_blank">array_push</a>() 和array_pop() 模拟实现。
2、中序遍历:
/**
* 中序遍历(递归方法)
*/
private function mid_order1($root)
{
    if (!is_null($root)) {
      $function = FUNCTION;
      $this->$function($root->left);
      echo $root->key . " ";
      $this->$function($root->right);
    }
}
/**
* 中序遍历(非递归方法)
* 因为当遍历过根节点之后还要回来,所以必须将其存起来。考虑到后进先出的特点,选用栈存储。
*/
private function mid_order2($root)
{
    if (is_null($root)) {
      return;
    }
    $stack = new splstack();
    $node = $root;
    while (!is_null($node) || !$stack->isEmpty()) {
      while (!is_null($node)) {
        $stack->push($node);
        $node = $node->left;
      }
      $node = $stack->pop();
      echo $node->key . ' ';
      $node = $node->right;
    }
}
//中序遍历
public function MidOrder()
{
    //    $this->mid_order1($this->tree->root);
    $this->mid_order2($this->tree->root);
}3、后序遍历:
/**
* 后序遍历(递归方法)
*/
private function post_order1($root)
{
    if (!is_null($root)) {
      $function = FUNCTION;
      $this->$function($root->left);
      $this->$function($root->right);
      echo $root->key . " ";
    }
}
/**
* 后序遍历(非递归方法)
* 因为当遍历过根节点之后还要回来,所以必须将其存起来。考虑到后进先出的特点,选用栈存储。
* 由于在访问了左子节点后怎么跳到右子节点是难点,这里使用一个标识lastVisited来标识上一次访问的结点
*/
private function post_order2($root)
{
    if (is_null($root)) {
      return;
    }
    $node = $root;
    $stack = new splstack();
    //保存上一次访问的结点引用
    $lastVisited = NULL;
    $stack->push($node);
    while(!$stack->isEmpty()){
      $node = $stack->top();//获取栈顶元素但不弹出
      if(($node->left == NULL && $node->right == NULL) || ($node->right == NULL && $lastVisited == $node->left) || ($lastVisited == $node->right)){
        echo $node->key.' ';
        $lastVisited = $node;
        $stack->pop();
      }else{
        if($node->right){
          $stack->push($node->right);
        }
        if($node->left){
          $stack->push($node->left);
        }
      }
    }
}
//后序遍历
public function PostOrder()
{
    //    $this->post_order1($this->tree->root);
    $this->post_order2($this->tree->root);
}广度优先遍历:
1、层次遍历:
/**
* 层次遍历(递归方法)
* 由于是按层逐层遍历,因此传递树的层数
*/
private function level_order1($root,$level){
if($root == NULL || $level < 1){
return;
}
if($level == 1){
echo $root->key.' ';
return;
}
if(!is_null($root->left)){
$this->level_order1($root->left,$level - 1);
}
if(!is_null($root->right)){
$this->level_order1($root->right,$level - 1);
}
}
/**
* 层次遍历(非递归方法)
* 每一层从左向右输出
元素需要储存有先进先出的特性,所以选用队列存储。
*/
private function level_order2($root){
if(is_null($root)){
return;
}
$node = $root;
//利用队列实现
// $queue = array();
// array_push($queue,$node);
//
// while(!is_null($node = array_shift($queue))){
// echo $node->key.' ';
// if(!is_null($node->left)){
// array_push($queue,$node->left);
// }
// if(!is_null($node->right)){
// array_push($queue,$node->right);
// }
// }
$queue = new splqueue();
$queue->enqueue($node);
while(!$queue->isEmpty()){
$node = $queue->dequeue();
echo $node->key.' ';
if (!is_null($node->left)) {
$queue->enqueue($node->left);
}
if (!is_null($node->right)) {
$queue->enqueue($node->right);
}
}
}
//层次遍历
public function LevelOrder(){
// $level = $this->getdepth($this->tree->root);
// for($i = 1;$i <= $level;$i ++){
// $this->level_order1($this->tree->root,$i);
// }
$this->level_order2($this->tree->root);
}
//获取树的层数
private function getdepth($root){
if(is_null($root)){
return 0;
}
$left = getdepth($root -> left);
$right = getdepth($root -> right);
$depth = ($left > $right ? $left : $right) + 1;
return $depth;
}说明:level_order2方法中,在使用队列的过程中,我使用的是PHP标准库SPL提供的splqueue,如果你们习惯使用数组的话,可以使用 array_push() 和array_shift() 模拟实现。
使用:
现在我们来看看客户端代码:
class Client
{
  public static function Main()
  {
    try {
      //实现文件的自动加载
      function autoload($class)
      {
        include strtolower($class) . '.php';
      }
      spl_autoload_register('autoload');
      $arr = array(10, 8, 12, 7, 9, 11, 13);
      $tree = new Bst();
//      $tree = new Avl();
//      $tree = new Rbt();
      $tree->init($arr);
      $traverse = new traverse($tree);
      $traverse->PreOrder();
//      $traverse->MidOrder();
//      $traverse->PostOrder();
//      $traverse->LevelOrder();
    } catch (Exception $e) {
      echo $e->getMessage();
    }
  }
}
CLient::Main();补充:
1. 在客户端中所使用的三个类 Bst、Avl、Rbt 大家可以参考前面一篇:《PHP实现绘制二叉树图形显示功能详解》
2. 为什么我推荐大家使用SPL标准库中提供的splstack和splqueue呢?这是我在某一篇文章中看到的:虽然我们可以使用传统的变量类型来描述数据结构,例如用数组来描述堆栈(Strack)– 然后使用对应的方式 pop 和 push(array_pop()、array_push()() 및 array_pop() 시뮬레이션 구현.
2. 순회:
rrreee3. 후순 순회:
rrreee 🎜사용법: 🎜🎜🎜🎜이제 클라이언트 코드를 살펴보겠습니다. 🎜rrreee🎜🎜🎜보조: 🎜🎜🎜🎜1 클라이언트에서 사용되는 세 가지 클래스 Bst, Avl 및 Rbt를 참조할 수 있습니다. 이전 글: "PHP에서 바이너리 트리를 그리는 그래픽 표시 기능에 대한 자세한 설명" 🎜🎜2. SPL에서 제공하는splstack 및 splqueue를 사용하는 것이 좋습니다. 표준 라이브러리? 기사에서 본 내용은 다음과 같습니다. 배열을 사용하여 스택을 설명하는 것처럼 데이터 구조를 설명하기 위해 전통적인 변수 유형을 사용할 수 있지만(Strack) 그에 상응하는 pop 및 push 메서드(array_pop( ))를 사용합니다. >, array_push()), 하지만 조심해야 합니다. 왜냐하면 이는 데이터 구조를 설명하기 위해 특별히 설계되지 않았기 때문입니다. 한 번의 잘못된 작업으로 인해 스택이 파괴될 수 있습니다. SPL의 SplStack 객체는 데이터를 스택 형태로 엄격하게 기술하고 그에 상응하는 메소드를 제공합니다. 동시에 이러한 코드는 배열이 아닌 스택에서 작동한다는 사실도 이해할 수 있어야 하며, 이를 통해 동료는 해당 코드를 더 잘 이해할 수 있고 속도가 더 빨라질 것입니다. 원래 주소: 잃어버린 보석, PHP SPL🎜🎜이 기사의 사례를 읽으신 후 방법을 마스터하셨다고 믿습니다. 더 흥미로운 정보를 보려면 PHP 중국어 웹사이트의 다른 관련 기사를 주목하세요! 🎜🎜추천 도서: 🎜🎜🎜PHP 단순 선택 정렬 사례에 대한 자세한 설명🎜🎜🎜🎜🎜PHP에서 Huffman 인코딩/디코딩을 구현하는 단계에 대한 자세한 설명🎜🎜🎜위 내용은 PHP의 이진 트리 깊이 및 너비 우선 탐색 알고리즘 단계에 대한 자세한 설명의 상세 내용입니다. 자세한 내용은 PHP 중국어 웹사이트의 기타 관련 기사를 참조하세요!