이번에는 Vue를 사용하여 컴포넌트를 등록하는 방법과 Vue를 사용하여 컴포넌트를 등록할 때 주의 사항에 대해 설명하겠습니다.
1. 소개
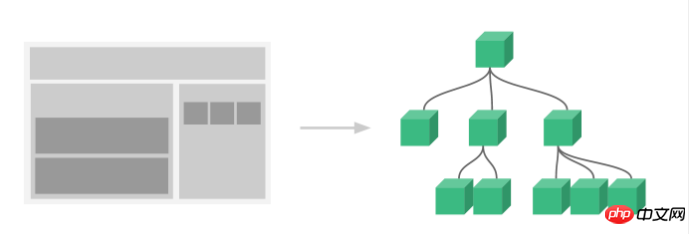
컴포넌트 시스템은 Vue.js의 중요한 개념 중 하나이며 독립적이고 재사용 가능한 작은 컴포넌트를 사용하여 모든 유형의 대규모 애플리케이션을 구축할 수 있도록 하는 추상화를 제공합니다. 인터페이스는 컴포넌트 트리로 추상화될 수 있습니다

그렇다면 컴포넌트란 무엇일까요?
구성 요소는 HTML 요소를 확장하고 재사용 가능한 HTML 코드를 캡슐화할 수 있습니다. 구성 요소를 사용자 정의 HTML 요소로 생각할 수 있습니다.
2. 컴포넌트 등록 방법
Vue.js의 컴포넌트를 사용하는 3단계는 컴포넌트 생성자를 생성하고, 컴포넌트를 등록하고, 컴포넌트를 사용하는 것입니다.

<!DOCTYPE html>
<html>
 <body>
  <p id="app">
   <!-- 注意: #app是Vue实例挂载的元素,应该在挂载元素范围内使用组件-->
   <my-component></my-component>
  </p>
 </body>
 <script src="https://cdn.jsdelivr.net/npm/vue/dist/vue.js"></script>
 <script>
  <!-- 1.创建一个组件构造器 -->
  var myComponent = Vue.extend({
   template: '<p>This is my first component!</p>'
  })

  <!-- 2.注册组件,并指定组件的标签,组件的HTML标签为<my-component> -->
  Vue.component('my-component', myComponent)

  <!-- 3.通过id=app进行挂载 -->
  new Vue({
   el: '#app'
  });

 </script>
</html>
1. 글로벌 등록 및 로컬 등록
Vue.comComponent()를 호출하여 컴포넌트를 등록할 때, 구성요소 등록은 전역적입니다. 이는 구성요소가 모든 Vue 예제에서 사용될 수 있음을 의미합니다.글로벌 등록이 필요하지 않거나 해당 구성 요소를 다른 구성 요소에서 사용하려는 경우 옵션 개체의 구성 요소 속성을 사용하여 로컬 등록을 구현할 수 있습니다.
<!DOCTYPE html>
<html>
 <body>
  <p id="app">
   <!-- 3. my-component只能在#app下使用-->
   <my-component></my-component>
  </p>
 </body>
 <script src="js/vue.js"></script>
 <script>
  // 1.创建一个组件构造器
  var myComponent = Vue.extend({
   template: '<p>This is my first component!</p>'
  })

  new Vue({
   el: '#app',
   components: {
   // 2. 将myComponent组件注册到Vue实例下
    'my-component' : myComponent
   }
  });
 </script>
</html><p id="app2">
<!-- 不能使用my-component组件,因为my-component是一个局部组件,它属于#app-->
<my-component></my-component>
</p>
<script>
new Vue({
el: '#app2'
});
</script>2. 컴포넌트 등록 구문 설탕
위의 컴포넌트 등록 방법은 약간 번거롭지만 이 과정을 단순화하기 위해 Vue.js에서는 등록 구문 설탕// 全局注册,my-component1是标签名称
Vue.component('my-component1',{
template: '<p>This is the first component!</p>'
})
var vm1 = new Vue({
el: '#app1'
})이 방법을 사용하면 Vue는 뒤에서 자동으로 Vue.extend()를 호출합니다. 로컬 등록을 구현하는 컴포넌트
var vm2 = new Vue({
 el: '#app2',
 components: {
  // 局部注册,my-component2是标签名称
  'my-component2': {
   template: '<p>This is the second component!</p>'
  },
  // 局部注册,my-component3是标签名称
  'my-component3': {
   template: '<p>This is the third component!</p>'
  }
 }
}3. 부모 및 자식 컴포넌트
부모 컴포넌트와 자식 컴포넌트 간의 관계를 구성하는 컴포넌트에서 다른 컴포넌트를 정의하고 사용할 수 있습니다.
<!DOCTYPE html>
<html>
 <body>
  <p id="app">
   <parent-component>
   </parent-component>
  </p>
 </body>
 <script src="https://cdn.jsdelivr.net/npm/vue/dist/vue.js"></script>
 <script>

  var Child = Vue.extend({
   template: '<p>This is a child component!</p>'
  })

  var Parent = Vue.extend({
   // 在Parent组件内使用<child-component>标签
   template :'<p>This is a Parent component</p><child-component></child-component>',
   components: {
    // 局部注册Child组件,该组件只能在Parent组件内使用
    'child-component': Child
   }
  })

  // 全局注册Parent组件
  Vue.component('parent-component', Parent)

  new Vue({
   el: '#app'
  })

 </script>
</html> 4. 스크립트 또는 템플릿 태그 사용
구문 설탕은 구성 요소 등록을 단순화하지만 템플릿 옵션에서 HTML 요소를 연결하는 것이 더 번거롭고 이로 인해 JavaScript
와 HTML High 결합.다행히 Vue.js는 JavaScript에 정의된 HTML 템플릿을 분리하는 두 가지 방법을 제공합니다. <!DOCTYPE html>
<html lang="en">
<head>
<meta charset="UTF-8">
<title>vue组件</title>
<script src="js/vue.js"></script>
</head>
<body>
<p id="app1">
<my-com></my-com>
<my-com1></my-com1>
</p>
<template id="myCom">
<p>这是template标签构建的组件</p>
</template>
<script type="text/x-template" id="myCom1">
<p>这是script标签构建的组件</p>
</script>
<script src="https://cdn.jsdelivr.net/npm/vue/dist/vue.js"></script>
<script>
Vue.component('my-com1', {
template: '#myCom1'
});
var app1 = new Vue({
el: '#app1',
components: {
'my-com': {
template: '#myCom'
}
}
});
</script>
</body>
</html>
참고: