이 글에서는 Spring MVC 환경에서 구현된 JSON 형식 데이터에 대한 Ajax 비동기 요청 관련 정보를 주로 소개합니다. 필요하신 분들은 참고하시면 됩니다.
One 환경 구축
첫 번째는 기존 Spring MVC 환경입니다. 더 이상 할 필요가 없습니다. 여기서는 jackson 관련 jar 패키지를 도입해야 하며, 그런 다음 json 구문 분석 관련 구성이 스프링 구성 파일 "springmvc-servlet.xml"에 추가된다는 점에 유의해야 합니다.
<?xml version="1.0" encoding="UTF-8"?>
<beans xmlns="http://www.springframework.org/schema/beans"
xmlns:xsi="http://www.w3.org/2001/XMLSchema-instance" xmlns:context="http://www.springframework.org/schema/context"
xmlns:mvc="http://www.springframework.org/schema/mvc"
xsi:schemaLocation="http://www.springframework.org/schema/beans
http://www.springframework.org/schema/beans/spring-beans-4.0.xsd
http://www.springframework.org/schema/context
http://www.springframework.org/schema/context/spring-context-4.0.xsd
http://www.springframework.org/schema/mvc
http://www.springframework.org/schema/mvc/spring-mvc-4.0.xsd">
<!-- 避免IE执行AJAX时,返回JSON出现下载文件 -->
<bean id="mappingJacksonHttpMessageConverter"
class="org.springframework.http.converter.json.MappingJacksonHttpMessageConverter">
<property name="supportedMediaTypes">
<list>
<value>text/html;charset=UTF-8</value>
<value>application/json;charset=UTF-8</value>
</list>
</property>
<property name="objectMapper">
<bean class="org.codehaus.jackson.map.ObjectMapper">
<property name="dateFormat">
<bean class="java.text.SimpleDateFormat">
<constructor-arg type="java.lang.String" value="yyyy-MM-dd HH:mm:ss"></constructor-arg>
</bean>
</property>
</bean>
</property>
</bean>
<!-- 启动Spring MVC的注解功能,完成请求和注解POJO的映射 -->
<bean
class="org.springframework.web.servlet.mvc.annotation.AnnotationMethodHandlerAdapter">
<property name="messageConverters">
<list>
<ref bean="mappingJacksonHttpMessageConverter" /><!-- json转换器 -->
</list>
</property>
</bean>
<mvc:annotation-driven
content-negotiation-manager="contentNegotiationManager" />
<bean id="contentNegotiationManager"
class="org.springframework.web.accept.ContentNegotiationManagerFactoryBean">
<!-- true,开启扩展名支持,false关闭支持 -->
<property name="favorPathExtension" value="false" />
<!-- 用于开启 /userinfo/123?format=json的支持 -->
<property name="favorParameter" value="true" />
<!-- 设置为true以忽略对Accept Header的支持 -->
<property name="ignoreAcceptHeader" value="false" />
<property name="mediaTypes">
<value>
atom=application/atom+xml
html=text/html
json=application/json
xml=application/xml
*=*/*
</value>
</property>
</bean>
<context:annotation-config />
<!-- 启动自动扫描该包下所有的Bean(例如@Controller) -->
<context:component-scan base-package="cn.zifangsky.controller" />
<mvc:default-servlet-handler />
<!-- 定义视图解析器 -->
<bean id="jspViewResolver"
class="org.springframework.web.servlet.view.InternalResourceViewResolver">
<property name="requestContextAttribute" value="rc" />
<property name="viewClass"
value="org.springframework.web.servlet.view.JstlView" />
<property name="prefix" value="/WEB-INF/jsp/" />
<property name="suffix" value=".jsp" />
<property name="order" value="1"></property>
</bean>
</beans>
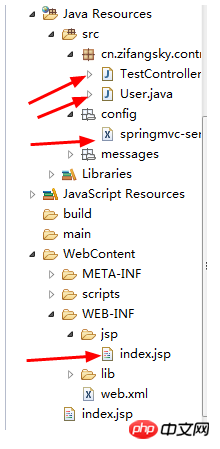
프로젝트 구조:

두 개의 테스트 예제
(1) WEB-INF/jsp 디렉토리에 간단한 jQuery ajax가 포함된 새로운 index.jsp 파일을 생성합니다. 요청 데이터의 형식은 JSON입니다.
<%@ page language="java" contentType="text/html; charset=UTF-8"
pageEncoding="UTF-8"%>
<%
String path = request.getContextPath();
String basePath = request.getScheme() + "://" + request.getServerName() + ":" + request.getServerPort()
+ path + "/";
%>
<html>
<head>
<meta http-equiv="Content-Type" content="text/html; charset=UTF-8">
<base href="<%=basePath%>">
<script type="text/javascript" src="scripts/jquery/jquery-1.6.2.min.js"></script>
<script type="text/javascript" src="scripts/jquery/jquery.i18n.properties-min-1.0.9.js"></script>
<script type="text/javascript" src="scripts/jquery/jquery.autocomplete.js"></script>
<script type="text/javascript" src="scripts/jquery/jquery.loadmask.js"></script>
<script type="text/javascript" src="scripts/jquery/jquery.form.js"></script>
<script type="text/javascript" src="scripts/jquery/jquery.timers.js"></script>
<title>jQuery i18n</title>
<script type="text/javascript">
$().ready(
function() {
$("#sub").click(
function() {
var name = $("#username").val();
var age = 18;
var user = {"username":name,"age":age};
$.ajax({
url : 'hello.json',
type : 'POST',
data : JSON.stringify(user), // Request body
contentType : 'application/json; charset=utf-8',
dataType : 'json',
success : function(response) {
//请求成功
alert("你好" + response.username + "[" + response.age + "],当前时间是:" + response.time + ",欢迎访问:http://www.zifangsky.cn");
},
error : function(msg) {
alert(msg);
}
});
});
});
</script>
</head>
<body>
<input type="text" id="username"
style="width: 100px; height: 30px; font-size: 20px; font-weight: bold;">
<input type="button" id="sub" value="Go"
style="height: 40px; height: 30px;">
<br>
</body>
</html>(2) 간단한 모델 클래스 User, 코드는 다음과 같습니다.
package cn.zifangsky.controller;
public class User {
private String username;
private int age;
public String getUsername() {
return username;
}
public void setUsername(String username) {
this.username = username;
}
public int getAge() {
return age;
}
public void setAge(int age) {
this.age = age;
}
}(3) 컨트롤러 클래스 TestController.java:
package cn.zifangsky.controller;
import java.text.Format;
import java.text.SimpleDateFormat;
import java.util.Date;
import java.util.HashMap;
import java.util.Map;
import org.springframework.context.annotation.Scope;
import org.springframework.stereotype.Controller;
import org.springframework.web.bind.annotation.RequestBody;
import org.springframework.web.bind.annotation.RequestMapping;
import org.springframework.web.bind.annotation.RequestMethod;
import org.springframework.web.bind.annotation.ResponseBody;
import org.springframework.web.servlet.ModelAndView;
@Controller
@Scope("prototype")
public class TestController {
/**
* 转到页面
*/
@RequestMapping(value = "/hello.html")
public ModelAndView list() {
ModelAndView view = new ModelAndView("index");
return view;
}
/**
* ajax异步请求, 请求格式是json
*/
@RequestMapping(value = "/hello.json", method = { RequestMethod.POST })
@ResponseBody
public Map<String, String> hello(@RequestBody User user) {
// 返回数据的Map集合
Map<String, String> result = new HashMap<String, String>();
Format format = new SimpleDateFormat("yyyy-MM-dd HH:mm:ss");
// 返回请求的username
result.put("username", user.getUsername());
// 返回年龄
result.put("age", String.valueOf(user.getAge()));
// 返回当前时间
result.put("time", format.format(new Date()));
return result;
}
}구체적인 실행 단계에 대해 간략하게 설명하겠습니다.
i) 프로젝트가 시작된 후 브라우저의 방문: http://localhost:8089/SpringDemo/hello.html에서 목록 메소드로 이동합니다. 컨트롤러에서 /WEB-INF/jsp/index.jsp로 이동합니다. (PS: 컨트롤러에서 반환되는 것은 논리적 뷰입니다. 이는 경로 접두사와 접미사를 이어붙인 후 파일의 실제 경로입니다. springmvc-servlet.xml 파일에 정의됨)
ii) index.jsp 페이지에 텍스트를 입력하고 버튼을 클릭하면 ajax 요청이 트리거됩니다. 이 요청은 입력 상자의 데이터와 기본 "age"를 가져옵니다. 매개 변수를 json 형식 문자열로 연결하고 마지막으로 "hello.json" 요청에 제출합니다. 이는 컨트롤러에서 hello 메서드를 실행하는 것입니다.
iii) hello 메서드가 실행됩니다. 일련의 데이터가 반환되고 마지막으로 페이지에 표시됩니다
(4) 효과는 다음과 같습니다.

위 내용은 제가 모두를 위해 정리한 내용입니다. 앞으로 모든 사람에게 도움이 되기를 바랍니다.
관련 기사:
위 내용은 SpringMVC 환경에서 구현된 JSON 형식 데이터에 대한 Ajax 비동기 요청의 상세 내용입니다. 자세한 내용은 PHP 중국어 웹사이트의 기타 관련 기사를 참조하세요!