PHP를 기반으로 사용자 등록 및 로그인 기능을 구현하는 방법
이 과정은 PHP와 웹 프런트엔드 기술을 사용하여 웹사이트 등록 및 로그인 입력 페이지를 구현하고, PHP 프로그래밍을 배우고 연습하는 등 관심 있는 학생들이 참고할 수 있습니다.
이 글에서는 PHP 기반의 사용자 등록 및 로그인 기능을 소개합니다. 이 프로젝트는 1. 프론트 엔드 페이지 제작, 2. 인증 코드 제작, 3. 등록 및 로그인 구현, 4. 기능 개선의 네 부분으로 구성됩니다. 자세한 내용은 아래에서 확인하실 수 있습니다.
인증코드 생성
1. 실험 소개
이 실험은 객체지향적 사고를 사용하여 인증코드 클래스를 캡슐화하도록 유도합니다. 등록 및 로그인 인터페이스에 표시됩니다. 본 실험을 통해 PHP의 OOP 개념과 GD 라이브러리의 활용 및 검증코드 생성에 대해 이해하게 될 것입니다.
1.1 관련 지식 포인트
PHP
GD 라이브러리
OOP 프로그래밍
1.2 개발 도구
sublime, 그리고 빠른 텍스트 편집기. 데스크탑 왼쪽 하단을 클릭하세요: 애플리케이션 메뉴/Development/sublime
2. 캡슐화 확인 코드 클래스
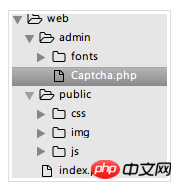
2.1 디렉토리 생성 및 글꼴 준비
웹 디렉토리에 백엔드 디렉토리로 admin 디렉토리를 생성합니다 백엔드 코드 문서를 저장합니다. 인증 코드 생성에 필요한 글꼴을 저장하려면 admin 아래에 글꼴 디렉터리를 만드세요.
관리자 아래에 새 Captcha.php 파일을 생성하세요. 이것이 우리가 편집해야 할 인증 코드 파일입니다.
현재 디렉터리 계층 구조: 
Captcha.php 파일 편집:
<?php
/**
* Captcha class
*/
class Captcha
{

  function __construct()
  {
    # code...
  }
}클래스의 개인 속성 및 생성자 추가:
<?php
/**
* Captcha class
*/
class Captcha
{
private $codeNum; //验证码位数
private $width; //验证码图片宽度
private $height; //验证码图片高度
private $img; //图像资源句柄
private $lineFlag; //是否生成干扰线条
private $piexFlag; //是否生成干扰点
private $fontSize; //字体大小
private $code; //验证码字符
private $string; //生成验证码的字符集
private $font; //字体
function __construct($codeNum = 4,$height = 50,$width = 150,$fontSize = 20,$lineFlag = true,$piexFlag = true)
{
$this->string = 'qwertyupmkjnhbgvfcdsxa123456789'; //去除一些相近的字符
$this->codeNum = $codeNum;
$this->height = $height;
$this->width = $width;
$this->lineFlag = $lineFlag;
$this->piexFlag = $piexFlag;
$this->font = dirname(__FILE__).'/fonts/consola.ttf';
$this->fontSize = $fontSize;
}
}글꼴 파일은 접근 가능하다 다음 명령을 통해 글꼴 디렉토리에 다운로드합니다:
$ wget http://labfile.oss.aliyuncs.com/courses/587/consola.ttf
다음으로 특정 메소드 작성을 시작합니다.
이미지 리소스 핸들 생성
//创建图像资源
public function createImage(){
    $this->img = imagecreate($this->width, $this->height);  //创建图像资源
    imagecolorallocate($this->img,mt_rand(0,100),mt_rand(0,100),mt_rand(0,100));  //填充图像背景(使用浅色)
}사용된 관련 기능
imagecreate: 새 팔레트 기반 이미지 만들기
imagecolorallocate: 이미지에 색상 할당
mt_rand: 더 나은 난수 생성
만들기 인증 코드 문자열을 이미지에 출력
//创建验证码
public function createCode(){
$strlen = strlen($this->string)-1;
for ($i=0; $i < $this->codeNum; $i++) {
$this->code .= $this->string[mt_rand(0,$strlen)]; //从字符集中随机取出四个字符拼接
}
$_SESSION['code'] = $this->code; //加入 session 中
//计算每个字符间距
$diff = $this->width/$this->codeNum;
for ($i=0; $i < $this->codeNum; $i++) {
//为每个字符生成颜色(使用深色)
$txtColor = imagecolorallocate($this->img,mt_rand(100,255),mt_rand(100,255),mt_rand(100,255));
//写入图像
imagettftext($this->img, $this->fontSize, mt_rand(-30,30), $diff*$i+mt_rand(3,8), mt_rand(20,$this->height-10), $txtColor, $this->font, $this->code[$i]);
}
}관련 기능 사용
imagecreate: 새 팔레트 기반 이미지 생성
imagecolorallocate: 이미지에 색상 지정
mt_rand : 더 나은 난수 생성
인증 코드 문자열을 생성하여 이미지로 출력
//创建验证码
public function createCode(){
$strlen = strlen($this->string)-1;
for ($i=0; $i < $this->codeNum; $i++) {
$this->code .= $this->string[mt_rand(0,$strlen)]; //从字符集中随机取出四个字符拼接
}
$_SESSION['code'] = $this->code; //加入 session 中
//计算每个字符间距
$diff = $this->width/$this->codeNum;
for ($i=0; $i < $this->codeNum; $i++) {
//为每个字符生成颜色(使用深色)
$txtColor = imagecolorallocate($this->img,mt_rand(100,255),mt_rand(100,255),mt_rand(100,255));
//写入图像
imagettftext($this->img, $this->fontSize, mt_rand(-30,30), $diff*$i+mt_rand(3,8), mt_rand(20,$this->height-10), $txtColor, $this->font, $this->code[$i]);
}
}사용된 관련 기능:
imagettftext: 트루타입 글꼴을 사용하여 이미지에 쓰기 Text
간섭선 만들기
//创建干扰线条(默认四条)
public function createLines(){
    for ($i=0; $i < 4; $i++) {
      $color = imagecolorallocate($this->img,mt_rand(0,155),mt_rand(0,155),mt_rand(0,155));  //使用浅色
      imageline($this->img,mt_rand(0,$this->width),mt_rand(0,$this->height),mt_rand(0,$this->width),mt_rand(0,$this->height),$color);
    }
}사용된 관련 기능:
imageline: 선분 그리기
간섭점 만들기
//创建干扰点 (默认一百个点)
public function createPiex(){
    for ($i=0; $i < 100; $i++) {
      $color = imagecolorallocate($this->img,mt_rand(0,255),mt_rand(0,255),mt_rand(0,255));
      imagesetpixel($this->img,mt_rand(0,$this->width),mt_rand(0,$this->height),$color);
    }
}사용된 관련 기능 :
이미지 세트픽셀: 단일 픽셀 그리기
출력 이미지:
 public function show()
  {
    $this->createImage();
    $this->createCode();
    if ($this->lineFlag) {  //是否创建干扰线条
      $this->createLines();
    }
    if ($this->piexFlag) {  //是否创建干扰点
      $this->createPiex();
    }
    header('Content-type:image/png');  //请求页面的内容是png格式的图像
    imagepng($this->img);  //以png格式输出图像
    imagedestroy($this->img);  //清除图像资源,释放内存
}사용된 관련 기능:
imagepng: 이미지를 브라우저 또는 PNG 형식의 파일로 출력
imagedestroy: 이미지 삭제
외부로 인증코드 제공 :
public function getCode(){
return $this->code;
}
完整代码如下:
<?php
/**
* Captcha class
*/
class Captcha
{
private $codeNum;
private $width;
private $height;
private $img;
private $lineFlag;
private $piexFlag;
private $fontSize;
private $code;
private $string;
private $font;
function __construct($codeNum = 4,$height = 50,$width = 150,$fontSize = 20,$lineFlag = true,$piexFlag = true)
{
$this->string = 'qwertyupmkjnhbgvfcdsxa123456789';
$this->codeNum = $codeNum;
$this->height = $height;
$this->width = $width;
$this->lineFlag = $lineFlag;
$this->piexFlag = $piexFlag;
$this->font = dirname(__FILE__).'/fonts/consola.ttf';
$this->fontSize = $fontSize;
}
public function createImage(){
$this->img = imagecreate($this->width, $this->height);
imagecolorallocate($this->img,mt_rand(0,100),mt_rand(0,100),mt_rand(0,100));
}
public function createCode(){
$strlen = strlen($this->string)-1;
for ($i=0; $i < $this->codeNum; $i++) {
$this->code .= $this->string[mt_rand(0,$strlen)];
}
$_SESSION['code'] = $this->code;
$diff = $this->width/$this->codeNum;
for ($i=0; $i < $this->codeNum; $i++) {
$txtColor = imagecolorallocate($this->img,mt_rand(100,255),mt_rand(100,255),mt_rand(100,255));
imagettftext($this->img, $this->fontSize, mt_rand(-30,30), $diff*$i+mt_rand(3,8), mt_rand(20,$this->height-10), $txtColor, $this->font, $this->code[$i]);
}
}
public function createLines(){
for ($i=0; $i < 4; $i++) {
$color = imagecolorallocate($this->img,mt_rand(0,155),mt_rand(0,155),mt_rand(0,155));
imageline($this->img,mt_rand(0,$this->width),mt_rand(0,$this->height),mt_rand(0,$this->width),mt_rand(0,$this->height),$color);
}
}
public function createPiexs(){
for ($i=0; $i < 100; $i++) {
$color = imagecolorallocate($this->img,mt_rand(0,255),mt_rand(0,255),mt_rand(0,255));
imagesetpixel($this->img,mt_rand(0,$this->width),mt_rand(0,$this->height),$color);
}
}
public function show()
{
$this->createImage();
$this->createCode();
if ($this->lineFlag) {
$this->createLines();
}
if ($this->piexFlag) {
$this->createPiexs();
}
header('Content-type:image/png');
imagepng($this->img);
imagedestroy($this->img);
}
public function getCode(){
return $this->code;
}
}위는 인증코드 클래스의 코드가 전부입니다. 꽤 간단해 보이지만, 이미지 처리 기능을 많이 사용합니다. 또한 위의 관련 기능에 필요한 링크와 사용 지침도 만들었습니다. 이러한 기능을 암기할 필요는 없습니다. 불분명한 내용이 있으면 언제든지 공식 PHP 문서를 참조하세요. 가장 중요한 것은 중국어 문서가 있다는 것입니다.
2.2 인증코드 사용하기
이제 포장되었으니 사용하시면 됩니다. 여기서 편의상 Captcha 클래스 바로 아래에 이 클래스를 호출합니다.
session_start(); //开启session
$captcha = new Captcha();  //实例化验证码类(可自定义参数)
$captcha->show();  //调用输出
3. 프런트 엔드 표시
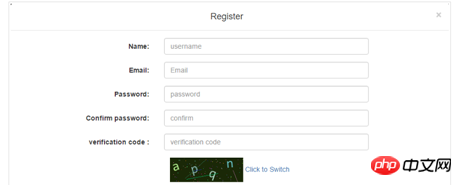
백엔드에서 인증 코드를 준비했으며, 프런트 엔드 인터페이스가 표시될 수 있습니다. index.php 수정 등록 및 로그인 양식의 인증 코드 부분:
<p class="form-group"> <p class="col-sm-12"> <img src="admin/Captcha.php" alt="" id="codeimg" onclick="javascript:this.src = 'admin/Captcha.php?'+Math.random();"> <span>Click to Switch</span> </p> </p>
img 태그는 클릭 이벤트의 js 코드를 추가하여 인증 코드를 변경하기 위해 클릭하는 기능을 구현할 수 있습니다!
렌더링:

4. 개선
지금까지 인증 코드 모듈이 기본적으로 완료되었습니다. 여기에서 공부한 후에는 모든 사람이 객체지향 프로그래밍에 대해 더 잘 이해하게 될 것입니다. 나는 또한 OOP 사고의 힌트를 깨달았습니다. OOP의 세 가지 주요 특징은 캡슐화, 상속, 다형성입니다. 여기서는 캡슐화라는 개념을 약간만 사용합니다. 이 인증코드 클래스를 계속해서 개선하고 개선하여 더욱 완벽한 클래스를 설계할 수 있습니다. 이 실험은 또한 PHP에 많은 기능이 있다는 것을 알려주므로, 이를 암기하지 말고 더 많은 공식 문서를 읽어보세요.
요약: 위 내용은 이 글의 전체 내용입니다. 모든 분들의 공부에 도움이 되었으면 좋겠습니다.
관련 추천:
php WeChat 결제로 현금 빨간 봉투를 실현하세요
thinkPHP 자동 확인, 자동 추가 및 양식 오류 세부 정보
위 내용은 PHP를 기반으로 사용자 등록 및 로그인 기능을 구현하는 방법의 상세 내용입니다. 자세한 내용은 PHP 중국어 웹사이트의 기타 관련 기사를 참조하세요!

핫 AI 도구

Undresser.AI Undress
사실적인 누드 사진을 만들기 위한 AI 기반 앱

AI Clothes Remover
사진에서 옷을 제거하는 온라인 AI 도구입니다.

Undress AI Tool
무료로 이미지를 벗다

Clothoff.io
AI 옷 제거제

AI Hentai Generator
AI Hentai를 무료로 생성하십시오.

인기 기사

뜨거운 도구

메모장++7.3.1
사용하기 쉬운 무료 코드 편집기

SublimeText3 중국어 버전
중국어 버전, 사용하기 매우 쉽습니다.

스튜디오 13.0.1 보내기
강력한 PHP 통합 개발 환경

드림위버 CS6
시각적 웹 개발 도구

SublimeText3 Mac 버전
신 수준의 코드 편집 소프트웨어(SublimeText3)

뜨거운 주제
 7321
7321
 9
9
 1625
1625
 14
14
 1349
1349
 46
46
 1261
1261
 25
25
 1209
1209
 29
29
 Ubuntu 및 Debian용 PHP 8.4 설치 및 업그레이드 가이드
Dec 24, 2024 pm 04:42 PM
PHP 8.4는 상당한 양의 기능 중단 및 제거를 통해 몇 가지 새로운 기능, 보안 개선 및 성능 개선을 제공합니다. 이 가이드에서는 Ubuntu, Debian 또는 해당 파생 제품에서 PHP 8.4를 설치하거나 PHP 8.4로 업그레이드하는 방법을 설명합니다.
 CakePHP 토론
Sep 10, 2024 pm 05:28 PM
CakePHP는 PHP용 오픈 소스 프레임워크입니다. 이는 애플리케이션을 훨씬 쉽게 개발, 배포 및 유지 관리할 수 있도록 하기 위한 것입니다. CakePHP는 강력하고 이해하기 쉬운 MVC와 유사한 아키텍처를 기반으로 합니다. 모델, 뷰 및 컨트롤러 gu
 PHP 개발을 위해 Visual Studio Code(VS Code)를 설정하는 방법
Dec 20, 2024 am 11:31 AM
VS Code라고도 알려진 Visual Studio Code는 모든 주요 운영 체제에서 사용할 수 있는 무료 소스 코드 편집기 또는 통합 개발 환경(IDE)입니다. 다양한 프로그래밍 언어에 대한 대규모 확장 모음을 통해 VS Code는
 CakePHP 빠른 가이드
Sep 10, 2024 pm 05:27 PM
CakePHP는 오픈 소스 MVC 프레임워크입니다. 이를 통해 애플리케이션 개발, 배포 및 유지 관리가 훨씬 쉬워집니다. CakePHP에는 가장 일반적인 작업의 과부하를 줄이기 위한 여러 라이브러리가 있습니다.
 DeepSeek 공식 웹 사이트 입구 및 최신 홍보 활동
Feb 19, 2025 pm 05:15 PM
DeepSeek의 공식 웹 사이트는 이제 사용자에게 쇼핑 경험을 제공하기 위해 여러 할인 활동을 시작하고 있습니다. 신규 사용자는 10 달러짜리 쿠폰을 받기 위해 가입하고 전체 잠재 고객에게 15% 제한된 시간 할인을 즐기십시오. 추천 친구들도 보상을받을 수 있으며 쇼핑 할 때 선물의 구속을 위해 포인트를 축적 할 수 있습니다. 이벤트 마감일은 다릅니다. 자세한 내용은 DeepSeek 공식 웹 사이트를 방문하십시오.


