이 글은 주로 WeChat 애플릿의 순환 진행률 표시줄 구현 아이디어를 소개합니다. 매우 훌륭하고 참고할 만한 가치가 있습니다. 도움이 필요한 친구가 참고할 수 있습니다.
요구 사항 요약
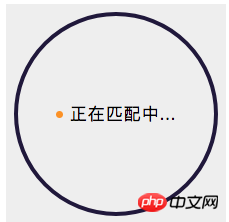
순환 카운트다운 사용 애플릿에서 렌더링:

Idea
솔루션
첫 번째 단계는 구조를 작성하는 것입니다.
상자는 2개의 캔버스와 텍스트 상자를 감쌉니다.
상자는 상대 위치 지정을 상위 항목으로 사용하고 플렉스 레이아웃을 사용합니다.
절대 위치를 배경으로 사용하는 하나의 캔버스, canvas-id="canvasProgressbg"canvas-id="canvasProgressbg"
另一个canvas,使用相对定位作为进度条,canvas-id="canvasProgress
상대 위치를 진행률 표시줄로 사용하는 또 다른 캔버스,
canvas-id="canvasProgress"
코드는 다음과 같습니다.
1 2 3 4 5 6 7 8 9 10 11 12 13 14 15 16 17 18 19 20 21 22 23 24 25 26 27 28 29 30 31 32 33 34 35 36 37 38 39 40 41 42 43 44 45 46 47 48 49 50 | <view class="container">
<view class='progress_box'>
<canvas class="progress_bg" canvas-id="canvasProgressbg"> </canvas>
<canvas class="progress_canvas" canvas-id="canvasProgress"> </canvas>
<view class="progress_text">
<view class="progress_dot"></view>
<text class='progress_info'> {{progress_txt}}</text>
</view>
</view>
</view>
.progress_box{
position: relative;
width:220px;
height: 220px;
display: flex;
align-items: center;
justify-content: center;
background-color: #eee;
}
.progress_bg{
position: absolute;
width:220px;
height: 220px;
}
.progress_canvas{
width:220px;
height: 220px;
}
.progress_text{
position: absolute;
display: flex;
align-items: center;
justify-content: center
}
.progress_info{
font-size: 36rpx;
padding-left: 16rpx;
letter-spacing: 2rpx
}
.progress_dot{
width:16rpx;
height: 16rpx;
border-radius: 50%;
background-color: #fb9126;
}
|
로그인 후 복사
wxml을 보면 데이터 Progress_txt를 사용하는 것을 볼 수 있으므로 js에서 데이터를 다음과 같이 설정합니다.
1 2 3 | data: {
progress_txt: '正在匹配中...',
},
|
로그인 후 복사
칠판을 두드려 요점을 표시하세요
1. 배경을 먼저 그려주세요
- js에서 원을 그리는 drawProgressbg 함수를 캡슐화하고, 캔버스에 원을 그립니다
- onReady에서 이 함수를 실행하세요.
애플릿의 캔버스 구성 요소는 H5 캔버스와 약간 다릅니다. 코드는 다음과 같습니다.
1 2 3 4 5 6 7 8 9 10 11 12 13 14 15 | drawProgressbg: function(){
var ctx = wx.createCanvasContext('canvasProgressbg')
ctx.setLineWidth(4);
ctx.setStrokeStyle('#20183b');
ctx.setLineCap('round')
ctx.beginPath();
ctx.arc(110, 110, 100, 0, 2 * Math.PI, false);
ctx.stroke();
ctx.draw();
},
onReady: function () {
this.drawProgressbg();
},
|
로그인 후 복사
효과를 보면 다음과 같습니다.

2. 색칠된 원 그리기
- JS에서 그려진 원 캡슐화 링 함수 drawCircle,
- 는 onReady에서 이 함수를 실행합니다.
1 2 3 4 5 6 7 8 9 10 11 12 13 14 15 16 17 18 19 20 21 | drawCircle: function (step){
var context = wx.createCanvasContext('canvasProgress');
var gradient = context.createLinearGradient(200, 100, 100, 200);
gradient.addColorStop("0", "#2661DD");
gradient.addColorStop("0.5", "#40ED94");
gradient.addColorStop("1.0", "#5956CC");
context.setLineWidth(10);
context.setStrokeStyle(gradient);
context.setLineCap('round')
context.beginPath();
context.arc(110, 110, 100, -Math.PI / 2, step * Math.PI - Math.PI / 2, false);
context.stroke();
context.draw()
},
onReady: function () {
this.drawProgressbg();
this.drawCircle(2)
},
|
로그인 후 복사
this.drawCircle(0.5) this.drawCircle(1) 효과는 다음과 같습니다. this.drawCircle(2) 효과는 다음과 같습니다.
3. 타이머 설정
에서 카운터 카운트, 단계 및 타이머를 설정합니다. js의 데이터
js에서 타이머 함수 countInterval을 캡슐화합니다.
onReady 함수에서 실행합니다.
1 2 3 4 5 6 7 8 9 10 11 12 13 14 15 16 17 18 19 20 21 22 23 24 25 26 27 28 | data: {
progress_txt: '正在匹配中...',
count:0,
countTimer: null
},
countInterval: function () {
this.countTimer = setInterval(() => {
if (this.data.count <= 60) {
this.drawCircle(this.data.count / (60/2))
this.data.count++;
} else {
this.setData({
progress_txt: "匹配成功"
});
clearInterval(this.countTimer);
}
}, 100)
},
onReady: function () {
this.drawProgressbg();
this.countInterval()
},
|
로그인 후 복사
최종 효과
위 내용은 모든 사람에게 도움이 되기를 바랍니다. 미래.
관련 기사:
div 스크롤 막대를 사용하여 숨기지만 vue.js에서 스크롤 효과를 얻을 수 있습니다. 어떻게 구현하나요?
vue를 사용하여 이미지 스크롤을 구현하는 방법은 무엇입니까?
js는 바이너리 데이터를 작동하는 방법을 구현합니다
🎜
위 내용은 WeChat 미니 프로그램에서 순환 진행 표시줄을 구현하는 방법의 상세 내용입니다. 자세한 내용은 PHP 중국어 웹사이트의 기타 관련 기사를 참조하세요!


![[웹 프런트엔드] Node.js 빠른 시작](https://img.php.cn/upload/course/000/000/067/662b5d34ba7c0227.png)


