Ajax 및 Jquery를 사용하여 드롭다운 상자의 보조 연결 구현
이제 Ajax와 Jquery를 사용하여 데이터베이스와 협력하여 드롭다운 상자의 2차 연결을 구현하는 예를 공유하겠습니다. 이는 좋은 참고 가치가 있으며 모든 사람에게 도움이 되기를 바랍니다.
먼저 데이터베이스를 생성하고 여기에 일부 데이터를 삽입해야 합니다.
에는 두 개의 테이블이 필요합니다:
province: Province 테이블
city: city 테이블
그림에 표시된 대로:

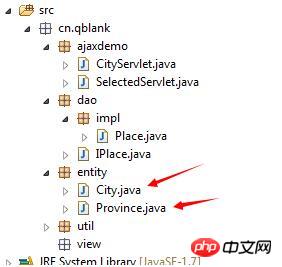
그런 다음 해당 엔터티 클래스를 Java에서 생성합니다

그런 다음 jdbc 작업을 시작할 수 있습니다
public class ConnectionFactory {
 private static String driver;
 private static String url;
 private static String user;
 private static String password;
 static {
  Properties prop = new Properties();
  //读取文件

  try {
   InputStream in = ConnectionFactory.class.getResourceAsStream("./jdbc.properties");

   prop.load(in);
   driver = prop.getProperty("jdbc.driver");
   url = prop.getProperty("jdbc.url");
   user = prop.getProperty("jdbc.user");
   password = prop.getProperty("jdbc.password");
  } catch (IOException e) {
   e.printStackTrace();
  }

 }

 /**
  * 获取连接对象
  * @return
  */
 public static Connection getConnection(){
  Connection conn = null;

  try {
   Class.forName(driver);
   conn = DriverManager.getConnection(url, user, password);

  } catch (Exception e) {
   throw new RuntimeException(e);
  }

  return conn;
 }

 /**
  * 关闭资源
  * @param conn
  * @param pstmt
  * @param stmt
  * @param rs
  */
 public static void close(Connection conn,PreparedStatement pstmt,Statement stmt,ResultSet rs){

   try {
    if (conn != null) {
     conn.close();
    }

    if (pstmt != null) {
     pstmt.close();
    }

    if (stmt != null) {
     stmt.close();
    }

    if (rs != null) {
     rs.close();
    }
   } catch (SQLException e) {
    throw new RuntimeException(e);
   }

}우선 페이지가 로드되면 모든 지방의 정보를 얻을 수 있습니다. SQL 문은 다음과 같습니다.
Connection conn = null;
 PreparedStatement pstmt = null;
 Province province2 = null;

 @Override
 public ArrayList<Province> findAllPro() {
  ResultSet rs = null;
  ArrayList<Province> pros = null;
  try {
   String sql = "select id,place from province";
   conn = ConnectionFactory.getConnection();
   pstmt = conn.prepareStatement(sql);
   pros = new ArrayList<Province>();

   rs = pstmt.executeQuery();

   while(rs.next()){
    Province province = new Province();
    province.setId(rs.getInt(1));
    province.setPlace(rs.getString(2));
    pros.add(province);
   }

  } catch (SQLException e) {
   throw new RuntimeException(e);
  }

  return pros;
}찾은 데이터를 백그라운드에 넣고 SelectedServlet 클래스를 생성하여 모든 지방에 대한 쿼리 정보를 받습니다.
response.setContentType("application/json;charset=utf-8");
  response.setCharacterEncoding("utf-8");
  request.setCharacterEncoding("utf-8");
  //创建一个Place对象
  ArrayList<Province> pros= new Place().findAllPro();
  PrintWriter out = response.getWriter();
  //将集合直接转换为Json对象
out.write(JSONArray.fromObject(pros).toString());여기서 컬렉션을 사용하여 Json 개체를 변환해야 합니다
.
그런 다음 첫 페이지를 작성하기 시작했습니다.
<body>
  省份:<select id="province">
   <option>--请选择省份--</option>
  </select>

  城市:<select id="city">
    <option>--请选择城市--</option>
   </select>
  <br/><br/>
  <span></span>
</body>그런 다음 jQuery 코드는 다음과 같습니다. (내가 가져온 jQuery 버전이 상대적으로 낮기 때문에 사용된 방법은 getJson 대신 getJSON입니다)
$.getJSON("SelectedServlet",function(data,textStatus){
 var provinces = data;

 var res = "";
 for(var i =0;i<provinces.length;i++){
 <span style="white-space:pre"> </span>res += "<option>"+provinces[i].place+"</option>";
 }
  $("#province").append(res);
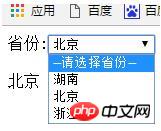
});이렇게 하면, 페이지가 데이터에 로드될 때 얻을 수 있습니다

그런 다음 연결을 수행하고 먼저 드롭다운 상자에 변경 이벤트를 추가한 다음 선택한 정보를 가져오고 선택한 정보를 다른 CityServlet으로 보냅니다
//下拉框改变时触发的事件
 $("#province").change(function(){
 var seled = $("option:selected").html();

 $("span").html(seled);
 $.getJSON("CityServlet",{
  "province":encodeURI(encodeURI(seled))
     },function(data){
  $("#city").html("");
  var citys = data;
  var res = "";
  for(var i = 0;i<citys.length;i++){
   res += "<option>"+citys[i].place+"</option>";
  }
  $("#city").append(res);
 });

});획득한 정보를 통해 서버가 sql 문을 통해 쿼리를 하면, SQL 코드는 다음과 같습니다.
public ArrayList<City> findAllCityByPro(String name) {
ResultSet rs = null;
ArrayList<City> citys = null;
try {
//通过名字获得所有值
String sql = "select c.city_place from city c ,"
+ "province p where c.province_id = "
+ " (select id from province where place = '"+ name +"') "
+ " and c.province_id = p.id";
conn = ConnectionFactory.getConnection();
pstmt = conn.prepareStatement(sql);
citys = new ArrayList<City>();
System.out.println(sql);
rs = pstmt.executeQuery();
while(rs.next()){
City city = new City();
city.setPlace(rs.getString(1));
citys.add(city);
}
System.out.println(citys);
} catch (SQLException e) {
e.printStackTrace();
}
return citys;
}쿼리된 데이터를 백그라운드로 전송합니다. 데이터를 받은 후 백그라운드는 이를 Json 객체로 변환하여 보냅니다. 콜백 기능을 통해 프런트 데스크에서 이벤트를 통해 직접 데이터를 얻을 수 있으며, 여러 페이지로 이동할 필요 없이 Ajax(Asynchronous Javascript And XML),
protected void doGet(HttpServletRequest request, HttpServletResponse response)
   throws ServletException, IOException {
  response.setContentType("application/json;charset=utf-8");
  response.setCharacterEncoding("utf-8");
  request.setCharacterEncoding("utf-8");
//  String proName = "浙江";
  String proName = URLDecoder.decode(URLDecoder.decode(request.getParameter("province"), "utf-8"),
    "utf-8");
  ArrayList<City> citys= new Place().findAllCityByPro(proName);
  PrintWriter out = response.getWriter();
  out.write(JSONArray.fromObject(citys).toString());

}를 표시하는 코드는 다음과 같습니다. 페이지에는 앞서 jQuery 문에도 적혀 있었습니다
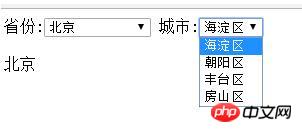
효과는 다음과 같습니다.

위 내용은 제가 정리한 내용입니다. 앞으로도 많은 분들께 도움이 되었으면 좋겠습니다.
관련 기사:
jQuery에서 niceScroll 스크롤 막대 정렬 문제를 해결하는 방법
위 내용은 Ajax 및 Jquery를 사용하여 드롭다운 상자의 보조 연결 구현의 상세 내용입니다. 자세한 내용은 PHP 중국어 웹사이트의 기타 관련 기사를 참조하세요!

핫 AI 도구

Undresser.AI Undress
사실적인 누드 사진을 만들기 위한 AI 기반 앱

AI Clothes Remover
사진에서 옷을 제거하는 온라인 AI 도구입니다.

Undress AI Tool
무료로 이미지를 벗다

Clothoff.io
AI 옷 제거제

Video Face Swap
완전히 무료인 AI 얼굴 교환 도구를 사용하여 모든 비디오의 얼굴을 쉽게 바꾸세요!

인기 기사

뜨거운 도구

메모장++7.3.1
사용하기 쉬운 무료 코드 편집기

SublimeText3 중국어 버전
중국어 버전, 사용하기 매우 쉽습니다.

스튜디오 13.0.1 보내기
강력한 PHP 통합 개발 환경

드림위버 CS6
시각적 웹 개발 도구

SublimeText3 Mac 버전
신 수준의 코드 편집 소프트웨어(SublimeText3)
 PHP 및 Ajax: 자동 완성 제안 엔진 구축
Jun 02, 2024 pm 08:39 PM
PHP 및 Ajax를 사용하여 자동 완성 제안 엔진 구축: 서버측 스크립트: Ajax 요청을 처리하고 제안을 반환합니다(autocomplete.php). 클라이언트 스크립트: Ajax 요청을 보내고 제안을 표시합니다(autocomplete.js). 실제 사례: HTML 페이지에 스크립트를 포함하고 검색 입력 요소 식별자를 지정합니다.
 iOS 18에는 손실되거나 손상된 사진을 검색할 수 있는 새로운 '복구된' 앨범 기능이 추가되었습니다.
Jul 18, 2024 am 05:48 AM
Apple의 최신 iOS18, iPadOS18 및 macOS Sequoia 시스템 릴리스에는 사진 애플리케이션에 중요한 기능이 추가되었습니다. 이 기능은 사용자가 다양한 이유로 손실되거나 손상된 사진과 비디오를 쉽게 복구할 수 있도록 설계되었습니다. 새로운 기능에는 사진 앱의 도구 섹션에 '복구됨'이라는 앨범이 도입되었습니다. 이 앨범은 사용자가 기기에 사진 라이브러리에 포함되지 않은 사진이나 비디오를 가지고 있을 때 자동으로 나타납니다. "복구된" 앨범의 출현은 데이터베이스 손상으로 인해 손실된 사진과 비디오, 사진 라이브러리에 올바르게 저장되지 않은 카메라 응용 프로그램 또는 사진 라이브러리를 관리하는 타사 응용 프로그램에 대한 솔루션을 제공합니다. 사용자는 몇 가지 간단한 단계만 거치면 됩니다.
 PHP에서 MySQLi를 사용하여 데이터베이스 연결을 설정하는 방법에 대한 자세한 튜토리얼
Jun 04, 2024 pm 01:42 PM
MySQLi를 사용하여 PHP에서 데이터베이스 연결을 설정하는 방법: MySQLi 확장 포함(require_once) 연결 함수 생성(functionconnect_to_db) 연결 함수 호출($conn=connect_to_db()) 쿼리 실행($result=$conn->query()) 닫기 연결( $conn->close())
 PHP에서 데이터베이스 연결 오류를 처리하는 방법
Jun 05, 2024 pm 02:16 PM
PHP에서 데이터베이스 연결 오류를 처리하려면 다음 단계를 사용할 수 있습니다. mysqli_connect_errno()를 사용하여 오류 코드를 얻습니다. 오류 메시지를 얻으려면 mysqli_connect_error()를 사용하십시오. 이러한 오류 메시지를 캡처하고 기록하면 데이터베이스 연결 문제를 쉽게 식별하고 해결할 수 있어 애플리케이션이 원활하게 실행될 수 있습니다.
 PHP 대 Ajax: 동적으로 로드되는 콘텐츠를 생성하기 위한 솔루션
Jun 06, 2024 pm 01:12 PM
Ajax(비동기 JavaScript 및 XML)를 사용하면 페이지를 다시 로드하지 않고도 동적 콘텐츠를 추가할 수 있습니다. PHP와 Ajax를 사용하면 제품 목록을 동적으로 로드할 수 있습니다. HTML은 컨테이너 요소가 있는 페이지를 생성하고 Ajax 요청은 로드한 후 요소에 데이터를 추가합니다. JavaScript는 Ajax를 사용하여 XMLHttpRequest를 통해 서버에 요청을 보내 서버에서 JSON 형식의 제품 데이터를 얻습니다. PHP는 MySQL을 사용하여 데이터베이스에서 제품 데이터를 쿼리하고 이를 JSON 형식으로 인코딩합니다. JavaScript는 JSON 데이터를 구문 분석하여 페이지 컨테이너에 표시합니다. 버튼을 클릭하면 제품 목록을 로드하라는 Ajax 요청이 트리거됩니다.
 PHP와 Ajax: Ajax 보안을 향상하는 방법
Jun 01, 2024 am 09:34 AM
Ajax 보안을 향상시키기 위해 다음과 같은 여러 가지 방법이 있습니다. CSRF 보호: 토큰을 생성하여 클라이언트에 보내고, 확인 요청 시 서버 측에 추가합니다. XSS 보호: 악성 스크립트 삽입을 방지하려면 htmlspecialchars()를 사용하여 입력을 필터링하세요. Content-Security-Policy 헤더: 악성 리소스 로드를 제한하고 스크립트 및 스타일 시트를 로드할 수 있는 소스를 지정합니다. 서버측 입력 유효성 검사: 공격자가 입력 취약성을 악용하지 못하도록 Ajax 요청에서 수신된 입력의 유효성을 검사합니다. 보안 Ajax 라이브러리 사용: jQuery와 같은 라이브러리에서 제공하는 자동 CSRF 보호 모듈을 활용하세요.
 Golang에서 데이터베이스 콜백 함수를 사용하는 방법은 무엇입니까?
Jun 03, 2024 pm 02:20 PM
Golang의 데이터베이스 콜백 기능을 사용하면 다음을 달성할 수 있습니다. 지정된 데이터베이스 작업이 완료된 후 사용자 정의 코드를 실행합니다. 추가 코드를 작성하지 않고도 별도의 함수를 통해 사용자 정의 동작을 추가할 수 있습니다. 삽입, 업데이트, 삭제, 쿼리 작업에 콜백 함수를 사용할 수 있습니다. 콜백 함수를 사용하려면 sql.Exec, sql.QueryRow, sql.Query 함수를 사용해야 합니다.
 JSON 데이터를 Golang의 데이터베이스에 저장하는 방법은 무엇입니까?
Jun 06, 2024 am 11:24 AM
JSON 데이터는 gjson 라이브러리 또는 json.Unmarshal 함수를 사용하여 MySQL 데이터베이스에 저장할 수 있습니다. gjson 라이브러리는 JSON 필드를 구문 분석하는 편리한 방법을 제공하며, json.Unmarshal 함수에는 JSON 데이터를 비정렬화하기 위한 대상 유형 포인터가 필요합니다. 두 방법 모두 SQL 문을 준비하고 삽입 작업을 수행하여 데이터를 데이터베이스에 유지해야 합니다.


