Vue+Flask를 사용하여 로그인 확인 점프를 구현하는 방법(자세한 튜토리얼)
이 글에서는 간단한 로그인 인증 점프를 구현하기 위한 Vue+Flask의 샘플 코드를 주로 소개하고 있으니 참고용으로 올려보겠습니다.
이 글에서는 간단한 로그인 인증 점프를 구현하기 위한 Vue+Flask를 소개합니다. 자세한 내용은 다음과 같습니다.
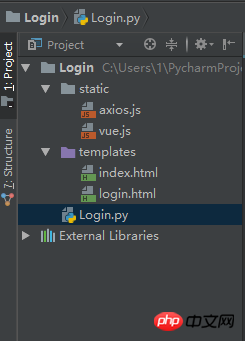
파일 위치: 
login.html
<!DOCTYPE html>
<html lang="en">
<head>
<meta charset="UTF-8">
<title>Login</title>
<script type="text/javascript" src="../static/vue.js"></script>
<script type="text/javascript" src="../static/axios.js"></script>
</head>
<body>
<p id="login">
<form action="#" novalidate>
<label for="username">Username</label>
<input type="text" name="username" id="username" placeholder="Enter your Name" v-model="username"><br>
<label for="password">Password</label>
<input type="text" name="password" id="password" placeholder="Enter your Password" v-model="password"><br>
<br>
<button type="button" v-on:click="login">Apply</button>
</form>
</p>
<script type="text/javascript">
var login = new Vue({
el: '#login',
data:{
username: '',
password: ''
},
methods: {
login: function () {
axios.post('http://127.0.0.1:5000/login',{
username: this.username,
password: this.password
}).then(function (response) {
console.log(response.status)
// 其实是应该走后台路由
if(parseInt(response.status) === 200){
window.location.href = 'index'
}
}).catch(function (error) {
console.log(error.response)
})
}
}
})
</script>
</body>
</html>index.html
<!DOCTYPE html>
<html lang="en">
<head>
  <meta charset="UTF-8">
  <title>Index</title>
</head>
<body>
  <h1>Hello,This is Index Page!</h1>
</body>
</html>
Login.py
# -*- coding: utf-8 -*-

from flask import Flask, request, session, redirect, url_for, render_template, make_response, jsonify
app = Flask(__name__)


@app.route('/login', methods=('GET', 'POST'))
def login():
  if request.method == 'POST':
    session['username'] = request.json.get('username')
    session['password'] = request.json.get('password')
    # 登录成功,则跳转到index页面
    return jsonify({'code': 200, 'token': "123456"})
  # 登录失败,跳转到当前登录页面
  return render_template('login.html')


@app.route('/index')
def index():
  # 如果用户名和密码都存在,则跳转到index页面,登录成功
  if 'username' in session and 'password' in session:
    return render_template('index.html')
  # 否则,跳转到login页面
  return redirect(url_for('login'))


@app.route('/logout')
def logout():
  session.pop('username', None)
  session.pop('password', None)
  return redirect(url_for('login'))


# set the secret key. keep this really secret:
app.secret_key = 'A0Zr98j/3yX R~XHH!jmN]LWX/,?RT'


if __name__ == '__main__':
app.run(debug=True)위에서 모든 사람을 위해 정리했습니다. 앞으로 모든 사람에게 도움이 되기를 바랍니다.
관련 기사:
vue에서 vue-cli를 사용하여 helloWorld를 구축하는 방법
JavaScript를 사용하여 복권 시스템을 구현하는 방법
vue What에 대한 자세한 답변 변경 사항이 구성 요소에 미치는 영향은 무엇입니까?
위 내용은 Vue+Flask를 사용하여 로그인 확인 점프를 구현하는 방법(자세한 튜토리얼)의 상세 내용입니다. 자세한 내용은 PHP 중국어 웹사이트의 기타 관련 기사를 참조하세요!

핫 AI 도구

Undresser.AI Undress
사실적인 누드 사진을 만들기 위한 AI 기반 앱

AI Clothes Remover
사진에서 옷을 제거하는 온라인 AI 도구입니다.

Undress AI Tool
무료로 이미지를 벗다

Clothoff.io
AI 옷 제거제

AI Hentai Generator
AI Hentai를 무료로 생성하십시오.

인기 기사

뜨거운 도구

메모장++7.3.1
사용하기 쉬운 무료 코드 편집기

SublimeText3 중국어 버전
중국어 버전, 사용하기 매우 쉽습니다.

스튜디오 13.0.1 보내기
강력한 PHP 통합 개발 환경

드림위버 CS6
시각적 웹 개발 도구

SublimeText3 Mac 버전
신 수준의 코드 편집 소프트웨어(SublimeText3)

뜨거운 주제
 7563
7563
 15
15
 1385
1385
 52
52
 84
84
 11
11
 61
61
 19
19
 28
28
 99
99
 Vue 용 버튼에 기능을 추가하는 방법
Apr 08, 2025 am 08:51 AM
HTML 템플릿의 버튼을 메소드에 바인딩하여 VUE 버튼에 함수를 추가 할 수 있습니다. 메소드를 정의하고 VUE 인스턴스에서 기능 로직을 작성하십시오.
 Vue에서 부트 스트랩을 사용하는 방법
Apr 07, 2025 pm 11:33 PM
vue.js에서 bootstrap 사용은 5 단계로 나뉩니다 : Bootstrap 설치. main.js.의 부트 스트랩 가져 오기 부트 스트랩 구성 요소를 템플릿에서 직접 사용하십시오. 선택 사항 : 사용자 정의 스타일. 선택 사항 : 플러그인을 사용하십시오.
 Vue에서 시계를 사용하는 방법
Apr 07, 2025 pm 11:36 PM
vue.js의 시계 옵션을 사용하면 개발자가 특정 데이터의 변경 사항을들을 수 있습니다. 데이터가 변경되면 콜백 기능을 트리거하여 업데이트보기 또는 기타 작업을 수행합니다. 구성 옵션에는 즉시 콜백을 실행할지 여부와 DEEP를 지정하는 즉시 포함되며, 이는 객체 또는 어레이에 대한 변경 사항을 재귀 적으로 듣는 지 여부를 지정합니다.
 vue.js로 JS 파일을 참조하는 방법
Apr 07, 2025 pm 11:27 PM
vue.js에서 JS 파일을 참조하는 세 가지 방법이 있습니다. & lt; script & gt; 꼬리표;; mounted () 라이프 사이클 후크를 사용한 동적 가져 오기; Vuex State Management Library를 통해 수입.
 Vue 다중 페이지 개발은 무엇을 의미합니까?
Apr 07, 2025 pm 11:57 PM
VUE 멀티 페이지 개발은 vue.js 프레임 워크를 사용하여 응용 프로그램을 구축하는 방법입니다. 여기서 응용 프로그램은 별도의 페이지로 나뉩니다. 코드 유지 보수 : 응용 프로그램을 여러 페이지로 분할하면 코드를보다 쉽게 관리하고 유지 관리 할 수 있습니다. 모듈 식 : 각 페이지는 쉬운 재사용 및 교체를 위해 별도의 모듈로 사용할 수 있습니다. 간단한 라우팅 : 페이지 간의 탐색은 간단한 라우팅 구성을 통해 관리 할 수 있습니다. SEO 최적화 : 각 페이지에는 자체 URL이있어 SEO가 도움이됩니다.
 Vue가 이전 페이지로 돌아 오는 방법
Apr 07, 2025 pm 11:30 PM
vue.js는 이전 페이지로 돌아갈 수있는 네 가지 방법이 있습니다. $ router.go (-1) $ router.back () 사용 & lt; router-link to = & quot;/quot; Component Window.history.back () 및 메소드 선택은 장면에 따라 다릅니다.
 VUE 버전을 쿼리하는 방법
Apr 07, 2025 pm 11:24 PM
Vue DevTools를 사용하여 브라우저 콘솔에서 vue 탭을 보면 VUE 버전을 쿼리 할 수 있습니다. npm을 사용하여 "npm list -g vue"명령을 실행하십시오. package.json 파일의 "종속성"객체에서 vue 항목을 찾으십시오. Vue Cli 프로젝트의 경우 "vue -version"명령을 실행하십시오. & lt; script & gt에서 버전 정보를 확인하십시오. vue 파일을 나타내는 html 파일의 태그.
 함수 인터셉트 vue를 사용하는 방법
Apr 08, 2025 am 06:51 AM
VUE의 기능 차단은 지정된 기간 내에 기능이 호출되는 횟수를 제한하고 성능 문제를 방지하는 데 사용되는 기술입니다. 구현 방법은 다음과 같습니다. lodash 라이브러리 가져 오기 : 'lodash'에서 import {debounce}; Debounce 기능을 사용하여 인터셉트 기능을 만듭니다. const debouncedfunction = debounce (() = & gt; { / logical /}, 500); 인터셉트 함수를 호출하면 제어 기능이 최대 500 밀리 초 안에 한 번 호출됩니다.


