이 글은 주로 VUE에서 VueAwesomeSwiper를 사용하는 방법과 발생하는 몇 가지 문제를 소개하고 참고 자료를 제공합니다.
Vue-Awesome-Swiper
Carousel 차트 플러그인은 Vue.js(1.X ~ 2.X)를 동시에 지원할 수 있으며, Vue의 광범위한 사용으로 인해 PC와 모바일 터미널 모두를 고려합니다. 플러그인 스위퍼도 고려해 볼 수 있습니다. 자주 사용하는 플러그인에 대해서는 사용 방법과 개발 과정에서 겪게 되는 몇 가지 문제점을 공유하겠습니다.
먼저 패키지를 다운로드한 후 main.js에서 구성합니다.
npm install vue-awesome-swiper --save
가져오기 방법을 사용할 수 있습니다
//import
import Vue from 'vue'
import VueAwesomeSwiper from 'vue-awesome-swiper'
또는 require
var Vue = require('vue')
var VueAwesomeSwiper = require('vue-awesome-swiper')
둘 다 목적을 달성할 수 있으며,
Vue.use(VueAwesomeSwiper)
를 main.js에 전역적으로 등록하고 템플릿에서 사용합니다
import { swiper, swiperSlide } from 'vue-awesome-swiper'

export default {
 components: {
  swiper,
  swiperSlide
 }
}<template>
<swiper :options="swiperOption" ref="mySwiper">
<!-- slides -->
<swiper-slide v-for="slide in swiperSlides" v-bind:style="{ 'background-image': 'url(' + slide + ')' }" :key="slide.id"></swiper-slide>
<!-- Optional controls -->
<p class="swiper-pagination" slot="pagination"></p>
<p class="swiper-button-prev" slot="button-prev"></p>
<p class="swiper-button-next" slot="button-next"></p>
</swiper>
</template>
<script>
import { swiper, swiperSlide } from 'vue-awesome-swiper'
export default {
name: 'carrousel',
components: {
swiper,
swiperSlide
},
data () {
return {
swiperOption: { //以下配置不懂的,可以去swiper官网看api,链接http://www.swiper.com.cn/api/
notNextTick: true, // notNextTick是一个组件自有属性,如果notNextTick设置为true,组件则不会通过NextTick来实例化swiper,也就意味着你可以在第一时间获取到swiper对象,假如你需要刚加载遍使用获取swiper对象来做什么事,那么这个属性一定要是true
autoplay: true,
loop: true,
direction: 'horizontal',
grabCursor: true,
setWrapperSize: true,
autoHeight: true,
pagination: {
el: '.swiper-pagination'
},
centeredSlides: true,
paginationClickable: true,
navigation: {
nextEl: '.swiper-button-next',
prevEl: '.swiper-button-prev'
},
keyboard: true,
mousewheelControl: true,
observeParents: true, // 如果自行设计了插件,那么插件的一些配置相关参数,也应该出现在这个对象中,如下debugger
debugger: true
},
swiperSlides: ['../../static/img/swiper1.jpg', '../../static/img/swiper2.jpg', '../../static/img/swiper3.jpg', '../../static/img/swiper4.jpg']
}
}
}
</script>
<!-- Add "scoped" attribute to limit CSS to this component only -->
<style>
html, body, #app {
height: 100%;
width: 100%;
}
.swiper-container-autoheight, .swiper-container-autoheight .swiper-slide {
height: 100vh;
}
.swiper-pagination-bullet {
width: 15px;
height: 15px;
}
.swiper-pagination-fraction, .swiper-pagination-custom, .swiper-container-horizontal > .swiper-pagination-bullets {
bottom: 8%;
}
</style>이렇게 하면 정상적으로 사용할 수 있습니다. , 그러나 다음은 개발 과정에서 발생하는 몇 가지 문제입니다.
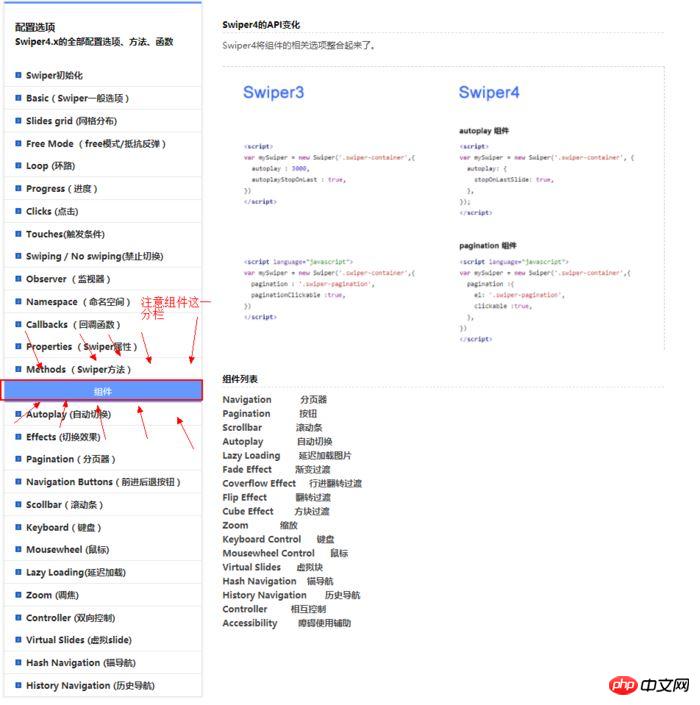
많은 사람들이 스와이퍼를 도입할 때 스와이퍼 페이지네이션이 나오지 않거나 일부 구성 속성이 적용되지 않는다는 것을 알게 될 것입니다. 그 이유는 최신 스위퍼 버전에서는 구성품과 일반 버전을 구분하기 시작했기 때문이다.
Swiper 하위 버전에서는 이렇게 쓸 수 있습니다. (바이두나 어린이 신발 포럼의 대부분의 사용 방법이 이런 것 같아요)
<script>
// swiper options example:
export default {
name: 'carrousel',
data() {
return {
swiperOption:
notNextTick: true,
// swiper configs 所有的配置同swiper官方api配置
autoplay: 3000,
direction: 'vertical',
grabCursor: true,
setWrapperSize: true,
autoHeight: true,
pagination: '.swiper-pagination',
paginationClickable: true,
prevButton: '.swiper-button-prev',//上一张
nextButton: '.swiper-button-next',//下一张
scrollbar: '.swiper-scrollbar',//滚动条
mousewheelControl: true,
observeParents: true,
debugger: true,
}
}
},
}
</script>주의! ! ! !
autoplay, pagination, prevButton 및 nextButton과 같은 속성은 하위 버전에서 사용이 허용되어 정상적으로 작동할 수 있지만 상위 버전의 swiper에서는 이런 방식으로 작성하면 적용되지 않으며 Vue에서는 오류를 보고하지 않습니다.
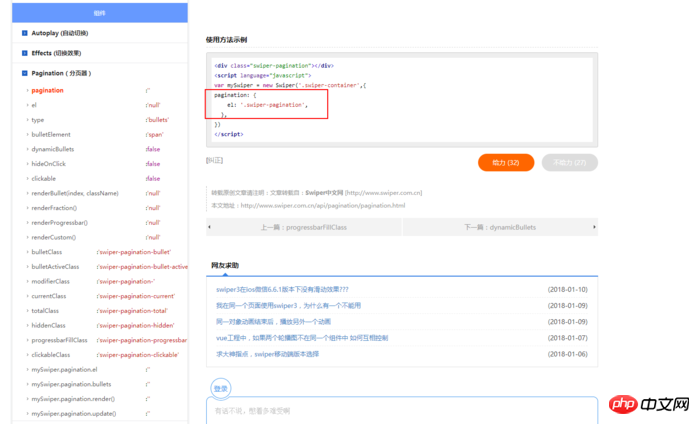
다음으로 공식 웹사이트 API를 살펴보겠습니다. 페이지 매김을 예로 들어보겠습니다.

과거에는 하위 버전의 Swiper에는 이러한 구분이 없었습니다! 이제 최신 버전의 Swiper Paginator에 대한 특정 문서를 살펴볼 수 있습니다.

그림에 표시된 부분은 하위 버전의 Swiper 사용법과 분명히 다릅니다.
공식 웹사이트 API는 매우 명확하게 작성되었습니다. 관심 있는 친구들은 공식 웹사이트 API에서 직접 읽고 확인할 수 있습니다.
위 내용은 모두를 위해 제가 정리한 내용입니다. 앞으로 모든 사람에게 도움이 되기를 바랍니다.
관련 기사:
vue에서 하위 구성 요소 이벤트를 트리거하기 위해 상위 구성 요소 클릭을 구현하는 방법
위 내용은 VueAwesomeSwiper를 사용할 때 흔히 발생하는 문제는 무엇입니까?의 상세 내용입니다. 자세한 내용은 PHP 중국어 웹사이트의 기타 관련 기사를 참조하세요!