이번에는 프로젝트에 스와이퍼를 적용하는 방법을 보여드리고, 프로젝트에 스와이퍼를 적용할 때 주의할 점은 무엇인지 실제 사례로 살펴보겠습니다.
먼저 간단한 반응 네이티브 프로젝트를 만들고 폴더를 만듭니다. 그런 다음 명령줄을 사용하여
react-native init swiper
를 입력합니다. 프로젝트를 생성한 후 vs

를 사용하여 콘솔을 열고 swiper 종속성을 설치합니다.
설치: npm i React-native-swiper --save
보기: npm view React-native-swiper
삭제: npm rm React-native-swiper --save
npm i에서 로컬 종속성 라이브러리도 업데이트해야 합니다.
앱 프로젝트 시작
ios: React-native run-ios
android: React-native run-android
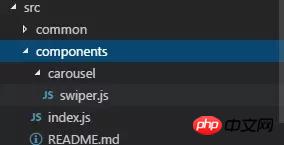
코딩을 시작하고, src에 컴포넌트 폴더를 생성하고, 그 아래에 swiper.js 파일을 생성하고, index.js , 추가 문서

import PropTypes from 'prop-types';
import React, { Component } from 'react';
import { StyleSheet, TouchableWithoutFeedback, View } from 'react-native';
import RNSwiper from 'react-native-swiper';
const styles = StyleSheet.create({
activeDotWrapperStyle: {
//圆点样式
},
activeDotStyle: {
//圆点样式
},
dotStyle: {
//圆点样式
}
});
const activeDot = (
<View style={styles.activeDotWrapperStyle}>
<View style={styles.activeDotStyle} />
</View>
);
const dot = <View style={styles.dotStyle} />;
export class Carousel extends Component {
// Define component prop list
static propTypes = {
data: PropTypes.array,
height: PropTypes.number,
onPressItem: PropTypes.func,
renderItem: PropTypes.func.isRequired,
autoplay: PropTypes.bool,
autoplayTimeout: PropTypes.number
};
// Define props default value
static defaultProps = {
data: [],
height: 150,
autoplay: true,
autoplayTimeout: 2.5,
onPressItem: () => {},
renderItem: () => {}
};
// Define inner state
state = {
showSwiper: false
};
constructor(props) {
super(props);
this.handleItemPress = this.handleItemPress.bind(this);
}
componentDidMount() {
setTimeout(() => {
this.setState({ showSwiper: true });
});
}
handleItemPress(item) {
this.props.onPressItem(item);
}
_renderSwiperItem(item, index) {
return (
<TouchableWithoutFeedback key={index} onPress={() => this.handleItemPress(item)}>
<View style={[{ flex: 1 }]}>{this.props.renderItem(item)}</View>
</TouchableWithoutFeedback>
);
}
render() {
return this.props.data.length === 0 || !this.state.showSwiper ? null : (
<RNSwiper
height={this.props.height} //图片高度
activeDot={activeDot}
dot={dot}
style={{ backgroundColor: '#fff' }}
autoplay={this.props.autoplay} //是否自动轮播
autoplayTimeout={this.props.autoplayTimeout} //轮播秒数
>
{this.props.data.map((item, idx) => this._renderSwiperItem(item, idx))} //如果数据是个对象里面的数组加一个循环
</RNSwiper>
);
}
}index.js 파일입니다
import { Carousel } from './carousel/Carousel';
export { Carousel };공용 구성 요소 라이브러리
비즈니스와 관련 없는 공용 구성 요소를 배치하는 데 사용됩니다. 구성 요소 구현은 유연성과 확장성을 고려해야 하며 특정 비즈니스 논리를 포함할 수 없습니다.
구성 요소에는 TryCarousel.js와 같이 비즈니스 이름이 앞에 붙어야 합니다. 각 구성 요소는 별도의 디렉터리에 배치되어야 하며 디렉터리는 carousel/TryCarousel.js와 같이 모두 소문자(대시로 구분)여야 합니다.
기본 컴포넌트 구조:
import PropTypes from 'prop-types';
import React, { Component } from 'react';
export class TryCarousel extends Component {
 // Define component prop list
 static propTypes = {};
 // Define props default value
 static defaultProps = {};
 // Define inner state
 state = {};
 constructor(props) {
  super(props);
 }
 // LifeCycle Hooks
 // Prototype Functions
 // Ensure the latest function is render
 render() {}
}Component list
carousel(캐러셀 컴포넌트)
주로 일반 이미지 캐러셀에 사용되며 클릭 이벤트 응답을 제공할 수 있습니다.
사용법:
Props:
| Property | Description | Type | 기본값 |
|---|---|---|---|
| data | Carousel 데이터 소스 | Array | - |
| height | Carousel Carousel Item을 클릭하면 | number | 150 |
| onPressItem | 의 높이가 트리거됩니다. | fn | - |
| renderItem | 구체적인 렌더링 방법은 FlatList를 참조하세요. | fn | - |
| autoplay | 자동 전환 여부 | bool | true |
| autoplayTimeout | 항목 자동 전환 시간 간격(단위 s) | number | 2.5 |
어디로 import
import { HigoCarousel } from '../../components';
<Carousel
      data={} //接受的数据
      onPressItem={} //点击事件
      height={} //图片高度
      autoplay={} //是否自动播放
      autoplayTimeout={} //过渡时间
      renderItem={item => {
       return <Image source={{ uri: item.imageSource }} style={{ flex: 1 }} />;
      }} //图片
/>이 기사의 사례를 읽으신 후 방법을 마스터하셨다고 생각합니다. 더 흥미로운 정보를 보려면 PHP 중국어 웹사이트의 다른 관련 기사를 주목하세요!
추천 도서:
vue-router에서 쿼리 동적 매개변수 전송을 처리하는 방법
위 내용은 프로젝트에서 스와이퍼를 적용하는 방법의 상세 내용입니다. 자세한 내용은 PHP 중국어 웹사이트의 기타 관련 기사를 참조하세요!