
이 글은 주로 React-Reflux에 대한 기본 소개를 소개하며, 이제는 필요한 친구들이 참고할 수 있도록 공유합니다.
#🎜 🎜#개발을 위해 React + Reflux를 사용해야 하기 때문에 지난 며칠 동안 열심히 공부했습니다. 특히 Reflux는 온라인에서 찾은 정보와 github에 있는 문서 중 상당수가 약간 오래된 JavaScript를 따릅니다. 현재 속도가 너무 빨라서 기존 문서의 일부 구문이 업데이트를 따라잡을 수 없습니다. 실제로 대다수의 초보자에게는 혼란이 많습니다. 이 글은 React 초보자나 Masters에 관심이 있는 친구들에게만 적합합니다. ! !
더 이상 고민하지 말고 본론으로 들어가겠습니다~
다음 말을 인용합니다. 언어, hello world를 사용하세요. "todolist를 사용하여 프레임워크 배우기", 오늘은 todolist를 사용하여 설명하겠습니다.
비교해 보면, todolist-raw는 Reflux를 사용하여 todolist의 추가 및 삭제를 구현하지 않습니다. todolist를 구현합니다. React-reflux는 기본 연관 컴포넌트와 단순 연관 컴포넌트로 구분됩니다.
먼저 구성 요소의 렌더링을 살펴보겠습니다.
#🎜 🎜# 🎜# 컴퓨터는
컴퓨터는
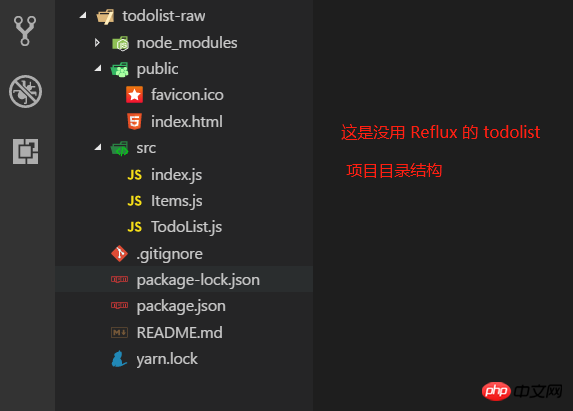
및 yarn#을 사용하는 환경을 준비해야 합니다. 🎜🎜 #, Baidu에 이 두 도구를 직접 설치하십시오. 프로젝트 디렉토리는 다음과 같이 단순화됩니다. 🎜🎜# 1.todolist-raw 파일이 몇 개 뿐이고, 안에 있는 코드도 비교적 간단해서 모든 도사들이 한 눈에 이해할 수 있을 거라 믿습니다.
package.json
#🎜 🎜 #{
"name": "todolist-raw",
"version": "0.1.0",
"private": true,
"dependencies": {
"react": "^16.4.1",
"react-dom": "^16.4.1",
"react-scripts": "1.1.4"
},
"scripts": {
"start": "react-scripts start",
"build": "react-scripts build",
"test": "react-scripts test --env=jsdom",
"eject": "react-scripts eject"
}
}
yarn #🎜🎜 #Rflux를 설치한 후 "react-scripts" 프롬프트는 내부 명령이 아니며, yarn start를 시작할 수 없고 반복됩니다. 시도가 작동하지 않았고 공제되었습니다yarn -h그리고
yarn -autoclean은 괜찮을 것입니다. 사실 제가 직면한 문제는 버전 비대칭 문제가 아닙니다. 설명할 수 없는 버그가 나타나면 실을 정리하는 것이 좋습니다. 가려움? 가렵다면 긁어주세요! ! !
index.html은 다음과 같습니다. 에는 자동 생성된 항목에서 변경된 사항이 없으며 일부 댓글만 삭제되었습니다! <!DOCTYPE html>
<html>
<head>
<meta charset="utf-8">
<meta name="viewport" content="width=device-width, initial-scale=1, shrink-to-fit=no">
<link rel="shortcut icon" href="%PUBLIC_URL%/favicon.ico">
<title>TodoList-raw</title>
</head>
<body>
<noscript>
You need to enable JavaScript to run this app.
</noscript>
<div id="root"></div>
</body>
</html>1 import React from 'react';
2 import ReactDOM from 'react-dom';
3 import TodoList from './TodoList';
4
5 ReactDOM.render(<TodoList />, document.getElementById('root'));
import React, { Component, Fragment } from 'react';
import Items from './Items';

class TodoList extends Component {

  constructor(props) {
    super(props);
    this.state = {
      items: [1, 2, 3],
      isC: false
    };

    this.handlerClick = this.handlerClick.bind(this);
  }
  // 添加一个 item 项
  handlerClick() {
    const val = this.refs.inputEl.value;
    this.refs.inputEl.value = '';
    const items = [...this.state.items, val]; // 最好不要直接操作 state
    this.setState({items}); // es6 语法,等价于 {items: items}
    }

  // 删除某一个 item 项,点击就删除
  handlerDelete(index) {
    const items = [...this.state.items];
    items.splice(index, 1);
    this.setState({items});
  }

  render() {
    return (
      <Fragment>
        <h3>Hello React!</h3>
        <input
          ref="inputEl"
          style={{marginRight: "10px"}}
        />
        <button onClick={this.handlerClick}>添加</button>
        <Items
          msg={this.state.items}
          func={this.handlerDelete.bind(this)} />
      </Fragment>
    );
  }
}

export default TodoList;몇 가지 사항을 설명합니다.
a.#🎜🎜 # this.handlerClick = this.handlerClick.bind(
this); React는 jsx 구문 설탕을 사용합니다. 태그에서 바인딩 이벤트는 괄호를 가질 수 없습니다. 기존 HTML 이벤트 바인딩처럼 이벤트를 바인딩하면 태그가 js 파일에 있으므로 이벤트가 직접 호출됩니다. 따라서 jsx의 태그 바인딩 이벤트는 참조에 바인딩됩니다. 그리고 이 js 파일(컴포넌트)에 바인딩되어야 합니다. 따라서 jsx의 레이블 이벤트는 이것은 저만 그렇게 이해하고 있는지 모르겠습니다. 틀렸다면 정정해 주세요!
b. 代码很少阅读起来应该没难度,而且上面也有一些注释了。不过还是要啰嗦一下。React 是用数据(data)基于状态(state)来驱动视图(view),也就是搞来搞去都是在搞数据,用数据改变状态来达到渲染视图的目的,大多是在虚拟内存处理,通过什么 diff 比较算法,层层计较然后达到提高性能,加快视图渲染的目的。额,我只能用“非常快”来形容 React 的性能,当然,性能的事还是跟实际代码复杂度相关,我只想说 React 确实出众!扯远了...,既然是基于状态(state),所以要有 state,在 constructor 中定义了,而且处理业务时改变 state,比如 handlerClick,deleteClick 中都是先用变量保存下来,通过 this.setState() 方法在设置回去!
c. 父子关系的组件,父组件可通过属性来给子组件传参,就像这样:<Items msg={this.state.items} />,子组件可通过 this.props.msg 拿到 items。
Items.js 代码如下:
import React, { Component } from 'react';

class Items extends Component {

  constructor(props) {
    super(props);
    this.func = this.props.func;
  }

  render() {
    return (
      <ul>
        {this.props.msg.map((item, index) => <li
            key={index}
            onClick={this.func.bind(this, index)}
          >{item}</li>
        )}
      </ul>
    );
  }
}

export default Items;注意,父组件传递方法给子组件时,this 指向的是子组件,所以通过属性传递时,需要用函数绑定 bind() 绑定父组件的 this。
最后,通过 cmd 命令行,yarn start 运行任务即可实现一个简单的 TodoList 功能。
2. react-reflux: 通过 Reflux 来实现简单的 TodoList (基本法关联 Component)。
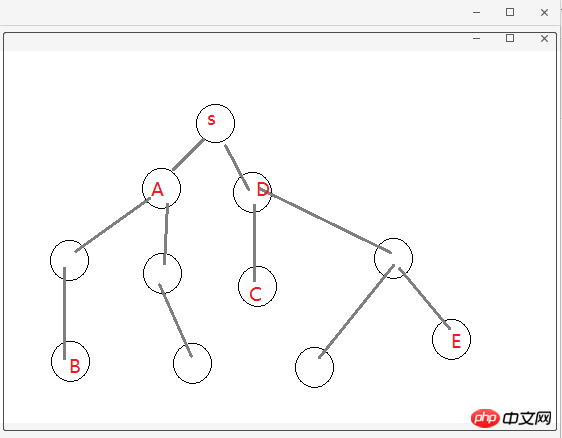
2.1 简单地说明下为什么要 Reflux 架构,如图(自己画的组件树结构!),不存在父子关系的组件(如 B 和 E)通讯势必会很困难而且麻烦,需要一个中间件(Store)来存储数据,类似于订阅者和发布者(中间人模式)一样,大家都往 Store 中存取数据就好,不需要层层走关系了,避免了层层传递数据的灾难!
2.2 关于 Actions、Store 和 Component 的关系,可以这么理解:Store 作为一个中间人有订阅和发布的功能,Actions 就是 Component 触发的动作,Actions 被 Store 监听着,组件有新动作了, Store 就会做出相应的处理(回调函数)更改 Store 中的数据通过 this.trigger(this.items) 发布消息[就相当于更新 items], Component 监听着 Store,用一些手段(mixin 或回调函数)关联起 Component 中的状态信息(state.items)和 Store 中的信息(items),这就是所谓的单向数据流,单向表示一个方向流动,不能反向。
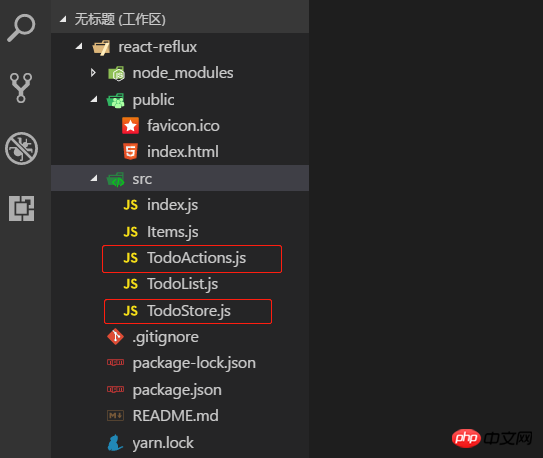
2.3 目录结构和前面的 todolist-raw 没多大区别,就是多了 TodoActions.js 和 TodoStore.js 两个文件。如图:
2.4 一言不合就贴代码。首先 index.js 代码没变化,就不贴了,TodoActions.js 代码如下:
import Reflux from 'reflux';

const TodoActions = Reflux.createActions([
    'getAll',
    'addItem',
    'deleteItem'
]);
export default TodoActions;TodoStore.js 代码如下:
import Reflux from 'reflux';
import Actions from './TodoActions';
const TodoStore = Reflux.createStore({
    // items: [1, 2, 3],
    // listenables: Actions,
    init() {
        console.log('TodoStore init method~');
        this.items = [1, 2, 3]; // 给个初始值
        this.listenables = Actions; // 监听 TodoActions.js
        // this.listenTo(addItem, 'addItem');
    },
    onGetAll() {
        console.log('onGetAll');
        this.trigger(this.items);
    },
    onAddItem(model) {
        console.log('onAddItem---', model);
        this.items.unshift(model);
        this.trigger(this.items);
    },
    onDeleteItem(index) {
        console.log('onDeleteItem---', index);
        this.items.splice(index, 1);
        this.trigger(this.items);
    }
})
export default TodoStore;说明:多个监听用 listenables,单个监听 this.listenTo(addItem, 'addItem'); 多个监听的时候定义处理函数是 on + ActionName 驼峰式命名。定义初始值和监听可以写在 init 方法外面,就像上面那样(已注释)。
2.5 Actions 和 Store 都写好了,就差最后一步,整合到组件 Component 中,才算有点意义了!TodoList.js 代码如下:
import React, { Component, Fragment } from 'react';
import Actions from './TodoActions';
import TodoStore from './TodoStore';
import Items from './Items';

class TodoList extends Component {

    constructor(props) {
        super(props);
        this.state = {
            items: [],
            isC: false
        };

        this.handlerClick = this.handlerClick.bind(this);
    }
    // 组件挂载
    componentDidMount() {
        this.unsubscribe = TodoStore.listen(this.onStatusChange, this);
        Actions.getAll();
    }
    // 组件移除
    componentWillUnmount() {
        console.log('componentWillUnmount');
        this.unsubscribe(); // 解除监听
    }
    // callback
    onStatusChange(items) {
        this.setState({items});
    }
    // 添加一个 item 项
    handlerClick() {
        const val = this.refs.inputEl.value;
        this.refs.inputEl.value = '';
        Actions.addItem(val);
    }

    render() {
        return (
            <Fragment>
                <h3>Hello React-Reflux!</h3>
                <input
                    ref="inputEl"
                    style={{marginRight: "10px"}}
                />
                <button onClick={this.handlerClick}>添加</button>
                <Items msg={this.state.items} />
            </Fragment>
        );
    }
}

export default TodoList;说明:这是基本的添加关联,需要在组件挂载时监听 Store,需要定义一个回调函数 onStatusChange(),组件卸载时解除监听 this.unsubscribe(),Store 源码如下:
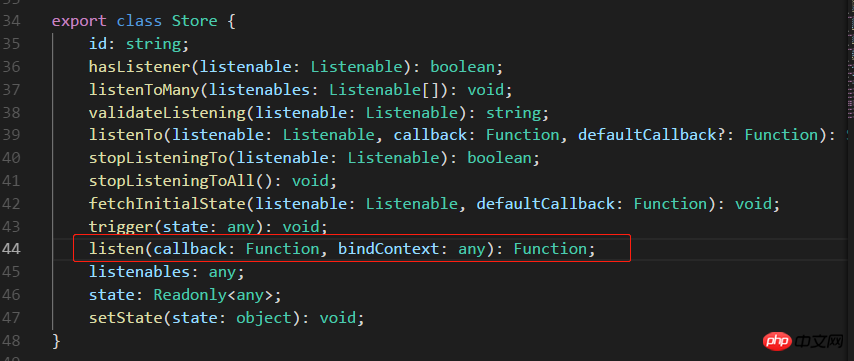
不传 bindContext 更新不了状态,回调函数 onStatusChange 中报异常,传入 this 就好了。如图:

Items.js 代码如下:
import React, { Component } from 'react';
import Actions from './TodoActions';

class Items extends Component {
    render() {
        return (
            <ul>
                {this.props.msg.map((item, index) => <li
                        key={index}
                        onClick={this.handlerDelete.bind(this, index)}
                    >{item}</li>
                )}
            </ul>
        );
    }
    handlerDelete(index) {
        Actions.deleteItem(index);
    }
}

export default Items;3. react-reflux: 通过 Reflux 来实现简单的 TodoList (简便法关联 Component)。
3.1 先安装 react-mixin 和 axios: npm install react-mixin,npm install axios。结合异步操作实现简便 Store 关联 Component。
安装两个依赖之后,修改 TodoStore.js 和 TodoList.js 代码如下:
我贴:TodoStore.js:
import Reflux from 'reflux';
import Actions from './TodoActions';
import Axios from 'axios';

const TodoStore = Reflux.createStore({

    // items: [3, 2, 1],
    // listenables: Actions,

    init() {
        console.log('TodoStore init method~');
        this.items = [3, 2, 1]; // 初始值,此处不是 state, mark-1 -2 -3 都可以直接操作
        this.listenables = Actions;
    },
    onGetAll() {
        console.log('onGetAll');
        Axios.get('https://api.github.com/')
        .then(res => {
            const keys = Object.keys(res.data);
            console.log('axios-response-keys: ', keys);
            this.items = keys; // mark-1
            this.trigger(this.items);
        })
        .catch(err => console.log('axios-error: ', err));
    },
    onAddItem(model) {
        console.log('onAddItem---', model);
        this.items.unshift(model); // mark-2
        console.log('TodoStore-items: ', this.items);
        this.trigger(this.items);
    },
    onDeleteItem(index) {
        console.log('onDeleteItem---', index);
        this.items.splice(index, 1); // mark-3
        this.trigger(this.items);
    }
})

export default TodoStore;我再贴:TodoList.js:
import React, { Component, Fragment } from 'react';
import ReactMixin from 'react-mixin';
import Reflux from 'reflux';
import Actions from './TodoActions';
import TodoStore from './TodoStore';
import Items from './Items';
class TodoList extends Component {
constructor(props) {
super(props);
this.state = {
items: [],
isC: false
};
this.handlerClick = this.handlerClick.bind(this);
}
// 组件挂载
componentDidMount() {
Actions.getAll();
}
// 添加一个 item 项
handlerClick() {
const val = this.refs.inputEl.value;
this.refs.inputEl.value = '';
if (!val) {
alert('Please enter the data which type of number or string');
return false;
}
Actions.addItem(val);
}
render() {
return (
<Fragment>
<h3>Hello React-Reflux!</h3>
<input
ref="inputEl"
style={{marginRight: "10px"}}
/>
<button onClick={this.handlerClick}>添加</button>
<Items msg={this.state.items} />
</Fragment>
);
}
}
// 用 Reflux.connect 将 Store 和 Component 组合在一起
ReactMixin.onClass(TodoList, Reflux.connect(TodoStore, 'items'));
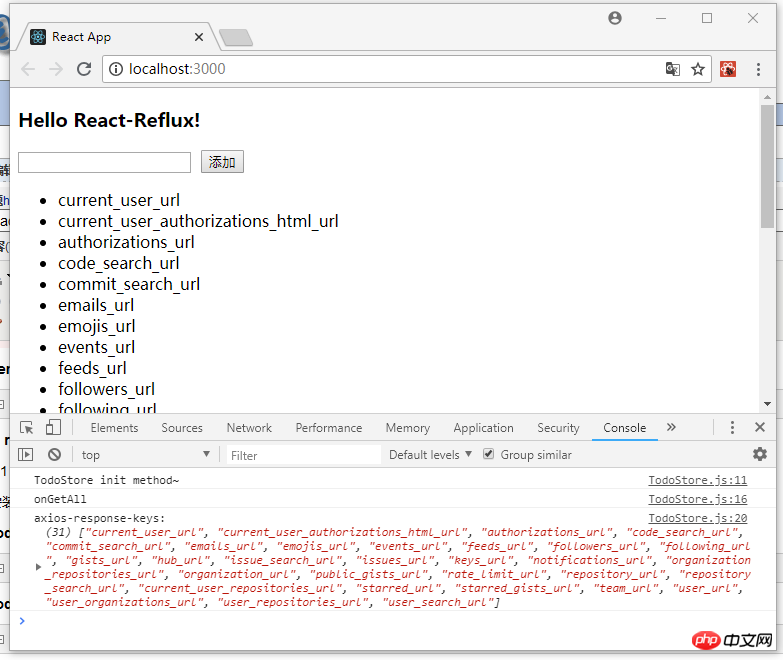
export default TodoList;修改之后 yarn start 启动项目,截图如下:
4. 说在后面的话:本篇文章只是关于 React-Reflux 基础入门的一些知识,没有涉及实战应用,读者自酌。对于 React 我也是初学者,难免有许多不准确的地方,有待提高,欢迎各位道友留言指正。
4.1 好了,简单地分享就到此结束了,谢谢阅读~~~
以上就是本文的全部内容,希望对大家的学习有所帮助,更多相关内容请关注PHP中文网!
相关推荐:
위 내용은 React-Reflux 기본 소개의 상세 내용입니다. 자세한 내용은 PHP 중국어 웹사이트의 기타 관련 기사를 참조하세요!


![[웹 프런트엔드] Node.js 빠른 시작](https://img.php.cn/upload/course/000/000/067/662b5d34ba7c0227.png)


