laravel dingo/api에 jwt-auth 인증 추가
이 글에서는 laravel dingo/api에 jwt-auth 인증을 추가하는 방법을 주로 소개합니다. 이제 필요한 친구들이 참고할 수 있도록 공유하겠습니다.
We 이전에 배웠던 API를 모든 사람에게 공개하도록 laravel dingo/api를 사용하여 간단한 API를 만드세요. API 호출을 보고 제한하는 방법은 무엇인가요? jwt-auth를 사용하여 JSON 웹 토큰 인증을 확인할 수 있습니다
1. 먼저 jwt-auth 플러그인을 설치하고 작곡가를 사용하여 명령줄에 설치합니다
#🎜🎜 #composer require tymon/jwt-auth '0.5.*'
2을 게시한 다음
php artisan vendor:publish --provider="Tymon\JWTAuth\Providers\JWTAuthServiceProvider"
A jwt. php는 /config/ File
3. 키 생성
php artisan jwt:generate
에 생성됩니다. 실행하면 /config/jwt에서 실행할 수 있습니다. PHP 파일에서 Changeme를 수정하여 직접 키를 설정하세요. 4. /app/Api/Controllers/HelloController.php를
'secret' => env('JWT_SECRET', 'changeme'),
으로 수정합니다. 5. 라우팅을 추가합니다(/routes/web.php )
<?php
namespace App\Api\Controllers;
use Illuminate\Http\Request;
use App\Http\Controllers\Controller;
//添加jwt-auth认证
use JWTAuth;
use Tymon\JWTAuth\Exceptions\JWTException;
class HelloController extends Controller
{
public function index()
{
return '{content:Helloworld!}';
}
//添加jwt-auth认证
public function authenticate(Request $request)
{
// grab credentials from the request
$credentials = $request->only('email', 'password');
try {
// attempt to verify the credentials and create a token for the user
if (! $token = JWTAuth::attempt($credentials)) {
return response()->json(['error' => 'invalid_credentials'], 401);
}
} catch (JWTException $e) {
// something went wrong whilst attempting to encode the token
return response()->json(['error' => 'could_not_create_token'], 500);
}
// all good so return the token
return response()->json(compact('token'));
}
}6. 테스트 라우팅: php artisan api:routes, 다음 프롬프트가 나타나면 올바른 것입니다#🎜 🎜#
방문 URL: ***.com/api/auth는 토큰이 추가되지 않아 오류를 표시합니다
hellocontrol 다시 수정 및 경로
$api->post('auth', 'App\Api\Controllers\HelloController@authenticate');
#🎜 🎜#
<?php
namespace App\Api\Controllers;
use Illuminate\Http\Request;
use App\Http\Controllers\Controller;
use JWTAuth;
use Tymon\JWTAuth\Exceptions\JWTException;
class HelloController extends Controller
{
/**
* Create a new controller instance.
*
* @return void
*/
/**
* Show the application dashboard.
*
* @return \Illuminate\Http\Response
*/
public function index()
{
return '{content:Helloworld!}';
}
public function authenticate(Request $request)
{
// grab credentials from the request
$credentials = $request->only('email', 'password');
try {
// attempt to verify the credentials and create a token for the user
if (! $token = JWTAuth::attempt($credentials)) {
return response()->json(['error' => 'invalid_credentials'], 401);
}
} catch (JWTException $e) {
// something went wrong whilst attempting to encode the token
return response()->json(['error' => 'could_not_create_token'], 500);
}
// all good so return the token
return response()->json(compact('token'));
}
//添加user
public function user()
{
JWTAuth::parseToken();
$user = JWTAuth::parseToken()->authenticate();
return $user;
}
}
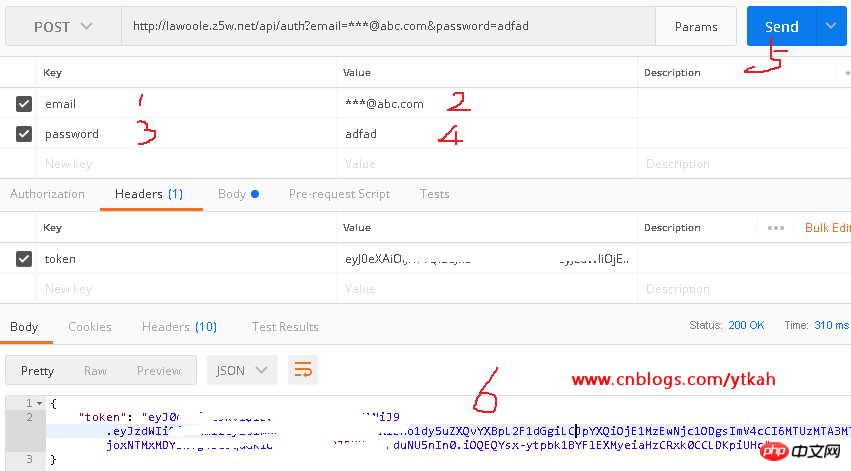
토큰을 얻으려면 Google Chrome 우편 배달부 플러그인을 사용하세요. 아래 그림과 같습니다
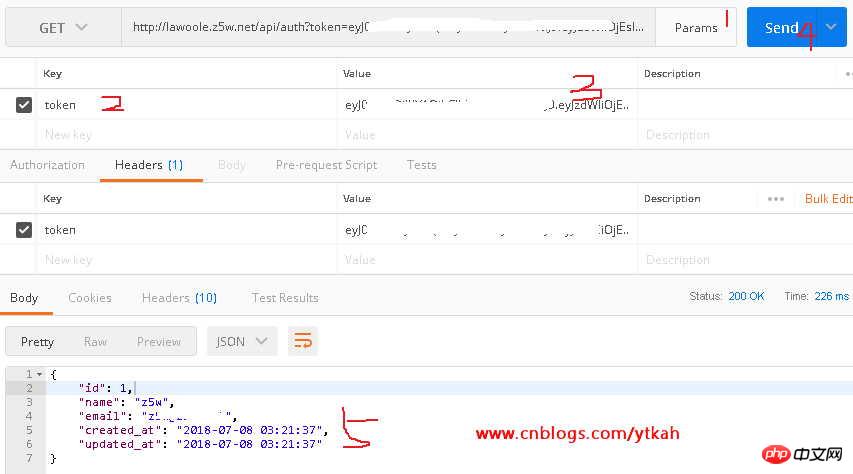
획득한 토큰을 복사하여 사용자 인증 토큰에 붙여넣습니다. 두 번째 단계는 아래의 그림 5가 방금 등록한 사용자입니다. #🎜 🎜#위 내용은 모든 분들께 도움이 되기를 바랍니다. 더 많은 관련 내용을 보시려면 PHP 중국어 웹사이트를 주목해주세요! 관련 권장사항:

# 🎜🎜 #Laravel 프레임워크에서 Composer 자동 로딩의 세부 구현
위 내용은 laravel dingo/api에 jwt-auth 인증 추가의 상세 내용입니다. 자세한 내용은 PHP 중국어 웹사이트의 기타 관련 기사를 참조하세요!

핫 AI 도구

Undresser.AI Undress
사실적인 누드 사진을 만들기 위한 AI 기반 앱

AI Clothes Remover
사진에서 옷을 제거하는 온라인 AI 도구입니다.

Undress AI Tool
무료로 이미지를 벗다

Clothoff.io
AI 옷 제거제

Video Face Swap
완전히 무료인 AI 얼굴 교환 도구를 사용하여 모든 비디오의 얼굴을 쉽게 바꾸세요!

인기 기사

뜨거운 도구

메모장++7.3.1
사용하기 쉬운 무료 코드 편집기

SublimeText3 중국어 버전
중국어 버전, 사용하기 매우 쉽습니다.

스튜디오 13.0.1 보내기
강력한 PHP 통합 개발 환경

드림위버 CS6
시각적 웹 개발 도구

SublimeText3 Mac 버전
신 수준의 코드 편집 소프트웨어(SublimeText3)

뜨거운 주제
 7681
7681
 15
15
 1639
1639
 14
14
 1393
1393
 52
52
 1286
1286
 25
25
 1229
1229
 29
29
 Laravel에서 이메일 전송이 실패 할 때 반환 코드를 얻는 방법은 무엇입니까?
Apr 01, 2025 pm 02:45 PM
Laravel 이메일 전송이 실패 할 때 반환 코드를 얻는 방법. Laravel을 사용하여 응용 프로그램을 개발할 때 종종 확인 코드를 보내야하는 상황이 발생합니다. 그리고 실제로 ...
 laravel 일정 작업이 실행되지 않습니다 : 스케줄 후 작업이 실행되지 않으면 어떻게해야합니까?
Mar 31, 2025 pm 11:24 PM
laravel 일정 작업 실행 비 응답 문제 해결 Laravel의 일정 작업 일정을 사용할 때 많은 개발자 가이 문제에 직면합니다 : 스케줄 : 실행 ...
 Laravel에서는 이메일로 확인 코드를 보내지 못하는 상황을 처리하는 방법은 무엇입니까?
Mar 31, 2025 pm 11:48 PM
Laravel의 이메일을 처리하지 않는 방법은 LaRavel을 사용하는 것입니다.
 DCAT 관리자에서 데이터를 추가하기 위해 클릭하는 사용자 정의 테이블 기능을 구현하는 방법은 무엇입니까?
Apr 01, 2025 am 07:09 AM
DCAT를 사용할 때 DCATADMIN (LARAVEL-ADMIN)에서 데이터를 추가하려면 사용자 정의의 테이블 기능을 구현하는 방법 ...
 Laravel - 덤프 서버
Aug 27, 2024 am 10:51 AM
Laravel - 덤프 서버 - Laravel 덤프 서버는 Laravel 5.7 버전과 함께 제공됩니다. 이전 버전에는 덤프 서버가 포함되어 있지 않습니다. 덤프 서버는 laravel/laravel 작곡가 파일의 개발 종속성이 됩니다.
 Laravel Redis Connection 공유 : 선택 메소드가 다른 연결에 영향을 미치는 이유는 무엇입니까?
Apr 01, 2025 am 07:45 AM
Laravel 프레임 워크 및 Laravel 프레임 워크 및 Redis를 사용할 때 Redis 연결을 공유하는 데 영향을 줄 수 있습니다. 개발자는 문제가 발생할 수 있습니다. 구성을 통해 ...
 Laravel 멀티 테넌트 확장 STANCL/TENANCY : 테넌트 데이터베이스 연결의 호스트 주소를 사용자 정의하는 방법은 무엇입니까?
Apr 01, 2025 am 09:09 AM
Laravel 다중 테넌트 확장 패키지 패키지 패키지 패키지 패키지 Stancl/Tenancy, ...
 Laravel - 작업 URL
Aug 27, 2024 am 10:51 AM
Laravel - 액션 URL - Laravel 5.7에는 "호출 가능한 액션 URL"이라는 새로운 기능이 도입되었습니다. 이 기능은 액션 메소드에서 문자열을 허용하는 Laravel 5.6의 기능과 유사합니다. Laravel 5.7에 도입된 새로운 구문의 주요 목적은


