ThinkPHP5에서 Auth2를 이용한 검증과정 분석
이 글의 내용은 ThinkPHP5에서 Auth2를 이용한 검증 과정을 분석한 내용입니다. 도움이 필요한 친구들이 참고하시면 좋겠습니다.
TP에서 구현된 Auth2 검증, yii와 달리 인터넷에서 메모가 거의 발견되지 않았기 때문에 관련 요구 사항이 있는 친구들을 돕기 위해 여기에 몇 가지 메모를 게시하겠습니다.
PS: oauth2에는 네 가지 솔루션이 있다는 사실을 고려하여 이 예는 클라이언트 자격 증명을 기반으로 구현되며 나머지 3개에 대해서는 설명하지 않습니다. 1. Composer를 통한 설치
composer require --prefer-dist bshaffer/oauth2-server-php
설치가 완료되면 다음과 같이 됩니다. 그림:
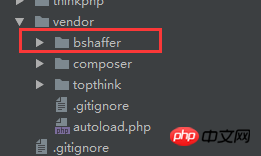 관련 디렉터리가 나타납니다
2. 인증 파일 구현
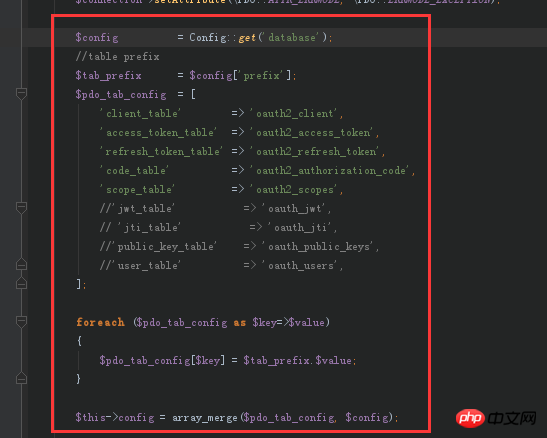
1) 해당 데이터 테이블을 만듭니다먼저 그림과 같이 Pdo.php 파일을 찾습니다.
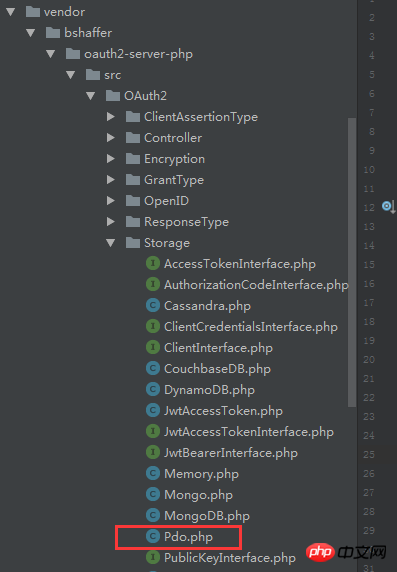 그런 다음 위치를 찾습니다
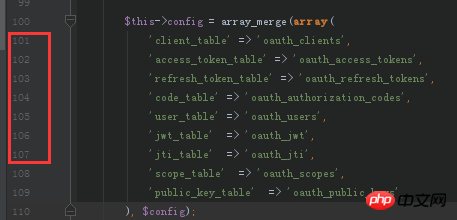 목적은
목적은
생성된 테이블에 대해서는 제가 직접 말씀드리겠습니다. 직접 복사하여 붙여넣을 수 있도록 코드를 업로드하세요.
CREATE TABLE
oauth_access_tokens
 (
access_token
 varchar(40) NOT NULL,
client_id
 varchar(80) NOT NULL,
user_id
 int(11) DEFAULT NULL,
expires
 varchar(19) NOT NULL,
scope
 text,
  PRIMARY KEY (
access_token
),
  KEY
fk_access_token_oauth2_client_client_id
 (
client_id
),
  KEY
ix_access_token_expires
 (
expires
),
  CONSTRAINT
fk_access_token_oauth2_client_client_id
 FOREIGN KEY (
client_id
) REFERENCES
pos_oauth2_client
 (
client_id
) ON DELETE CASCADE ON UPDATE CASCADE
) ENGINE=InnoDB DEFAULT CHARSET=utf8;
CREATE TABLE
oauth_authorization_codes
 (
authorization_code
 varchar(40) NOT NULL,
client_id
 varchar(80) NOT NULL,
user_id
 int(11) DEFAULT NULL,
redirect_uri
 text NOT NULL,
expires
 int(11) NOT NULL,
scope
 text,
  PRIMARY KEY (
authorization_code
),
  KEY
fk_authorization_code_oauth2_client_client_id
 (
client_id
),
  KEY
ix_authorization_code_expires
 (
expires
),
  CONSTRAINT
fk_authorization_code_oauth2_client_client_id
 FOREIGN KEY (
client_id
) REFERENCES
pos_oauth2_client
 (
client_id
) ON DELETE CASCADE ON UPDATE CASCADE
) ENGINE=InnoDB DEFAULT CHARSET=utf8;
CREATE TABLE
oauth_clients
 (
client_id
 varchar(80) NOT NULL,
client_secret
 varchar(80) NOT NULL,
redirect_uri
 text NOT NULL,
grant_type
 text,
scope
 text,
created_at
 int(11) DEFAULT NULL,
updated_at
 int(11) DEFAULT NULL,
created_by
 int(11) DEFAULT NULL,
updated_by
 int(11) DEFAULT NULL,
  PRIMARY KEY (
client_id
)
) ENGINE=InnoDB DEFAULT CHARSET=utf8;
CREATE TABLE
oauth_refresh_tokens
 (
refresh_token
 varchar(40) NOT NULL,
client_id
 varchar(80) NOT NULL,
user_id
 int(11) DEFAULT NULL,
expires
 int(11) NOT NULL,
scope
 text,
  PRIMARY KEY (
refresh_token
),
  KEY
fk_refresh_token_oauth2_client_client_id
 (
client_id
),
  KEY
ix_refresh_token_expires
 (
expires
),
  CONSTRAINT
fk_refresh_token_oauth2_client_client_id
 FOREIGN KEY (
client_id
) REFERENCES
pos_oauth2_client
 (
client_id
) ON DELETE CASCADE ON UPDATE CASCADE
) ENGINE=InnoDB DEFAULT CHARSET=utf8;
CREATE TABLE
oauth_scopes
 (
scope
 text,
is_default
 tinyint(1) DEFAULT NULL
) ENGINE=MyISAM DEFAULT CHARSET=utf8;
데이터 추가
insert  into
oauth_clients
(
client_id,
client_secret,
redirect_uri,
grant_type,
scope,
created_at,
updated_at,
created_by,
updated_by
) values ('admin','123456','http://','client_credentials',NULL,NULL,NULL,NULL,NULL);
PS, 그림과 같이 설명해주세요:
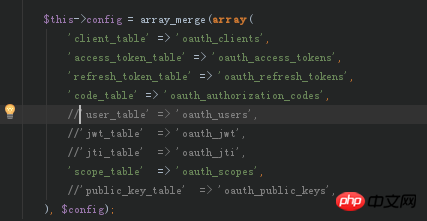
또 다른 상황을 설명하겠습니다. 예를 들어, 예, 그림을 참조하세요.
 그래서 관련 수정을 했습니다.
2) 인증 파일 Oauth2.php, 원하는 대로 이름을 지정하세요. <?phpnamespace appcommon;/**
@author jinyan
@create 20180416
*/use OAuth2StoragePdo;use thinkConfig;
class Oauth2{/**
* @Register new Oauth2 apply
* @param string $action
* @return boolean|\OAuth2\Server
*/
function grantTypeOauth2($action=null)
{
Config::load(APP_PATH.'database.php');
$storage = new Pdo(
[
'dsn' => config('dsn'),
'username' => config('username'),
'password' => config('password')
]
);
$server = new \OAuth2\Server($storage, array('enforce_state'=>false));
// Add the "Client Credentials" grant type (it is the simplest of the grant types)
$server->addGrantType(new \OAuth2\GrantType\ClientCredentials($storage));
// Add the "Authorization Code" grant type (this is where the oauth magic happens)
$server->addGrantType(new \OAuth2\GrantType\AuthorizationCode($storage));
// Add the "User Credentials" grant type (this is where the oauth magic happens)
$server->addGrantType(new \OAuth2\GrantType\UserCredentials($storage));
return $server;
}
/**
* @校验token值
* @param unknown $server
*/
protected function checkApiAuthroize($server)
{
if (!$server->verifyResourceRequest(\OAuth2\Request::createFromGlobals())) {
$server->getResponse()->send();
exit;
}
}}
?>
3) 토큰 파일 Access.php<?phpnamespace apprestfulcontroller;use appcommonOauth2;
/**
@uathor:jinyan
*/
class Access extends Oauth2{protected $_server;
/**
* @授权配置
*/
public function __construct()
{
return $this->_server = $this->grantTypeOauth2();
}
/**
*
*/
private function _token()
{
// Handle a request for an OAuth2.0 Access Token and send the response to the client
$this->_server->handleTokenRequest(\OAuth2\Request::createFromGlobals())->send('json', 'oauth2_');
}
/**
* @get access_token
*/
public function access_token()
{
$this->_token();
}}
?>
요청 url: http://restful.thinkphp.com/r...
그리고 이전에 데이터 테이블을 생성하실 때 새로운 데이터를 추가하셨나요? 해당 기능은 access_token의 계정 비밀번호를 얻는 것과 동일합니다. Post 메소드를 사용하여 토큰
요청 매개변수
{
client_id=admin
client_secret=123456
grant_type=client_credentials //这个参数是固定的
}요청이 성공하면 아래와 같이 반환됩니다.
 ff 브라우저 httprequest의 요청 인터페이스를 통해 게시하세요:
 4) access_token
<?php
namespace apprestfulcontroller;
/**
Created by PhpStorm.
User: Administrator
Date: 2018/7/29
Time: 22:02
*/
use appcommonOauth2;
class Sms extends Oauth2
{
protected $_server;
/**
* @授权配置
*/
public function __construct()
{
$this->_server = $this->grantTypeOauth2();
}
public function test()
{
//access_token验证
$this->checkApiAuthroize($this->_server);
echo '成功请求到数据';
}
}1) 먼저 access_token 요청이 없으면 test() 메서드는
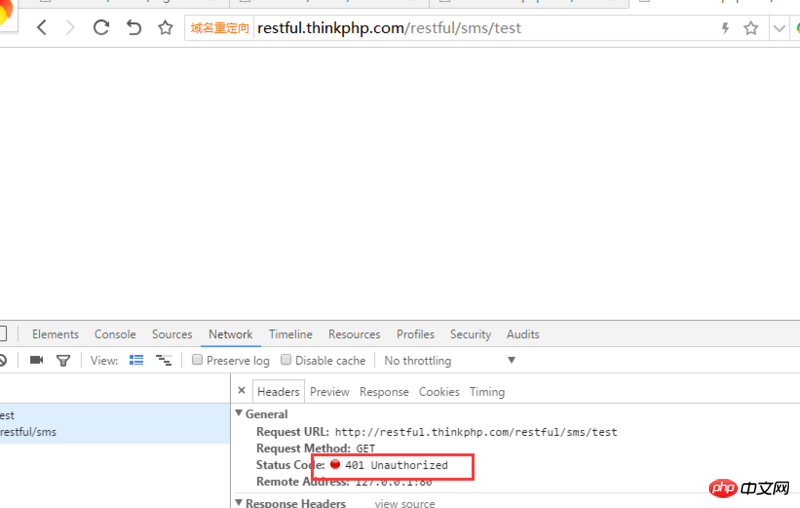 401 확인되지 않은 상태가 됩니다.
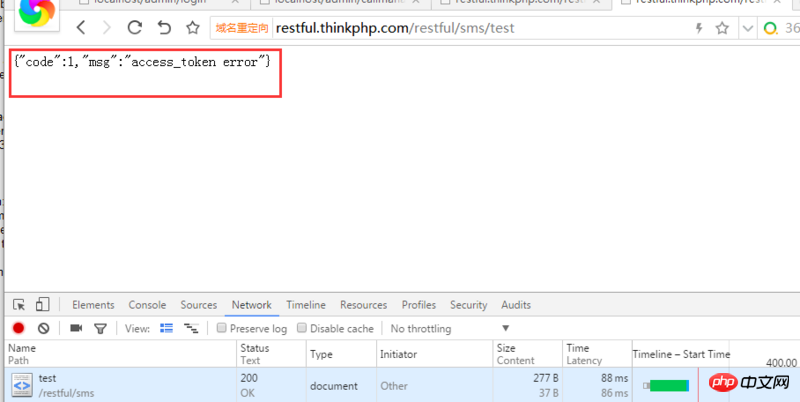
는 다음과 같습니다. 401 상태도 동일하지만 이때 그림과 같이 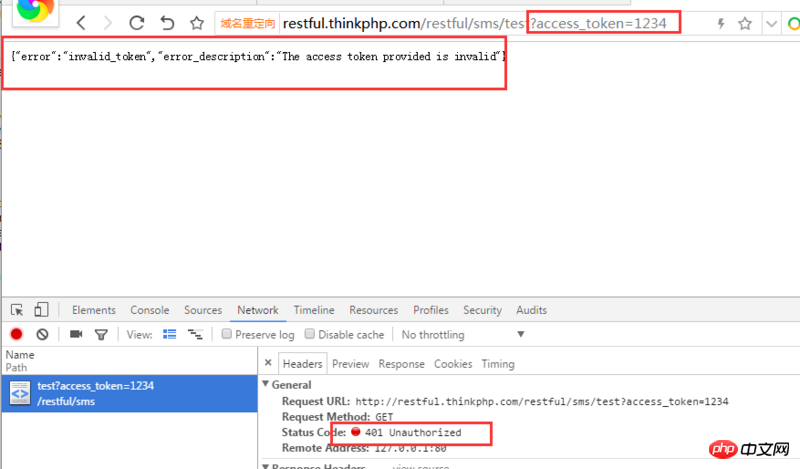
 정보가 우리에게 반환됩니다
3) 마지막으로 올바른 access_token, test() 메소드를 사용하십시오
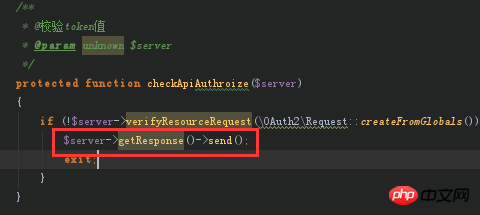
따라서 1번과 2번 상황을 바탕으로 그림과 같이 토큰 검증 실패 방법을 맞춤화해야 합니다. 완료. 모든 유형의 신용 카드 등급 확인을 위한 PHP 구현 thinkphp 인증 코드 구현(양식, ajax 구현 확인)_php 예시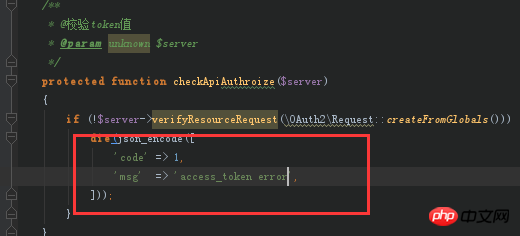 추천 관련 글:

위 내용은 ThinkPHP5에서 Auth2를 이용한 검증과정 분석의 상세 내용입니다. 자세한 내용은 PHP 중국어 웹사이트의 기타 관련 기사를 참조하세요!

핫 AI 도구

Undresser.AI Undress
사실적인 누드 사진을 만들기 위한 AI 기반 앱

AI Clothes Remover
사진에서 옷을 제거하는 온라인 AI 도구입니다.

Undress AI Tool
무료로 이미지를 벗다

Clothoff.io
AI 옷 제거제

AI Hentai Generator
AI Hentai를 무료로 생성하십시오.

인기 기사

뜨거운 도구

메모장++7.3.1
사용하기 쉬운 무료 코드 편집기

SublimeText3 중국어 버전
중국어 버전, 사용하기 매우 쉽습니다.

스튜디오 13.0.1 보내기
강력한 PHP 통합 개발 환경

드림위버 CS6
시각적 웹 개발 도구

SublimeText3 Mac 버전
신 수준의 코드 편집 소프트웨어(SublimeText3)

뜨거운 주제
 7548
7548
 15
15
 1382
1382
 52
52
 83
83
 11
11
 57
57
 19
19
 22
22
 90
90
 Ubuntu 및 Debian용 PHP 8.4 설치 및 업그레이드 가이드
Dec 24, 2024 pm 04:42 PM
PHP 8.4는 상당한 양의 기능 중단 및 제거를 통해 몇 가지 새로운 기능, 보안 개선 및 성능 개선을 제공합니다. 이 가이드에서는 Ubuntu, Debian 또는 해당 파생 제품에서 PHP 8.4를 설치하거나 PHP 8.4로 업그레이드하는 방법을 설명합니다.
 PHP 개발을 위해 Visual Studio Code(VS Code)를 설정하는 방법
Dec 20, 2024 am 11:31 AM
VS Code라고도 알려진 Visual Studio Code는 모든 주요 운영 체제에서 사용할 수 있는 무료 소스 코드 편집기 또는 통합 개발 환경(IDE)입니다. 다양한 프로그래밍 언어에 대한 대규모 확장 모음을 통해 VS Code는
 이전에 몰랐던 후회되는 PHP 함수 7가지
Nov 13, 2024 am 09:42 AM
숙련된 PHP 개발자라면 이미 그런 일을 해왔다는 느낌을 받을 것입니다. 귀하는 상당한 수의 애플리케이션을 개발하고, 수백만 줄의 코드를 디버깅하고, 여러 스크립트를 수정하여 작업을 수행했습니다.
 PHP에서 HTML/XML을 어떻게 구문 분석하고 처리합니까?
Feb 07, 2025 am 11:57 AM
이 튜토리얼은 PHP를 사용하여 XML 문서를 효율적으로 처리하는 방법을 보여줍니다. XML (Extensible Markup Language)은 인간의 가독성과 기계 구문 분석을 위해 설계된 다목적 텍스트 기반 마크 업 언어입니다. 일반적으로 데이터 저장 AN에 사용됩니다
 JWT (JSON Web Tokens) 및 PHP API의 사용 사례를 설명하십시오.
Apr 05, 2025 am 12:04 AM
JWT는 주로 신분증 인증 및 정보 교환을 위해 당사자간에 정보를 안전하게 전송하는 데 사용되는 JSON을 기반으로 한 개방형 표준입니다. 1. JWT는 헤더, 페이로드 및 서명의 세 부분으로 구성됩니다. 2. JWT의 작업 원칙에는 세 가지 단계가 포함됩니다. JWT 생성, JWT 확인 및 Parsing Payload. 3. PHP에서 인증에 JWT를 사용하면 JWT를 생성하고 확인할 수 있으며 사용자 역할 및 권한 정보가 고급 사용에 포함될 수 있습니다. 4. 일반적인 오류에는 서명 검증 실패, 토큰 만료 및 대형 페이로드가 포함됩니다. 디버깅 기술에는 디버깅 도구 및 로깅 사용이 포함됩니다. 5. 성능 최적화 및 모범 사례에는 적절한 시그니처 알고리즘 사용, 타당성 기간 설정 합리적,
 문자열로 모음을 계산하는 PHP 프로그램
Feb 07, 2025 pm 12:12 PM
문자열은 문자, 숫자 및 기호를 포함하여 일련의 문자입니다. 이 튜토리얼은 다른 방법을 사용하여 PHP의 주어진 문자열의 모음 수를 계산하는 방법을 배웁니다. 영어의 모음은 A, E, I, O, U이며 대문자 또는 소문자 일 수 있습니다. 모음이란 무엇입니까? 모음은 특정 발음을 나타내는 알파벳 문자입니다. 대문자와 소문자를 포함하여 영어에는 5 개의 모음이 있습니다. a, e, i, o, u 예 1 입력 : String = "Tutorialspoint" 출력 : 6 설명하다 문자열의 "Tutorialspoint"의 모음은 u, o, i, a, o, i입니다. 총 6 개의 위안이 있습니다
 PHP에서 늦은 정적 결합을 설명하십시오 (정적 : :).
Apr 03, 2025 am 12:04 AM
정적 바인딩 (정적 : :)는 PHP에서 늦은 정적 바인딩 (LSB)을 구현하여 클래스를 정의하는 대신 정적 컨텍스트에서 호출 클래스를 참조 할 수 있습니다. 1) 구문 분석 프로세스는 런타임에 수행됩니다. 2) 상속 관계에서 통화 클래스를 찾아보십시오. 3) 성능 오버 헤드를 가져올 수 있습니다.
 php magic 방법 (__construct, __destruct, __call, __get, __set 등)이란 무엇이며 사용 사례를 제공합니까?
Apr 03, 2025 am 12:03 AM
PHP의 마법 방법은 무엇입니까? PHP의 마법 방법은 다음과 같습니다. 1. \ _ \ _ Construct, 객체를 초기화하는 데 사용됩니다. 2. \ _ \ _ 파괴, 자원을 정리하는 데 사용됩니다. 3. \ _ \ _ 호출, 존재하지 않는 메소드 호출을 처리하십시오. 4. \ _ \ _ get, 동적 속성 액세스를 구현하십시오. 5. \ _ \ _ Set, 동적 속성 설정을 구현하십시오. 이러한 방법은 특정 상황에서 자동으로 호출되어 코드 유연성과 효율성을 향상시킵니다.


