이 기사의 내용은 작은 다람쥐 스탬프의 효과를 얻기 위해 CSS 그리드 레이아웃을 사용하는 방법에 대한 것입니다. (소스 코드 첨부) 도움이 필요한 친구들이 참고할 수 있기를 바랍니다. 도움이 됩니다.
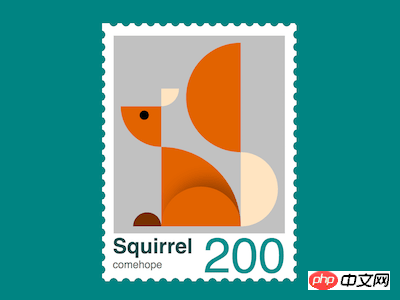
데일리 프론트엔드 실용 시리즈 github에서 전체 소스 코드를 다운로드하세요:
https://github.com/comehope/front-end-daily-challenges
<div>
</div>
body {
    margin: 0;
    height: 100vh;
    display: flex;
    align-items: center;
    justify-content: center;
    background-color: teal;
}.stamp {
position: relative;
width: 45em;
height: 63em;
font-size: 6px;
padding: 5em;
background-color: white;
}.stamp {
display: flex;
flex-direction: column;
align-items: center;
justify-content: center;
}
.stamp::after,
.stamp::before {
content: '';
width: 100%;
height: 100%;
position: absolute;
background:
radial-gradient(circle, teal 50%, transparent 50%),
radial-gradient(circle, teal 50%, transparent 50%);
background-size: 3.5em 3.5em;
}
.stamp::before {
top: 1.5em;
background-repeat: repeat-y;
background-position: -4% 0, 104% 0;
}
.stamp::after {
left: 1.5em;
background-repeat: repeat-x;
background-position: 0 -3%, 0 103%;
}<p> </p><p> </p><p></p> <p></p> <p></p> <p></p> <p></p> <p></p> <p></p>
.squirrel {
    display: grid;
    grid-template-columns: 11.5em 7em 15.5em 10.5em;
    grid-template-rows: 13em 5em 11.5em 22.5em;
    background-color: silver;
    padding: 2em;
    margin-top: -2em;
}부채 모양 머리 그리기:
.head {
    grid-column: 1;
    grid-row: 3;
    background-color: chocolate;
    border-bottom-left-radius: 100%;
}.head {
background-image: radial-gradient(
circle at 58% 22%,
black 1.4em,
transparent 1.4em
);
}.ear {
grid-column: 2;
grid-row: 2;
width: 5em;
background-color: bisque;
border-bottom-right-radius: 100%;
}부채 모양의 몸체 그리기:
.body {
    grid-column: 2 / 4;
    grid-row: 4;
    background-color: chocolate;
    border-top-right-radius: 100%;
    position: relative;
    overflow: hidden;
}의사 요소 사용 그림자를 통해 구부러진 다리 그리기:
.body::before {
    content: '';
    position: absolute;
    width: 100%;
    height: 50%;
    box-shadow: 2em -2em 4em rgba(0, 0, 0, 0.3);
    bottom: 0;
    --w: calc((7em + 15.5em) / 2);
    border-top-left-radius: var(--w);
    border-top-right-radius: var(--w);
}.foot {
grid-column: 1;
grid-row: 4;
height: 4em;
width: 8em;
background-color: saddlebrown;
justify-self: end;
align-self: end;
border-radius: 4em 4em 0 0;
filter: brightness(0.8);
}.tail-start {
grid-column: 4;
grid-row: 4;
--h: calc(22.5em - 1.5em);
height: var(--h);
background-color: bisque;
align-self: end;
border-radius: 0 var(--h) var(--h) 0;
}.tail-end {
grid-column: 3;
grid-row: 1 / 5;
--h: calc(13em + 5em + 11.5em + 1.5em);
height: var(--h);
background-color: chocolate;
border-radius: var(--h) 0 0 var(--h);
}제목, 작성자 및 액면가를 포함하여 돔에 더 많은 텍스트 추가:
<p>
    </p><p>
        <!-- 略 -->
    </p>
    <p>
        <span>Squirrel</span>
        <span>comehope</span>
        <span>200</span>
    </p>
제목의 텍스트 스타일 설정: # 🎜🎜#
.text {
    position: relative;
    width: calc(100% + 2em * 2);
    height: 6em;
    font-family: sans-serif;
}

.text .title {
    position: absolute;
    font-size: 6em;
    font-weight: bold;
    color: darkslategray;
}.text .author {
position: absolute;
font-size: 3em;
bottom: -1.2em;
color: dimgray;
}.text .face-value {
position: absolute;
font-size: 14em;
right: 0;
line-height: 0.9em;
color: darkcyan;
}위 내용은 다람쥐 스탬프 효과를 얻기 위해 CSS 그리드 레이아웃을 사용하는 방법(소스 코드 첨부)의 상세 내용입니다. 자세한 내용은 PHP 중국어 웹사이트의 기타 관련 기사를 참조하세요!
